Brave, Magical, Darling Layout


Saturday, July 21, 2018

I brought a few new-to-me collections with me to my parent's house to scrap with during this in-between time. For this layout I used the Hawthorne collection by Heidi Swapp.
I started by die cutting my Butterfly Heart cut file from a purple patterned paper. Then I ungrouped all of the butterflies and die cut them individually from all of the Hawthorne patterned papers.

Once the butterflies were cut, I backed the background with an ombre paper and then lightly adhered the butterflies on top. I machine stitched through the butterflies and then bent up the wings for dimension.
I printed two black & white photos of Jane splashed white acrylic paint where I planned to place them. Once dry, I added the pics and then embellished with a few pieces from the collection including die cuts, transparency pieces, kraft bits, and more. I finished up with a few enamel dots.
I wrote my journaling with a black pen on a die cut and tucked it into the top right side. All done!
I still have lots of this collection leftover so I'll save it for a mini album :)
SUPPLIES: Patterned paper, die cuts: Hawthorne collection by Heidi Swapp; Cut file: Butterfly Heart by Paige Evans; Die cut machine: Silhouette Cameo 3; Sewing machine: Brother; Thread: Coats & Clark; white acrylic paint; enamel dots

Embrace the Glasses Layout by Kim Jeffress


Hi everyone! It's Kim Jeffress and I am thrilled to be joining you here on Paige’s blog to share my first layout with some of Paige’s delicious cut files. As a mum to two boys my scrapbooking mostly revolves around their crazy boyish antics, but occasionally I like to create a page about myself. When I saw the Sunglasses cut file I couldn’t help but be reminded of the glasses I have just begun to wear because of my declining eyesight. I wanted to create a big impact with the glasses so I cut them full size from white cardstock using my Silhouette Cameo.
I wanted a fun eclectic feel to my glasses so using an exacto knife, I trimmed out the horizontal lines in one of the heart lenses. I then laid the glasses cut file down on my base cardstock and added some 1canoe2 constellation rub-ons and then added a clear transparency on the underside of the cut file. I also added in a couple of gold glitter stars punched from gold glitter paper from my stash to create a fun shaker element to my page before laying the white base onto the diagonal black and white stripe patterned paper from Crate Paper 
I then used Paper 24 from the Turn the Page collection to back the other lens. I added pop dots all around the under side edge of the sunglasses to create some depth and dimension to them.
To complete my layout I added some gold letter stickers along the edge of the lens and tucked and layered some sticker embellishments from the Turn the Page Sticker Book and Journaling Spots around my photo to help tell the story. My journaling I typed using a We R Memory Keepers Typecast Typewriter and added the strips at the top of my layout. I love how all the elements together help to tell the story! Thanks for joining me here today, I’ll be back soon with another fun layout using Paige’s cut files!

SUPPLIES: Cut file: Sunglasses by Paige Evans; Die cut machine: Silhouette Cameo; TURN THE PAGE: Paper 24, Sticker Book, Journaling Spots; Typecast Typewriter; white cardstock; 1canoe2 rub-ons
Blog: Glass Half Full / Instagram: @kimjeffress / Pinterest: @kimjeffress / Facebook: Kim Jeffress Designs / YouTube: Kim Jeffress

Fun Summer Layout


Friday, July 20, 2018

I die cut my Summer cut file as an example to share in a quick tutorial video for my Happy Scrappy Place Facebook group (which is also where you can find this cut file for free!) and so I had it sitting in my bucket, just waiting to be used. I've finished up all of my assignments for the next while and so now it's just play time! Perfect opportunity to use up things just sitting around, waiting for a rainy day, like this cut file!
 I backed the letters of the cut file with papers from the Pick-Me-Up 6x6 Paper Pad and then used yellow patterned papers from all of my Pink Paislee collections to back the sun rays. I used a piece of yellow textured cardstock to back the circle of the sun after everything else was backed. And then I added hand stitching with yellow floss around the sun.
 Next came some background work. First I tore three strips of Paper 08 and stitched them to the top of a blue textured cardstock background. Then I used a palette knife to scrap white gesso over the middle. Once that dried I splashed white acrylic paint and pink and blue watercolors on top. And then after that dried I scraped modeling paste through a script stencil. Finished with the background! So then I started layering everything on top.
 First I placed the cut file on the left side so it covers up a lot of the mixed media, but that's okay, you can still see it peeking through. Then I tucked in the photo under the top right side. After that I auditioned all kinds of embellishments from Pick-Me-Up that matched the colors and felt summery including Chipboard Stickers, Puffy Stickers, Stickers, Rub-Ons, and Ephemera Die Cuts. I made a few clusters here and there and finished with journaling written around the curve of the sun.

Be sure to check out my Happy Scrappy Place Facebook group every week for a free cut file and pair it with my Pick-Me-Up collection!
SUPPLIES: PICK-ME-UP: 6x6 Paper Pad, Paper 08, Chipboard Stickers, Puffy Stickers, Stickers, Rub-Ons, Ephemera Die Cuts; Cut file: Summer by Paige Evans; Die cut machine: Silhouette Cameo 3; gesso; white acrylic paint; watercolors; modeling paste

BEAUTIFUL Layout by Steffi Ried


Hi everyone, it's Stefanie Ried here today! After a long while, I once again made a double-page spread. I like this format, especially for layouts with large photos, I find it perfect.
For this spread I made one page a full-sized picture. Since the title is very colorful, I printed the photo in black and white so the other colors pop.
And have you already seen? I used the Washi Tape Book from the Pick-Me-Up collection to back the title! It's been on my table for a long time and I finally had a fun idea for how to use it!
First, I cut out Paige's Beautiful cut file from white cardstock with the Silhouette Cameo. Then I stuck the washi tape strips in the middle of an 8.5x11 white cardstock page.
I used foam dots to attach the title over the washi tape for the ultimate dimension.
Then I used my sewing machine on the photo and layout. I added cluster of embellishments by the title. To finish I stamped leaves from the Turn the Page Layerable Stamp Set in black ink around the pages.
I kept the layout clean and bright to make the title and the photo stand out! Until next time!

Blog: steffiried.blogspot.com / Instagram: @steffiried / Pinterest: @steffiried / Facebook: stefanie.ried.96 YouTube: Steffi Ried

The Good Life Layout by Lucile Peignon


Thursday, July 19, 2018

Hello everyone, it's Lucile! Today I present to you my first design team layout! I wanted a summer project and what's better than a flower wreath matching the beautiful and colorful Crémieux street in Paris?! I started by cutting Paige's Flower Wreath cut file with my Silhouette Cameo from white cardstock and filled the pattern with various papers from the Oh My Heart collection. I admit it is quite a long process but with good music, it's relaxing!
I really wanted to use Paper 21 for my background and to make cut file more visible, I added gesso and drops of paint.
Being a big fan of flowers, I decided to add floral die cuts to decorate my flower wreath and add more color.
I decided to add a sewing frame on my photos - I love this effect, I think it perfectly decorates the photos! Then my favorite part: I added several pieces of paper to highlight my photos. Finally, I decorated my photos with die cuts and puffy stickers. No journaling on this page, just a phrase "the good life" that summarizes the state of mind of these photos! I hope I would have inspired you to put flowers on your next layout!

SUPPLIES: OH MY HEART: Paper 18, Paper 21, Ephemera Die Cuts, Puffy Stickers; white cardstock; gesso; acrylic paint; Cut file: Flower Wreath by Paige Evans; Die cut machine: Silhouette Cameo
Instagram: @dejolieschoses18 / YouTube: Lucile Peignon / Facebook: dejolieschoses18 / Pinterest: dejolieschoses18

Friendship Beautiful Happiness Layout by Zsoka Marko


Wednesday, July 18, 2018

Hello crafty friends, Zsoka here with a new layout I've created for the Paige Evans + Silhouette Design Team! I decided to go with the Flower cut file and my favorite papers from the beautiful Pick-Me-Up collection!
In Silhouette Studio I designed my page: I multiplied the flowers and changed their direction so they don't all look the same. I arranged them in a circle only leaving space for a photo in the middle. Then I sent it all to my Silhouette Cameo and cut the image from white cardstock.
I always plan to back multiple cut files like these with different papers but then I always end up backing them the same way because there's too much thinking involved and my brain can't take it haha! But I do love monochromatic layouts so that's OK. I glued them down on my background paper.
I layered some tissue papers and tags behind my photo and adhered all to the background paper. I then went through all my embellishments and pulled everything out that I thought matched. I was pretty happy to find the Friendship Chipboard Sticker because this picture is of me and my best friend in the whole world! We've known each other for 25 years! Actually as you're reading this, she will be arriving to Barcelona with her twins to spend a week with us on holiday woot woot! I love her to pieces!
I added another chipboard piece and a few die cuts. I felt like this layout didn't need more! Oh, and I splattered some Heidi Swapp Gold Color Shine around the page too. I hope you like how this turned out! Thanks for stopping by today! I wish you an awesome day!
Blog: apocketfullofscrap.blogspot.com / Instagram: @zsokamarko / Facebook: Zsoka Marko / YouTube: Zsoka Marko

Turn the Page Cards by Flóra Farkas


Tuesday, July 17, 2018

Hello friends, it's Flóra back today. I created two cards with Paige's Turn the Page collection. I wanted to have soft and pretty results so I used pastel tones. I picked Paper 01 for the background and I trimmed A2 pieces. Then I started to layer many embellishments.
I added Journaling Spots, Ephemera Die Cuts, Chipboard Stickers, pieces from the Sticker Book, and Puffy Stickers. I also used foam tape to create more layers. It’s all about the arrangement. I spend a few minutes to find the right elements and then make the order of the layers. I really love to work on this small scale and enjoy using lots of embellishments while keeping the scene clean.
I hope you enjoyed today’s cards and they inspired you to make a couple and send them to your loved ones or crafty friends!
SUPPLIES: TURN THE PAGE: Paper 01, Journaling Spots, Ephemera Die Cuts, Chipboard Stickers, Sticker Book, Puffy Stickers; white cardstock
Blog: pinkandpapergift.blogspot.com Instagram: @floramfarkas Pinterest: @floramfarkas
Facebook: pinkandpapergift YouTube: Flora Monika Farkas

Today Layout by Lorilei Murphy


Monday, July 16, 2018

Feast your eyes upon this jaw dropping and colorful new layout by design team member Lorilei Murphy!
Hi everyone! For my layout today I chose the Heart Group cut file. I knew I wanted to do some mixed media on my page and thought about how I could tweak the cut file to get the look I wanted.
I first cut just the whole outline from white cardstock using my Silhouette Cameo by ungrouping the design and deleting the hearts. I then used spray mists to "fill in" the heart. I used four different colors and the cut file made a great stencil! While the ink was drying, I went back to the cut file and this time I deleted the outside cut line of the hearts and just kept the heart's themselves. I lined them all up in a grid, grouped them, and then duplicated all the hearts and reduced the size. I painted the hearts with a deep navy paint and painted the smaller hearts with white paint. I then ran a line of stitching through both hearts and glued them onto my page!

Now comes the embellishing! I had chosen the ink sprays to coordinate with Pick-Me-Up, so it was just a matter of choosing which Die Cuts looked great with my photo. I chose a flower cluster, some word tabs, and the butterflies from the Stickers. I finished it off with the pretty "today" chipboard in glimmery gold foil.

I LOVE how my page turned out! Using Paige's cut files as stencils is a great way to get multiple uses out of them!

SUPPLIES: PICK-ME-UP: Ephemera Die Cuts, Chipboard Stickers, Stickers; Cut file: Heart Group by Paige Evans; Die cut machine: Silhouette Cameo; white cardstock
Blog: roseyposeystudio.com / Instagram: @roseyposey_studio / Pinterest: @roseyposeygirl /
Facebook: 
Rosey Posey Studio / YouTube: Lorilei Murphy

Felt Flowers Layout


Sunday, July 15, 2018

I've finished up all my assignments for a couple weeks so now I get to create just for fun! I mean, it's always fun, but it's also nice not to have deadlines :) A few years ago I got a pack of nice felt for Christmas and it's been sitting in a box ever since, out of sight, out of mind. But then as I was sorting through my boxes purging in preparation for our move, I came across the felt and wanted to feature it in some way. What better way to do so than... FLOWERS! Because I love love love flowers.
Here is a process video so you can see how this layout was made from start-to-finish:

I started with a Maggie Holmes layered metal flower die set from a few years ago and cut five large and seven small flowers using shades of the same color for each layer of every flower (I used the Spellbinders Platinum Manual Die Cut Machine for the cutting). I picked the yellow B-side of Pick-Me-Up Paper 01 as my background and did a bit of mixed media on it.
I used a palette knife to scrape gesso across the background and then splashed white acrylic paint on top. Then once that dried I flicked black watercolors across. While the background was drying I used liquid adhesive to attach the flower layers together. I arranged the felt flowers and leaves onto the background and tucked two photos of Janey girl into the top right side.
For the title I dug into my old Thickers stash and found some pretty blue foam ones and also used my white foam Mini Thickers to write Last Day of School. I wrote journaling next to the title expressing how proud we are of Jane and her accomplishments over the year.
The layout is so bold and colorful already, I didn't want to add too much else. There's always room for enamel dots though! So I sprinkled them all around the page and in between some of the flowers. From the 30-page Paige Evans #StickerBook I found a pink scalloped sticker and tucked it under the photo edges to compliment the brightest pink felt flower.
That's it! I hope you are inspired to create felt flowers using metal dies! Note you need to use good quality felt and a good die cut machine - I used the Spellbinders Platinum Manual Die Cut Machine. 

SUPPLIES: Metal flowers and leaves dies: Maggie Holmes; Felt: Etsy; PICK-ME-UP: Paper 01, Mini Thickers; Blue Thickers: American Crafts; 30-page Paige Evans #StickerBook; gesso; precision pen; watercolors; enamel dots; Manual die cut machine: Spellbinders Platinum

Cake Layout by Lorilei Murphy


Saturday, July 14, 2018

Lorilei Murphy is back today sharing another sweet layout!
Paige's Cake Stand cut file is SO super cute! It reminds me of my glass cake stand.
I started out by cutting the Cake Stand from white cardstock using my Silhouette Cameo 3. 99% of the time I use white cardstock for cut files. Sometimes after I see it cut I will switch out to a patterned paper and re-cut a design, but for me, I find white so pretty and crisp! I cut the word "cake" while I had my Silhouette software open.

I chose papers from Turn the Page and a big pink flower I had fussy cut from Oh My Heart Paper 06 to decorate the cake stand. I backed the stand and knob with patterned paper and then I got the bright idea to turn the dome top into a sequin shaker spot! I cut a piece of white polka dot acetate to fit the dome and glued it on to the cut file, being careful not to get glue onto the acetate. Next, I used very thin foam tape and ran it around the entire portion of the dome so that the sequins would be trapped in that space. Once the foam tape was all on, I added Sequins from Turn the Page and a few from my stash. I then added a white piece of cardstock to the back area (on top of the foam tape) to seal it all in. I trimmed the excess white cardstock off and then shake shake shake!

I kept my embellishments very light - a doily, a few sprinkles of hearts, and puffy flowers and a puffy butterfly from Turn the Page. I stamped the date in pink and voila!

SUPPLIES: TURN THE PAGE: 12x12 Paper Pad, Sequins, Puffy Stickers; Cut file: Cake Stand by Paige Evans; Die cut machine: Silhouette Cameo; white cardstock
Blog: roseyposeystudio.com / Instagram: @roseyposey_studio / Pinterest: @roseyposeygirl /
Facebook: 
Rosey Posey Studio / YouTube: Lorilei Murphy

Amberg, Germany Mini Album (Heart Squash Mini Album Tutorial)


Friday, July 13, 2018

I have a new mini album to share today! This one features my Heart Squash Mini Album cut file and the Let Your Heart Decide collection by Pinkfresh Studio.
First, here is a video showing how to assemble the base of the Heart Squash Mini Album and then a flip through of my finished book about our day in Amberg, Germany.
For the cover I machine stitched around the edge then painted a layer of gesso on top. I splashed black watercolors around and then created a cluster of embellishments including mini alphabet stickers to say "amberg". To keep the album closed I cut tiny slits into the sides on the front and back and wrapped baker's twine around with a bow tied over the embellishment cluster.
For the inside I cut three base pages from smooth white cardstock and then cut all the inner pieces from the Let Your Heart Decide patterned papers. Before adhering them in place I pierced holes for stitching. I did a chain link stitch through the square pieces and was planning to add hand stitching to the half heart pieces but decided it would make the album too thick. I like the texture the holes add though.
On the left most square seen above I only placed adhesive on three edges to turn it into a pocket since that photo of the skinny red building has a lot of interesting history behind it that I wanted to include.
I kept the embellishing pretty simple and simply added a sticker or two to every half heart section and tucked a few tab stickers here and there.
If a sticker was too long to fit one section I let it go across two sections and the album still collapses.
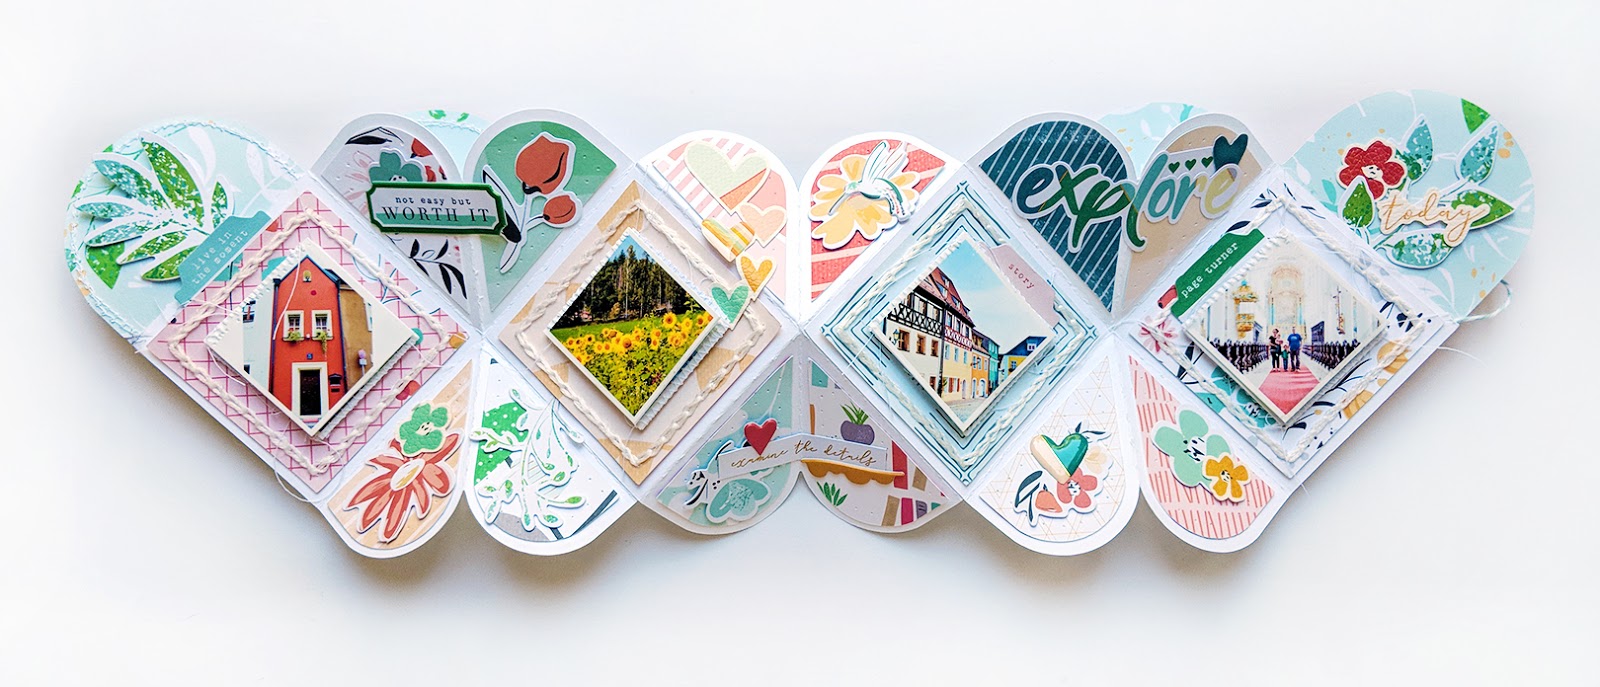
I wanted to include way more than four photos so I had to think of a way to do that. I figured out how to machine stitch photos and cardstock squares together using a zigzag stitch and then they fold over each other into a single layer - you can see what this looks like in the video at the beginning. Here are all four main photo sections opened up all the way to reveal hidden photos and journaling.
Here is what the album looks like when opened, without opening the interactive photo bits.
 The photos are held shut with velcro adhesive dots.
Details of opening each of the four interactive photos. I was able to include about 20 photos this way and journaling to go along with the pictures.
For the journaling I just copied and pasted the text from our blog post recap of Amberg into a new document, changed the font to Remington Noiseless, printed it out, trimmed it into strips, then adhered the strips with liquid glue. That was probably the most time consuming part of this whole process. If there were empty spots on the journaling squares I filled them in with stickers and trimmed the excess.
Here is the open album with all of the photos opened. So many layers!
I completed this album over about 5 days, working on it in spurts, but if I had to put an actual time on it I think it took about 6 or 7 hours. Not too bad and it was tons of fun and so easy with the help of the Heart Squash Mini Album cut file! I can't wait to see how you use it! Let me know if you have any questions, thanks for stopping by!

SUPPLIES: Cut file: Heart Squash Mini Album by Paige Evans; Patterned paper, stickers, epoxy stickers, die cuts, vinyl stickers, puffy stickers: Let Your Heart Decide collection by Pinkfresh Studio; Die cut machine: Silhouette Cameo 3
Paige Taylor Evans © // Quinn Creatives DESIGN