Sweet Smile Layout


Tuesday, June 23, 2020

Hey there! I have a new layout to share today using my Bloom Street collection.
 I started with two pieces of the beautiful floral Paper 02 and went to town fussy cutting out the flowers and leaves from one sheet and then lightly tacking them on top of the same image on the second paper. I just wanted to make sure I didn't lose any and had a reference for where to place them.
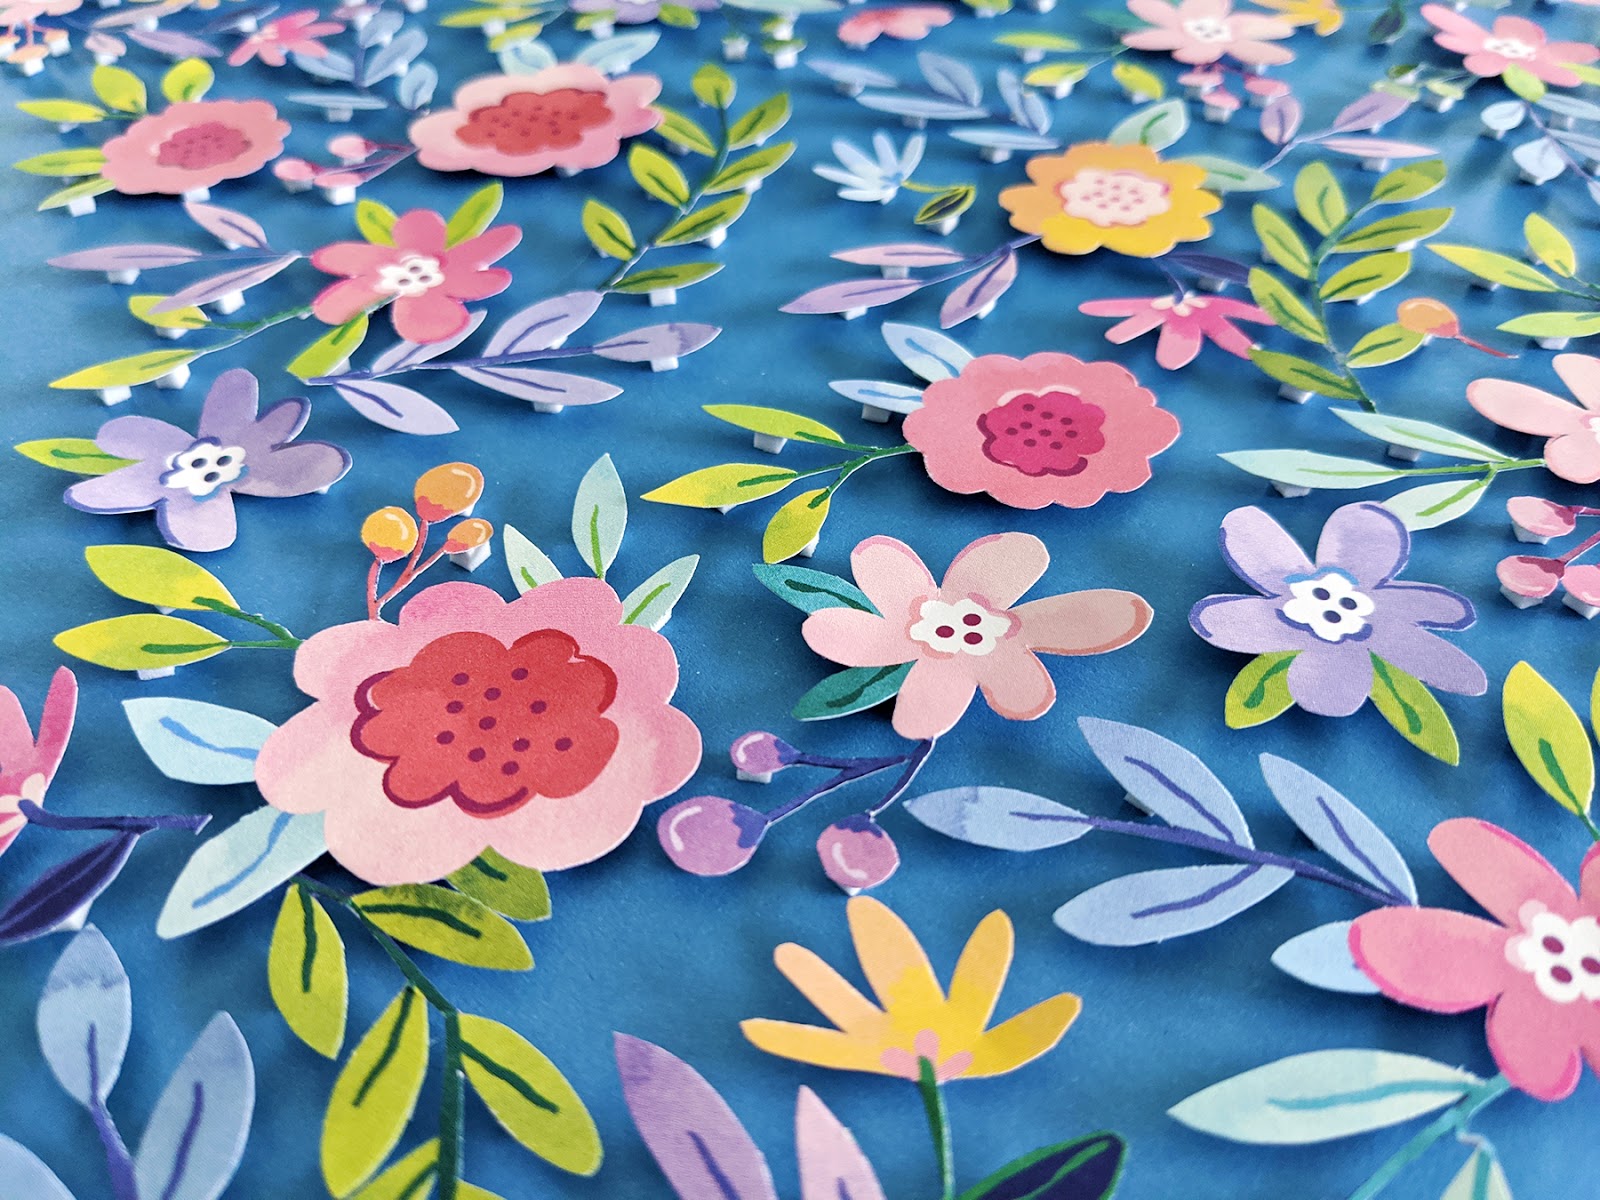
 Fussy cutting the flowers took me several hours, probably 8, over the course of 4 days and I cut them all out except the bottom left section of flowers to leave room for a photo. Then I pulled a solid blue paper from the Project Pad to use as the background. I grabbed one fussy cut flower at a time, added lots of tiny foam squares to the back, and adhered it as best as I could in the same spot as it appears on the patterned paper, but on the solid paper.
 Once all of the flowers were pieced onto the solid blue background, I found a photo. Actually, I needed a photo, so I grabbed Jane for an impromptu photoshoot outside. The spring colors go perfectly with these flowers! I printed the photo to 7x4" at home on my Canon Pro-100 printer and then trimmed it in half diagonally to fit the space better and really draw the eye in with the unique shape.
 Along the edge of the photo I created the title with the small alphabet stickers in the 4-Page Sticker Book to say "sweet" and the white "SMILE" from the Puffy Word Stickers. To finish, next to the title I wrote a small caption with a dark blue pen.
 All-in-all this layout took a long time to make, but scrapbooking has been so therapeutic for me over the last few months, I have really enjoyed longer projects so it was worth it to me. I hope you are inspired to pick up my Bloom Street collection and scrap your memories! Thanks for stopping by!
SUPPLIES: Patterned paper, stickers, Project Pad: BLOOM STREET

Vintage Journal Spread by Paula Fiihr


Hello friends - Paula Fiihr here today! How about some vintage fun using Paige's older Take Me Away collection (entire digital version can be found HERE), and her Dress cut file?!
I decided to coffee dye some of the Take Me Away papers. It’s fairly easy to make any paper look distressed by soaking it in coffee for 10-15 minutes and then baking on low temp for 10 minutes to dry out. The result is fantastic! Now we are ready to junk journal with it.

The Dress cut file was the inspiration for these pages. I wanted to document my spring crafty memories and it is perfect for that. I cut the dress on a paper from the Take Me Away 12x12 Paper Pad. I traced the dress into several other pieces of paper from that line and hand stitched them into a mini book with embroidery floss around the neck line. Pictures and a bit of journaling finish up the flip book nicely.

Next I used the pieces of my favorite paper from the Take Me Away paper pad to make a pocket, a tag, and several journaling cards. For the tag, I sewed some ribbon on top and added a hand stitched card under a pic of one of the teams I was asked to be on this spring. It tucks away into this cute pocket. I topped the pocket with the dress mini book and a pic of two of my best buddies on a weekend crafting getaway. The "CREATE" and "JOY" letters are from the Puffy Word Stickers from Bloom Street. On the other page I added a bit of stitching to the embroidery hoop also found in the Take Me Away paper pad. I put it on top of another hoop with foam tape to add dimension. Inside the pocket on this page, the journaling cards each contain a fun spring crafty memory. Wooden Buttons from the Truly Grateful line and Horizon Washi Tape add the last cute touches.

I hope this inspires you to try a vintage layout with Paige’s papers and her cut files. Have a lovely day!

SUPPLIES: Patterned papers, stickers, die cuts, washi tape, embellishments: TAKE ME AWAY (Digital collection HERE); Wooden buttons: TRULY GRATEFUL; Washi tape: HORIZON; Die cut machine: Cricut; Cut file: Dress by Paige Evans
Location: Texas, USA / Instagram: @psplannergirl / Pinterest: pfiihr / Facebook: Paula Fiihr

Pick-Me-Up Exploding Box Mini Album by Amber Mitchell


Monday, June 22, 2020

Hello crafty friends! Amber Mitchell here on Paige's blog today to share with you a fun, interactive mini album I created using the Exploding Box Mini Album with Pockets and Lid cut file and her older Pick-Me-Up collection (the digital version can be found HERE)!
Mini albums are, hands down, my favorite type of project to create. They're fun, personable, and a great way to store cherished memories and photos. And although all of that is great, they can sometimes be a hefty project to tackle. That's why I love using cut files to create the bases for them: it can take out a lot of the guesswork and make the process, as a whole, easier! The Exploding Box Mini Album with Pockets and Lid cut file is the perfect example for this.

 I started by first resizing the cut file to fit within the margins of an 8.5x11" piece of paper. I then cut each individual piece of the file one at a time and then assembled them to create the base of the mini. From there, it was all about decorating and embellishing!

I used the digital version of the Pick-Me-Up collection so the embellishing process started by resizing the digital die cuts to fit perfectly within my project. I then used my Cricut to print and cut these images and layered them, along with some of the Chipboard Stickers from Pick-Me-Up, throughout my project. I also opted to use some scalloped and pom-pom trim on some of the pages for added texture.

For the lid of the box, I wanted to create another interactive element. I used my Cricut to create a heart-shaped shaker. I used the sequins from the Mixed Embellishments pack from the Truly Grateful collection, along with some heart-shaped sequins from my stash, to fill the shaker. I also added some tiny, floral die cuts from Pick-Me-Up into the shaker as well for some extra flair. Then, I simply layered up some die cuts and added a hand painted wood veneer right on top of the lid.

One of my favorite things to add to any project I create are tassels and charms. As this project is a box, there wasn't really any space to punch a hole and hang some. Instead, I opted to create a longer chain using jump rings and then clipped that onto one of the die cuts on the lid using a mini clothespin. I was then able to add a small tassel and one of the Butterfly Charms from the Whimsical collection to finish off the project!

Thanks so much for stopping by today! I'll see you next time with another fun project!

SUPPLIES: Patterned paper, stickers, die cuts, embellishments: PICK-ME-UP (Digital version: Pick-Me-Up); Die cut machine: Cricut; Cut file: Exploding Box Mini Album with Pockets and Lid by Paige Evans
Location: California, USA / Blog: Happy Crafty Studio / Instagram: @bambismail / YouTube: bambidearr / Pinterest: bambidearr

Ariel & Eric Layout by Shimelle


Sunday, June 21, 2020

Hello crafty friends! It's Shimelle here and I'm thinking all things mermaid thanks to a new Seashell cut file from Paige paired with Bloom Street!
I started by cutting the Seashell from white cardstock then found my mermaid-inspired color scheme with two patterned papers from the 12x12 Paper Pad - one is a green chevron pattern and the other is a watercolor wash of purple and pink. The green and purple combination is perfect for some photos from breakfast with Ariel and Prince Eric from The Little Mermaid. The green became my background and the pastel purple backed the cut shell - I only used one paper behind the shell so it was super quick and simple to back it.

With the shell in the middle of the page, I created a loose line of embellishments from the top left corner to the bottom right. The two photos - printed at 3x4 then backed with a narrow mat of white cardstock - sit together just to the right center of the page.
Along the line of embellishments from the top left to the bottom right, I tucked in bouquet die-cuts from the Floral Die Cuts, journaling spots and file tabs from the Ephemera Die Cuts, Cardstock Stickers, the title made with mini alphas from the 4-Page Sticker Book, and Enamel Dots. I love the white glitter dots against the darker background - such a pretty, sparkly contrast! For finishing touches, I added a Puffy Word Sticker plus a few tiny puffy stickers from the Truly Grateful collection to bring in just a bit more purple and green. You can see this entire page come together in this video:

Thanks so much for heading under the sea with me today! Happy crafting!

SUPPLIES: Patterned papers, stickers, die cuts, enamel dots: BLOOM STREET; Puffy stickers: TRULY GRATEFUL; white cardstock; Die cut machine: Silhouette Cameo; Cut file: Seashell by Paige Evans
Location: London / Blog: Shimelle / Instagram: @shimelle / Facebook: Shimelle / YouTube: Shimelle Laine / Pinterest: glittershim

Hello Beautiful Layout by Maija Männistö


Saturday, June 20, 2020

Hi, Maija Männistö here to share a layout full of summer and Bloom Street! Today we celebrate Midsummer, or Juhannus as we call it - the celebration of summer, sun, and flowers! So what a more perfect layout to share today than this one filled with flowers?!
This lovely little girl arrived into the world this spring and I became her godmother. I wanted to make a layout that shows off the joy she brings to the world and I believe this does it! I wanted to have lots of flowers and have them burst out of the Envelope, cut from Paper 05. For the flowers I used three different styles of Layered Flower cut files. To make them even more dimensional I altered the positioning for pairs of layers. I used the 12x12 Paper Pad and the 6x8 Paper Pad to cut the flowers with three patterned papers on each of the flowers. I used a rounding tool to curve the edges of each flower and bent them up. For some of the flowers I put a clear rhinestone in the middle from the Mixed Embellishments.

In addition to the flowers I also added three different styles of Layered Butterflies. I used the same patterned papers for the butterflies, matching small butterflies to the bigger flowers and vice versa. I slipped some of the flowers into the envelope and on top placed the photo, backed with a pink polkadot paper from the 6x8 Paper Pad. For the title I mixed a sticker from the Puffy Vinyl Stickers and the Cardstock Stickers, keeping it quite simple as the rest of the page is so full of loveliness.

Thank you so much for stopping by today, have a lovely and crafty day!

SUPPLIES: Patterned papers, stickers, die cuts, jewels: BLOOM STREET; white cardstock; Die cut machine: Silhouette Cameo; Cut files: Envelope, Layered Flowers, and Layered Butterflies by Paige Evans
Location: Finland / Blog: Mai Makings / Instagram: @maimakings / YouTube: Mai Makings / Pinterest: Mai Loves

Bloom Street MemoryDex Cards by Kelly Daye


Friday, June 19, 2020

Hello, hello! Kelly Daye here with another Bloom Street project for Paige’s Silhouette Design Team. I’ve changed things up today and designed MemoryDex cards. If you’re creating a MemoryDex of your own, you already know it’s a super fun way to use up bits of a collection. Also, I must admit, I find mini things so darn cute.
Here are the backs of all the cards so they're pretty on both sides!
I call my first card "Sunshine in a Jar." How handy would that be on a gloomy day? It’s a shaker card made using a plastic page cover because it’s easy to cut and sew. It was cut out using the offset of the  Mason Jar cut file. The palm trees, beach umbrella, and sun are from the Summer Wreath cut file and the rainbow is part of the Rainbow cut file. Gold glitter doubles as a sandy beach.

The assembled sunny scene was sewn into the clear plastic jar using gold thread then sequins were spilled inside before sewing it shut. The colorful Puffy Word Stickers were perfect for adding ‘SHINE’ to the outside. I used the 6x8 Paper Pad for most of the paper backing and all cut files are made with white cardstock on my Silhouette Cameo 3.

My next card was inspired by world events as of late. Paige’s Geometric Peace Sign cut file was backed with another piece of paper from the 6x8 Paper Pad then backed with acetate and popped up with foam tape to create a shaker card. The foiled paper adds a nice sparkle in the background.

As I spin around my MemoryDex, I see both sides of a card so I always like to have a little bit of something on the back side. This is just a personal preference and twice the fun. When the peace sign rolls over, you see HOPE.

The glitter backing was made by layering 1/4” Score Tape on a slightly smaller circle. You start at the top, remove the cover off one row of tape, and sprinkle with glitter. Tap off the excess and move on to the next row. I also machine stitched over the words, leaving the thread ends messy. A phrase from the Cardstock Stickers was popped up over the middle with foam tape. The tiny butterflies are fussy cut from Washi Tape.

The base of my final card was made with a MemoryDex Die by Heidi Swapp and another paper from the MemoryDex. The card is built up by backing Paige’s Stained Glass Heart cut file with vellum then layering floral stickers from the 4-Page Sticker Book and butterflies from the scrapbook.com Ephemera Die Cuts. The LOVE letters were fussy cut from a tag on Paper 01 and tucked in and on the layers.

When the card turns over the back side reveals a stitched background made with Washi Tape and some extra tapes from my stash. I stitched with four colors of DMC embroidery floss and gold thread, leaving loose ends to add texture. I may add something more, but for now I’m just happy to enjoy all the pretty colors and patterns.

Thanks so much for your visit and hope you can adopt an idea or two for your own pretty cards!  

SUPPLIES: Patterned papers, stickers, die cuts, washi tape, embellishments; BLOOM STREET; white cardstock; Die cut machine: Silhouette Cameo; Cut files: Mason Jar, Summer Wreath, Rainbow, Geometric Peace Sign, and Stained Glass Heart by Paige Evans
Location: Edmonton, Canada / Blog: Kelly Made It / Instagram: @kellymadeit / Facebook: Petals Daye / Pinterest: Kelly Made It

But First Coffee Layout by Zsoka Marko


Thursday, June 18, 2020

Hello crafty peeps, Zsoka Marko stopping by to share a new layout for the Paige Evans Design Team! While I had the Horizon collection out last time, I decided to create another layout with it! I had had this photo on my desk since last summer but never really found a collection that worked with the colors. Enter all the blues and yellows in Horizon and we have a perfect match!
I can't drink coffee anymore but last summer I could still enjoy a couple of espressos a day! I loved sitting on the balcony with a cup of foamy goodness after Maxim left for school in the morning. Over the years I got used to crafting at night so I often sleep very little and espresso helped me wake up and make myself useful :D. I picked out the cut file first, it's totally random, nothing to do with the layout, but I really don't mind using flowers on everything. This one is one of the newer ones by Paige called Flowers and it's so pretty!

I then selected all the blue and yellow papers and went through the embellishments too. Luckily there were plenty of things to choose from. I backed the cut file then glued it down on my background of Paper 08. I added my photo then started embellishing. I tucked some tags and labels behind my photo. I created the date label from patterned paper and white cardstock - I like when my labels match the rest of the papers! I added sentiment Stickers, Floral Die Cuts, and Chipboard Stickers.

For my title (very original, isn't it?! But so true!) I used the navy mini alpha thickers from the Pick-Me-Up collection. To finish off my page I added my journaling and a few enamel dots.

That's all! Do you guys prefer limited color palettes like I used here or are more into colorful layouts? I love them all the same! I also love monochromatic! Thank you for stopping by today and have a wonderful day!

SUPPLIES: Patterned papers, die cuts, stickers, embellishments: HORIZON; Thickers: PICK-ME-UP; white cardstock; Die cut machine: Silhouette Cameo; Cut file: Flowers  by Paige Evans
Blog: apocketfullofscrap.blogspot.com // Instagram: @zsoka_marko // Facebook: Zsoka Marko // YouTube: Zsoka Marko

Magic Layout


Wednesday, June 17, 2020

Hey friends! I have a new layout and process video to share with you today using Bloom Street!
Here is a process video so you can see how this layout came together from start-to-finish:
I began by die cutting my Diced Star cut file from white cardstock. I pulled a light blue solid paper from the exclusive Project Pad and placed the Diced Star overlapping the left edge and secured it with Washi Tape. Then, I grabbed one inner shape on the sticky mat, and used it as a template to cut out a patterned paper. I placed the patterned paper inside the coordinating section of the diced star on the layout, and adhered it in place with foam squares for dimension. I repeated that process 19 more times to fill in the entire star with a rainbow of patterned papers. Then I removed the star cut file to reveal the finished rainbow star.
I grabbed my (now sold out) Star stencil and scraped white modeling paste through on the left and right edges as well as the top left and bottom middle edges. I printed two 3x4" photos, trimmed them out leaving a white border for contrast, and overlapped them slightly on the right side. Time to embellish! I grabbed the Puffy Word Stickers and added the pink "JOY" over a pink section of the star and blue "MAGIC" above the photos. From the 4-Page Sticker Book I grabbed all of the star stickers and placed them around the page. I layered two Washi Tapes on the top right and bottom left edges. And I grabbed three sentiment stickers from the Cardstock Stickers placed around the page.
 To finish, I grabbed a journaling spot from the scrapbook.com Ephemera Die Cuts and wrote journaling with a blue pen on it, placed under the right photo. Anything overlapping the edges of the layout I trimmed off. All done! I hope you are inspired to create pages using Bloom Street to document your memories!
 SUPPLIES: Patterned papers, stickers, die cuts, washi tape, scrapbook.com Ephemera Die Cuts, Project Pad: BLOOM STREET; Star stencil, Diced Star cut file: Paige Evans; white cardstock; modeling paste

A New Friend Layout by Brianna Lepper


Tuesday, June 16, 2020

Hey friends! Brianna Lepper here today to share this soft and pretty layout documenting a photo I took when the quarantine first began. My son caught a few lizards and created a little habitat for them and they entertained him for a few days before he let them go. It's been so nice to have some extra family time, especially when we all get to be outside together. So let's get to my layout!  I used Paige's Bloom Street collection to create the entire thing along with her new Flower Garden Background stencil and Butterflies cut file.
Since I was documenting a photo of my son holding his new friend, I thought the Butterflies cut file was fitting for the base for my design. I cut it on white cardstock and backed each of the butterflies using the 6x8 Paper Pad and Paper 02 which have the shrunken designs. After the cut file was completely backed, I set it aside and started working on the foundation page. I chose the B-side of Paper 22 and decided on adding mixed media to it.

  I took Paige's new Flower Garden Background stencil and applied white modeling paste through it. Since the Butterflies cut file is at a diagonal, I kept my mixed media in the same shape to make sure that the cut file would sit right on top of it. After the modeling paste dried, I then took Distress Oxides ink pads in pink and yellow and blended the color right on top of the paste in a few different areas. The pink ink is very light and subtle in the photos, but you can really see it in person. I love the extra element of color it gives. And look at that texture!

I embellished around the cut file using the floral Enamel Dots and also added tangled thread in a few areas. I pulled a few Ephemera Die Cuts and embellished with those. I also layered and matted my photo using the same patterned papers that I used to back the cut file. I created my small title using the alpha stickers from the 4-Page Sticker Book and scattered some of the hearts from the Puffy Vinyl Stickers along the cut file. I felt that the top portion of my page felt a bit too empty so I took a 2" strip of Paper 14 and adhered it to the back of the foundation paper. I then cut into it and distressed the edges to reveal parts of that Paper 14. I just love those pretty stripes!
Thank you so much for stopping by today! I had so much fun creating this page and hope that I've inspired you in some way today!  If you haven't checked out Paige's new stencils, you should definitely take a look! I love them and can't wait to use the others that came in the bundle! See you soon!

SUPPLIES: Patterned papers, stickers, die cuts, enamel dots, embellishments: BLOOM STREET; Flower Garden Background stencil by Paige Evans; modeling paste; white cardstock; Die cut machine: Silhouette Cameo; Cut file: Butterflies by Paige Evans
Location: Louisiana, USA / Blog: I Love Paper Blog / Instagram: @briannalepper / Facebook: Brianna Nichole
YouTube: Brianna Lepper / Pinterest: Brianna Lepper

Heart Squash Mini Album by Elsie Robinson


Monday, June 15, 2020

Hey everyone, it’s Elsie Robinson here and today I’m sharing a mini album that I created using the Bloom Street collection with Paige’s Heart Squash Mini Album cut file. I love creating mini albums that look unassuming from the outside, but really pack a punch once you look inside them! This accordion album certainly does that, and I’m so pleased with the results.

I firstly started by cutting the base of the album from Paper 20 because it has such a subtle rainbow pattern. I then cut the heart cover pieces from Paper 04. However, instead of using them as the cover, I wanted to create something a little sturdier - keep reading!

So I traced around those hearts onto some chipboard which I then cut out. I used Paper 02 to wrap around the chipboard. The key to getting a smooth finish when covering the heart was to use lots of adhesive and cutting some small slits into the paper so I was able to easily mold it around the heart.

I used the hearts I cut from Paper 04 to decorate the inside of the cover. On the back cover piece, I sandwiched a long piece of ribbon between the chipboard and paper so I would have a way to close the album. I also added a Flower Charm and Tassel to the ribbon because they are the perfect embellishments to decorate mini albums with!

Paige has a video demonstrating how to put the album together, so I won’t bore you with a written explanation:

Once the album was put together, I cut all of the inside pieces and adhered them all onto the album in a rainbow order.

Next, it was the simple matter of embellishing! I used the tone-on-tone technique to embellish the album, which creates a really layered and colorful look.

I love mini albums with lots of interactivity, so I made sure that each square section of the album had an interactive element. On two of the squares I used Ephemera Die Cuts to create a hinge with space underneath to include photos/journaling.

On the yellow section, I attached a journaling spot from the Ephemera Die Cuts with a brad so you can spin the die cut around to reveal the embellishments underneath. And in the purple section I adhered down some of the Specialty Transparency Paper on three sides to create an opening which I could insert a tag into.

You can see all of the interactive elements of this mini album in the video flip-through below:

Thanks for joining me, and I hope you're inspired to create your own Heart Squash Mini Album using Bloom Street!

SUPPLIES: Patterned papers, patterned transparency, stickers, die cuts, washi tape, charm, tassel embellishments: BLOOM STREET; Die cut machine: Silhouette Cameo; Cut file: Heart Squash Mini Album by Paige Evans
Location: England / Blog: Hey Elsie / Instagram: @heyelsie_ / Facebook: Elsie Robinson / YouTube: Elsieeee / Pinterest: heyelsie
Paige Taylor Evans © // Quinn Creatives DESIGN
