Christmas Cards by Kat Flores


Thursday, November 23, 2023

Hello scrappy friends! Kat Flores here and I’m so happy to be back on Paige's blog sharing some Christmas cards featuring Sugarplum Wishes! Are you getting ready for the Christmas season? I think it’s a perfect time to make a lot of cute Christmas cards. For my cards I used Paige's Christmas, Ornaments, and 25 from the 25 Christmas Cut Files 2021.
I started by cutting the files from gold foil cardstock I got in an art shop and I backed every file with designs from the 6x8 Paper Pad. Once I had the designs backed, I picked some card bases from the Boxed Cards, trying to make a good contrast with the cut files. For my first card, I added some patterned paper over my card base and placed it down with machine stitching. I also added some stitches over a Floral Die Cut and glued down the cut file using foam dots. For embellishments, I used Cardstock Stickers and Enamel Dots.
For the second card, I placed patterned paper at the bottom and covered the seam with a border and a sentiment from the Cardstock Stickers. I placed down the ornaments using foam dots and I finished with a poinsettia cut in half and placed some Mini Puffy Stickers over the cut file and around the card.
For my third card I used vellum to make a shaker card with machine stitching. I added Sequins before I closed the shaker pocket. I also added hand stitching in the “25” cut file and I put it in place with foam dots over a big Snowflake Die Cut. I finished by adding a sentiment from the Cardstock Stickers and some Enamel Dots.
I absolutely loved how these cards turned out! This collection is so colorful and cheerful so I want to make a dozen more! I hope you get inspired to use Sugarplum Wishes as well as the 25 Christmas Cut Files 2021! Have a wonderful day and happy scrapping!
SUPPLIES: Patterned papers, stickers, Thickers, die cuts, enamel dots, embellishments: SUGARPLUM WISHES; Cut files: Christmas, Ornaments, and 25 from the 25 Christmas Cut Files 2021 by Paige Evans

Merry Little Christmas Layout by Jackie Ashton


Wednesday, November 22, 2023

Hi everyone! Jackie Ashton here sharing my layout using the lovely Sugarplum Wishes collection. For my layout I used Paige's Merry Little Christmas from the 25 Christmas Cut Files 2020.
I started by cutting the Merry Little Christmas from white cardstock and backed each letter with patterns from the 12x12 Paper Pad and 6x8 Paper Pad. I added stencil details to a second sheet of white cardstock. Before adding the cut file I added the stenciled cardstock to Paper 3, positioning it at an angle and machine stitched around the edges. I added the cut file over the top,using 3D foam to add some extra dimension to my page. My photograph is 3x4 which I matted onto a few sheets of patterned paper from 6x8 Paper Pad. I finished my layout using Ephemera Die Cuts, the Sticker Book, Enamel Dots, Floral Die Cuts, Mini Puffy Stickers, and a Paper Clip.
I love how this turned out and I hope you can get some inspiration to use Sugarplum Wishes and the 25 Christmas Cut Files! Thanks so much for stopping by and have a great day!
SUPPLIES: Patterned papers, stickers, die cuts, enamel dots, embellishments: SUGARPLUM WISHES; white cardstock; Cut file: Merry Little Christmas from the 25 Christmas Cut Files 2020 by Paige Evans

Christmas Tree Layout by Heidi Lewis


Tuesday, November 21, 2023

Hello scrappy friends! Heidi Lewis here and it's beginning to look a lot like Christmas! Getting a head start on holiday scrapbooking is an excellent way to reduce stress. I was inspired by this pin to make a little scene with a Christmas Tree Cut File and Paige's Sugarplum Wishes collection.
To make my Christmas-inspired scene, I first cut out a Christmas Tree from the center of a piece of white cardstock. Then I traced the tree with a pencil onto a second piece of smooth white cardstock. Next, I grabbed a tree branch stamp from my stash and covered the penciled outline of the tree with lime green, aqua, and green branches. I also added Washi Tape to the trunk. Then I adhered the paper with a tree cut out to the paper with a stamped background. Utilizing foam tape gave my tree a little bit of dimension. Next, I decked my tree with a combination of fussy cut ornaments from Paper 10 and colorful Sequins. The tree is topped an angel Mini Puffy Sticker and Washi Tape bow. A tree wouldn't be complete without presents around it so I layered Cardstock Sticker, Mini Puffy Sticker, and Foam Sticker presents all around the tree. I even used some square phrase stickers for additional presents. To complete the scene, I "hung" Chipboard Frame Stickers from Blooming Wild on the wall. Most of the frames are filled with additional stickers and Ephemera Die Cuts (I love the portrait of Mrs. Claus!) and one the frames is backed with a black & white photo. The last element on the page was my title, which I created with a Foam Sticker.
I hope you feel inspired to get a head start on holiday scrapbooking with Paige's Christmas Tree Cut File and Sugarplum Wishes collection!
SUPPLIES: Patterned papers, die cuts, stickers, Thickers, embellishments: SUGARPLUM WISHES and BLOOMING WILD; Cut file: Christmas Tree by Paige Evans

Let It Snow & Sweater Pages by Heather Rubert


Monday, November 20, 2023

Hello scrappy friends! It’s Heather Rubert back on the blog and I’m in December Daily mode! I’m so excited to share something a little different on the blog today - two decorative foundation pages using Sugarplum Wishes and two of Paige’s cut files: Sweater and Snowflakes Background.
True confession: this is my first year making a December Daily! I figured it’s about time I jumped on the bandwagon so I’m making a 6x8 album to document this year’s memories. Since I don’t have any festive photos for this year yet, I’ve been working on decorative pages for now. I made these to go next to each other in the album, since sweaters and snow go hand in hand! I want my pages to include a variety of sizes and shapes and Paige’s Sweater cut file is just perfect for a fun page. I wanted my sweater to be double-sided, so I took some white cardstock and used my Cricut to cut two sweaters that are mirror images of each other. They measure about 6” wide. On one side of the sweater, I backed the sections with Paper 4, Paper 6, and the poinsettia print from the 6x8 Paper Pad. I added a snowflake from the Floral & Snowflake Die Cuts to decorate the front of the sweater. On the mirrored sweater I used Paper 2, Paper 10, and Paper 11 for backing pieces and I decorated with a “Merry Christmas” sentiment from the Cardstock Stickers. I wish I had real sweaters that look like these ones! The next foundation page uses vellum as a base. I cut a bunch of snowflakes using the Snowflakes Background cut file which I resized to just over 8”. If you don’t want to arrange the snowflakes randomly, you could use the negative paper as a guide for placing your snowflakes on the vellum. After gluing all the snowflakes down with liquid adhesive, I added a title using Thickers. A little white pom pom trim and some machine stitching finish up the page! In the final album I plan to place this page over a full-size photo.
I had so much fun using Sugarplum Wishes and two wintery cut files to make these fun, decorative pages! I love the sweater so much I may have to make more shaped pages for my December Daily. Thanks for stopping by and happy scrapping!
SUPPLIES: Patterned papers, die cuts, stickers, Thickers: SUGARPLUM WISHES; white cardstock; vellum; Cut files: Sweater and Snowflakes Background by Paige Evans
December Daily 2023 Before the Photos by Paige Evans

Sunday, November 19, 2023

Take a look through my December Daily 2023 before I add all the photos!
I can't wait to fill this up with all our memories and traditions, old & new!
I do have a kit & class available in my shop so you can create this exact same album following along self-paced videos which can be found at www.bit.ly/ChristmasAlbumClass! I also have a virtual class only option at www.bit.ly/ChristmasAlbumClass.
CHRISTMAS KIT & CLASS
Let me know if you have any questions and have a happy scrappy day!
🎅🎄🦌🛷🔔❄️☃️🤶🌟

Meowy Christmas Layout by Paige Evans

Here is the other bonus page we could make with leftovers from our kit at Sugarplum Wishes Weekend!
1. Cut (9) blocks of Sugarplum Wishes patterned papers to 4x4¾” then use a Scoring Board & Tool to score them every ¼” on the longer side. Fold the papers accordion style, making sure to alternate having the ends pointing up or down. Place ¼”double-sided tape on the ends pointing up and attach the paper blocks together end-to-end. Connect the ends of the first and last pieces then press the center down to form the rosette. Attach a 5” square of scrap paper onto the back to secure the rosette in place and add liquid glue between the ridges on the front.
2. Trim off the barcode strip from lime green stars Paper 10 then adhere the rosette centered in the middle. Add a 3x4” photo over the center and embellish over/under/around it with Foam Stickers, Mini Puffy Stickers,and bits from the Sticker Book as shown.
3. Make the title with a mix of Thickers and Mini Thickers on the upper left and balance on the bottom right with a cluster of flowers, leaves, and a bird from the Floral Die Cuts, Foam Stickers, and Sticker Book. Edge the top right with a zig zag border from the Sticker Book and the bottom left with yellow crochet trim.
4. Embellish with additional stickers, a label sticker with journaling written on it tucked under the photo, and a smattering of Enamel Dots.
I hope you're inspired to document your furry friends with Sugarplum Wishes and a large patterned paper accordion rosette!
SUPPLIES: Patterned papers, stickers, Thickers, die cuts, enamel dots, embellishments: SUGARPLUM WISHES

Feeling Festive Layout by Paige Evans


Saturday, November 18, 2023

Hi friends!! I have a new layout to share with you today made for the Merry Makers event with American Crafts at scrapbook.com featuring my Sugarplum Wishes collection!
I do have a process video to go along with this page so you can see exactly how it came together!
The background paper is the pastel grid Paper 5 from Blooming Wild.
I had a ball punching three sizes of circles and three sizes of stars from all the Sugarplum Wishes patterned papers. Check out all the nesting punches HERE! I layered all the stars and circles together to resemble ornaments.
For the next step I machine stitched using gold thread a bunch of lines from the top of the background to varying lengths. Then I splashed watered down white acrylic paint to look like falling snow. Once the paint dried I scattered the faux ornaments across so they look like they're dangling! Too fun!
From there I added two 4x3" photos, made a title at the bottom with Mini Puffy Stickers, Foam Stickers, and Cardstock Stickers, wrote journaling below with a blue pen, and sprinkled Enamel Dots across the background. The last step was adding even more stars on top using Foam Stickers, Cardstock Stickers, and the Sticker Book!
I hope you are inspired to check out the Merry Makers event sponsored by American Crafts and scrapbook.com and pick up my Sugarplum Wishes collection to document your merry memories this holiday season! Take care and have a happy scrappy day!
SUPPLIES: Patterned papers, stickers, Thickers, die cuts, enamel dots, embellishments: SUGARPLUM WISHES; Blooming Wild Paper 5; Nesting Punches; white acrylic paint

Holly Jolly Layout by Paige Evans


Last weekend I taught in-person classes at our Sugarplum Wishes Weekend Event!
Here is one of the bonus pages we made with leftovers and my Holly Jolly Cut File!
1. Trim off the barcode strip from pink cardstock to use as the background.
2. Back a white cardstock Holly Jolly Cut File with paper scraps then attach to the top of the page with foam squares.
3. Tuck a 10x5½” photo under the title.
4. Glue blue pom pom trim across the top edge.
5. Decorate the title and bottom of the photo with Cardstock Stickers, Foam Stickers, Ephemera Die Cuts, Floral Die Cuts, Mini Puffy Stickers, and pieces from the Sticker Book as shown.
6. Journal on white space of the photo with a black permanent pen.
7. Finish with a smattering of Enamel Dots around the page.
I hope you're inspired to document attending an event using my Holly Jolly Cut File paired with Sugarplum Wishes!
SUPPLIES: Patterned papers, stickers, die cuts, embellishments: SUGARPLUM WISHES; white cardstock; Cut file: Holly Jolly by Paige Evans

Joy to the World Layout by Audrey Mutschall


Friday, November 17, 2023

Hello friends! Audrey Mutschall here with my first Christmas layout of the season! I’ve used Paige’s Cut and Fold Christmas Trees Background Cut File and the fabulous Sugarplum Wishes collection for this page. I love how fun and festive it turned out!
I started by cutting the background design from green star Paper 10 and then carefully folded over all of the Christmas trees. This type of cut file is so fun to use because it allows you to see the back side of the paper too! I wanted to stick with green for the trees, so I backed the open spaces with green plaid Paper 3. To finish off the background I used Mini Puffy Stickers to add little stars, bows, and birds to the tops of a few of the Christmas trees. These stickers are so adorable and they fit perfectly on the little trees - I love when that happens! With the background complete, I matted my photo with a candy cane striped paper from the 6x8 Paper Pad and then got to work embellishing around it. I added a tag from Paper 1 and a journaling card from the Ephemera Die Cuts and used a Decorative Paper Clip to hold them in place. I also used two floral clusters from the Floral & Snowflake Die Cuts, arranging them on opposite corners of the photo. I added Cardstock Stickers, an Acrylic Sweater, and embellished a little sign from the Ephemera Die Cuts with hand stitching and Enamel Dots. Lastly, I made a little bow using red and pink striped paper from one of the Boxed Cards and placed it by one of the floral clusters around my photo.
I had so much fun creating this Christmas layout and I hope it inspires you to check out Paige’s Cut and Fold Cut Files - she has lots of fun ones!!
SUPPLIES: Patterned papers, stickers, die cuts, embellishments: SUGARPLUM WISHES; Cut file: Cut and Fold Christmas Trees Background by Paige Evans

Merry Christmas Layout by Ashley Neu


Thursday, November 16, 2023

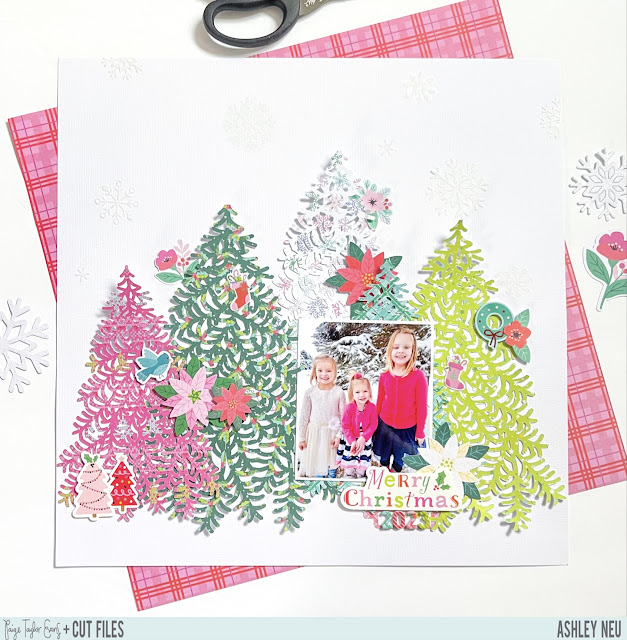
Hello everyone! It’s Ashley Neu back to share my next design team layout! As the season changes and the holidays approach, I am eager to pull out my Christmas scrapbooking supplies! And that’s exactly what I did for this layout. Using Paige’s Sugarplum Wishes collection I documented a photo of my girls from 7 years ago. I put them in some cute Christmas dresses and had them stand in front of a snow covered tree. The Christmas Tree Branches cut file just seemed like the perfect backdrop for the photo!
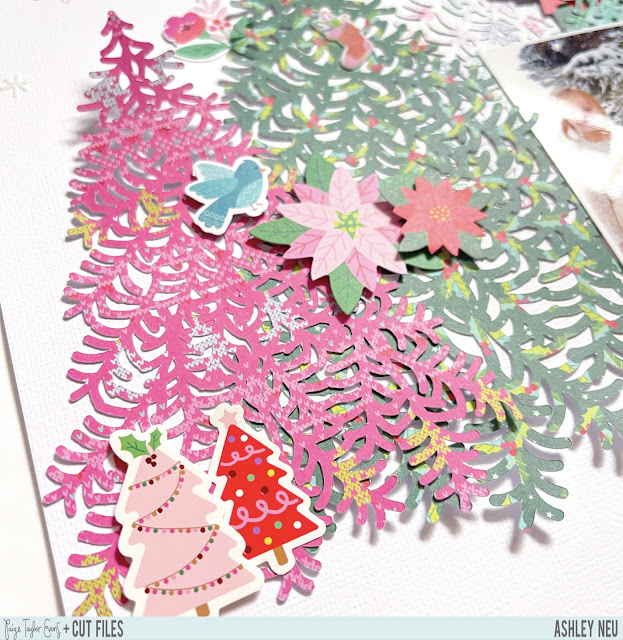
To cut the 5 festive trees, I used the 6x8 Paper Pad. I wanted to use colors that complemented my girls’ dresses so I selected pinks, teals, greens, and a white patterned paper with snowflakes. I layered them across a white cardstock background on the lower half of the paper. I only added adhesive in the middle of the trees in order to allow them to cast shadows across the background. I love that effect! After adhering my photo, I started embellishing the trees. I used the Floral & Snowflake Die Cuts, Sticker Book, Mini Puffy Stickers and Cardstock Stickers to pull in lovely florals, a bird, stockings, a wreath, and some more cute trees. I scattered these items across the trees. To add the title, I grabbed a “Merry Christmas” sticker from the Cardstock Stickers and popped it up on the bottom of my photo. I also added in the year under that title sticker using the Thickers. I put the wrong year but it has since been changed lol! Lastly, I wanted to add to the snowy look that was going on in the picture so I grabbed some snowflakes from the Sticker Book and scattered them across the “sky”. They are beautiful and so intricate and sparkly!
I am just loving Paige’s new Sugarplum Wishes collection! It has the most beautiful colors and elements. If you haven’t been able to play with it yet, I encourage you to pick up even just a few pieces! Thank you for stopping by and have a great day!
SUPPLIES: Patterned papers, stickers, Thickers, die cuts, embellishments: SUGARPLUM WISHES; white cardstock; Cut file: Christmas Tree Branches by Paige Evans

Sugarplum Wishes Weekend Recap


Wednesday, November 15, 2023

On Saturday & Sunday November 11th & 12th 2023, Andrea and I taught our fourth in-person event here in Colorado called Sugarplum Wishes Weekend! It was our biggest and bestest event yet!
Right after Garden Shoppe Weekend back in November 2022 we began preparing for our next event. We posted this save the date in February to get everyone excited!
On March 31st we opened registration. Within a few hours we sold out and felt bad that many people couldn't come. So we quickly found a solution and opened up even more spots. In the end almost 100 people signed up!
In August we went live to show the kit contents and talk about the MemoryDex Swap.
In September & October we created our class samples. I made a 12x12 layout, double-page spread, 5x7" mini album, two cards, and two bonus 12x12 pages.
Andrea filled the entire 6x8 Album with spreads and made two 12x12 layouts.
Jessica Upton from Color Cast Designs was the bonus teacher and made a cute spread to go into the album!
In September Chris helped me put all the kits together.
Everything got moved into the basement storage and eventually spilled out and took over the entire house as the event got closer and sponsors started sending their goodies!
Throughout the months leading up to the event everyone made MemoryDex Cards for the swap. Here are mine:
Kelly's cute cards!
Two days before the event Andrea drove to Colorado from Omaha and Tasha came over to make buttons, open boxes of extra goodies, and count all the things. It was a fun day of prepwork!
The day before the event we drove up to the hotel and spent all day setting up and making it magical! This is what it looked like in the beginning, only tables and chairs.
And this is what it looked like in the afternoon - minus a few more goodies we added the next morning!
The girls made a super cute & festive balloon arch photo op as usual!
Such adorable balloons!!!
Now all that was left to do was open the doors and let everyone in!!
I hardly slept Friday night in anticipation of Saturday! I drove up early in the morning with another car full of last minute goodies. We put the final pieces out on the tables and prepped the MemDex Swap tables.
Let's do this!!
Kicking off the event!
My heart is full.
After an hour for shopping and settling in my first class began!
This might be the only project most people finished 100% ;)
Before taking our group photo, Janelle gave out her amazing handmade journals to every single person. The amount of time and effort and love that went into making 100 of these Christmas junk journals is absolutely astounding.
Janelle is simply the sweetest with the biggest heart.
Before breaking for lunch we took group pics!
Lindsay gave everyone a pair of cute Christmas glasses!
After lunch I taught my mini album class followed by the cards! Phew!!
Fun-filled day!!
A HUUUUUUGE thank you to Chasity and Lynette from American Crafts for all they donated to the event!! Without these ladies, none of this would be possible! They've made my dreams come true in more ways than one!
The rest of the evening was open crop time.
I slept really good Saturday night :) The next day was Andrea's turn teaching all day so I was able to walk around and soak it all in.
Andrea's amazing mini album display.
My sale & display table.
Some of my scrapbooks & mini albums.
Paula G & Kelly B of Crafty Me brought a pop-up shop!
Selfies!
Throughout the first day and second morning people added their swap cards to the blush pink MemDex spinners.
The time and effort that went into the cards is incredible.
Isn't this an amazing sight to behold?!
In the afternoon of the 2nd day everyone chose their spinner to take home.
Keeping busy!
Whenever we had a spare moment we would take pics with friends under the balloon arch.
As things wound down on the second day and some people started heading home, Chasity and Lynette gave away 17 Print Makers!!
Jennifer so sweetly gave hers to Janelle.
Andrea and I received these AMAZING handmade charms by Daisy Lu Designs to match Sugarplum Wishes.
Another look at the Daisy Lu Designs charms - be still my heart!
Jessica couldn't make it so Lindsay taught her super cute spread as the final workshop.
Marilyn was there in spirit!
Closing out the evenings!
And then in the blink of an eye the event came to an end, we hugged, and said our goodbyes! I can't think of one thing I'd change, it was the perfect event :)
Thank you SO MUCH to all our sponsors for their generous donations!
This was me the entire week following the event :)
WE DID IT!!!!
Already working on plans for 2024 - stay tuned!!!
Paige Taylor Evans © // Quinn Creatives DESIGN
