Fun in the Sea Layout by Steffi Ried


Tuesday, July 31, 2018

Hello and welcome to a new layout from me, Steffi. For this page I used a another beautiful cut file from Paige. I love the Wonky Circles Background 8.5x11 cut file. When I saw it for the first time, it reminded me of drops of water and our last vacation at the sea in Greece.
First I cut out the cut file from white cardstock with my Silhouette Cameo. Then I used different blue & turquoise ink pads to swipe over it. It's so easy and I love this technique.

After that I glued it on a white cardstock background. I also cut out the photo in the form of a wonky circle.

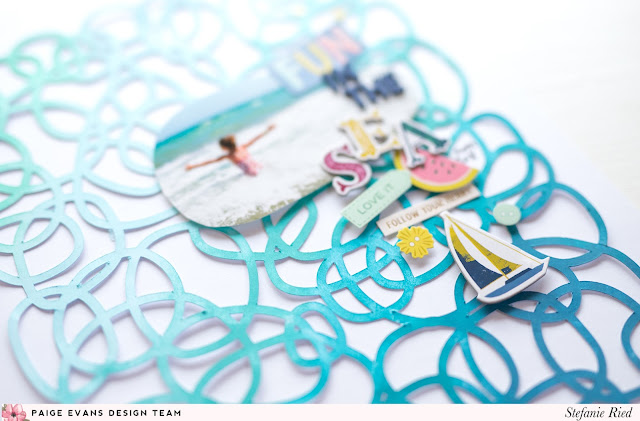
For the last step I decorated the picture and the background with some embellishments. And finally I used this cute boat sticker :) Thanks for stopping by!
Blog: steffiried.blogspot.com / Instagram: @steffiried / Pinterest: @steffiried / Facebook: stefanie.ried.96 YouTube: Steffi Ried

Best Buds Layout by Jana Maiwald-McCarthy


Monday, July 30, 2018

Hello, my name is Jana Maiwald-McCarthy and I am totally happy to share my first official Design Team layout on the blog.

I decided to use the Diamond Background Stitching Template cut file for my first project. I used it on white cardstock because I really love how stitching looks on white paper, so crisp and clean.

Before I started the stitching part I had a look into my Paige Evans papers and grabbed Paper 14 from Pick-Me-Up as my color inspiration. I used some matching embroidery floss and started to fill the diamond shapes with them. The photos are showing my little one and my mother's dog, they are best friends. She is always with him, it's so cute.

I had the idea to fill some of the diamond shapes with layered paper diamonds and I used the paper that was my inspiration for it. I also added a few layers of vellum and tissue paper to the mix. Some matching watercolor splatters were added for more fun and interest. To embellish my page I used bits and pieces from the digital Fancy Free collection and also a few stickers from Pink Paislee Wild Child collection. I fussy cut moths from Paper 14 and scattered them around my page. The first letter from both names was added to one of the white diamonds - for this I used the white Mini Thickers.

SUPPLIES: PICK-ME-UPPaper 12Mini ThickersFancy Free Digital Kit; Cut file: Diamond Background Stitching Template by Paige Evans; Die cut machine: Silhouette Cameowhite cardstock

So Chill Layout for the Scrap Gals Seattle Retreat


Sunday, July 29, 2018

I had the opportunity to teach at the Scrap Gals Seattle Retreat and we made three layouts using only 7 pieces of Pick-Me-Up patterned paper (Paper 01Paper 02Paper 10Paper 13Paper 14Paper 16, and Paper 19), a pack of Chipboard ThickersRub-Ons, and a set of Journaling Spots! Here is one of the layouts we made:
Use the B-side of Paper 14 for the background (blue & aqua stripes). Remember to set aside the barcode strip for the last layout. Arrange die cuts from the Journaling Spots pack accordingly, including a 3” square photo on the right side. I bent up the edges and used foam squares for dimension.
1st row – fussy cut a “FAB” sentiment from Paper 13 and add it to the stork card. Apply “stay golden,” a plum, and a few “x” Rub-Ons. Leave the tomato card plain (or truth be told I simply forgot to add anything to it lol). On the flower card, apply a flower Rub-On to the top edge and “x” Rub-Ons to the bottom left corner. Write journaling on hand drawn lines. Fussy cut “Love” from Paper 13 (the whole phrase says “Love much” but I only cut the “Love” part) and add it to the yellow striped card. Apply flower Rub-Ons and tuck a blue tab under the top edge. Stamp the date (stamp not included in the kit) on the tab. 
2nd row - cut out the “dream wild” tag from Paper 13 and apply flower Rub-Ons. Apply a moth and yellow bow Rub-On to the “a slice of the good life” tag. Fussy cut the pink “happy” frame from Paper 01 and add it to the rolodex card. Apply star Rub-Ons to the top right corner and three button Rub-Ons to the bottom left corner. Fussy cut the teal banner from Paper 13, layer it over the bottom edge of the photo, and create the title on top with Chipboard Thickers. Apply a row of "x" Rub-Ons below the title.
3rd row – apply the “love” frame Rub-On to a white journaling card, fussy cut it out, then adhere it to the red ticket journaling spot. Cut out the top of a tag from Paper 13 and add it to the left edge – apply a flower Rub-On over the left edge. Apply a flower cluster Rub-On and “JOY” Rub-On to the flower pennant card. Apply “shine bright” and mini star Rub-Ons to the blue frame. Apply a butterfly and mini heart Rub-Ons to the yellow frame
4th row – fussy cut the pink banner with lemons from Paper 13, tear off the left edge, and add it to the pink striped card (save the other half for the 3rd layout). Apply “x” Rub-Ons below and tuck a pink tab die cut underneath. Apply three “x” Rub-Ons to the pink tab. Fussy cut “I love every little thing about you” sentiments from Paper 13 and add them to the moth card. Trim the top of a tag from Paper 13 and attach it to the top of the watermelon card. Apply a flower Rub-On overlapping the tag. Apply two red “x” Rub-Ons to the “remember” die cut card to finish.

Little Bookworm Layout by Julie Taylor


Saturday, July 28, 2018

Do you ever have an idea in your head for a page that you need to get down onto paper? That’s what happened when I saw these cut files: Stack of Books, Bookworm, and Books - I found the perfect photos to go with them.
I cut all the files from kraft cardstock, making the stack of books the largest to add impact to my page.

I backed the cut files with papers from Take Me AwayOh My HeartTurn the Page, and Pick-Me-Up, using lots of color and patterns. I added a small bit of mixed media in the center of my page and then fussy cut all those cute books from Oh My Heart Paper 15 and the same paper found in the 6x6 Paper Pad. I layered the books down the page to look like they were falling off the shelf.

I backed the bookworm with papers from all the 6x6 Paper Pads and settled him on top of my photos at the bottom of the page in a cluster of more fussy cut books.

My title is made from Turn the Page letter stickers from the Sticker Book and Mini Thickers. A few Pick-Me-Up Rub-Ons and Puffy Stickers finished my page! Thanks for stopping by!

SUPPLIES: PICK-ME-UP6x6 Paper PadMini ThickersPuffy StickersRub-OnsTURN THE PAGE6x6 Paper PadOH MY HEARTPaper 15, 6x6 Paper Pad; TAKE ME AWAY: 6x6 Paper Pad; Cut files: Stack of BooksBookwormBooks by Paige Evans; Die cut machine: Silhouette Cameo
Instagram: @julie9699 / Facebook: Julie Taylor

Happiness Layout by Flóra Farkas


Friday, July 27, 2018

Hi ladies, It's Flóra here today. I am sharing my new layout made with the Pick-Me-Up collection and Butterflies Border cut file. I cut out the lovely butterflies from Paper 24 and tore the paper across the middle. I adhered this piece onto Paper 22 and between them added a piece of Paper 16.

I glued all the butterflies back in place but added adhesive only in the middle to create a 3D look and put them at a slight angle so the background looks more interesting. I added my photo on the right in an Ephemera Die Cut frame along a title on the left. I used Ephemera Die CutsStickersPuffy Stickers and Chipboard Stickers to embellish.

Between the layers I added fussy cut flowers from Paper 02. To add more details, I adhered Chipboard Stickers and Washi Tape pieces on the top section following the tone-on-tone technique. I also made random hand stitches here and there. In the end I wrote my journaling on a Journaling Spot.

I hope you like my new scrapbook page! Thanks for stopping by! Happy crafting!

Beautiful Layout for JOANN


Thursday, July 26, 2018

This blog post is sponsored by JOANN.
The 30-page Paige Evans #StickerBook can be found in JOANN stores so I wanted to feature those stickers on my next layout!
I went through the sticker book and peeled off all of the flowers, birds, hearts, and other icons that I was drawn to, placed them on a piece of smooth white cardstock, and then fussy cut out all of the images. This is not a necessary step but I like being able to move around the pieces so this turns them into more like die cut embellishments.

Next I designed a large title to say BEAUTIFUL and cut it from a piece of smooth white cardstock using a Silhouette Cameo. (Find the cut file for free in my Happy Scrappy Place Facebook group!) I spent some time piercing holes around each letter (about 5mm apart) and then did a chain link stitch through the holes using all six strands of white DMC embroidery thread for ultimate texture.

On a separate piece of smooth white cardstock I had the Cameo draw an offset version of the title and then on that background piece I arranged the stickers-turned-die-cuts on the top left side of every letter. Every once in awhile as I was adding the stickers I would place the die cut title page on top to see how things were looking. I left the "A" empty for a photo.

I wrote journaling on another sticker and tucked it into the photo frame along with a few more stickers. Finished! Easy peasy!

I hope you are inspired to check out the 30-page Paige Evans #StickerBook along with the other 8 designer books at your local JOANN store or online!
SUPPLIES: 30-page Paige Evans #StickerBook; smooth white cardstock; Die cut machine: Silhouette Cameo; DMC embroidery floss; Zig pen

Star Wreath Layout by Lady Nany


Hello world! My name is Lady Nany and I've been creating pages for my 2018 album with Paige's cut files. Today I chose the Star Wreath cut file and the Take Me Away collection to make this layout.
First I opened the file and ungrouped it to work better. I cut the middle leaving one of the parts out and I sent it to cut in my Silhouette Curio from white cardstock. Then I went back to the program and repeated the process with the other half. For the next step I selected only the stars in the file, lined them up on an A4 sheet, and sent them to cut in the Take Me Away Paper Pack 1 design 6. Once I had the pieces cut, I selected a pastel green cardstock for the background.
I pasted the cut file halves first then I added the stars, some with pop dots for dimension.
In the center I placed two photos framed with papers from the Take Me Away 6x6 Paper Pad and decorated around with elements from the same digital collection. To add more visual interest I cut the pink label "#loveya" and added a white eyelet with along with baker's twine.
I also splashed white paint over the entire page. I wrote my journaling with a white gel pen above the title and to finish I put some enamel dots forming two triangles around the photo. Thanks for reading, I hope it has been an inspiration and see you in the next post!

SUPPLIES: Cut file: Star Wreath by Paige Evans; Die cut machine: Silhouettewhite cardstockenamel dotsTAKE ME AWAY6x6 Paper Pad; Take Me Away Digital Collection
Blog: Lady Nany Art / Instagram: @ladynanyart / Facebook: Lady Nany Art / YouTube: Lady Nany Art

Two Brilliant Colors Layout by Cristina Sales


Wednesday, July 25, 2018

Hi ladies, it’s Cristina here! Today I’d like to show you my first project for Paige Evans + Silhouette design team! I can’t tell you how happy I am to be part of this amazing design team and start this wonderful new adventure with all of you!
The idea for the making of this composition comes from the Fireworks cut file and I used my Silhouette Cameo to cut it from white cardstock. I decided to stick it to a pink patterned paper in the Take Me Away collection. I truly love how the shades of colors underneath the stars change from fuchsia to light green. Then in order to create a 3D effect I used a thick double tape under each element.
After that I used the stars I had previously cut along with other different sizes using vellum and cuts of patterned paper, stitching them together using my sewing machine.
I wanted to embellish my picture so I used the digital Take Me Away collection to print and cut labels, a sentiment, and a bow. I also printed and cut my title using the "Back This Font" font by Paige and to finish I added enamel dots, a mini flair button, and a tiny button to complete my cluster.
I hope you like my page and find some inspiration to create something new or similar! Thanks for stopping by and see you soon!

SUPPLIES: TAKE ME AWAYPaper 08digital Take Me Away collection; Cut files: Fireworks and Back This Font by Paige Evans; enamel dotswhite cardstock; Die cut machine: Silhouette Cameo
Blog: Scrap and So On / Instagram: @cristina__sales / YouTube: Cristina Sales
Facebook Page: Scrap and So On / Facebook: Cristina Sales

Selfie Giggles Layout by Missy Whidden


Tuesday, July 24, 2018

Hey, friends! Missy here! Have you ever used one of Paige’s cut files as a stencil? That’s what I did on this layout using her Flower cut file. It’s a simple flower, but I duplicated it in several sizes and made a vertical design. I cut it on white cardstock using a Silhouette Cameo and then scraped modeling paste over it. I used a fun multi-colored paper from the Fancy Free 12x12 Paper Pad as my background and faded out a lot of the pattern with white gesso. Once the paste dried, I used some bold ink sprays to add in lots of red, pink, aqua, dark blue, and yellow. These colors match the Pick-Me-Up collection perfectly.
The gesso helped to prep the patterned paper for the paste and liquid sprays. I really love the rich colors and fun texture this created. To add in a bit more dark blue, I machine stitched around the center of each flower. I used color photos to brighten everything up and embellished with Pick-Me-Up Chipboard StickersEphemera Die CutsStickers, and fussy cut bits from the 12x12 Paper Pad. Did you know there are several papers included in it with gold foil? Yes!! My title is subtle on the dark blue area and made with the Pick-Me-Up Mini Thickers.
I fussy cut several flower clusters from one of the Pick-Me-Up 12x12 Paper Pad papers and used them as layers. Here is another floral Chipboard Sticker under the photo. I also tucked some dark blue thread under the flowers for an extra pop of color and texture.
I added in a few more Pick-Me-Up Chipboard Stickers and even a Rub-On. I’m really crushing on this deep reddish pink color! My final touch was some Heidi Swapp Gold Color Shine.
If you want a new idea on stencils, give this fun cut file a try. Paige has so many cut files that would make awesome stencils! I hope this inspires you and gives you some ideas for your next layout. Thanks for stopping by!
SUPPLIES: FANCY FREE:12x12 Paper Pad; PICK-ME-UP12x12 Paper PadChipboard StickersRub-OnsEphemera Die CutsMini ThickersStickers; Cut file: Flower by Paige Evans; Die cut machine: Silhouette CameoinksgessoHeidi Swapp Gold Color Shine
Blog: littlenuggetcreations.blogspot.com  Instagram: @missywhidden  Pinterest: @missywhidden
Facebook: missy.whidden  YouTube: Missy Whidden

Dubrovnik Mini Album


Sunday, July 22, 2018

I made a new mini album using my Accordion Box Mini Album cut file and the Box of Crayons collection by Shimelle for the Scrapbook & Cards Today Magazine Blog!
Here is a flip through with soothing background music so you can see how this album looks in "real life" and how all of the elements are interactive.
The rainbow bright colors, tropical vibes, and artistic touches reminded me of our day in Dubrovnik, Croatia so that is what I decided to document in this mini album. I took most of the journaling directly from our blog post recap and got my pictures printed at Costco - I used Picasa to create the collages first. I love how interactive this mini album is - lots of pockets, envelopes, flaps, and more.
Here is a video tutorial for assembling the Accordion Box Mini Album cut file. In this example I used my Turn the Page collection with Pink Paislee.

While I love Turn the Page more than words can describe, I have made many mini albums with it so I wanted to switch things up and that's why I chose Box of Crayons. I created a new base, decorated the cover, and then got to work on what to put inside each pocket.
I used my Silhouette Cameo 3 to cut out a variety of envelopes from patterned papers and then started embellishing.
In the first pocket I created a tri-fold card from white cardstock and on each section I attached a small photo with a sticker. I covered up the sentiment on the toucan floral sticker with alphabet stickers to say "Croatia" along with a picture of the Croatian flag which I thought was fitting for the introduction. I machine stitched around each segment for texture and to create a border.
On the back side I splashed watercolors and white acrylic paint and then copied, pasted, printed, trimmed, and adhered journaling using my favorite font called Remington Noiseless.
The next pocket holds a few different things - I made a rainbow bright tag, a card about when we ate ice cream, and embellished a favorite photo of us on the busiest street in Dubrovnik. I like to include cut files in my mini albums so I cut the Ice Cream Cone and watercolored over it.
Here are some close ups of the cards, tags, and die cuts in this pocket:
On the back of the Ice Cream Cone I added a picture of Jane eating her treat.
This card about lunch seemed like a good place for the strawberry icons.

On the front of this envelope about getting "birded" I used a rainbow sticker strip, die cut banner, gold glitter heart die cut, "birds" alphabet stickers, and toucan puffy sticker to embellish and let people know what to expect inside. Before adhering the banner in place I machine stitched through it.
Inside is a pair of cards with typed journaling and a super cute toucan bird patch.
The back sides of the cards with photos and sequins.
The next pocket holds another envelope which I decorated with stamping, a die cut, alpha stickers, and a heart enamel sticker.
Inside is some favorite photos from the day and I added scrappy details for interest.
Here is the back side of the tags and card.
From one of the cut apart patterned papers I trimmed a row of squares and folded it up to create a mini mini book which I adhered on the cover of this accordion style card.
Here's a peek inside the mini mini book.
I used the roller stamp down this lined card and stitched on clear sequins.
I added a photo to each section and embellished with stickers and a couple captions.
On the back side I didn't do anything to the middle three sections, they're cute as is!
The next pocket holds another envelope. I fussy cut the "TODAY" letters from patterned paper and adhered them on the front.
I love the rainbow dots patterned paper! Makes such a cute envelope. I used a velcro dot to keep all of the envelopes closed.
Inside is a tri fold card with photos and journaling held together with washi tape strips.
The second to last section has an envelope and photo pocket. The heart paper clip keeps the folded photo pocket together and I like how it peeks through when looking at the album.
Inside the envelope is three photos with photo corner stickers and typed captions.
I decorated the back sides super minimally but colorfully :)
I still had a whole bunch of photos I wanted to include, so I trimmed down a 6x8 2" square photo pocket page and folded it into quarters. I left one spot empty for a heart sticker.
To keep the photos in their places I machine stitched across the top of each section.
For the last section I created a pocket and before assembling it I embossed it with a floral folder. To decorate the cover I die cut my Flower Banner, watercolored over it, and stitched "the end" alpha stickers in the middle.
Inside is some info about the last thing we did and a little extra "say yes to new adventures" card.
The back of the journaling tag has one of my favorite photos from the day - the view from the top of Mt. Srđ overlooking Dubrovnik is incredible!
Everything folds up and tucks away nicely into the mini album box.
I hope you are inspired to check out the Accordion Box Mini Album cut file, the Box of Crayons collection by Shimelle, and the Scrapbook & Cards Today Magazine Blog!

SUPPLIES: Cut files: Accordion Box Mini AlbumIce Cream Cone, and Flower Banner by Paige Evans; Die cut machine: Silhouette Cameo 3white cardstockwatercolorssequins; Sewing machine: Brother; Thread: Coats & Clark; Font: Remington NoiselessBOX OF CRAYONS by Shimelle: Patterned paper, stickers, patches, roller stamp, ephemera die cuts, paper clips, enamel dots, puffy stickers, alphabet stickers, photo corners, washi tape
Paige Taylor Evans © // Quinn Creatives DESIGN