Spring Time Layout by Jackie Ashton


Tuesday, May 30, 2023

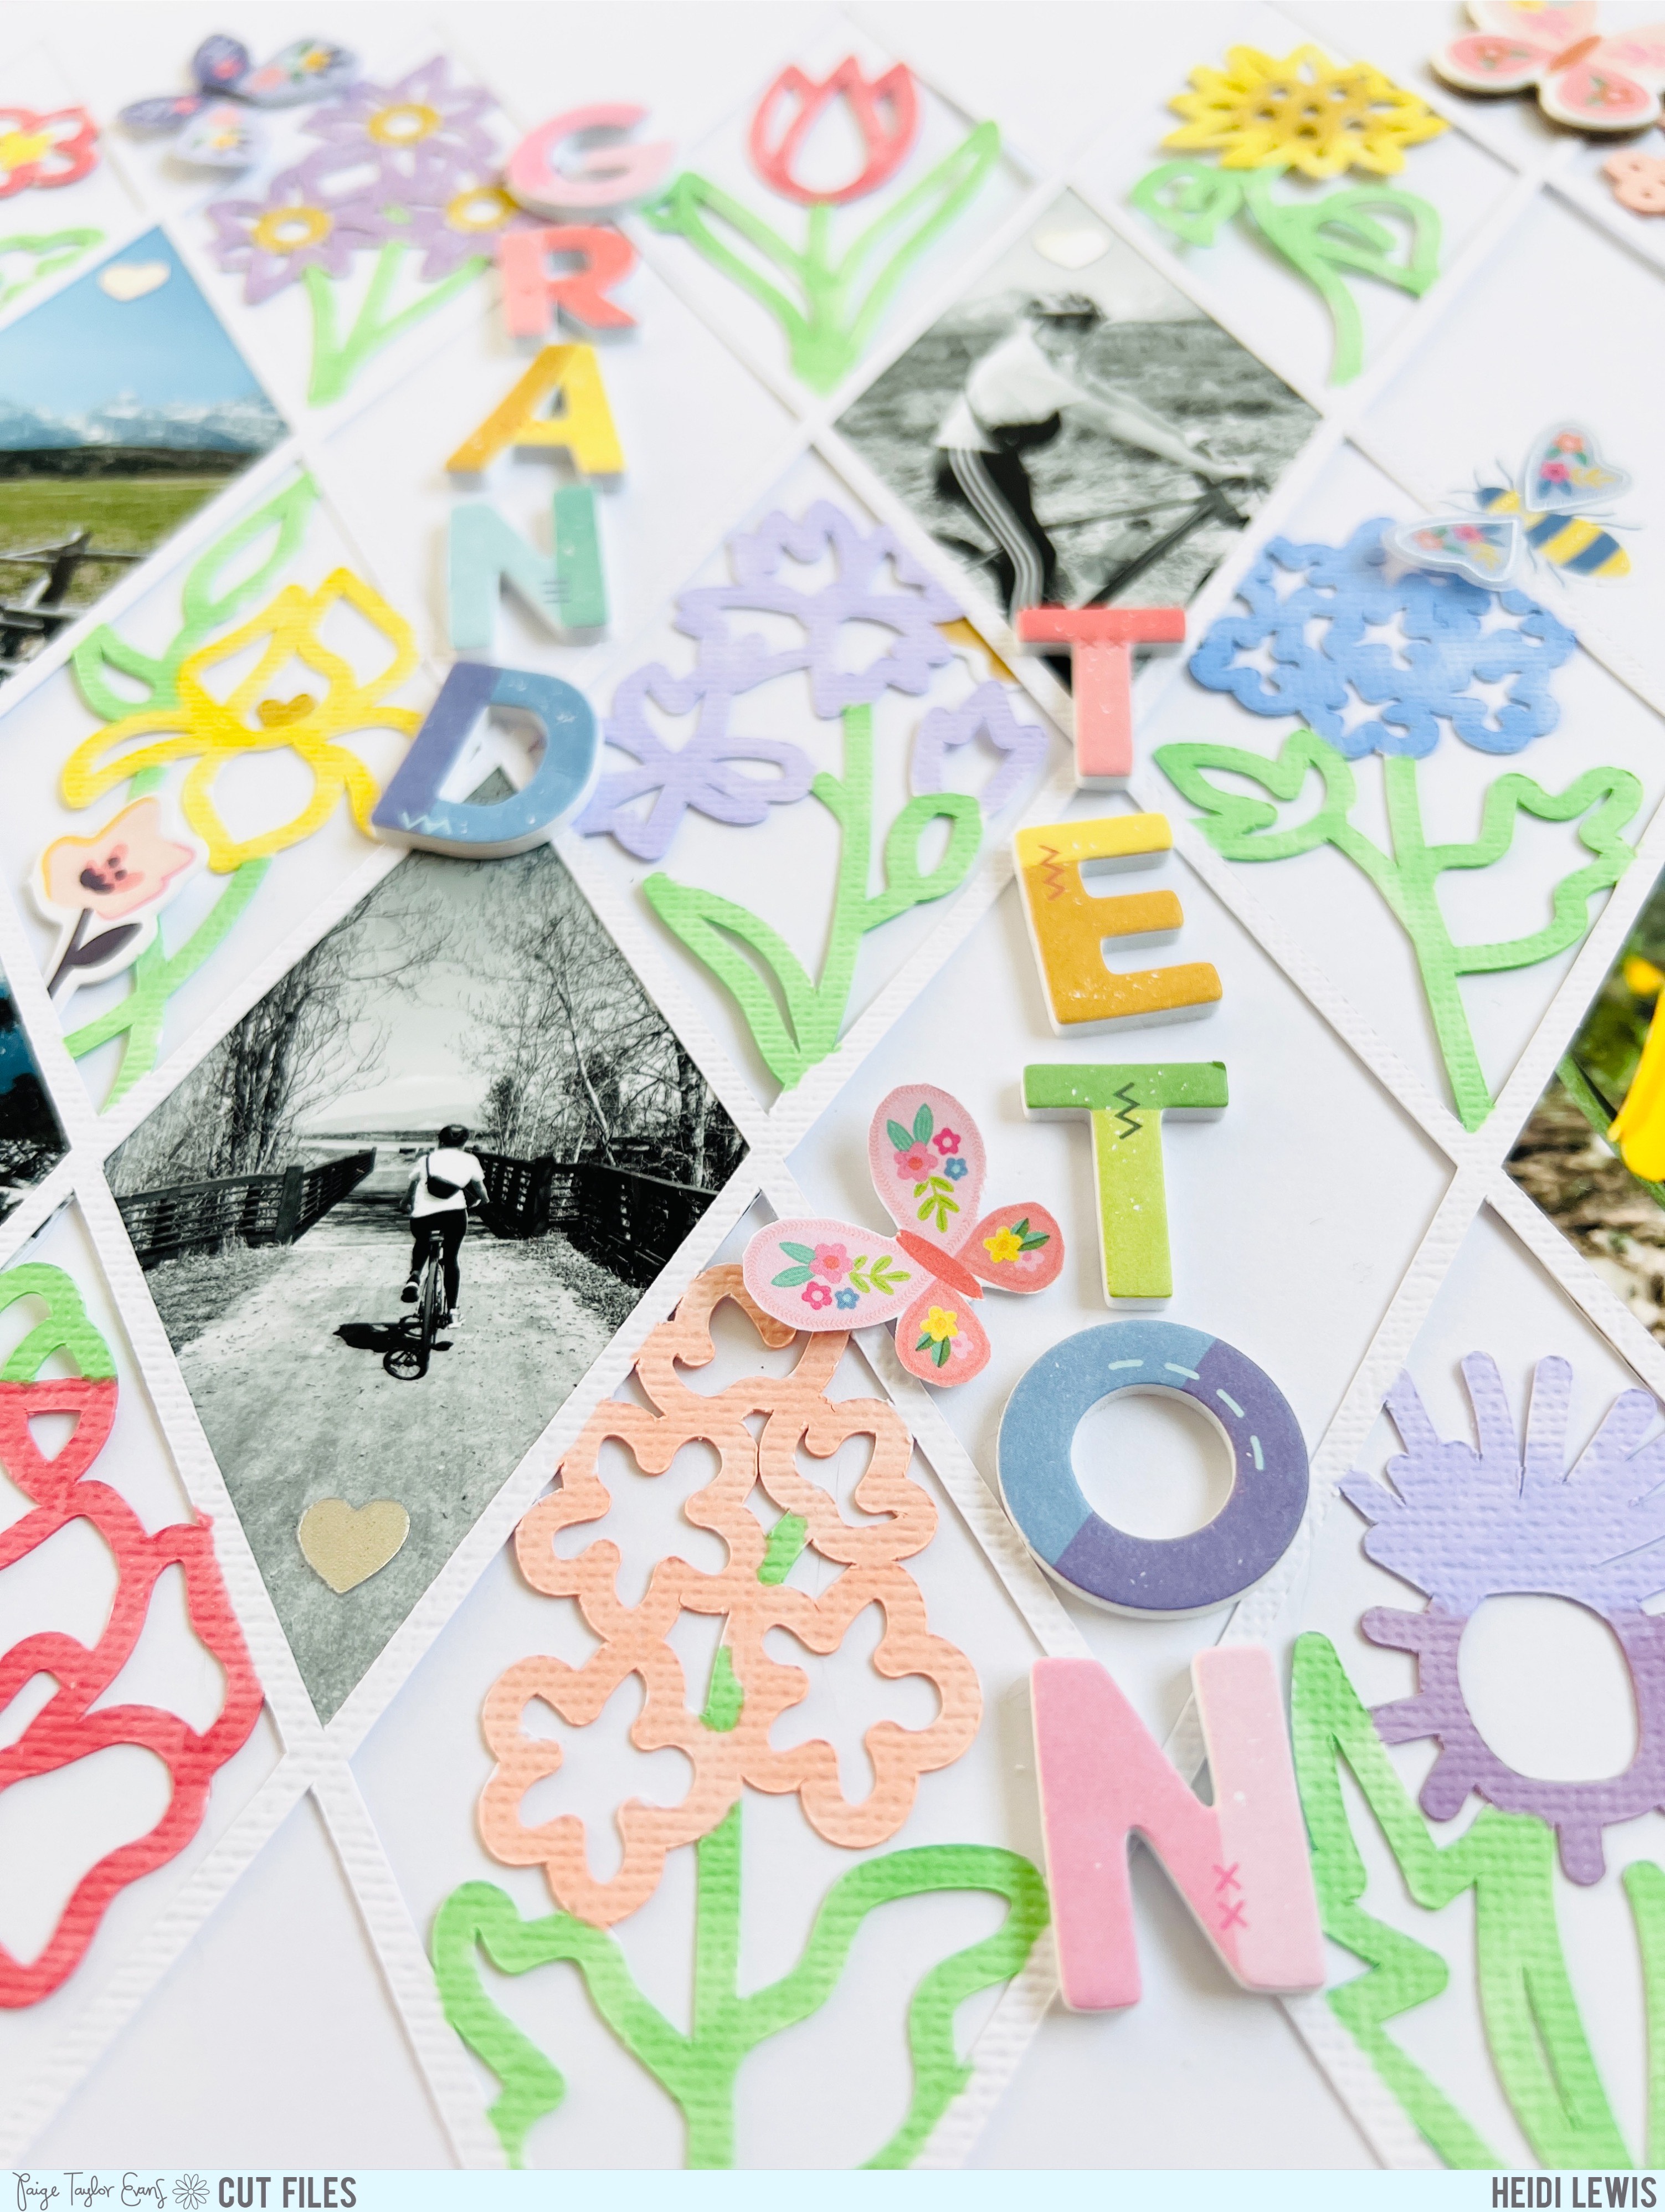
Hi friends! Jackie Ashton here with my next design team project using Paige's Flower Background from the 20 Spring Cut Files paired with Blooming Wild!
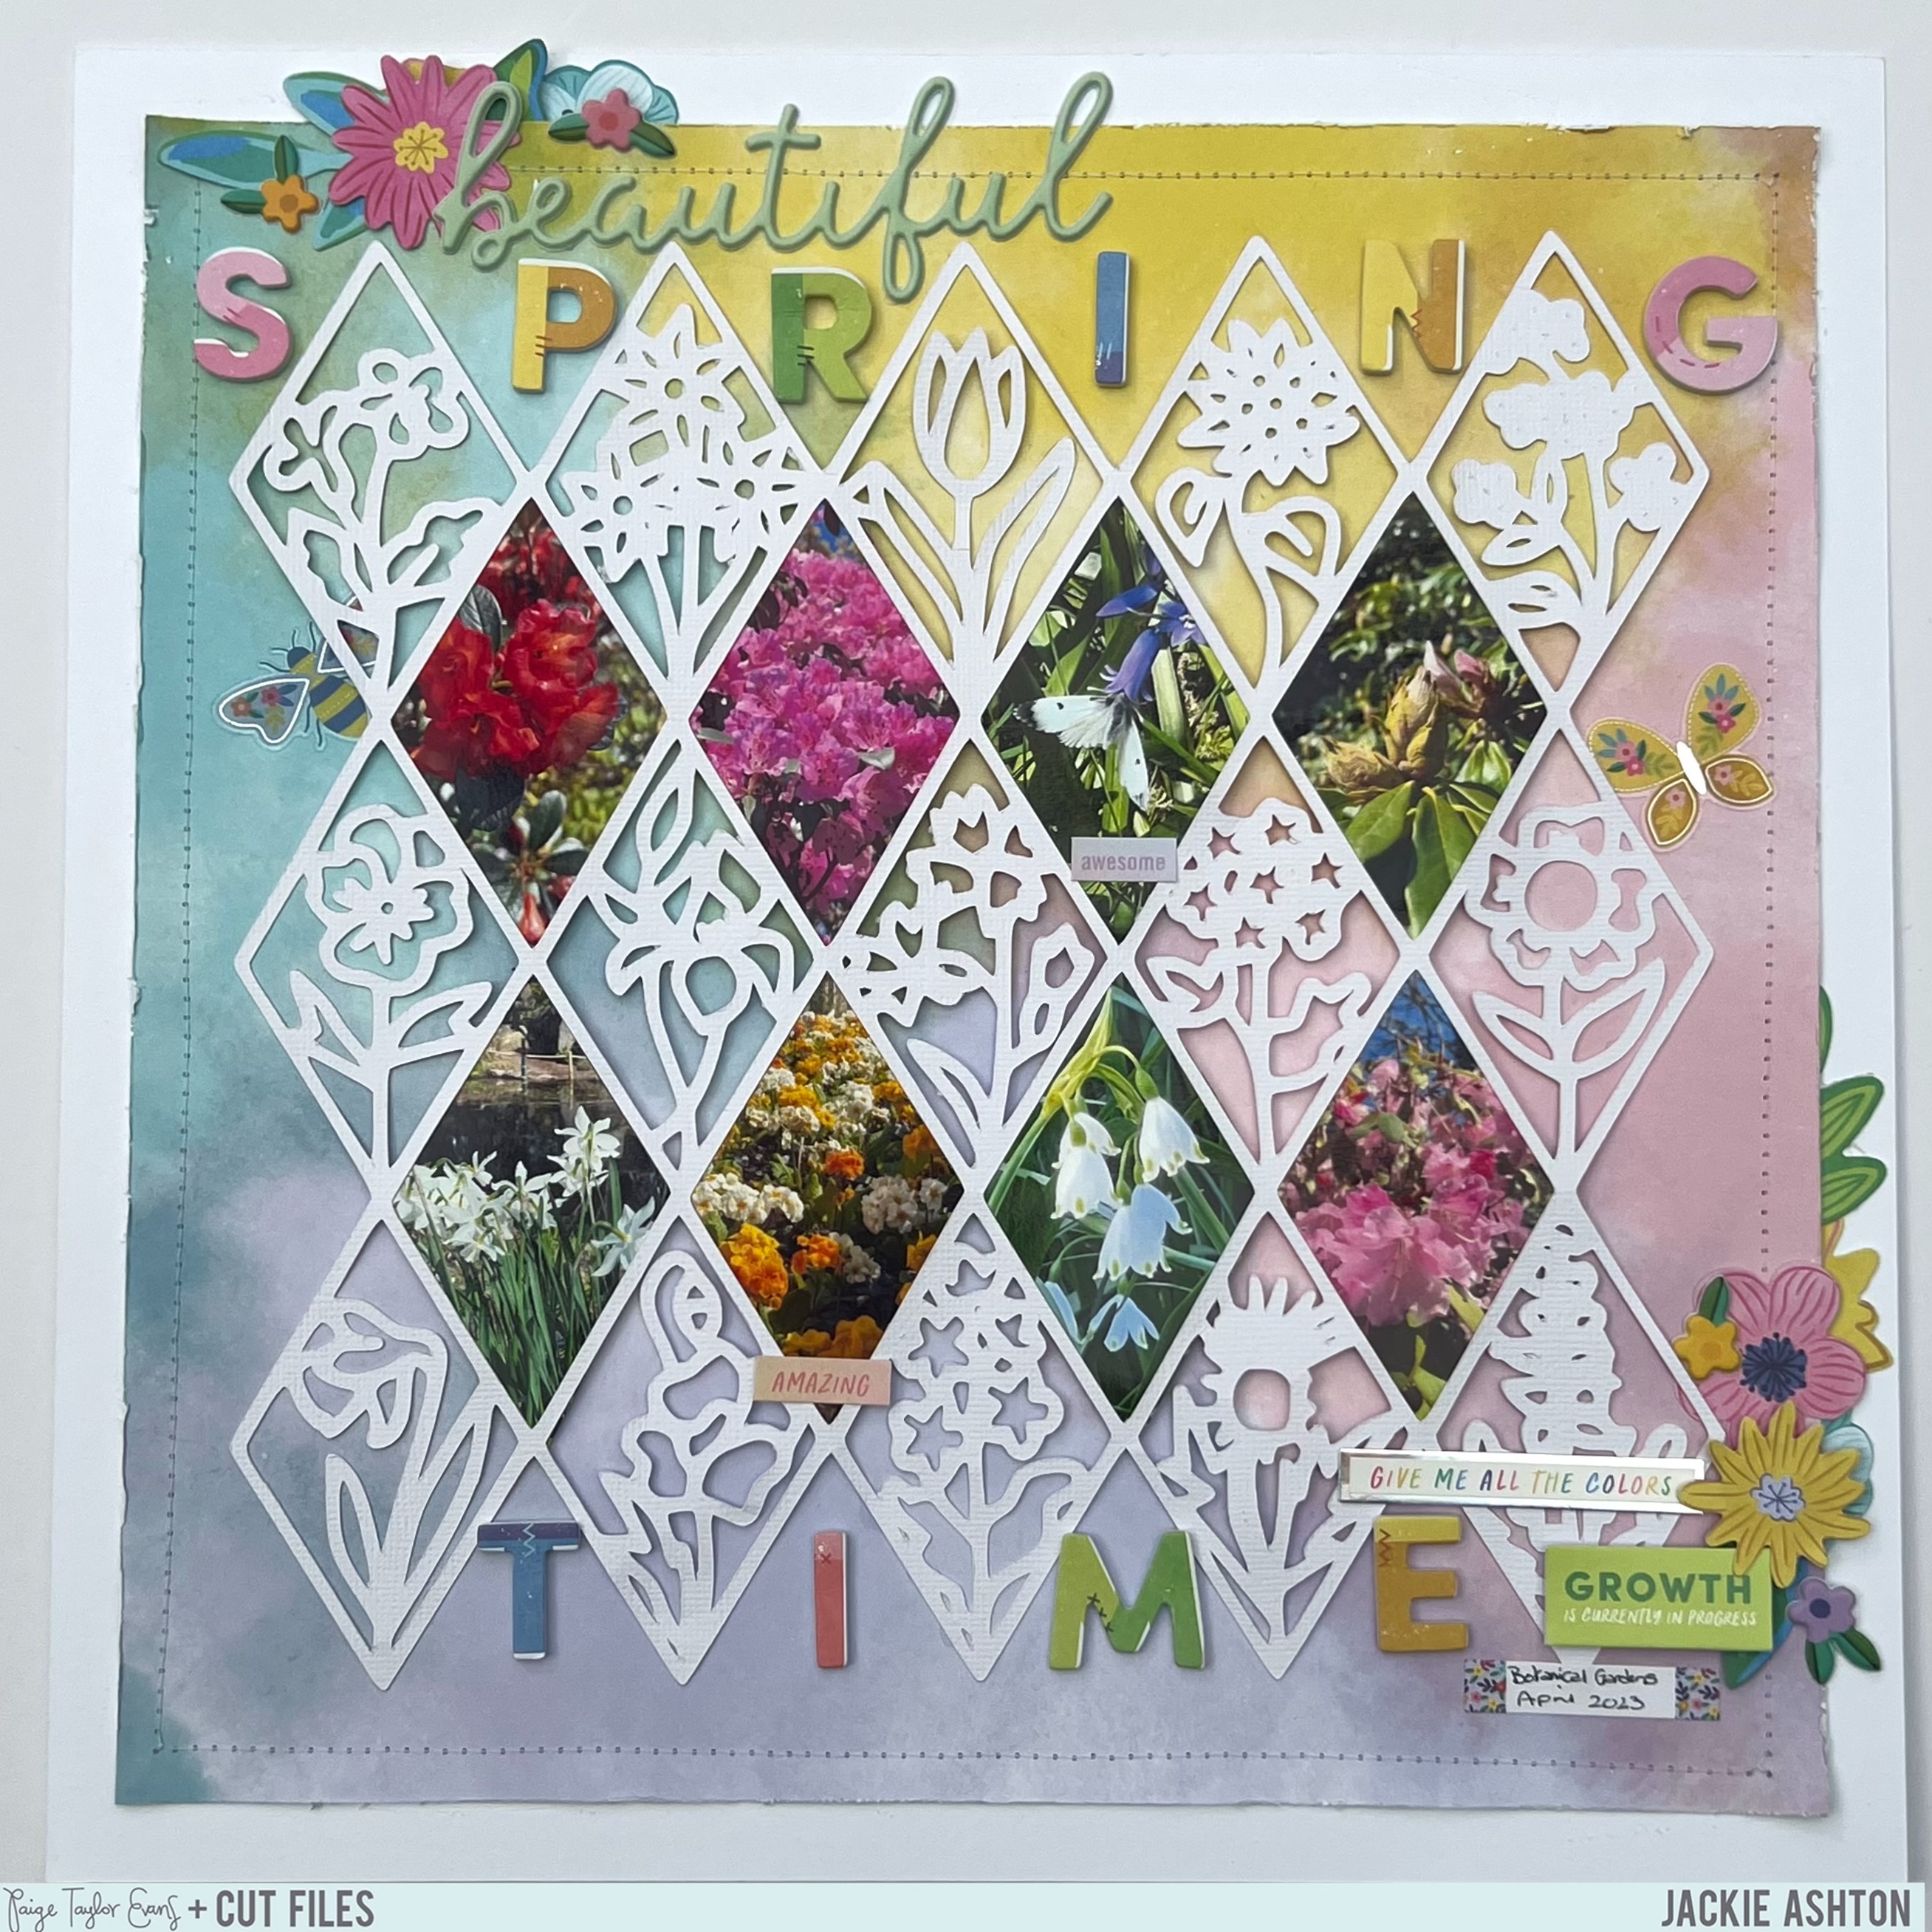
To start I cut the design from white cardstock and using the cut-out diamond shapes as a template, I hand cut my photographs to fit in the open spaces. I used Paper 18 as my background which I cut down to 11x11" and machined stitched this piece onto white cardstock, distressing the edges of the patterned paper to add extra texture. Before adding the cut file to my background paper, I added foam behind each photograph to raise it from the paper. I embellished with Floral Die Cuts, cutting some of them in half so I could tuck them in between the edge of the patterned paper and the white cardstock. For my title I used the lovely Thickers and also added the Puffy Phrase Stickers word ‘beautiful’ to the top of the page and a few of the small flowers to both flower clusters. I finished off by adding some stickers from the Cardstock Stickers and the Sticker Book.
I loved how this page came together using the Flower Background from the 20 Spring Cut Files and  Blooming Wild!
SUPPLIES: Patterned papers, stickers, Thickers, die cuts, embellishments: BLOOMING WILD; white cardstock; Cut file: Flower Background from the 20 Spring Cut Files by Paige Evans

Grand Teton Layout by Heidi Lewis


Monday, May 29, 2023

Hello friends! It’s Heidi Lewis here on the blog today to share a new layout featuring a cut file from Paiges 20 Spring Cut Files! I went biking in Grand Teton National Park recently and wanted to scrap my photos right away. I chose to work with the Flower Background. Painting cut files with watercolor is a popular technique, but I put a different spin on this technique by using alcohol markers instead. Alcohol markers are less messy and more saturated than watercolors, so if mixed media isn’t your jam, give markers a try!
To make this layout, I cut out the Flowers Background from white cardstock. Then I traced the flowers with the brush-side of my Ohuhu alcohol markers. (Other brands would work great, too, if they are acid-free.) Next, I backed some of the diamonds in the cut file with a mix of colored and black and white photos. Then I adhered the cut file to smooth white cardstock. I made my title out of Thickers from Paige’s Blooming Wild collection. I finished off the layout with Floral Die CutsChipboard Stickers, and pieces from the Sticker Book. What goes with flowers better than more flowers, butterflies, and bees? Lol.
If you want to document some recent photos or try a new technique, this is your sign to go buy the 20 Spring Cut Files bundle and to start playing with markers. I can’t wait to use this technique again!
SUPPLIES: Patterned papers, die cuts, stickers, Thickers, embellishments: BLOOMING WILDwhite cardstock; Cut file: Flowers Background from the 20 Spring Cut Files by Paige Evans

Best Friends Double-Page Spread by Paige Evans


Sunday, May 28, 2023

I taught a Virtual Layouts Class last week including my very first double-page spread for my own classes!!
The class is available online HERE.
I used my Blooming Wild collection to create this spread about Jane and her besties. I love patterned papers, repeating shapes, flowers, bright colors - all the things! So we combined all of those elements together to create this fun spread.
Upon purchase of the Virtual Layouts Class a PDF will be emailed with the link to the YouTube video where the class takes place on the first page, a list of supplies to buy or gather from your stash, photo sizes, instructions, any homework needed to be completed before the class, and templates to download/print/cut. The class can be watched whenever you have time - it was recorded so you can watch as many times as you like!
Let me know if you have any questions about anything, always happy to help!
I hope you are inspired to check out my Virtual Layouts Class with my first (and definitely not my last!) double-page spread!

Disc Bound Pockets Mini Album by Paige Evans


Saturday, May 27, 2023

On Wednesday I taught a Disc Bound Pockets Mini Album Class and it's available online HERE!
I used my Blooming Wild collection to create this fun & interactive mini album complete with tags, a variety of photo sizes, shiny metallics, and more!
Please note that a Disc Cinch or Multi Cinch or Disc Power Punch and Discs are needed to create this type of album. Ooooor you could punch holes with a regular hole punch and put it together with binder rings.
This Disc Bound Pockets Mini Album includes 9 spreads and is filled with memories of our Spring 2023.
Each page has some kind of page turner or textured edge to make flipping of every page a delight!
Because of this style of binding, you could add lots more pages! Or less, whatever you prefer :)
Here are pictures of the rest of the pages in my Acetate Flower Shaped Mini Album.
Let me know if you have any questions about anything!
Here are the fronts of the 8 tags that I inserted into the 8 pockets.
And the backs! Easy does it!
Upon purchase of this Disc Bound Pockets Mini Album Class a PDF will be emailed with the link to the YouTube video where the class takes place on the first page, a list of supplies to buy or gather from your stash, photo sizes, instructions, any homework needed to be completed before the class, and templates to download/print/cut. The class can be watched whenever you have time - it was recorded so you can watch as many times as you like!
I hope you are inspired to check out my Disc Bound Pockets Mini Album Class!

Hey Sugar Layout by Audrey Mutschall


Friday, May 26, 2023

Hello again friends! It’s Audrey Mutschall here with a new layout featuring Paige’s Lollipop and Conversation Hearts cut files. I used the beautiful Blooming Wild collection for this page and I love how bright and vibrant it turned out!
I started by resizing both cut files and cutting out one set of Conversation Hearts and eight Lollipops. I backed the hearts with pink Paper 16 and heart Paper 2. I backed the lollipops with sunburst Paper 22, choosing one color for each lollipop, and backing every other segment of the lollipop in that color. Once the little pieces were backed, I cut a yellow circle from Paper 20 for each lollipop. The sticks for the lollipops are backed in shiny metallic paper from the 6x8 Paper Pad. With the backing complete, I spent about two hours re-arranging the candy pieces onto background Paper 9 (just kidding!) It did take me a little while to get them balanced, but I love how that navy polka dot paper brings out the different colors used for the candies. I printed a photo of my daughter in little pigtails, hiding behind a muffin. She has a major sweet tooth and I have no shortage of photos of her with candy, but I chose this one because I loved her sweet expression. I matted the photo onto striped Paper 10 and placed it on the background. I cut out two tags from Paper 9 and used Thickers on them for my title, “Hey Sugar”. I added two Chipboard Stickers to the top of the photo and then embellished around the page with sentiments from the Sticker Book and heart stickers from the Puffy Phrase Stickers.
I had so much fun creating this candy-themed layout! I hope it inspires you to try combining two or more of Paige’s cut files along with the Blooming Wild collection—the possibilities are endless!!
SUPPLIES: Patterned papers, stickers, die cuts, Thickers, embellishments: BLOOMING WILD; white cardstock; Cut files: Lollipop and Conversation Hearts by Paige Evans

Spring is in the Air Layout by Ashley Neu


Thursday, May 25, 2023

Hello friends! Ashley Neu here to share my next project for the Paige Evans Cut File Design Team! Over the next few weeks we're sharing projects created with Paige’s Spring bundles from the past couple of years so I was super excited to try out another one from the 20 Spring Cut Files! I selected the ‘Spring is in the Air’ which pairs beautifully with Paige’s Blooming Wild collection. I recently took some photos of my daughters on a walking bridge one spring morning after church and I couldn’t wait to scrap them.
One of my favorite things to do when backing a word cut file is selecting rainbow papers. I grabbed these patterned papers from the 6x8 Paper Pad and used foam adhesive to give lots of shadows and dimension. I also backed the flower border on the bottom of the cut file with vellum - this gives the patterned paper background paper room to shine! Speaking of the background paper, I grabbed Paper 13 to adhere the cut file to. I love the way the cut file just pops right off of the beautiful dark blue hexagon and floral patterns! I added my photos just above the cut file which were printed at 2x3”. From Paper 7 I fussy cut 5 floral bunches to add on top of the vellum flowers. I just love the colors in these florals! To add to the rainbow look I had going on, I grabbed some color coordinating pieces from the Cardstock StickersSticker Book, and Chipboard Frame Stickers, including 2 birds, a birdhouse, a heart, a phrase sticker and a green border sticker. Lastly, I wanted to give some interest to the background so I used a scalloped border punch on the bottom and added a piece of white cardstock to finish off the fun design!
Go check out all of the cut file bundles that Paige has available! Thanks so much for stopping by and have a wonderful day!
SUPPLIES: Patterned papers, stickers, die cuts, embellishments: BLOOMING WILDvellum; white cardstock; Cut file: Spring is in the Air from the 20 Spring Cut Files by Paige Evans

Machine Stitching Mini Album by Amber Mitchell


Wednesday, May 24, 2023

Hello crafty friends! Amber Mitchell here and my challenge for iNSD in Paige's Happy Scrappy Place Facebook Group was to use machine stitching! When creating this project, I challenged myself to use machine stitching in as many different ways as possible. I love adding machine stitching to any and all of my projects, so this challenge was a fun way to incorporate this technique!
To create the front cover for this album, I use two separate pieces: the Pie Chart Heart Cut File that I cut from white cardstock, and a solid heart that I cut from patterned paper to back the cut file. I glued the center of the heart cut file to the solid heart and then I used my sewing machine to stitch along all of the separate lines on the cut file. I repeated these steps to create the back cover of the album as well. To embellish the front cover, I used a few pieces from the Floral Die Cuts and added a “happy” sentiment that I cut from Paper 22. I added another sentiment from the Sticker Book to a tab from the Chipboard Stickers and tucked that into the cluster. A few fussy cut butterflies finished off the cover perfectly!
When it came to creating the pages for this album, I incorporated machine stitching in several different ways: on a couple of the pages I stitched along the patterns of the paper using my sewing machine - this makes the patterns pop and also adds a lot of texture. I used one of these pages as the opening page in the album. Here is a detail of stitching along the plaid pattern of Paper 3.
On the other page I added machine stitched monochromatic butterflies that I created using punches.
Here is a close up of the layered butterflies and machine stitching holding them together as well as stitching over the patterns on the paper.
Another way I used punches in this album was to create the large pink and yellow flower on the second page a few pics above. I used a teardrop punch to create the petals. I machine stitched carefully along the edges of all 8 petals then arranged them in an alternating pattern to create a flower shape.
On another page, I added flowers with paper stems. I learned this technique from one of Paige’s 4x4 Mini Album virtual classes and fell in love with it so much that I’ve used it in several albums! To create the stems, I cut ¼ inch strips from a green patterned paper. I stitched these down onto the page itself and then I added Floral Die Cuts to the tops.
On the page across from this flowers, I added strips of paper that I machine stitched down into the white spaces of Paper 23. I then pulled up the edges of this paper to add dimension.
Another fun way to add stitching to this album was by creating a large rainbow embellishment that I made using the Rainbow Simple Cut File. I machine stitched along all of the different pieces of this cut file and then adhered them together using foam tape (this adds extra dimension). I layered Floral Die Cuts on top of the rainbow, along with a few fussy cut butterflies. I finished this page by adding a photo mat behind the rainbow.
For the last page, I created a layered heart by cutting three more solid hearts in smaller and smaller sizes. I machine stitched again along the edges of these hearts and then down the middle of them,\ while they were stacked,\ to attach them all together. I then glued this to the last page of the album. I added a photo mat to this page and also machine stitched down a “together” sentiment that I pulled from the Phrases Thickers.
In-between the pages, I added smaller pieces like cut-parts, journaling cards, and even an envelope that I created using the Envelope Cut File. I machine stitched along the edges of all of these pieces. To decorate the envelope, I used an embellishment from the Chipboard Rounds. To finish off the album, I created some handmade pom pom charms and added some tassels from my stash, along with some of the Flower Charms to create a chunky, fun dangle.
I loved seeing all your projects featuring MACHINE STITCHING in the Happy Scrappy Place Facebook Group comments of my challenge! Winners were posted on Monday!
SUPPLIES: Patterned papers, die cuts, stickers, charms, embellishments: BLOOMING WILD; Cut files: Pie Chart HeartRainbow Simple, and Envelope by Paige Evans
Location: California, USA / Blog: Happy Crafty Studio / Instagram: @bambidearr / YouTube: bambidearr / Pinterest: bambidearr

Make Your Memory Book Now Available!


Tuesday, May 23, 2023

Today is a big day! It's the official release of my very first published book called MAKE YOUR MEMORY!
Thank you so much to Better Day Books for making this dream come true!
Pre-order a signed copy from me HERE.
Order from Amazon HERE.
Order from Barnes & Noble HERE.
Or check out your favorite scrapbooking and online bookstores to order a copy!
I absolutely love seeing MAKE YOUR MEMORY arrive in your crafty hands all around the world!
Be sure to tag me and Better Day Books so we can see!
What's this book all about? "Preserve, celebrate, and cherish life’s most memorable moments with this creative guide to modern scrapbooking by prolific paper craft designer Paige Evans! This stunning project book is organized into three themes: scrapbook layouts, handmade cards, and mini albums. The scrapbooking chapter will teach you how to create contemporary layouts using nine different techniques, including border punches, mixed media, stamped designs, tile grids, quilt-inspired designs, handmade flowers, stitched designs, and stars. Each technique includes a step-by-step project as well as a gallery of additional samples for endless inspiration! The card chapter will teach you how to make beautiful cards that are just as thoughtful as they are gorgeous. Themes include congratulations, sympathy, birthday, thank-you, and anniversary. Each card is presented with step-by-step instructions, and there are additional card designs at the end of the chapter to give you even more ideas. The mini album chapter will teach you how to make three memory books that are small in size, but big on detail! Three techniques are used in this featured projects: an elastic-bound album, a shaped album, and an accordion album. Each album is overflowing with beautiful paper designs and layers of coordinating embellishments.
For those new to the craft, the book includes a comprehensive 'getting started' chapter that will guide you through the massive amount of tools and materials available (and let you know exactly what’s needed). Plus, you’ll find an overview to basic paper-crafting techniques and design principles. At the back of the book, there are eight pages of perforated scrapbook paper that you can pull out and use to create the projects in the book or those of your own design."
Go ahead and make your memories into lovely works of art that will be cherished for years!
*******
Sneak peek collage of all my new projects that you'll find in Make Your Memory!
Almost all of them use my Splendid collection with American Crafts.
Here is a YouTube video of me flipping through the 3 mini albums you'll find step-by-step photos and instructions for inside MAKE YOUR MEMORY!
Thank you so much for sharing in my enthusiasm for this book! Don't forget to 
Pre-order a signed copy from me HERE.
Order from Amazon HERE.
Order from Barnes & Noble HERE.
HAVE A HAPPY SCRAPPY DAY!

Radial Layout by Yui Oku


Monday, May 22, 2023

Hi everyone! Yui Oku here and my challenge for iNSD in Paige's Happy Scrappy Place Facebook Group was to create a radial design!
Paper 22 is a radial (sunburst) design in the Blooming Wild collection. For my page I cut it into 8" circle, then I cut along the lines, and used a pencil to make a slight curve on each one. I arranged them in the order of the patterns and placed my 3" round photo in the middle. I moved the paper little by little to give it an irregular arrangement. I found perfectly matching small word stickers in the Sticker Book. From Puffy Phrase Stickers I used the word "sweet", hearts, and flowers to embellish. I cut out butterflies and tiny flowers from Paper 16. On either side of the layout, I added Cardstock Stickers and more bits from the Sticker Book. I love the dimension of the curving paper!
I loved seeing all your projects featuring a RADIAL DESIGN in the Happy Scrappy Place Facebook Group comments of my challenge! Winners will be posted today!
SUPPLIES: Patterned papers, stickers, die cuts, embellishments: BLOOMING WILD; white cardstock
Paige Taylor Evans © // Quinn Creatives DESIGN