Oh My Heart Layout by Phil Donahue


Wednesday, January 31, 2024

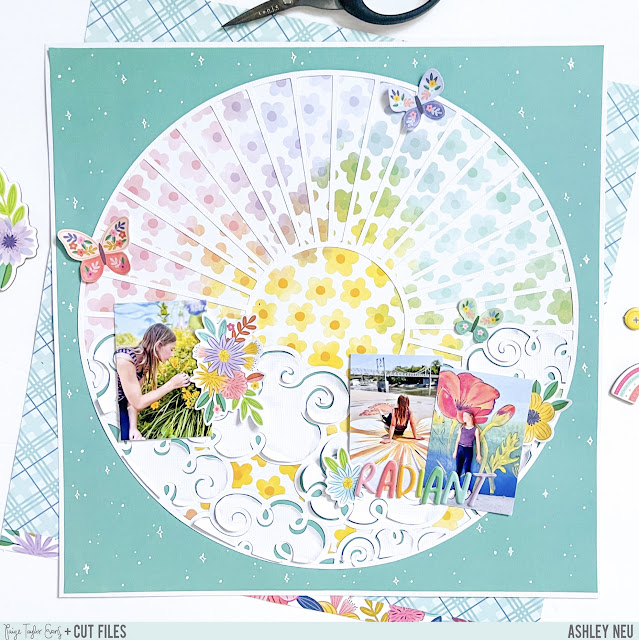
Hello scrappy friends! Phil Donahue here back on Paige's blog with a sweet and simple pastel layout featuring Paige's Hearts Background cut file and the lovely Blooming Wild collection! I wanted to feature a black & white photo of my niece taking a breather with her teddy during her second birthday party. The calm and cute photo leant itself beautifully to a pastel, dreamy heart layout.
To begin, I resized the Hearts Background cut file to be a bit smaller because I knew I wanted to place the photo on the left side of the page because she was looking toward the right. I backed the file with various patterns - some with holographic foiling - from the 6x8 Paper Pad. I added the file with adhesive foam squares and placed it on the right-center of the background page. This would leave room for the photo on the left and embellishments next to it. The main background was Paper 20 but instead of the main paper I used the one from the Blooming Wild Project Pad which not only has the watercolor hearts but also features holographic stitching which worked beautifully with the papers I used to back the cut file. I matted the photo with a bit of tissue paper and surrounded it with flowers from the Floral Die Cuts pack. I added a title using Thickers and placed final embellishments including holographic hearts from the Chipboard Stickers and clusters of thread in complementary colors around the photo.
I hope you found some inspiration in this layout and choose to try one of Paige's many heart cut files along with her beautiful Blooming Wild collection! Thanks for reading and have a lovely day!
SUPPLIES: Patterned papers, stickers, die cuts, ellishments: BLOOMING WILDwhite cardstock; Cut file: Hearts Background by Paige Evans

XOXO Layout by Noelle Culp


Tuesday, January 30, 2024

Hi crafty friends! Noelle Culp back with a new layout for the Cut File Design Team! For this page I used Paige's XOXO cut file along with her Garden Shoppe collection.
I love making shakers and I also love the special acetate sheets that match Paige's collections so I made a layout that combined both of these! I started with the XOXO cut file cut from white cardstock and backed it with the Floral Transparency. I then made shakers behind the hearts and filled them with small copper hearts. For my background I added texture with a heart stencil and copper texture paste. I adhered the cut file with foam squares to the background to give it a bit of dimension. I added a few Floral Die Cuts behind my photo and a title that I painted with copper paint.
I love how this page turned out and I hope it inspires you to try making a shaker with Paige's cut file along with her Garden Shoppe collection!
SUPPLIES: Patterned papers, floral transparency, die cuts, stickers, embellishments: GARDEN SHOPPE; white cardstock; Cut file: XOXO by Paige Evans

Love Laugh Always Layout by Lisa Fonseca


Monday, January 29, 2024

Hey friends, it's Lisa Fonseca back with a new layout using a cut file from Paige's 14 Valentine Cut Files bundle and her Blooming Wild and Garden Shoppe collections. I think this cut file is amazing because you can use the words in so many different ways!
I backed the words with different patterned papers, creating a colorful outline, and then added them to strips of patterned paper. I think this technique makes everything stand out and gives it a lot of interest! Then I added a lot of fussy cut flowers and hearts scattered down the page. A few sentiments from the Garden Shoppe Cardstock Stickers topped with gold paint splatters finishes it off!
I hope this page inspires you to check out Paige's 14 Valentine Cut Files bundle and her Blooming Wild and Garden Shoppe collections! See you again next time!
SUPPLIES: Patterned papers, stickers, Thickers, die cuts, enamel dots, embellishments: BLOOMING WILDGARDEN SHOPPE; white cardstock; Cut file: Words from the 14 Valentine Cut Files by Paige Evans

Peace on Earth Layout by Kelly Daye


Saturday, January 27, 2024

Happy New Year friends! Kelly Daye here with my first Design Team layout of 2024. Last year my New Year’s layout was an homage to me. This year I’m thinking about peace.
I started with Paige’s Globe Outline cut file. It’s cut from pretty Blooming Wild Paper 14 and glued to another Globe Outline cut from white cardstock. That gave me a sturdy piece of paper to stitch on. I always love the detail a chain stitch adds and stitched all around the globe with 6 strands of DMC B5200 which is Bright White. Once stitched, I taped a 12x12 sheet of acetate behind it. That gave me a level surface to add a title. My entire background showing beneath the globe is ladened with flowers. They’re all handmade with several of Paige’s Layered Flower Cut Files. I included: dark blue 328336, yellow 319451, light blue 319449, and pink 319450. All the many layers are made with Blooming Wild then gently teased to add texture. I also tucked in three rainbows, fussy-cut from Paper 6. My title was made with Paige’s Peace On Earth cut file. To be able to pop up the letters, I released the compound path in Silhouette Design Studio and dragged away the inner letters. I cut that from white cardstock. I doubled the layers again for sturdiness and chain stitched it too. Then all the letters were cut from Paper 7 and popped up with foam tape. Once put together, the entire title was popped up over my layout with more foam tape. A trail of butterflies fussy cut from Paper 16 float across my title. It’s all about the layers in this layout. To finish it off, I added Mini Flower Puffy Stickers, sequins, and dabs of gold Stickles. My journaling, printed on vellum, is simple - more flowers, more rainbows, more love.
I hope you’re inspired to create your own New Year message or wish for 2024 using Paige's cut files and Blooming Wild collection. See you again soon!
SUPPLIES: Patterned papers, stickers, die cuts, embellishments: BLOOMING WILDwhite cardstock; Cut files: Globe Outline and Layered Flowers by Paige Evans

Celestun Layout by Kat Flores


Friday, January 26, 2024

Hello scrappy friends! Kat Flores here and I hope your new year is off to a great start! I’m so happy to be back on Paige's blog sharing my first layout of 2024 featuring the Tropical Wreath cut file paired with her Blooming Wild and Splendid collections.
I wanted to document my first days of the year during a family vacation in southern Mexico so I started by cutting the Tropical Wreath from white cardstock and backed it with the 6x8 Paper Pad from. I made the base of my page using Paper 4 and Paper 23 from Blooming Wild. For a different look, I made a frame with Paper 4 and folded over one corner of Paper 23 to make a cute design. I added machine stitching around the border. Next I added the cut file using foam dots on the right bottom corner and cut off the excess. I placed my photos in the middle of the wreath and decorated them with stickers from the Splendid 8-Page Sticker Book. I used a journaling spot Ephemera Die Cut that fit into the folded corner to write my journaling. I added embellishments like Thickers to make my title and Floral Die Cuts. Finishing touches were stickers from the 8-Page Sticker Book and Epoxy Stickers from Splendid.
Even though we are in winter, I loved using this Tropical Wreath cut file that made me miss the warmer weather. I loved mixing these colorful collections and I hope you get inspired to use the Blooming Wild and Splendid collections in your projects. Have a wonderful day and happy scrapping!
SUPPLIES: Patterned papers, stickers, Thickers, die cuts, enamel dots, embellishments: BLOOMING WILD and SPLENDID; Cut file: Tropical Wreath by Paige Evans

Summer Joy Layout by Jackie Ashton


Thursday, January 25, 2024

Hi everyone! Jackie Ashton here with my next DT project using Paige's Summer cut file and the colorful Blooming Wild collection!
To start my layout, I added Distress Oxides inks to the center of a sheet of white cardstock and cut Paper 16 to 5” and border punched one edge before adding it to the left side of my cardstock. I cut the Summer cut file from white cardstock, backed it with Paper 1, and adhered it in place with foam squares. I matted my photo with papers from the 6x8 Paper Pad, added two of the tags from Paper 9, plus a journaling card from the Journaling Spots. I kept the embellishments to a minimum and added some fussy cut labels from Paper 13, florals from the Cardstock StickersMini Flower Puffy Stickers, as well as various stickers from the Sticker Book. I added ‘JOY’ using the wonderful Thickers to complete the title.
I love how this turned out and I hope you can get some inspiration to use Blooming Wild and the Summer cut file! Thanks so much for stopping by and have a great day!
SUPPLIES: Patterned papers, stickers, die cuts, embellishments: BLOOMING WILD; white cardstock; Cut file: Summer by Paige Evans

Winter Layout by Heidi Lewis


Wednesday, January 24, 2024

Hello friends! Heidi Lewis here and even though Christmas is over Sugarplum Wishes is still perfect for wintery layouts. This layout has all the January vibes with origami polar bears clustered around Paige's Winter cut file.
First I made polar bears following this tutorial from YouTube. I made the body of the bears with plain white printer paper after I learned the hard way that cardstock was too thick. Live and learn, lol. However, I was able to use patterned double-sided papers for the hats, specifically Paper 6 and Paper 9. I used stamps from my stash to create the faces and paws for the bears, but you could just as easily hand-draw them. For finishing touches I added 1 1/2 inch hearts for the tummies and hot glued little pom poms to the caps. Once the bears were finished, I backed the Winter cut file with various papers from Sugarplum Wishes. I focused on patterns that aren't specific to Christmas (think plaids, snowflakes, and florals.) Next, I placed the cut file at an angle on light blue cardstock and clustered the bears around the title. For embellishments, I again focused on wintery icons (snowflakes, mittens, penguins, etc). The embellishments were pulled from the Sticker Book, Cardstock Stickers, Mini Puffy Stickers, and Floral & Snowflake Die Cuts.
If you are feeling the January blues, making an origami layout with Sugarplum Wishes is a sure cure! Thanks for stopping by!
SUPPLIES: Patterned papers, die cuts, stickers, embellishments: SUGARPLUM WISHES; Cut file: Winter by Paige Evans

Sweet Dreams by Heather Rubert


Tuesday, January 23, 2024

Hello scrappy friends! It’s Heather Rubert back on the blog and today I have a super easy layout to share using Blooming Wild and Paige’s Clouds Background cut file!
A colorful background and the cut file do all the work! I used the watercolored side of Paper 18 for my background. With the Clouds Background cut file placed on top, I love the beautiful, multi-colored clouds! I glued the cut file to the background in just a few places so that most of the clouds would lift off the page. For even more dimension I took the inner pieces of several clouds and added them back inside the outline using foam adhesive. The clouds and background were busy enough that I wanted to keep the rest of the page pretty simple. So I added a black & white photo of my kitty and framed it with a couple Floral Die Cuts that I cut in half. I figured a title wouldn’t show up well on my busy background, so I stuck the title right to the photo using the holographic silver letters from the Sticker Book. A couple flowers from the Cardstock Stickers frame the title.
I hope you feel inspired to make a layout with Blooming Wild and Paige's Clouds Background cut file!
SUPPLIES: Patterned papers, die cuts, stickers, embellishments: BLOOMING WILD; white cardstock; Cut file: Clouds Background by Paige Evans

Kindergarten Layout by Audrey Mutschall


Monday, January 22, 2024

Hello friends and happy 2024!! Audrey Mutschall here with a school-themed layout featuring Blooming Wild and two cut files by Paige! I’ve used the Box of Crayons and the Paintbrush cut files to create a fun kindergarten layout.
I started by cutting the Box of Crayons from white cardstock and backing it with a variety of patterned papers from the 12x12 Paper Pad. I used watercolors to create solid colors for backing a few of the crayons. For the Paintbrush cut file I used woodgrain paper, shiny metallic paper, and floral Paper 11 to make a pretty little paintbrush. With the cut files complete, I got to work embellishing the page! I placed a 6" section of grid Paper 5 across the middle of a white cardstock background and then added a blue border from Paper 10 above it and a piece of watercolor Paper 18 below it. I added the cut files on the left side of the layout and placed my photo on the right side. For a little extra fun I made a library pocket from Paper 17 and Paper 23 and placed it behind my photo. I used a few of the labels from Paper 13 underneath my photo and wrote “Kindergarten Days” on one of them to mark the occasion. I fussy cut butterflies from Paper 16 and letters from alphabet Paper 8 and placed them around the page. Lastly, I finished the layout with Puffy Phrase Stickers, Chipboard Stickers, Ephemera Die Cuts, and Cardstock Stickers.
I had so much fun creating this page and I hope it inspires you to check out Blooming Wild and Paige's cut files!
SUPPLIES: Patterned papers, stickers, die cuts, embellishments: BLOOMING WILDwhite cardstockwatercolors; Cut file: Box of Crayons and Paintbrush by Paige Evans

Radiant Layout by Ashley Neu


Friday, January 19, 2024

Hello friends! It’s Ashley Neu back for the Paige Evans Cut File Design Team to share my next project! I know we are still in the winter season, especially here in Minnesota where we have snow in the forecast, but I am wanting to use some bright, cheery colors with flowers and all of the spring things. That being said, for today’s layout, I used Paige’s beautiful Blooming Wild collection along with her Sun and Clouds cut file. This cut file is just so GORGEOUS!! I could not wait to use it and I had the PERFECT photos for it!
I kept the process of backing the cut file fairly simple. After cutting the cut file out from white cardstock I made sure to save the cloud pieces to add in at a later time. I used Paper 12 to back the rays of the sun and the small spots in between the clouds. I adhered the cut file onto a piece of cardstock and then added in the clouds, slightly offsetting them to show that beautiful cardstock background. I added 3 photos to the layout, grouping 2 of them together on the right side of the page so that my title could live underneath them. The title came from the Thickers. The embellishments came from the Ephemera Die Cuts which included 3 floral pieces, each placed next to a photo. I love the way it looks like my daughter is smelling the flowers from the larger floral piece! I also added 3 butterflies in a tone-on-tone fashion onto the flowers of the sun rays. Lastly, I used a white gel pen and added some dots to make the background a little more interesting!
Thank you so much for stopping by! I really enjoyed creating this layout and how quickly it came together. See you again soon!
SUPPLIES: Patterned papers, stickers, Thickers, die cuts, embellishments: BLOOMING WILD; white cardstock; Cut file: Sun and Clouds by Paige Evans

Sugarplum Wishes Easel Mini Album by Amber Mitchell


Thursday, January 18, 2024

Hi crafty friends! Amber Mitchell here on Paige’s blog today to share my first project of 2024! I cannot believe that it is already the new year; time has gone by so fast! I’m starting this year off with a fun, easel mini album that I created using Sugarplum Wishes.
I’m always sad to see Christmas go, so although it’s now January, I’m squeezing in one more holiday project! And what better project to make then one that can be displayed during next year’s holiday? This easel-style album can stand up on its own and holds a variety of different pages, elements, and more!
To create the base for this project I used chipboard, binder rings, and patterned paper. The covers of this project are made from medium weight chipboard. I took two sheets that measured 3.5 x 5.5 inches and wrapped them using patterned paper from the 12x12 Paper Pad that I trimmed down to 4.5 x 6.5 inches. Next I lined the inside space using sheets of paper that measured 3 3/8 x 5 3/8 inches. To bind these covers together I put them together back-to-back and punched three holes along the tops of both using a Crop-A-Dile. I then added pink binder rings to these holes and that was it - the base of this album was done!
When it came to creating the pages for this project I used a mix of different styles:
•     I created a 3 x 4.5-inch envelope to use as a storage page for extra photos or mementos. I created this envelope using the Envelope Punch Board.
•     I created two pages using some holiday Project Life cards from my craft stash. I adhered these cards back-to-back and made sure to choose them by coordinating colors.
•     I also used tags and small interactive pieces to create both more pages and more character throughout the album. These add interest when flipping through the project as a whole.
•     I created a shaped page by using some red glitter stars from my stash. I machine stitched them together so that both sides would have glitter, and then added photo mats and embellishments to them.
•     I also created a page using patterned paper trimmed down to the size I wanted - 3.5 x 4.25 inches.
To embellish I used a mix of physical products as well as some digital elements from the Digital Sugarplum Wishes Collection.
I love incorporating digital elements when needed. I’m a HUGE fan of layering embellishments, and adding bits here and there and everywhere, so I tend to go through embellishments fast. That’s left me with a low stash of supplies for this collection so I just purchased the Digital Collection and printed some extra die cuts to include in this project!
On the journaling pages I used the Enamel Dots to add bullet points. I also used the Sticker Book and the Cardstock Stickers to fill in any empty spaces.
To add a bit more fun to the finished album I created handmade pompom charms in coordinating colors and attached them to the front cover using a gold clip.
I’m sad to see Christmas go but I’m also excited to move on to some spring-themed projects! And I love how my last project of the season turned out!
Thanks so much for stopping by my post today! I’ll see you next time! Happy New Year!
SUPPLIES: Patterned paper, embellishments, die cuts, stickers, embellishments: SUGARPLUM WISHES
Location: California, USA / Blog: Happy Crafty Studio / Instagram: @bambidearr / YouTube: bambidearr / Pinterest: bambidearr

15th Anniversary Mini Album by Paige Evans


Wednesday, January 17, 2024

Here is one of the mini albums from my Make Your Memory book with Better Day Books!

In the chapter about MINI ALBUMS you'll find the step-by-step photo tutorial to make this mini!

I used my Bloom Street collection to create a bunch of hearts then attached them together to create an accordion fold mini album.
On the front sides I added lots of coordinating embellishments.


On the back sides I embellished tone-on-tone.
All the photos are from our 15th anniversary that we spent at The Broadmoor Hotel! This year we'll be celebrating 17 years of wedded bliss!


I hope you are inspired to purchase my Make Your Memory book and try the tutorial to make your own heart-shaped accordion mini album!

SUPPLIES: Patterned papers, stickers, die cuts: Bloom Street
Paige Taylor Evans © // Quinn Creatives DESIGN