Best of 2019 Layout by Maija Männistö


Tuesday, December 31, 2019

Hi lovelies and happy Christmas time! Maija Männistö here to share my last project for 2019! It is time to recap the past year and it is the perfect topic for a scrapbook layout too. I created this Best of 2019 layout with Truly Grateful, filled with happy colors and joy, just like this year was for me!
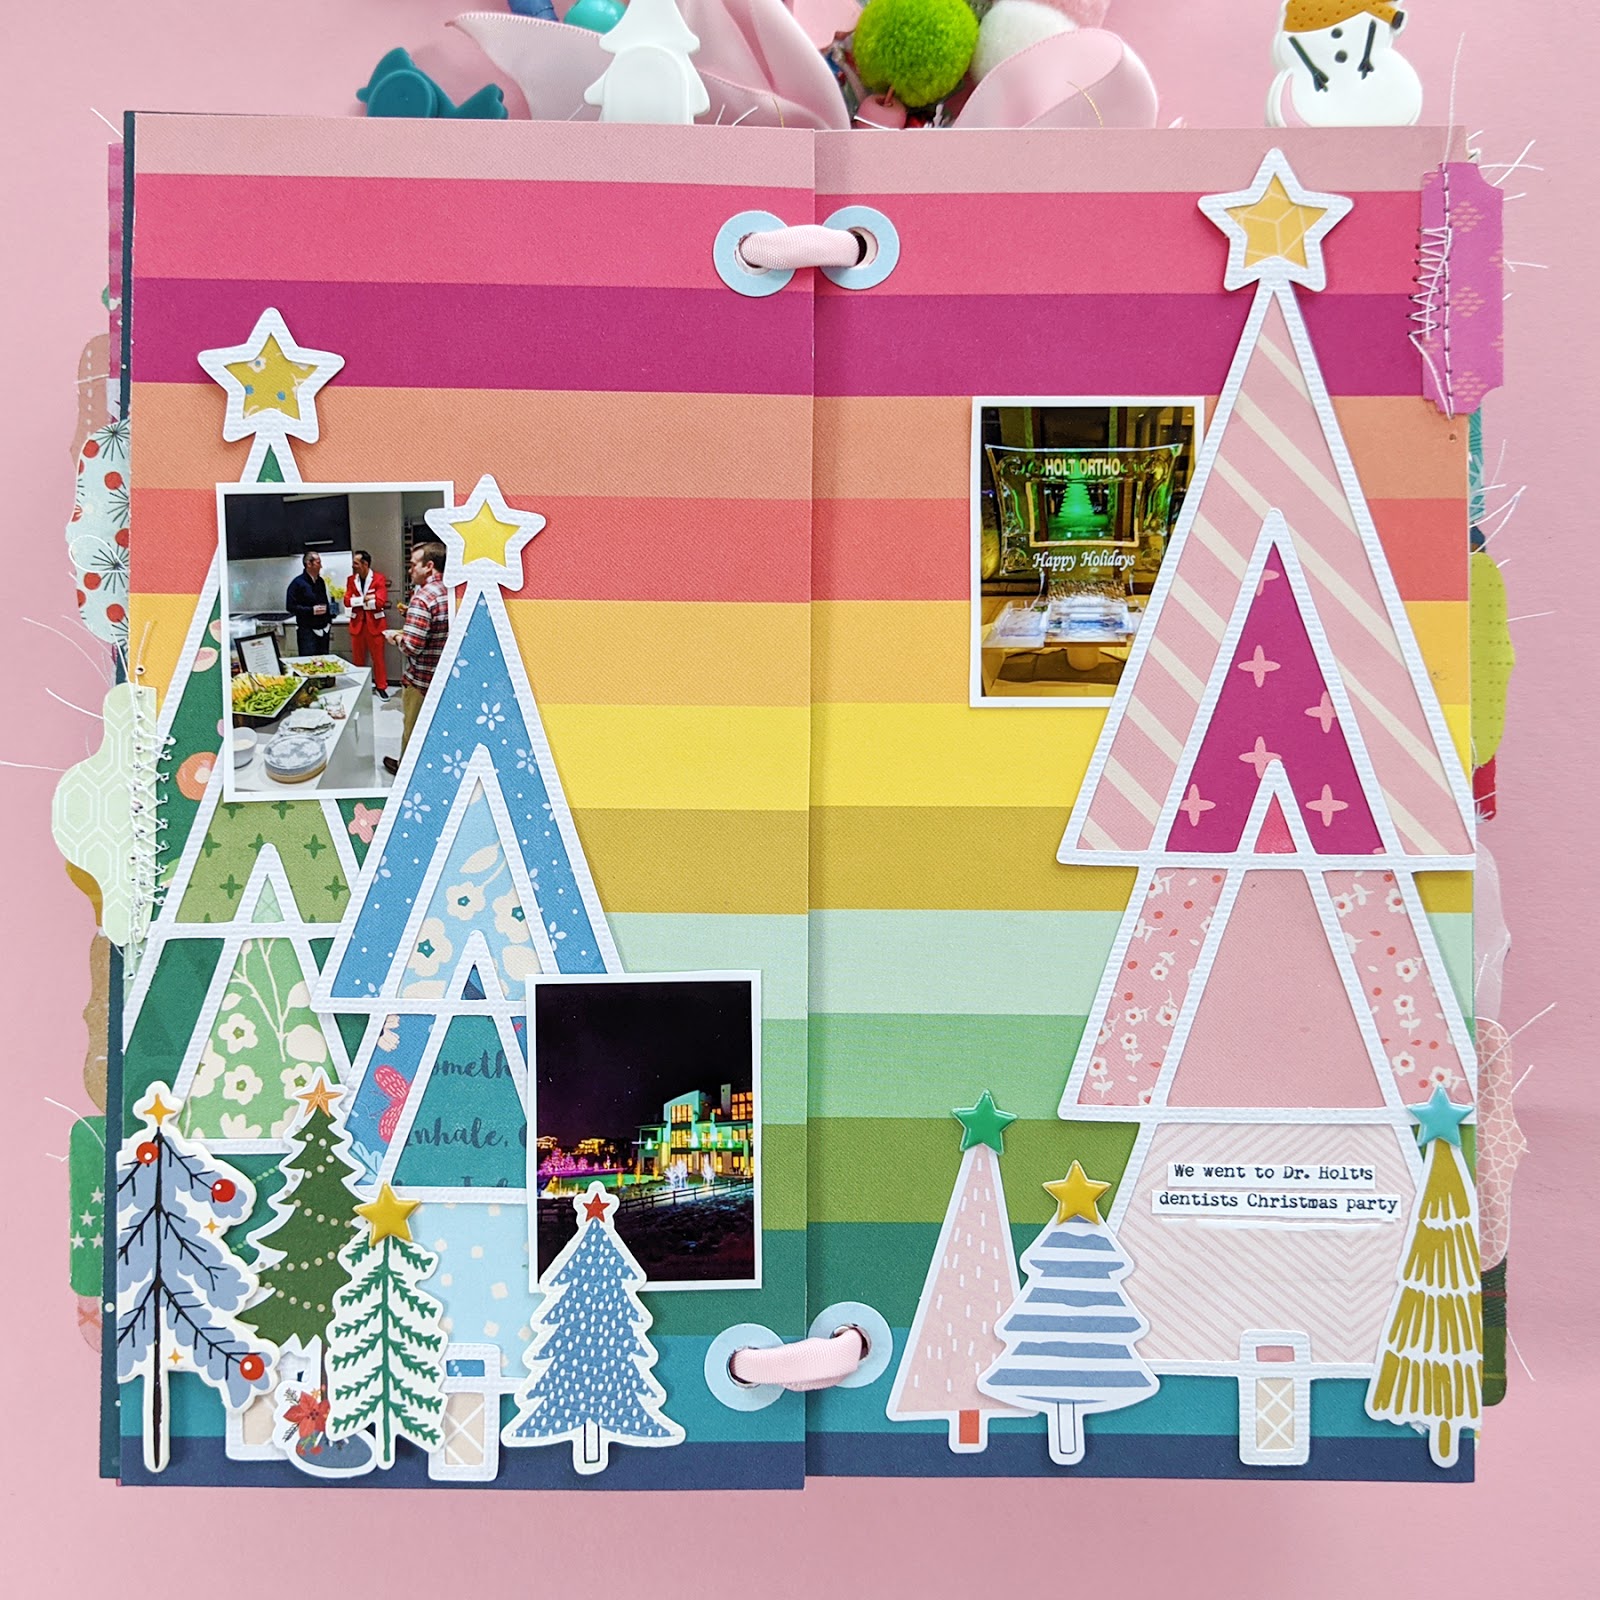
I wanted to add many photos for this layout so the Polaroid Frame Banner cut file is just perfect for this. This cut file allowed me to add several memories and highlights from 2019 and lots places to use embellishments. For the background I chose the B-side of Paper 06, a light purple ledger paper that isn’t a busy one but still wanted to tone it down a bit. I used gesso to prep the page and then painted with white acrylic paint and made some splashes with it too. I think this really helps the cut file to pop off the page! I sized by photos to match the frames and backed the cut file with the photos along with patterned papers from the 2x2 Paper Pads, the perfect size for this.

As a big fan of banners and pennants I wanted to add some more on the existing banner so I took two phrase banners from the Ephemera Die Cuts, stitched them with rose gold thread, and “hung” them on the banner. I wanted to add lots of small embellishment so I took two papers from the6x8 Paper Pad, one with flowers and one with trees. I fussy cut both and decided to decorate the frames with either trees or flowers. I also added flower and tree Cardstock Stickers on to the page itself to really go big with the themes I chose.

As I am not a big fan of journaling I wanted to add some sentiments on the page and the words and phrases in the Cardstock Stickers are just perfect for this. They also bring lots of color on the layout. For other embellishments I used the Epoxy Stickers to add hearts and other shapes to not only bring more color but also different kind of textures on the layout as well. And last but not least I added a title on the page with the Thickers - such a fun and colorful finish!

Thank you so much for stopping by today and HAPPY NEW YEAR!

SUPPLIES: Patterned papers, stickers, Thickers, die cuts: TRULY GRATEFULwhite acrylic paintgessowhite cardstock; Die cut machine: Silhouette Cameo 3; Cut file: Polaroid Frame Banner by Paige Evans
Location: Finland / Blog: Mai Makings / Instagram: @maimakings / YouTube: Mai Makings / Pinterest: Mai Loves

Mini Album Card by Lilly Sanchez


Monday, December 30, 2019

Hey guys, Lilly Sanchez here, here, welcome back to the blog. I hope everyone is keeping warm as winter is definitely creeping in. Jersey has been super cold hitting the low 30’s lately. BRRRR!!! But guess what, this post is bringing in some sunshine because we all know Truly Grateful is full of sunshine and butterflies!

Today I have finally created what I had on my to do list from the start with this collection. I also used one of my all time favorite cut files from Paige: Mini Album Card with Pocket Envelope and Tags.

I love this file so much, it is so much fun to play with. Not only is the file super easy to put together but Paige has a video showing you step by step how to assemble it. What more can we ask for!? I added stitching because I love to add texture to my projects, but you can totally do what works for you.

To decorate and embellish the album I used a bunch of pieces from the collection such as the  Ephemera Die CutsFloral Die CutsCardstock StickersPuffy Phrase StickersPuffy StickersEpoxy Stickers, sequins from the Mixed Embellishments, and Wooden Buttons. I also used a combination of papers that went together to make the album pop.

I am so happy with this project and I hope you guys like it too. I can’t wait to fill it with pictures of my girls and make it complete. Well that’s it for the post guys, until next time, stay crafty!

SUPPLIES: Patterned papers, stickers, wooden buttons, sequins, die cuts, embellishments: TRULY GRATEFUL; Die cut machine: Silhouette Cameo; Cut file: Mini Album Card with Pocket Envelope and Tags by Paige Evans
Location: New Jersey, USA / Instagram: @craftingwithliller / Facebook: Crafting with Liller
YouTube: Crafting with Liller / Pinterest: Crafting with Liller

This is the Good Stuff Layout by Stefanie Ried


Sunday, December 29, 2019

Hello everyone! Stefanie Ried here and welcome to a new layout! What could be more beautiful than to bring colorful colors to a white paper? I love it so so much!! Paige's collections offer a wide range of all colors. They're all so beautiful and versatile.
For my layout I used colorful yarns and different stickers, motifs, beads, sequins, etc. from different collections. I also have a weakness for ribbons & yarns. I collect them in a box they serve as decoration on my table.

The idea for this layout was born during my last mini album made with Truly Grateful. I also wrapped yarns around the book cover and attached the photos and beads to it. And since I did that in other projects, this time it was the colorful yarns. So that it doesn't get too colorful and too big, I only placed the yarns in the middle of the layout. I also hung the photo on the yarn. I think that will not be my last layout with yarns and embellishments, haha :)

Many thanks for stopping by!

SUPPLIES: Patterned papers, stickers, embellishments: TRULY GRATEFULwhite cardstock; Printer: Canon Pro-100; Photo paper: Canon
Blog: steffiried.blogspot.com / Instagram: @steffiried / Pinterest: @steffiried / Facebook: stefanie.ried.96 YouTube: Steffi Ried

Sketch & Stitch Snowflake Layout by Kelly Daye


Saturday, December 28, 2019

Hello friends, it’s Kelly Daye, I hope Christmas was super special this year and you also had time to scrap! I have a very tropical winter layout to share. A great many of my friends live in lovely warm places and they’re currently enjoying their summer. There’s no snow to shovel, their flowers are blooming, and warm sunshine fills the day. With a little wishful thinking and a whole lot of thread, I’m right there with them too!
I began with Paige’s Sketch & Stitch Snowflake cut file. Paige has designed her wonderful file to first sketch the design, then pierce all the holes for stitching too. Watch this video to see the magic happen. I used B-side of Paper 12 as my colour inspiration and a sheet of white cardstock. I’ve never attempted so much stitching for a layout before and honestly, it’s pretty addicting. I kept saying, “just a little bit more” and before I knew it, the clock rang 3:00 AM, ha!

There are many gorgeous Sketch & Stitch Cut Files to choose from. Since I was stitching with tropical colours, the snowflake is a bit of cheeky fun. After all the late night stitching, I didn’t want to cover up too much of it and carefully added just a few perfect embellishments from the Truly Grateful collection including Puffy StickersEphemera Die Cuts, and a beautiful frame from the Cardstock Stickers. Using Prima’s Pastel Dreams watercolors, I tapped on a very small amount of watercolour then added sequins and gold Stickles here and there.

I thought I was finished, but decided I needed a border. So I trimmed a scant 1/8" off each side of my design and taped it onto my colour inspiration. I chain stitched around with all the same colours, adding a few tiny sequins as I went. I’m pretty tickled with how it all came together.

Don’t be shy about the stitching. It’s fun, relaxing. and I guarantee you’ll feel so happy when you do one! Thanks so much for visiting and have a very Happy New Year!

SUPPLIES: Patterned papers, stickers, embellishments, die cuts: TRULY GRATEFULwhite cardstock; Watercolors: Prima - Pastel Dreamswhite cardstock; Die cut machine: Silhouette Cameo 3; Cut file: Sketch & Stitch Snowflake by Paige Evans
 Location: Edmonton, Canada / Blog: Kelly Made It / Instagram: @kellymadeit / Facebook: Petals Daye / Pinterest: Kelly Made It

Right Now Layout by Zsoka Marko


Friday, December 27, 2019

Hello crafty friends, Zsoka Marko here sharing my last layout with you for this year! WOW how fast this year went by again... I can't even believe it! This layout was inspired by my uber talented DT peer, Steffi Ried. I actually was going to flat out copy hers because I loved it so much, but when I was working on it, the layout just kept changing lol.
This tree Paper 07 is one of my favorites in Paige's Truly Grateful collection, it's such a sweet and colorful design. For a long time I had no idea what photo I could use with it, but then we went biking in the forest one weekend and it just all made sense.

I fussy cut all the trees, layered them up, and glued them together along the middle so I could bend up the sides to create dimension. In retrospect, I could have added colorful hand stitching to the branches but I didn't think of it at the time.

I chose polka dot paper from the B-side of Paper 17 for my background and I added a wide strip of green paper from the B-side of Paper 03 as a reference to the forest. I added a few layers of tissue paper behind my photo then tucked it all in behind some trees. I didn't add a whole lot of embellishments: a date label, an Epoxy Sticker bird, and a die cut banner from the Ephemera Die Cuts around my photo as well as Epoxy Sticker dots in between the trees. For my title I chose one of the Epoxy Sticker phrases because I love the font so much! It would have been a shame not to use it! I wrote my journaling next to the title, kind of filling up the empty space there.

That's it! Thank you so much for stopping by today as well as your continuous support over the year! I'm wishing a merry Christmas and a healthy, happy new year to you and yours!

SUPPLIES: Patterned papers, die cuts, stickers, embellishments: TRULY GRATEFUL

Blog: apocketfullofscrap.blogspot.com // Instagram: @zsoka_marko // Facebook: Zsoka Marko // YouTube: Zsoka Marko

Snow Layout by Jamie Pate


Thursday, December 26, 2019

And just like that Christmas is a wrap… but winter is still here. Hey, friends. Jamie Pate here. Today with my layout I am eager to share with you what will actually be part of my November stories in our family album. Snow. Yep. November was snowy for us. And I am telling that story here today with this snowy layout.
This photo pretty much sums up many days for us this past fall. It had to be told. Well. Mainly because I just wanted to cut up a bunch of snowflakes from Paige's Snowflake Border cut file and play. With the file up on my Silhouette screen, I ungrouped the snowflakes, and placed them in such a way that they were just going to cut on the cardstock. I just needed various snowflakes. And this cut file was perfect for that idea. I knew I wanted to randomly layer the cuts at the bottom edge of this layout which is an 8x8-inch page. The other thing I wanted to do was add a subtle touch of color by layering some of the snowflakes over Truly Grateful Paper 20. More snowflakes were cut on that paper as well.

Another little subtle idea I had was to add chunky glitter to the centers of some of the snowflakes. Not too much. Just enough. I just added liquid glue around the center of a snowflake. Then I scooped a tiny amount of glitter in place. I used my craft tweezers to move them around if needed. Using one of the Journaling Spots as a template, I added my own tab to the top so that it would match the vibe of the page. I created a pocket on the back of the photo for some hidden journaling. The card just slips in and out of that pocket.

STORY was added using the Puffy Phrase Stickers. Was so glad to come upon that word in white! The background was also cut with the same cut file. I just moved them around in the Silhouette software in a random array. This sort of creates a tone-on-tone background paper. But definitely adds to the theme of white-on-white and snow and snowflakes just everywhere.

If you have winter in your parts, and you are like me, you have to embrace the cold and gray. Might as well do it with a Snowflake Border + photo + story. Happy Winter, ya’ll!

SUPPLIES: Patterned paper, stickers: TRULY GRATEFULwhite cardstock; Die cut machine: Silhouette Cameo 3; Cut file: Snowflake Border by Paige Evans
Location: Colorado, USA / Blog: Jamie Pate Designs / Instagram: @jamiepate
YouTube: Jamie Pate / Pinterest: @jamiepate / Facebook: Jamie Pate Designs

December Daily 2019


Wednesday, December 25, 2019

Merry Christmas!! I am so excited to share my finished December Daily 2019 with you today!

First, here is a video flip through of the entire album so sit back, relax, grab a cuppa hot cocoa, and enjoy!

My December Daily this year took many twists and turns and forms and ideas. In the end I like how it turned out - gimme all the colors and I'm a happy girl :) Next year I'm going to KEEP IT SIMPLE. Pocket pages for sure! In the end I decided to feature my 25 Days of Christmas Cut Files, plus 14 more separate Christmas-themed designs, all of which can be found in my Etsy shop.

For the cover, I wrapped two pieces of chipboard sized to 4 1/4 x 8 1/4" (and then all of my pages within are 4 x 8") with a plaid patterned paper from the Snow & Cocoa collection by Crate Paper and used the Thickers from all of my Pink Paislee collections to create the "25 Days of Christmas" title. There are 39 spreads though, so don't hold me to the 25 days ;) I added a couple Wooden Buttons from my Truly Grateful collection as simple embellishments as well as a Christmas tree paperclip and silver snowflake sequin from my stash. The "2019" gold puffy number stickers are from the Together For Christmas collection and the rubber bird paperclip at the top is from the new Snowflake collection by Crate Paper.

As a finishing touch I like to create charms and dangling things to hang from the spine and this album is no exception! I used all three tassels from my brand new Pink Paislee collection which I can talk about on January 3rd - eeeps! Stay tuned!! Then I made a whole bunch of paper beads from various colorful patterned papers from my Pink Paislee collections and strung them together along with a few random bells and charms from my stash. On a metal tag that came from packaging I added "2019" number stickers to both sides. Love the eclectic vibes and even the jingle bell sounds of this charm situation.

Once my album was assembled I was having a hard time turning the pages - tabs to the rescue! I found a bunch of different tabs in Silhouette, sized them all to the same width, and then cut a whooooole bunch of them from a rainbow of patterned papers in my stash and Christmas collections. I stitched them randomly to the edge of each page and now turning each and every page is so so so easy! Not only that, but I LOVE the pops of color, texture, and whimsy they add to the edges. Win win all around :)

Let's take a look at every page shall we! For the title page I used my Christmas Tree Border cut file (or find it with the backing pieces here or in a great bundle with 38 designs here) and backed it with the Snow & Cocoa collection from Crate Paper. I trimmed a piece of patterned paper from the Snowflake collection to 4 x 8" then splashed watered down white acrylic paint and liquid gold paint on top. I trimmed the cut file in half and adhered the pieces with thin foam squares to create depth and shadows. 99% of the journaling in this album is typed in the font Remington Noiseless at size 8, printed, trimmed into strips, and glued in place.

Now is a good time to mention that I had my Silhouette Cameo cut out allllllll of the backing pieces for every single cut file you'll see throughout this album. Imagine fussy cutting every single tiny piece by hand! No way, not happening. BUT, by simply trimming pieces of patterned paper and aligning them on a Silhouette mat, I was able to cut out all of the backing pieces for every design in one pass and then spent time gluing them in place. Not gonna lie, it still took me two whole weeks to back all of these cut files, but I think I saved a month of time by having the machine cut the backing pieces for me. SO, all that said, you can find the bundles with backing pieces here: 25 Days of Christmas Cut Files With Backing Pieces Bundle or 38 Christmas Cut Files With Backing Pieces Bundle. Trust me, worth it.

ALSO! On every single page I used the Reinforce Hole Punch to make little patterned paper hole reinforcers to go over the punched holes - this not only adds a pop of color and pattern but will keep the album held together for much longer than if there weren't the reinforcers.

Continuing on... Here is the 2nd spread! I used the Ornaments cut file from my 25 Days of Christmas Cut Files With Backing Pieces Bundle and used a bunch of different bright patterned papers from my Pink Paislee collections to back it. After using the same five or so Christmas collections to back about 20 cut files I turned to my pile of Pink Paislee patterned papers in rainbow order to pick and choose papers to get a new look.

This Noel cut file is from my 25 Days of Christmas Cut Files With Backing Pieces Bundle and I used my Truly Grateful collection to back it and embellish a little. We went to the Gaylord Rockies Hotel to check out the Ice exhibit and I took so.many.photos. I couldn't narrow them down anymore so I used Picasa to create a collage and printed them at home on my Canon Pro-100 printer with high quality Photo Paper. All of the photos in this album were printed n my Canon Pro-100 printer with this high quality Photo Paper. A lot of the time I get my photos printed at Costco, but I needed such unusual sizes and needed them quick so printing at home was the best option for me this year.

Here I used the Snowglobe cut file from my 25 Days of Christmas Cut Files With Backing Pieces Bundle and used the old Sweater Weather collection from Pebbles to back it. Movies and shows are a huge part of our Christmas traditions, how 'bout you?

This Snowflake Wreath cut file is also from my 25 Days of Christmas Cut Files With Backing Pieces Bundle. The few spaces there are to back were done so with my Take Me Away collection and then I watercolored over it using my favorite Pastel Dreams watercolors.

On this spread I used the Lightstrand Background cut file from my 25 Days of Christmas Cut Files With Backing Pieces Bundle and used all the bright colors from Horizon to back it. The subtle background paper is from Pick-Me-Up and then I added a few clear gems around the page for interest. I incorporated the journaling around the edges to keep the focus on the photos and cut file.

This is kinda funny, I used the Falala collection from Crate Paper to back this Falala Cut File from my 25 Days of Christmas Cut Files With Backing Pieces Bundle. Again I had too many photos to choose from so mini is the way to go.

I did mixed media on the background of this page using a snowflake stencil and white modeling paste scraped through. Once dry I added three Snowflakes (also from my 25 Days of Christmas Cut Files With Backing Pieces Bundle) backed with monochromatic blue papers from a bunch of different collections.

This spread features my Nordic Background Cut File with Backing Pieces and I used a variety of colors of paper to back it. This design creates such a fun texture with all the tiny squares, I didn't want to cover much of it up so I only added two photos, printed journaling strips, and a baker's twine bow.

The star of this page is the Poinsetta Wreath cut file. I'm learning to let Jane help me more in the kitchen.

This Tree Circles cut file from my 25 Days of Christmas Cut Files With Backing Pieces Bundle was backed with Turn the Page and features a special photo of four generations of girls in my family. This photo was taken over Thanksgiving, so not even during December, but I really wanted to include it because it means so much to me. I did a bit more embellishing than usual with bits and pieces also from Turn the Page.

Truly Grateful is not a Christmas collection, but by picking and choosing colors I was able to back this Christmas Glamper cut file and make it festive.

This Lightstrand Border cut file can be found for free in my Facebook Group, or you can grab it with the backing pieces in Etsy. I used Horizon with its bright, festive, and fun colors to back it and documented my December Daily - how meta :)

This here Christmas Teacup cut file was backed with one of my all-time favorite Christmas collections: Juniper Berry by Basic Grey. They have been gone for a long time, but I've still hoarded this collection.

Also using the Juniper Berry collection, I backed this Reindeer cut file from my 25 Days of Christmas Cut Files With Backing Pieces Bundle. Hey that's me! I got dressed up for once! Usually you can find me in a pair of sweats :)

"If kisses were snowflakes I'd send you a blizzard" except I wouldn't because snow isn't my favorite lolol. This cut file is from my 25 Days of Christmas Cut Files With Backing Pieces Bundle and I used monochromatic blue papers to back it.

Aspen is the best babysitter! She built our gingerbread tree with the kids while we went and saw Knives Out. So I just had to use this Gingerbread Village Border cut file from my 25 Days of Christmas Cut Files With Backing Pieces Bundle to go with the photo. I used stickers from Hip Kit Club to coordinate and pastel papers from Take Me Away to back the teeny tiny pieces. Seriously, thank goodness for the Cameo to cut such small backing pieces! You may notice the splashed white acrylic paint and Pastel Dreams watercolors to bring out the colors in the houses.

This Christmas Stocking cut file is from my 25 Days of Christmas Cut Files With Backing Pieces Bundle and I used Together For Christmas to back it. I clipped on a rubber Christmas tree paperclip from the Snowflake collection to the top and added a mouse sticker from Hip Kit Club. Easy does it!

These Mittens are the first cut file I sent out with the 25 Days of Christmas Cut Files. I used Merry Days from Crate Paper to back it and create this spread.

This is one of my favorite cut files, the Christmas Frame cut file. I used my Whimsical collection to back it which is not Christmas-themed, but again, it's all about the colors! The splashing of white acrylic paint across the background is reminiscent of snow and I documented our colorful holiday decorations.

Oh wait, I love this cut file too :) It's the Nutcracker from my 25 Days of Christmas Cut Files With Backing Pieces Bundle and I used Snowflake to back it. Before adding the photo and backed cut file, I used gold modeling paste through a stencil to create a bold background texture.

To go along with the Nutcracker, one must also have a Fairy Ballerina (from my 25 Days of Christmas Cut Files With Backing Pieces Bundle). To help it coordinate with the Nutcracker I also used the Snowflake collection. I really loved playing the piano again with purpose.

This page featuring the Truck with Trees cut file from my 25 Days of Christmas Cut Files With Backing Pieces Bundle documents two stories: getting pulled over for the very first time in my life (whomp whomp, and yes I got a ticket) and then also doing a session for my very first time at the Denver Temple with a lovely Nativity scene out front.

Another memory made over Thanksgiving but special enough to include, we visited the very art history room and chairs where we met nearly 16 years ago. I paired this photo with my Poinsettias cut file.

This Holly cut file is from my 25 Days of Christmas Cut Files With Backing Pieces Bundle and I backed it with an assortment of red, green, and mint patterned papers. I splashed white acrylic paint and liquid gold paint across the background and added a trio of photos across the middle which meant trimming the center photo in half.

Trees is the name of the game on this spread! I used the Christmas Tree Trio cut file from my 25 Days of Christmas Cut Files With Backing Pieces Bundle and used Whimsical to back it in all the colors. The additional trees across the bottom are from Hip Kit Club.

This Llama is also from my 25 Days of Christmas Cut Files With Backing Pieces Bundle and I used the bright & fun Snow & Cocoa collection to back it. I used the white glitter paper from the Together For Christmas project pad to create the snowy hills across the bottom.

Joey the dog and Rachel the cat must be included! This Wreath cut file from my 25 Days of Christmas Cut Files With Backing Pieces Bundle is a full wreath, but I trimmed it in half and added the halves to the pages for a different look. The splattered white acrylic paint and liquid gold paint across the pages add texture and shine.

Can't forget Phoebe the bunny! I backed the Starry Sky cut file from my 25 Days of Christmas Cut Files with a single colorful plaid paper from Truly Grateful to create an all over colorful spread. There is a little bunny Puffy Sticker in Truly Grateful which was meant to be included here :)

I backed this festive Christmas Banner cut file with solid colored papers from the Together For Christmas project pad and splashed liquid gold on top for shimmer & shine.

More Thanksgiving photos! I had enough pages so why not :) I backed the Candy Cane Poinsettia cut file from my 25 Days of Christmas Cut Files With Backing Pieces Bundle with an assortment of Christmas papers to get the colors I wanted.

This December cut file was backed with a rainbow of papers and I added some fitting sentiment Cardstock Stickers from Truly Grateful to embellish.

Once again I used Truly Grateful and I backed my Cabin cut file with it. This house though!!

One of the only pages where I added hand written journaling, this spread features my Banner cut file from the 25 Days of Christmas Cut Files With Backing Pieces Bundle and I used the Snowflake and Merry Days collections from Crate Paper to back it. We have many Christmas Eve traditions which I treasure.

Yay for hugs that are given without us even asking! Too cute! I used my Stamp cut file from the 25 Days of Christmas Cut Files With Backing Pieces Bundle and backed it with the Together For Christmas collection.

More Christmas Eve tradition photos were used with this Christmas cut file and I used colorful papers from Truly Grateful to back it, mostly following how Elsie backed it for her design team project.

The last cut file I sent as part of my 25 Days of Christmas Cut Files, this Sleigh was backed with Snow & Cocoa papers and I added a photo of the Christmas carnage!

Find this Christmas Tree Phrases cut file for free in my Happy Scrappy Place Facebook Group or with the backing pieces in Etsy. I used the uber bright and colorful Paper 03 from Horizon to back it and tell the story of Fox & Jane opening their stockings.

The last page of my December Daily 2019 features the Gingerbread Man Background cut file, cut in half and backed with an assortment of patterned papers. Notice the Pastel Dreams watercolors peeking from behind the gingerbread men to bring out pops of color.

And that's it my friends! Whew! What a fun project! I loved working on this album throughout the month and I hope you have found a thing or two to inspire you. Please let me know if you have any questions about anything and I will reply ASAP!

Merry Christmas and happy holidays! See you again soon!
Paige Taylor Evans © // Quinn Creatives DESIGN