Beautiful Sunshine Layout by Missy Whidden


Tuesday, June 30, 2020

Hey friends! Missy Whidden here with a fun summery Bloom Street layout featuring Paige’s new Flower Garden Background Stencil. I was inspired by the dark blue background from Paper 02 and how all the bright flowers just pop right off the page. I wanted to recreate that dark blue background incorporating some mixed media, so that is where this page began. I used thick white cardstock as my base and I coated all of it with clear gesso first. I scraped white modeling paste over the stencil covering the entire page. Once that dried, I used a few blue Shimmerz sprays to create a pretty blue color wash. I fussy cut lots of flowers from Paper 02 and Paper 12 and arranged them around my photos.
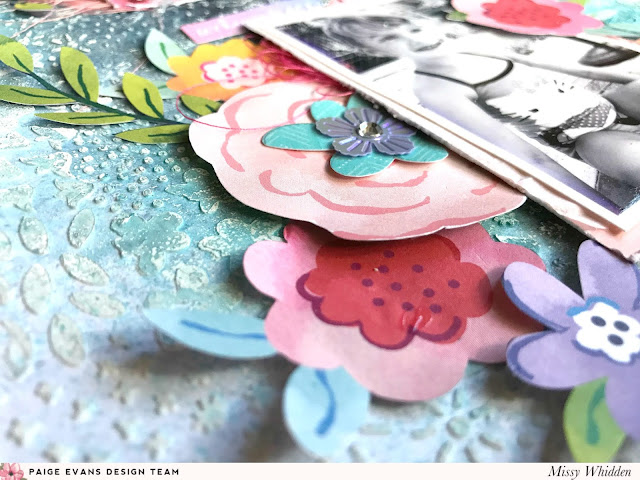
The texture turned out so awesome! It’s nice and raised off the page and very bumpy to touch. Once the blue sprays dried, I used a foam ink blending tool to lightly smudge white acrylic paint over some of the raised edges - this helped to give the shapes a little highlight and pop off the page a little more. I scattered the flowers all around the photos, making sure to get lots of different colors all over the page. I added in matching tangled thread in a few places as well.

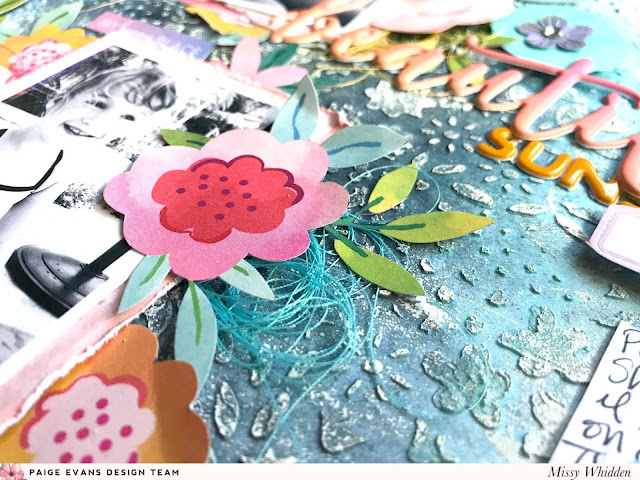
I love mixing and matching flowers and these went together perfectly! I wanted to add in a few turquoise colored flowers, so I used a roll of the Washi Tape to do that. I put some strips of tape down on scrap white cardstock and simply traced a few of these other flowers and then cut them out. Easy peasy! To top them off, I used a few of the purple flower sequin shapes from the Mixed Embellishments. For the centers, I added the clear rhinestones from the same Mixed Embellishments pack.

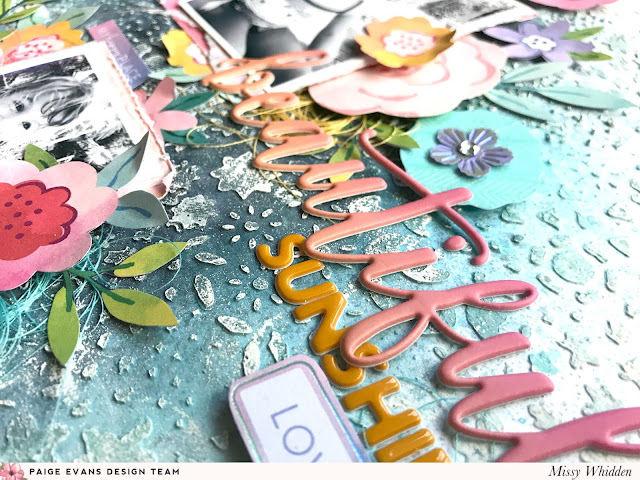
I used one of the Puffy Vinyl Stickers for my title and combined it with one of the Truly Grateful Puffy Phrase Stickers. It was a perfect match! I love how the “beautiful” piece stretches across to the cluster over on the right of the page. I used more flowers and a few Cardstock Stickers for that.

I really love how this page turned out and I hope it gives you some fun ideas to try on your next layout! Paige’s Stencils are just amazing!  Have a great week!
SUPPLIES: Patterned papers, stickers, die cuts, washi tape: BLOOM STREET; Puffy phhrase stickers: TRULY GRATEFULFlower Garden Background Stencilgessomodeling pastewhite acrylic paintwhite cardstock
Blog: littlenuggetcreations.blogspot.com // Instagram: @missywhidden // Pinterest: @missywhidden
Facebook: missy.whidden // YouTube: Missy Whidden

Pitlochry, Scotland Folding Squares Mini Album


Monday, June 29, 2020

I have a new Folding Squares Mini Album to share with you today created with Bloom Street which documents our hour in Pitlochry, Scotland! I have a step-by-step photo tutorial on THIS blog post for assembling the base of this type of Folding Squares Mini Album, and a video YouTube tutorial HERE.
Here is a quick flip through so you can see how this mini album looks "in-person":

For this mini album I cut the five folding squares from Paper 03Paper 08Paper 09Paper 14, and Paper 18. As I glued them back-to-back I created pockets to hold tags by only adding adhesive on the left, bottom, and right edges. Now I have more space for additional photos and journaling - win win!

On the cover I added the title made with the mini alphas from the 4-Page Sticker Book and framed it with a Floral Die Cut trimmed in half. To keep the album closed I stapled a piece of purple gingham ribbon to the front and back covers. When closed, the album is 3 1/2" square and each individual section when opened is also 3 1/2" square.
Each section opens up to reveal a plethora of photos and embellishments! In this open square I used a combination of Puffy Vinyl StickersCardstock StickersFloral Die Cuts, and pieces from the 4-Page Sticker Book. The right section holds a full 3 1/2" square photo.
For the journaling, I copied and pasted our blog post re-cap of Pitlochry, changed the font to Remington Noiseless at size 8, printed it out, and trimmed it into strips. I used liquid glue to attach the journaling strips in place. I kept this square on the monochromatic side and used purple and blue embellishments. Both top sections have a full 3 1/2" square photo.
Notice I notched the top left edge of each section to help make taking the tag out a little bit easier. To do this, I simply used a circle punch and only placed it halfway down to punch a semi-circle notch. The photo on this section is 3" square with a white border - I printed my photos at home on my Canon Pro-100 printer using Canon photo paper.
This section has lots of PINK and a few other pops of color. I layered a lot of pink flowers on the bottom left triangle section. Have fun playing with the angles of this type of album!
By cutting the Floral Die Cuts in half and adhering them on opposite sides of the crease, the album still folds up nicely.
Here are the fronts of the four tags that are tucked into the pockets. This way I was able to add additional photos and embellishments. I stapled pastel ribbons from my stash to the top of each tag for texture, color, and to help make pulling out the tags easier.
And here are the backs of the tags with bits of Bloom Street embellishments:
The album splays out into a fun star shape and the ribbons that hold the album closed can also be used to keep the album opened. Dual purpose!
A mini, mini album for sure and a fun way to keep memories preserved! I hope you are inspired to pick up my Bloom Street collection and Folding Squares Mini Album cut file! 
SUPPLIES: Patterned papers, stickers, die cuts, embellishments: BLOOM STREET; Cut file: Folding Squares Mini Album by Paige Evans; Ribbons: American Crafts

Joy Layout by Anita Bownds


Sunday, June 28, 2020

Hi crafty friends, Anita Bownds here with you sharing a layout about my kitty using the Bloom Street collection and the Flowers cut file. I so love how my cat Kush hops on the bed and just makes himself comfy. I wanted to create a layout with softness using the Flowers cut file as texture and dimension behind my photo. What’s great about cut files is they have many uses from backing them to using them as stencil or just using them plain like a doily and that’s the look I was after for my layout today.
I started off with white cardstock and framed it with a floral paper from the 12x12 Paper Pad. Next I flicked lavender spray across the background and left it to dry.
I used my Silhouette Cameo to cut out the Flowers cut file on white cardstock then added it in the center of my background and started to build my layers behind my photo using papers from the 12x12 Paper Pad. I tucked a tag and a few Ephemera Die Cuts into the layers then using the Floral Die Cuts I added flowers around my photo tucking them in two corners to add to the flow across the page. To add more color to my layout I used Washi Tape at the top and bottom.
Using the 4-Page Sticker Book I added stickers around my photo. Then I used Puffy Word Stickers to add my title and a couple of Layered Butterfly Stickers to finish it off.
I hope you have enjoyed my inspiration today! Happy crafting!

SUPPLIES: Patterned papers, stickers, die cuts, washi tape, embellishments: BLOOM STREETwhite cardstock; Cut file: Flowers by Paige Evans

Location: Australia / Blog: Neat-N-Crafty / Instagram: @anitabownds / Facebook: Anita Bownds
YouTube: Anita B / Pinterest: Anita Bownds

Hello Sunshine Layout by Nidia Rubio


Saturday, June 27, 2020

Hi, friends! Nidia Rubio from Scrapamundi here sharing with you my newest layout using Paige's collections and cut files! This time I mixed scraps from Bloom Street and Truly Grateful.
The Pennant Banner Background cut file made the whole page come together. Do you believe only a cut file could make this wonderful effect? I stuck different scraps on it and mixed them with mini shaker banners.

I used both gesso to emphasize the photograph and vellum under the words. Also, I added some sequins and enamel dots dispersed throughout the layout for pops of color.

I hope this layout could inspire you. Thank you for stopping by!

SUPPLIES: Patterned papers, stickers: BLOOM STREETTRULY GRATEFULwhite cardstockgesso; Die cut machine: Silhouette Cameo; Cut file: Pennant Banner Background by Paige Evans
Location: Spain/ Blog: Scrapamundi / Instagram: @scrapamundi Facebook: Scrapamundi
YouTube: Scrapamundi / Pinterest: Scrapamundi

Love Layout by Stefanie Ried


Friday, June 26, 2020

Hi friends, it's me, Stefanie Ried, and welcome to another layout with the beautiful Bloom Street collection. Do you feel the same way, that if you have such a beautiful collection that you can't stop doing more things with it? I have that feeling with this collection. The colors are just totally my style. And since we have to stay at home most of the time, the collection just feels so good.
I rummaged through the papers and chose some light-colored papers: Paper 08Paper 10, and Paper 17. I really like this color combination. In April we took some pictures outside in the garden. These bright photos match the colors perfectly.

Since the photo is quite small, I wanted to make several frames. To make the frames stand out better, I put white cardstock in between. I cut all the papers to concentric squares and glued them on. Then I curved the edges upwards with my fingers for texture and dimension.

This layout came together quickly, I was quite surprised! See you next time!

SUPPLIES:
 Patterned paper, stickers, die cuts, enamel dots, embellishments: BLOOM STREETwhite cardstock
Blog: steffiried.blogspot.com / Instagram: @steffiried / Pinterest: @steffiried / Facebook: stefanie.ried.96 YouTube: Steffi Ried

2020 Planner Spinner by Mik Godinho


Thursday, June 25, 2020

Hi friends! It’s Mik here from Papermiks back here, sharing some more planner inspiration using the Bloom Street collection and Paige's Wedges cut file.
For those who remember, last month I created a special planner for the International Scrapbook Day challenges in Paige’s Facebook group, Happy Scrappy Place. Today I decided to make a new cover for it. I started by die cutting the Wedges cut file from white cardstock on my Silhouette Cameo.

For the background, I cut two 6x2” pieces from Paper 06 and then glued them on the left and right sides of my cover. Next, I glued Paper 22Paper 21Paper 20Paper 16Paper 14Paper 08Paper 06Paper 05Paper 04Paper 03 on the wedges and then added hand stitching between each one for detail and texture.

Once the background was ready, it was time to cut a circle to make my multi-wedged calendar. The concept is creating a rotating centralized disk on the back so as to display movement on the top window of the front cover.

I made a flower brad to connect my multi-wedged circles and the circle on the back at their center. This gives us a solstice semi-calendar from July to December. I love it! I also added a few enamel dots and Puffy Word Stickers to embellish.
I hope you’ve got some inspiration from this idea and enjoyed it! Thanks for stopping by and have a creative day!

SUPPLIES: Patterned papers, stickers, die cuts, embellishments: BLOOM STREETwhite cardstock; Die cut machine: Silhouette Cameo; Cut file: Wedges by Paige Evans
Location: Bolivia / Instagram: @papermiks / Facebook: mik.godinho.papermiks 

Mixed Media Mini Album Tutorial


Wednesday, June 24, 2020

Heeey friends! I have a new mini album to share with you today, focusing on mixed media and my new STENCILS and then I embellished with my old Whimsical collection (sold out now but you can find the entire digital collection HERE).
Here is a tutorial for creating the base of this mixed media mini album and then a flip through at the end of the finished book:
I began by die cutting six 5 3/4" hearts from thick, white, smooth Bazzill Basics cardstock. Then I coated the front side of each heart with white gesso and let them dry and then coated the backs and let them dry. Next I grabbed my STENCILS (I currently have 7 available for purchase)...
...and scraped white modeling paste through with a palette knife to create awesome texture on the front of each heart, let them dry, then did the backs - one design per side so I could feature all 12 of my STENCILS.
Once the modeling paste dried, I grabbed a piece of sandpaper and smoothed the edges. Time for paints and sprays! I used a different color of acrylic paint on each heart and used lots of water and picked up some of the excess with paper towels. I sprayed coordinating colors and dropped inks on top for more interest and let everything dry between coats.
To assemble the album I figured out the order I wanted the hearts and then used a scoring board and scored 1/2" from the left side of each heart. I piled the hearts together and machine stitched repeatedly down the left edge. The base is complete! Time for photos and embellishments! I decided to make this album about Fox and Jane so far in 2020. Again, I used my Whimsical collection so everything you see is from it.
The cover features my old Doily STENCIL then I layered stickers and made the title. On every page I added a tassel paperclip for texture and to help turn the pages.
Here is the first spread with my Flowers stencil on the left and Sunburst Rays stencil on the right. I tried to keep the stickers and photos layered together in clusters to let the texture from the backgrounds shine through. It's a bit of a sticker sneeze situation, and I'm A-OK with that :)
The first page features Fox and Jane on their last day of in-person school at the beginning of March. There are a lot of school and craft-themed embellishments in Whimsical so it fun to add as many as I could to this page.
The second page has pics of the kiddos eating at some of our favorite places.
I had lots of pictures I wanted to include so I stapled 4 of them together and added them to the top right side.
The second spread has the Leopard Print stencil on the left and Chevrons stencil on the right with more clusters and photos of Fox and Jane being their cute selves.
On the third spread I used the Tiles and Flower Garden stencils on the third spread with layered pics of them in the great outdoors on the left and gaming together on the right.
The fourth spread uses my Wonky Hearts and Polka Dots stencils and photos from Easter and the last movie we saw in the theaters before quarantine.
On the last spread I used my older Heart Confetti stencil on the left and Fish stencil on the right with photos of the kids hugging and then swimming in various bodies of water.
The back cover features my old Star Confetti stencil. If there is enough interest in my retired stencils I can place a new order for them, just let me know in the comments. Otherwise, you can find all of my current stencils HERE.
I hope you enjoyed seeing how this mixed media mini album came together! It was a fun creative exercise for someone who doesn't particularly love the messy side effects lol :) But the results are totally worth it! I hope you're inspired to pick up my STENCILS and get crafty! See you again soon!
SUPPLIES: STENCILSBazzill Basics cardstockgessomodeling paste; acrylic paints; sprays; scoring board; Patterned papers, stickers, Thickers, tassel paperclips, embellishments: WHIMSICAL digital collection
Paige Taylor Evans © // Quinn Creatives DESIGN