Adventure Layout by Paige Evans


Sunday, January 31, 2021

 This layout titled ADVENTURE appears in the Winter 2020 issue of Scrapbook & Cards Today Magazine! It features my Go the Scenic Route collection and Globes cut file.

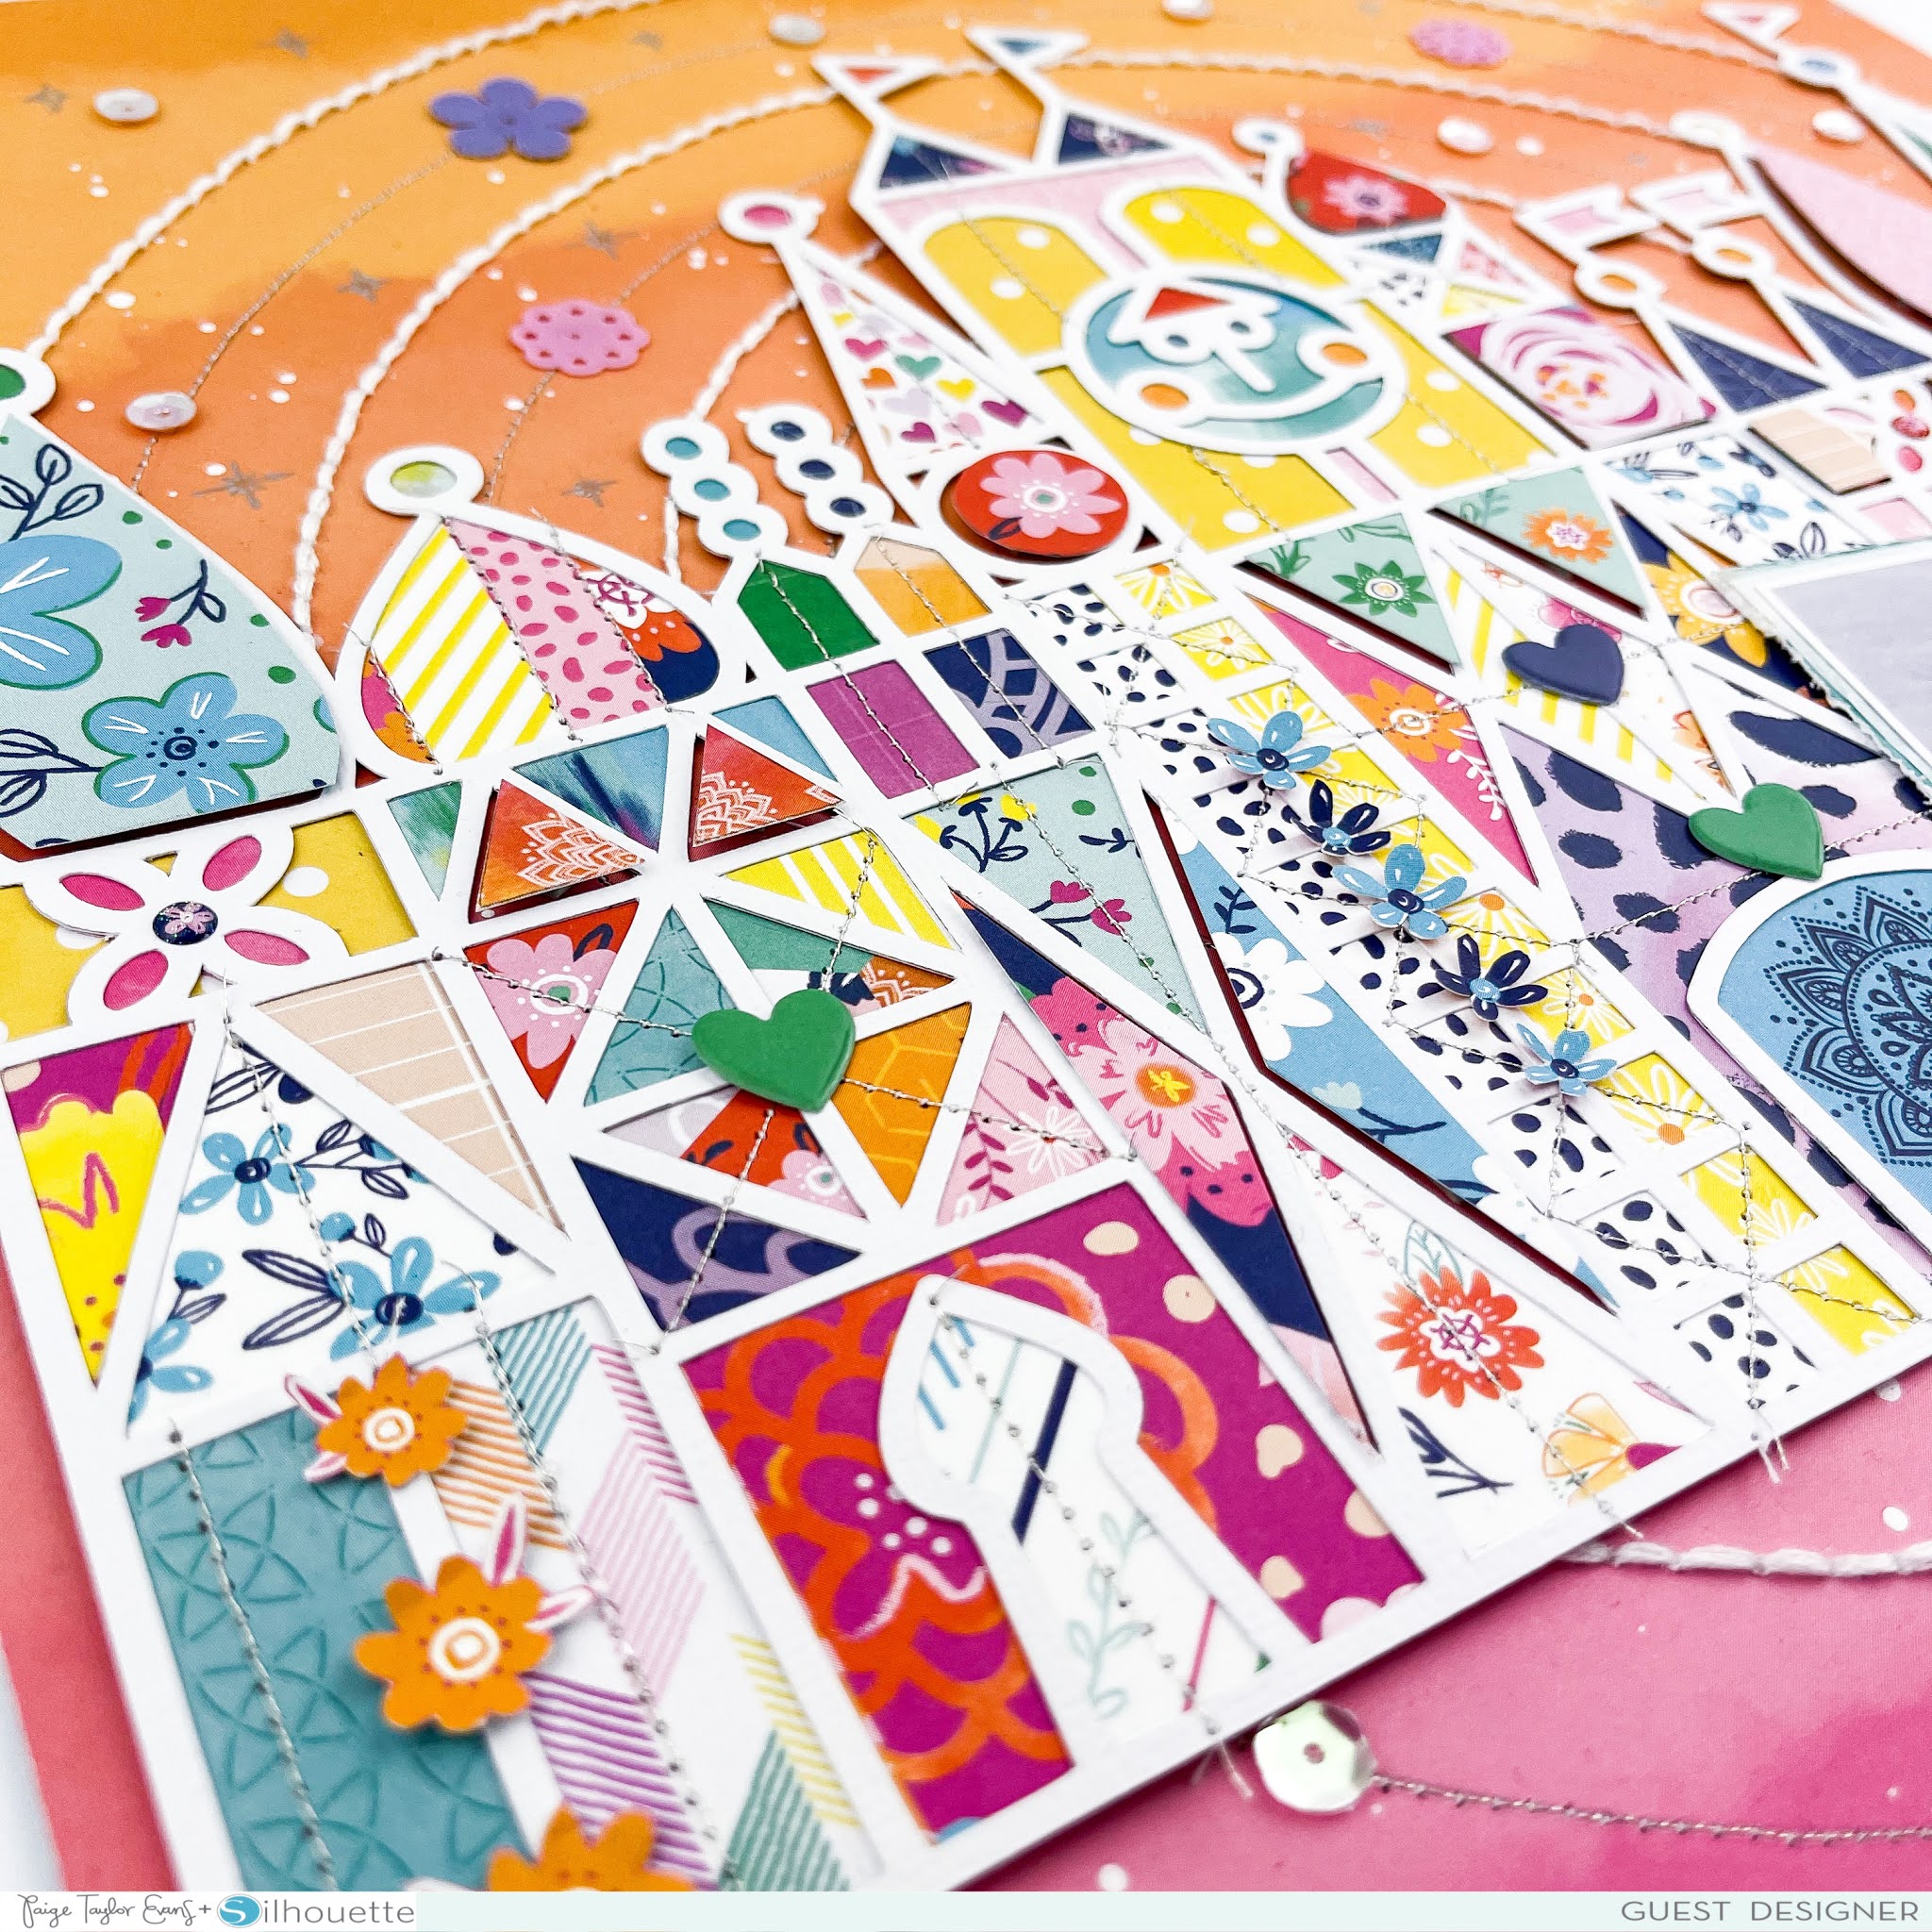
I started by die cutting the solid Globe from the middle of the blue ombre B-side of Paper 15. Then I cut the outline Globe from white cardstock and adhered it on top of the cut out globe with liquid glue.

On a piece of light blue textured cardstock, I lightly traced the globe on top then I started arranging a bunch of travel-themed Ephemera Die Cuts inside the drawn globe in a loose grid design. Once I liked the placement of the die cuts I attached them in place with foam squares for dimension. I added Enamel Dots tone-on-tone for texture and interest on top of some of the die cuts.
I placed the globe background on top and then added a photo of Jane from last summer to the bottom right side. I tucked a bunch of Ephemera Die Cuts under the photo to draw attention to it and wrote journaling on a round spot on top.

I created the colorful title "ADVENTURE" around the curve of the globe using the Foam Thickers. To finish, I stamped the date with a blue pen as ink on one of the die cuts inside the globe. I hope this layout inspires you to check out the Winter 2020 issue of Scrapbook & Cards Today Magazine and pick up my Go the Scenic Route collection as well as the Globes cut file. See you again soon!
SUPPLIES: Patterned papers, die cuts, Thickers, stickers, enamel dots, embellishments: GO THE SCENIC ROUTEwhite cardstock; Die cut machine: Silhouette Cameo; Cut file: Globes by Paige Evans

Paper Herringbone Layout by Paige Evans


Saturday, January 30, 2021

 Hey friends! I have a new layout and process video to share with you today made for SaraScrap's YouTube Party Hop! 5 years on YouTube is definitely cause for celebration :)

Here is the process video and be sure to check out all the other scrapper's videos in the hop:
The inspiration for this layout came from when I was working on my December Daily 2020 - I backed the Star Quilt cut file from my 25 Days of Christmas Cut Files with a few papers from my old Turn the Page collection (find the digital version here: Turn the Page Digital Collection) and I fell in love with the colors all over again. I had 8 little rectangles of patterned paper sitting on the corner of my desk since December, waiting for the right assignment to make a full layout out of those papers and the time finally came!
I also had a blast with this layout - even a blast from the past! I file my layouts away chronologically and I had a blank page in Fox's scrapbook between July and October 2011. We went to Hawaii then so I challenged myself to find and use photos from that vacation to fill in that space in his scrapbook. Done and done! Love getting things checked off my "to scrap" list :) It was so fun to go back through all of those photos of baby Fox, he was only 10 months old. Now he's 10 years old! Thank goodness for scrapbooking to remind us of all the great times!
Back to the layout! I punched (8) 1" squares from the 8 12x12 papers that I love and then grabbed a colorful one with gold foiling from the 6x6 Paper Pad to tie all the colors together. Once all of the squares were punched I grabbed 4 at a time and cut them in half to create a whoooole bunch of rectangles.
I chose a textured off-white cardstock for the background and did a little bit of mixed media on it for a first layer: I splashed watered down white acrylic paint and my favorite Pastel Dreams watercolors all across the background then sped up the drying process with a hair dryer I keep at my desk. Super handy! Once the background was dry I needed to figure out the placement for the rectangles. We're about to re-do our kitchen so I've been looking at a lot of tile designs for backsplash - I love the herringbone pattern and decided to try that with the patterned papers.
I quickly placed the rectangles without adhesive into the herringbone pattern across the top and bottom, decided I liked how it was looking, and adhered them all in place with foam squares for dimension. This is the part that took the longest, I'd say about 2-3 hours to attach them all. Then I found these two photos of Fox in Hawaii, printed them at home into 3x4", and trimmed them out leaving a border. Since the photos were vertical I decided to rotate my layout so the background was also vertical. I overlapped the photos at the bottom and tucked floral die cuts under and around to mimic the tropical vibes of Hawaii. Between the herringbone pieces I added the title "HAWAII" with the Turn the Page Thickers. Three butterflies create a visual triangle to draw the eye all around the layout. To finish I wrote journaling with a blue pen under the photos.
I hope you are inspired to try making a paper herringbone background layout! The more patterns of paper I can add to a layout, the better! And I hope you enjoy hopping through the YouTube Party celebrating SaraScrap's 5 years on YouTube! Have a wonderful day!
SUPPLIES: Patterned papers, die cuts, stickers, Thickers: TURN THE PAGETurn the Page Digital Collectionwhite acrylic paintPastel Dreams watercolors

Always a Dreamer Layout by Missy Whidden


Friday, January 29, 2021

Hey friends! Missy Whidden here with a new and bright layout featuring Paige’s Go the Scenic Route. I’ve been eyeing Paper 11 for a while, and I wanted to use it in a different way. I decided to fussy cut lots of the diamond shapes and use them as a main design element. As always with this collection I couldn’t narrow down which colors to use, so I just used them ALL…haha! I covered a sheet of thick white cardstock with clear gesso and then used a rainbow variety of Distress Oxides and Shimmerz sprays to add watercolor areas behind the diamonds. My photo helped determine where to place all the diamonds because it appears that she is looking up toward them sparkling in the sky. I popped up the diamonds to create dimension and then added embellishments around the photo.

I adore these beautiful, rich colors so much. I randomly scattered the diamonds mostly on the right half of the background. I overlapped a lot of them and tried not to make them too ordered. I made sure to scatter the colors around. I splattered the Shimmerz sprays in a few areas as well.

I created a cluster of goodies below the photo. I didn’t want a large title, so I fussy cut a few tickets from Paper 17. They make a perfect smaller title. I added in a few of the Enamel DotsPuffy Phrase Stickers, a Puffy Word Sticker, and a few Cardstock Stickers. I wanted to echo all the colors from the diamonds, so I made sure to use items with different colors and shapes. I tucked in orange and dark blue thread here, too.

Once the layout was almost finished, I decided there was just too much white space on the left side. I cut a crooked strip from the background and backed it with a sliver of Paper 17. I think that livened up that side of the page. I distressed the edge of the cardstock to give it some texture and I love how that detail added so much more to the layout. I felt like the diamonds needed a bit of sparkle, so I smudged Nuvo Glimmer Paste on most of them.

I had lots of fun making this page, and I hope it gives you some ideas to try on your next project! I’ve seen other designers use Paper 17 to create circles, so I wanted to try diamonds. It’s fun to try something different with a popular paper and see if you can use it in new way! Thanks so much for stopping by!


SUPPLIES: Patterned papers, stickers, die cuts, enamel dots, embellishments: GO THE SCENIC ROUTEwhite cardstockDistress Oxidesgesso
Blog: littlenuggetcreations.blogspot.com // Instagram: @missywhidden // Pinterest: @missywhidden
Facebook: missy.whidden // YouTube: Missy Whidden

Vision Board Inspired Journal Page by Paula Fiihr


Thursday, January 28, 2021

Welcome back! Paula Fiihr here today and I am sharing an art journaling page using Paige’s Go the Scenic Route collection. The inspiration for the layout is based on the Scrapbook.com January vision board. I loved the colors and wanted to make a journal page with Paige’s amazing collection!

For the cut files, I used the January cut file from the Months set cut from white cardstock and the Hexagons Background cut file cut from the yellow paper in the 12x12 Paper Pad. For my background I used Lindy’s magical powder and water. When that was dry I brushed Fossilized Amber Distress Oxides and white gelato randomly over the page. Then I looked for some fun ephemera that matched the colors of the vision board, yellow and pink being my two favorites. And this line is full of pieces to match! 

I added Puffy Word Stickers to the card from the Ephemera Die Cuts and sewed some hexagons along one side. The flowers on the page are both from the Floral Die Cuts and fussy cut from the flower paper in the 12x12 Paper Pad. The "remember" frame, "today" piece, butterfly card, and mini tag are from the Ephemera Die Cuts. The planner is from the Chipboard Stickers. I had fun layering these pieces with the hexagons and flowers. I tucked some tickets behind the happy card and a bit of embroidery floss in the corner. The clip is a crepe paper rosette layered with some more hexis and flowers and glued to a paper clip.

I am hoping to make an art journal entry for each of the next months vision boards as well and fill my journal with color and fun! Thanks for stopping by!


SUPPLIES: Patterned papers, stickers, die cuts, embellishments: GO THE SCENIC ROUTE; Die cut machine: Cricut; Cut files: January and Hexagons Background by Paige Evans

Location: Texas, USA / Instagram: @psplannergirl / Pinterest: pfiihr / Facebook: Paula Fiihr

Valentine's Day Memory Explosion Box Live Zoom Class!


Wednesday, January 27, 2021

Join me for my very first live ZOOM class creating a Valentine's Day Memory Explosion Box!!! Registration is free and you can sign up at www.bit.ly/zoomclasswithpaige. Hosted by Michaels, we'll create a twist on the classic valentine by decorating a memory explosion box, adding embellishments, and personalizing it for those you love! The 1 hour class is at 1pm Pacific Time/4pm Eastern Time on Thursday February 4th. 

This will be my first live class and I'm super duper nervous lol but we'll have tons of fun and I hope to see you virtually there to craft together! Register for the free live Zoom class HERE!

Wild & Free Layout by Stefanie Ried


Tuesday, January 26, 2021

Hi friends, Stefanie Ried here with a new layout! Do you have a favorite from the Go the Scenic Routecollection? I have sooo many. I can't make up my mind. One of them is the paper with the colored squares Paper 21. Isn't it a stunner? I knew I wanted all the colors on my layout. My first idea with single squares didn't appeal to me as much as I thought it would. That happens every now and then. You get an idea in your head but afterwards on the layout it looks completely different. So I slept a night over it and started again.

I wanted it to look colorful and light so first I punched out small frames from each square with a punch. Matching the colors, I fussy cut images from Paper 6.

The icons I partly attached with yarn to the frames. I glued the frames with the embellishments on the layout. The title "wild & free" from the Chipboard Stickers I associate with travel. Since this is currently not possible and I have so much wanderlust, it just fit the layout.

Thanks for stopping by!


SUPPLIES: Patterned papers, stickers, Thickers, enamel dots, die cuts, embellishments: GO THE SCENIC ROUTEwhite cardstock
Blog: steffiried.blogspot.com / Instagram: @steffiried / Pinterest: @steffiried / Facebook: stefanie.ried.96 YouTube: Steffi Ried

Sweet Girl Layout by Brianna Lepper


Monday, January 25, 2021

   Hey friends! Brianna Lepper here today sharing a fun mixed media layout using one of Paige's cut files as a stencil. I’ve always loved this technique and wanted to do another layout using it. Here’s what I created:

To start, I cut Paige’s Diagonal Stripes Background cut file out on white cardstock using my Silhouette Cameo. Once it was finished cutting, I taped it to a piece of thick white cardstock and applied modeling paste through it. Next, I grabbed Distress Oxides inks in a variety of colors that matched Paige’s Go the Scenic Route collection. I painted each color on making sure to add some water to allow the colors to run and blend together.

I set my background aside to dry and went to work on cutting out Paige’s Heart Group cut file on another piece of white cardstock. I then backed a few of the hearts in the cut file using the 2x2 Paper Pads. Next, I popped the cut file on some foam tape and adhered it to my mixed media background. I love the texture, dimension, and shadows!

I love a good rainbow inspired layout and I love embellishing tone-on-tone as well. I kept that in mind when choosing the embellishments for this layout. I pulled some Floral Die CutsChipboard StickersCharmsPuffy Phrase Stickers, a Flag Paperclip, and Enamel Dots. I also added in a few groups of tangled thread to give the layout another layer of texture.

I love how my mixed media colors match so well with this collection. The colors are so happy and vibrant. For my title, I used the Puffy Word Stickers and the Mini Foam Thickers from the Pick-Me-Up collection. Those awesome Mini Foam Thickers are still my favorite!

I hope that I’ve inspired you in some way today to either try using one of Paige's cut files as a stencil, create a rainbow themed layout, or to embellish tone-on-tone. I had so much fun with this layout and I hope that you like it! I really love working with Paige's cut files and finding different ways to use them. Thank you so much for being here and I’ll see you in my next post!


SUPPLIES: Patterned papers, stickers, die cuts, enamel dots, paperclip, embellishments: GO THE SCENIC ROUTEmodeling pasteDistress Oxideswhite cardstock; Die cut machine: Silhouette Cameo; Cut files: Diagonal Stripes Background and Heart Group by Paige Evans
Location: Louisiana, USA / Blog: I Love Paper Blog / Instagram: @briannalepper / Facebook: Brianna Nichole
YouTube: Brianna Lepper / Pinterest: Brianna Lepper

Layered and Backed Flower MemoryDex Card Tutorial by Paige Evans


Sunday, January 24, 2021

 Hi there! Here is a Layered Flower MemoryDex card I made for the November 2020 Crop & Create Event for Scrapbook and Cards Today using my Go the Scenic Route collection.

Check out this process video so you can see how to make a Layered Flower MemoryDex card:

I started by cutting the Layered Flower from white cardstock and then backed each layer with a patterned paper from Go the Scenic Route in rainbow order. I trimmed a square of Paper 20, rounded the bottom corners, turned it into an official MemoryDex using the Punch, and then machine stitched around it for texture.

To embellish I simply added a "happy" heart Chipboard Sticker in the center. To add even more texture I would machine stitch through all of the petals, but I wanted to keep things simple for the class attendees :) I hope you are inspired by this MemoryDex card and try making one!
SUPPLIES: Patterned papers, sticker: GO THE SCENIC ROUTE; Cut file: Layered Flower by Paige Evans; Punch: MemoryDex

Guest Designer | Anri Kobayashi


Saturday, January 23, 2021

Hello, everyone! My name is Anri Kobayashi and I am honored and excited to be Paige’s cut file guest designer for the month of January! You can find me on Instagram. Here are three layouts I created using Paige's cut files and her beautiful Go the Scenic Route collection:

For my first layout, I decided to use the It’s a Small World cut file to document a happy memory with my grandson at Disneyland.

For the background, I enlarged and had my cameo draw the Concentric Circles Background cut file on Paper 24. I machine and hand stitched over the lines and decorated by using sequins in the Mixed Embellishments from the Bloom Street collection. I used white cardstock to cut the It’s a Small World cut file. I backed the cut file using various patterned papers from the Go the Scenic Route collection. I love using Paper 23 to back cut files! You can get many beautiful patterns and fun shapes from using just this one paper! I offset some of the pieces and popped them up with adhesive foam. I machine stitched over the cut file with silver thread for more texture, dimension, and detail. I also added some fussy cut flowers and hearts from the Puffy Phrase Stickers on the cut file. I backed the photo with tissue paper and Paper 21. I used some fun tickets from the Ephemera Die Cuts for the title and placed it on the bottom corner of my photo along with tangled silver thread.


My second layout is of my other grandson taken at the park. I had beautiful natural lighting on this photo so I chose the Flower Garden Background cut file

I cut the cut Flower Garden Background cut file on Paper 2 and glued it on white cardstock and machine stitched the sides. Then I cut the same cut file again, this time using Paper 8. I glued all the flower pieces, offset from Paper 2. I machine stitched through fussy cut butterflies from Paper 20, backed my photo with tissue paper, and Paper 3. To finish, I picked a title from 2x2 Paper Pads.


For my last layout, I used the Snowflakes Background cut file. This was perfect to document the memory of going to see the Christmas lights with my grandson.

I chose Paper 10 for the background and sprayed and splattered white ink sprays. I cut the Snowflakes Background cut file on white cardstock. I arranged the snowflakes diagonally and placed tangled thread under some of the snowflakes. I added thin paper strips as well, which curl up naturally. I backed the photo with white and light blue tissue paper and used a Cardstock Sticker for the title.


I hope you have enjoyed seeing my three guest design layouts featuring Paige's cut files and Go the Scenic Route! See more of my work on Instagram. Thanks for stopping by today!


Today Was Magic Layout by Paige Evans


Friday, January 22, 2021

 Hello hello! Here is a layout made with my brand new Wonders collection for the American Crafts blog!

To begin, I grabbed the three butterfly filled papers from the 6x8 Paper pad - two of which have gold foiling details, swoon! I sat on my bed and fussy cut out all of the butterflies on New Years Eve while watching Bosch with Chris. That's my kinda night!
Then I pulled the rainbow striped paper from the 12x12 Paper Pad and did some mixed media on the background. First I splashed watered down white acrylic paint and then came in with Pastel Dreams & Tropicals watercolors, splashing them tone-on-tone to create pops of color and interest. Once the background dried, I loosely placed all of the butterflies on top.
I found a photo of our family from last October at Animal Kingdom and I thought the colors and theme of my layout so far went together well. I added the photo to the bottom right side and then used liquid glue to attach all of the butterflies in place - I only added a dot of glue to the centers to let the wings lift and bend like real butterflies.
To continue with the tone-on-tone look, I added a few sentiments from the Cardstock Stickers overlapping the edges of the photo as well as a "TODAY" Banner Sticker and then came in with a few words from the Puffy Phrase Stickers placed on the colored stripes. For the journaling, I tore a piece of a pink floral Ephemera Die Cut, tucked it under the picture, and wrote the caption with a blue pen.
I hope you are inspired to pick up my new Wonders collection when it's available and fussy cut to your heart's content!
SUPPLIES: Patterned papers, stickers, die cuts, embellishments: WONDERS; white acrylic paint; Watercolors: Pastel Dreams & Tropicals
Paige Taylor Evans © // Quinn Creatives DESIGN