The One with April 2014 American Crafts Layouts


Wednesday, April 30, 2014

Sorry I skipped a month! Between teaching my STITCHED class at Studio Calico, teaching a class to 80 wonderful German scrappers, my parents coming to visit for 10 days, guest designing for Shimelle and Bella Blvd, so on and so forth, I just had to let something go to survive. But, things are calming down again, and I'm so happy to have my two monthly American Crafts layouts completed for the month and ready to share :)
 photo 1stDayofPrimarybyPaigeEvans.jpg
1ST DAY OF PRIMARY by Paige Evans

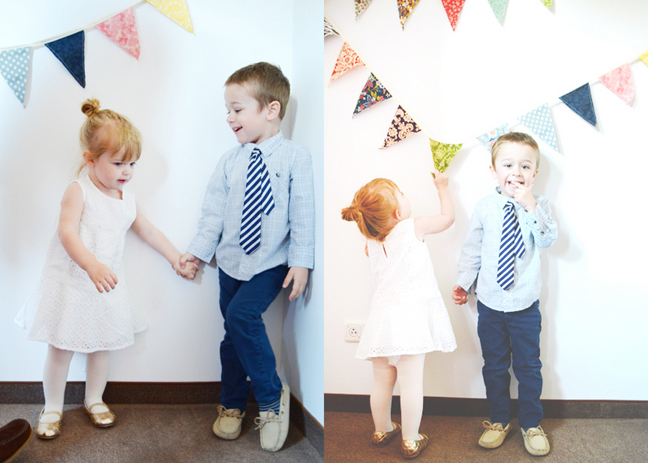
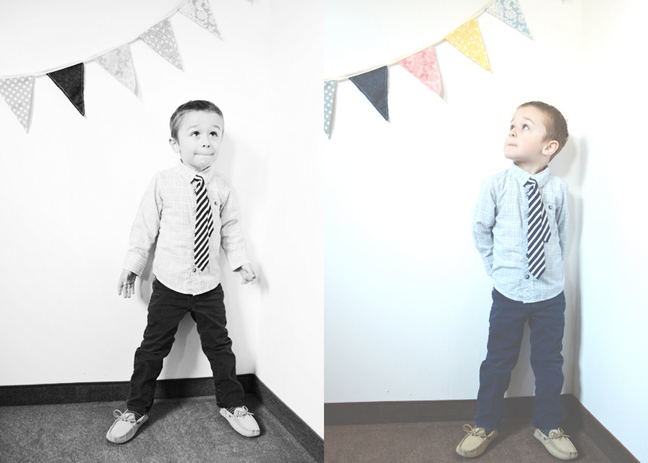
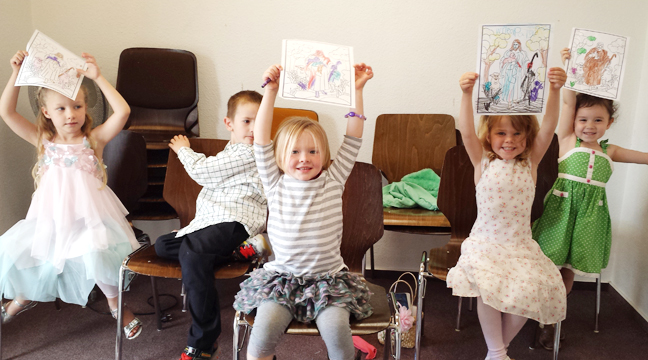
Journaling says: I was so nervous that Fox wouldn't like Primary because he looooved Nursery, or rather, playing with the toys. But he actually seemed to enjoy it, especially being sung to and participating. I'm lucky that I get to sit in the row behind him and watch him learn songs and make friends and... discipline him now and again. He is such a handsome guy with his church clothes and cute toddler ties! Love him!

How to: Die cut a starburst from white cardstock and back each section with paper from the Boys Rule collection by Crate Paper; adhere to a teal cardstock card base. Layer journaling cards, frames, photos, wood veneer shapes, vellum die cuts, a tag, and more on the center. Stitch Thickers and alphabet stickers above and below the photos to create the title. Adhere star embellishments on the top left and bottom right corners then drop blue spray mist over them. Journal around the starburst to finish.

Supplies: Cardstock, roller date stamp, pen, adhesive: American Crafts; Patterned paper, Thickers, stickers, chipboard, frames, die cuts, star sequins, wood veneer shapes: Crate Paper; Spray mist: Studio Calico; Die cut machine: Silhouette Cameo by QuicKutz; Sewing machine: Brother; Thread: Coats & Clark
*************************************************************
 photo SzechenyBathsbyPaigeEvans.jpg
SZÉCHENY BATHS by Paige Evans

Journaling says: Pretty sure this is one of the coolest places we've ever been! We didn't have swimsuits so we just let the kids go in the nude, ha!

How to: Punch starbursts from the #summer papers by American Crafts then trim each circle in half. Arrange the half circles in a quilt-inspired pattern down the left half of a blue cardstock layout base. Layer photo overlays, journaling spots, and photos down the right edge. I drew "Baths" in Adobe Illustrator with the pencil tool then die cut it from white cardstock; adhere it along with Thickers to create the title. Staple and stitch over the title and place a journaled sticker below. Scatter embellishments like badges, corkboard shapes, die cuts, wood veneer shapes, and more, around the layout to keep things interesting! Stamp the date on the bottom right corner and drop spray mist around the layout, like always :)

Supplies: Cardstock, patterned paper, Thickers, corkboard, wood veneer, photo overlays, badges, stickers, die cuts, roller date stamp, pen, adhesive: American Crafts; Spray mist: Studio Calico; Die cut machine: Silhouette Cameo by QuicKutz; Sewing machine: Brother; Thread: Coats & Clark; Staples: Tiny Attacher by Tim Holtz; Starburst punch: Martha Stewart Crafts

The One with Jane in her Neon Pink Spring Dress


Tuesday, April 29, 2014

This little girl looked so sweet in her neon pink spring dress. And she even let me put a headband in her hair for the first time in almost a year! So, lots of picture taking commenced.

Oh darling Jane.

The One with the 2Peas Anything Goes Layout & Video


Monday, April 28, 2014

I have a layout and accompanying "how to" video up at twopeasinabucket.com today! The theme is "anything goes!" meaning I got to do whatever I wanted, no moodboard, no direction, just whatever floated my boat!

 photo AdorablebyPaigeEvans.jpg
ADORABLE by Paige Evans

Description: I've been meaning to use the metal bow die from the Styleboard by Maggie Holmes/Crate paper for eons now and finally got a chance to play with it! And can I just say, I'm hooked! I made 22 bows and wanted to keep making them - they're just sooooo cute and easy to make! And think of the possibilities - you could make actual hairpin bows, a necklace, bookmark, placecard, party decorations... anything! I based my entire layout around the bows and pulled the photo and embellishments after I decided the placement of the bows.

Journaling says: I just love taking pictures of you - all day, every day because you are so gosh darn adorable Jane!

How to: Die cut 22 bows using the 6x6 Styleboard patterned paper pad, arrange the 3 pieces of the bows into piles, then assemble the bows using different patterns for an eclectic look. Sew down the middle of each bow using white thread and a straight stitch to keep them together. White wash the middle of a mint striped paper layout base. Drop white paint across the layout and let it dry (I didn't cuz I was trying to film the entire layout during Jane's nap, but if I had more time I would have let it dry completely cuz it got a little messy :) Adhere a photo to the center then layer the bows all around. Tuck die cuts and chipboard accents under and around the bows and sprinkle butterfly sequins on top. Add a chipboard sticker word title below the photo. Use a marker to color a roller date stamp and stamp it under the bottom right bow. Place washi tape across the top and bottom edges. Trim the edge of a journaling card, tuck it into the bottom piece of washi tape, then journal on top. 
 photo sneak.jpg
Video: Here is the video so you can see how this layout was made from start to finish:
http://youtu.be/mFvxEF4DdV4
Supplies: Patterned paper, badge, washi tape, die cuts, butterfly sequins, chipboard, metal bow die: Crate Paper; Paint: Americana; Roller date stamp: October Afternoon; Pen: Zig; Sewing machine: Brother; Thread: Coats & Clark; Die cut machine: Cuttlebug by Provo Craft
 photo AdorableDetailbyPaigeEvans.jpg
 photo AdorableDetail2byPaigeEvans.jpg
I definitely have a new favorite tool - the Styleboard by Maggie Holmes/Crate Paper bow metal die set!

The One with Studio Calico CAMELOT Layouts!


Sunday, April 27, 2014

The CAMELOT kits are now available at Studio Calico!
The colors and products were so easy to combine and work with this month, I even tried some new things like "mixed media" :)
 photo GoodTimesbyPaigeEvans.jpg
GOOD TIMES by Paige Evans

Description: I got the opportunity once again to design a couple of exclusive cut files for Studio Calico for the month of May and used the FRAMES background on this layout! So I used the cut file and only the GUINEVERE add on to create this entire layout.
Journaling says: Barbara had everyone blow bubbles to get some fun and artistic photos to scrapbook! I'll do lots of things just to get a good pic :) I had a blast teaching at the Crop am Rhein 2014!

How to: Die cut the FRAMES background I designed for this month's Studio Calico kits from white cardstock. Back the openings with one photo and the papers from the GUINEVERE add on then replace the frame centers with foam dots. Embellish with star die cuts, chevron stickers, eyelet stickers, a chipboard title, and mini alphabet stickers. Journal on one of the frames. Drop different colors of spray mist around the layout.

Supplies: Scrapbook kit: GUINEVERE by Studio Calico; Cardstock, pen, adhesive: American Crafts; Spray mist: Mr. Huey's by Studio CalicoDie cut machine: Silhouette Cameo by QuicKutz"Frames" background cut file: Paige Evans for Studio Calico
***********************************************************
 photo JaneinBarcelonabyPaigeEvans.jpg
JANE IN BARCELONA by Paige Evans

Description: The other cut file I designed exclusively for Studio Calico for May kits is the DOT SCALLOPS background which I used on this layout as well as only products from the EXCALIBUR add on. This layout was fun to make because it was a little out of the norm for me in that I didn't use lots of color! But it was a great challenge to create something that still felt authentic to me and my style!
Journaling says: Sweet little Jane running around Barcelona Spain without a care int eh world! Cutie!

How to: Die cut the DOT SCALLOPS background from blue cardstock then staple it to the "Lovely Floral" paper by Echo Park Paper Co. Layer vellum, a vintage book page, tag, doily (with the gold side down), photo, gold cupcake liner, ticket, sequins, and a wood veneer rose on the bottom right corner. Place mini alphabet stickers along the curve of the doily for a title. Write journaling on a tag and glue it to the top left corner along with another gold foil cupcake liner and more sequins. Drop blue spray mist around the layout.

Supplies: Scrapbook kit: EXCALIBUR by Studio Calico; Spray mist: Mr. Huey's by Studio Calico; Cardstock, adhesive: American Crafts; Staples: Tiny Attacher by Tim HoltzDie cut machine: Silhouette Cameo by QuicKutz"Dot Scallops" background cut file: Paige Evans for Studio Calico
***********************************************************
 photo BarcelonabyPaigeEvans.jpg
BARCELONA by Paige Evans

Description: The XO background cut file by Barbara Picinich is top notch. I wish I had thought of it :) I used her cut file and elements from the CAMELOT main kit to create this whimsical layout.

Journaling says: The best moments from our trip to Barcelona.

How to: Die cut the XO background cut file from vanilla cardstock, fold and staple the letters in place, then back each opening with papers from the CAMELOT main kit. Adhere tiny photos around the layout. Accent the layout with puffy flower stickers, a stickpin, gold chevron rub on, and a puffy letter stickers title. Crinkle a bit of the top and bottom edges then drop gold spray mist across the layout. Journal a little bit on the top row of die cuts.

Supplies: Scrapbook kit: CAMELOT by Studio Calico; Cardstock, adhesive: American Crafts; Pens: American Crafts (black), Uniball Signo (white); Spray mist: Mr. Huey's by Studio Calico; Staples: Tiny Attacher by Tim HoltzDie cut machine: Silhouette Cameo by QuicKutz"XO" background cut file: Barbara Picinich for Studio Calico
***********************************************************
 photo HellobyPaigeEvans.jpg
HELLO by Paige Evans

Description: Paper weaving is still one of my favorite things to do with patterned paper! So I used all of the papers (and even tearaway strips!) from the CAMELOT main kit to create this page. I tried my hand at the "mixed media" look and while I'll admit I'm an amateur, it was still fun to try!

Journaling says: I'll be yours and you'll be mine.

How to: Trim all the patterned papers and tearaway strips into 1/4" strips then weave them around the edges of a kraft cardstock background. Sew diagonally across each corner. Using the round star mask, spray white mist over it in three places inside the "frame". Trim flowers from patterned papers then layer then as well as photos and frames die cut from white cardstock over the sprayed areas. Apply gold rub ons to the top layer and embellish with puffy stickers.

Supplies: Scrapbook kit: CAMELOT by Studio Calico; Cardstock, adhesive: American Crafts; Spray mist: Mr. Huey's by Studio Calico; Sewing machine: Brother; Thread: Coats & Clark; Die cut machine: Silhouette Cameo by QuicKutz"Frames" background cut file: Paige Evans for Studio Calico
***********************************************************
 photo HelloFoxbyPaigeEvans.jpg
HELLO FOX by Paige Evans

Description: For my last layout I used supplies from all of the kits: CAMELOTEXCALIBUR, GUINEVERE, and MERLIN. Using a gray cardstock background helped the colors of the papers POP! And I created chevrons stripes across the background using a square punch. I ❤ chevrons.

Journaling says: Oops. Forgot to add some. I'll do that later :)

How to: Punch 1" squares from each of the patterned papers in all of the kits. Trim the squares in half to make triangles then place them in chevrons stripes down a gray cardstock layout. Stitch the patterned paper pieces in place. Drop white paint and white spray mist across the layout and let it dry. Tear a piece of vintage book paper then layer it along with a kraft envelope, photobooth strips, acrylic letters, gold glitter star stickers, tab sticker with the date stamped on it, "you and me" sticker, number stickers for the year, and a geotag sticker on the middle of the layout. Die cut the "hello" sentiment from white cardstock then staple it to the top of the pictures. Glue buttons and sequins around the layout.

Supplies: Scrapbook kits: CAMELOTEXCALIBURGUINEVEREMERLIN by Studio Calico; Cardstock, date stamp, adhesive, square punch: American Crafts; Ink: StazOnDie cut machine: Silhouette Cameo by QuicKutz"Hello" cut file: Suzy Plantamura for Studio Calico; Paint: Americana; Spray mist: Mr. Huey's by Studio Calico; Sewing machine: Brother; Thread: Coats & Clark; Stapler: Tim Holtz

That's all for now - another kit reveal coming next month!

The One with the L♡VE Y♡U M♡M Frame Tutorial


Saturday, April 26, 2014

Whipped up a little somethin' somethin' for my mother dearest and did a step-by-step photo tutorial so anyone can make one!

Gather your supplies: patterned paper, wooden frame, white cardstock, adhesive, scissors, embellishments (stickpins, flower brads) - not pictured: sewing machine, white paint, foam brush, pencil
 photo DSC_0396.jpg
Trace the inside of the frame onto the backside of white cardstock then trim it 1/4" wider on all sides to create the base of the project. Paint a wooden frame white and set it aside to dry.
 photo DSC_0412.jpg
Hand cut letters and hearts from patterned papers to make a sentiment then carefully sew through each letter. Keep the string ends long for a whimsical look, or trim them for a cleaner look. I kept them long.
 photo Desktop-1.jpg
Adhere the project to the back of the frame and embellish with buttons, brads, and stickpins.
 photo frame.jpg
A beautiful frame for Mom to hang in her home, laundry room, craft room, kitchen, etc!

The One with Studio Calico CAMELOT Sneaks!


Friday, April 25, 2014

The Studio Calico CAMELOT scrapbook kits are almost available! The last few days of waiting are always killer. The colors of the kits this month are droolworthy, swoonworthy, to-die-for-worthy :) I ventured away from my usual style for a couple layouts, but stayed true to the "color, repetition, layers" for the other three for a total of FIVE layouts! And so, here are some sneaks to entice you to check out this month's scrapbook kit and add ons!

GOOD TIMES - featuring the GUINEVERE add on and the frames background cut file I designed exclusively for Studio Calico for May!
 photo GoodTimesDetailbyPaigeEvans.jpg
JANE IN BARCELONA - using only the EXCALIBUR add on and the dot scallop background cut file I designed exclusively for Studio Calico for the month of May!
 photo JaneinBarcelonaDetailbyPaigeEvans.jpg
BARCELONA - using only the CAMELOT main kit and the awesome, amazing, so clever "XO" background cut file by Barbara Picinich!
 photo BarcelonaDetailbyPaigeEvans.jpg
HELLO - another layout using only the CAMELOT main kit and a few of the frames cut file I designed :)
 photo HelloDetailbyPaigeEvans.jpg
HELLO FOX - a mix of all the kits: CAMELOTEXCALIBURGUINEVERE, and MERLIN.
 photo HelloFoxDetailbyPaigeEvans.jpg
Come back on April 27th for the full reveal! Auf Wiedersehen! 

The One with My Bro & Sis


Thursday, April 24, 2014

I'm so glad there's such things as blogs and instagram and facebook so I can keep up with my brother & sister-in-law and my sister & brother-in-law because they're always up to something fun!

Allie and Tate are living it up in China. Every weekend they're off climbing some mountain, visiting some temple, smelling some bloomin' flowers. They're young and childless and their pictures scream beautiful!

Eric and Tanya just moved back to Seattle after a 6 month work internship in Florida. I'm sure the weather is a drastic change! But Seattle ain't too shabby :) They go and see and do a lot of stuff and Tanya is great at updating the blog with their adventures. 
I miss my siblings. Wish I had a date to look forward to of when I'll see them again!

The One with the 2Peas Milestones-Themed Layout


Tuesday, April 22, 2014

I have a milestones-themed Garden Girl layout up at Two Peas in a Bucket today!
 photo 18MonthsbyPaigeEvans.jpg
18 MONTHS by Paige Evans

Description: The Capture collection by BasicGrey? Amazing. Seriously, they've been knocking every line out of the park lately. Oh to be on their design team :) But anyway, the colors are a bit bolder version of the 2Peas April moodboard but that's where I drew my inspiration - the colors. And then I used one of my favorite techniques: punching patterned papers and piecing them together! Regarding the "milestones" theme - I think 18 months is a big milestone! A year and a half is when kids can enter Nursery at church and really it's just the cutest and most fun age of babies in my opinion. I dressed Jane up and got lots of pictures of her to scrap!

Journaling says: I'm pretty sure you're the cutest little girl to ever walk the face of the planet! I love you so!

How to: Punch 1" squares from each of the papers in the 6x6 paper pad and the 12x12 papers in the Capture collection by BasicGrey. Cut each square in half to make triangles. Place the triangles in chevron stripes around the edges of a robin's egg blue cardstock layout base. Use a sewing machine to stitch over the chevrons. Place a journaling spot page on the center, top it with two photos, and embellish with a scalloped border sticker, chipboard flower, flower sticker, chipboard arrow with the date stamped on it, chipboard "lovely," and journaling written below. Drop dark blue spray mist around the layout and place a chipboard photo corner on each corner.

Supplies: Cardstock, date stamp, square punch, adhesive, roller date stamp, pen: American Crafts; Patterned paper, chipboard (arrow, flower, heart, "lovely," photo corners, star), stickers (flowers, letters, scalloped border); Spray mist: Studio Calico; Ink: StazOn; Sewing machine: Brother; Thread: Coats & Clark
 photo 18MonthsDetail2byPaigeEvans.jpg
 photo 18MonthsDetailbyPaigeEvans.jpg
Thanks for takin' a look'! I had fun making this layout and it came together FAST! I was able to film the entire thing during my kids' afternoon nap - love when that happens!

The One with Guest Designing for Bella Blvd!


Monday, April 21, 2014

I love happy emails :) Such as the one I got from Laura Vegas asking if I'd like to be the April Guest Designer for Bella Blvd - yes please, sign me up! I received a ginormous box of supplies in the mail and couldn't wait to delve in. Here are the three layouts I made for my guest spot:
 photo PaigeEvans-MyGuy.jpg
MY GUY by Paige Evans

Description: For this layout I used the Max collection - it has foxes in it! Perfect for a layout about Fox :) I loved this geometric cut file and backed it with the Max patterned papers for a pop of color.

Journaling says: Handsome. I know this boy, he kinda stole my heart, he calls me mom. Love this guy. My guy.

How to: Die cut a geometric background from white cardstock. Back some of the spaces with patterned papers then adhere it onto a gray cardstock background. Place a photo corner sticker on each corner. Trim away a section of the cut, tuck a photo underneath, then go to town layering on the stickers and die cuts and a flag stickpin. Drop India ink around the layout.

Supplies: Patterned paper, stickers, stickpin flag, die cuts: Bella Blvd; Cardstock, adhesive: American Crafts; India ink: Speedball; Die cut machine: Silhouette Cameo by QuicKutz
 photo PaigeEvans-MyGuyDetail.jpg
*********************************************
 photo PaigeEvans-TrueLove.jpg
TRUE LOVE by Paige Evans

Description: I used the Lucky Starz collection on this layout - fitting for this "true love"-themed layout because I thank my lucky stars for Chris every day!

Journaling says: Dear Christopher - how do I even begin to tell you how much I love you? You are the best husband and father and every day I thank my lucky stars to have you in my life forever and always. I love you so much, I hope you know!

How to: Design a "TRUE LOVE" file in Silhouette Studio then cut it from white cardstock. Stitch around the open letters. Punch a bunch of stars from the rainbow of star patterned papers then use the stars to cover the die cut letters. Use the covered letters to back the open holes of the die cut cardstock. Embellish with matching colored stickers across the page and tuck a small photo into the "O" space. Place white letter stickers across the top and bottom to complete the title then journal on the bottom right corner. Stamp the date below the journaling.

Supplies: Patterned paper, crocheted hearts, stickers: Bella Blvd; Cardstock, adhesive, pen, roller date stamp, star punch: American Crafts; India ink: Speedball; Ink: StazOn; Die cut machine: Silhouette Cameo by QuicKutz; Sewing machine: Brother; Thread: Coats & Clark
 photo PaigeEvans-TrueLoveDetail.jpg
*********************************************
 photo PaigeEvans-Adorbs.jpg
ADORBS by Paige Evans

Description: The Molly collection was so lovely paired with these photos of me and Jane and Jane with her Great Grandma Cathie at my sister's wedding reception last year. So bright and fun and colorful with a touch of girly!

Journaling says: It was so fun to pass you around to all of your family members at Allie's wedding reception! Great Grandma Cathie especially loved to hold you - her first great granddaughter! You loved playing with her keys and held onto them all night!

How to: Punch hearts from the Molly papers then place them in three rings around two photos adhered on a blue cardstock layout base. Sew around the first ring of hearts. Embellish with stickers and a flag stickpin. Place washi tape on the edges then journal along the top and bottom. Stamp the date on the top left side. Drop blue spray mist around the layout.

Supplies: Patterned paper, crocheted hearts, stickers, flag stickpin: Bella Blvd; Cardstock, adhesive, pen, roller date stamp, heart punch: American Crafts; Spray mist: Studio Calico; Ink: StazOn; Sewing machine: Brother; Thread: Coats & Clark
 photo PaigeEvans-AdorbsDetail.jpg
LOOOOOOOVED guest designing for Bella Blvd!

The One with Easter 2014


Sunday, April 20, 2014

Our Easter festivities started yesterday evening with a ward party at the Outdoor Recreation park on post.
I didn't know there was going to be an Easter egg hunt so we improvised and Jane put the eggs she found in my purse. She loooooved finding eggs and squealed with delight every time she found one. Adorbs.
Chris helped Fox find eggs and added them to the loot.
This morning we gave the kids some pre-made store-bought baskets. I never got one of these growing up though I desperately wanted one and since I now enjoy holidays vicariously through my kids I got them one :)
Before church I took some pics of Fox and Janey in their Easter best! 
She's a little ball of sass this one is!
And this one is just a hoot. Remind me to tell you about how he calls me Paige...
Awwwwwwwww. Lovens these two.
Walking out the door to go to church!
Could this morning BE any more beautiful?!
We've passed by this Easter egg tree many times and I've been wanting to stop and take our family pictures here all month!
So many eggs!
Wish granted :) Evans family, Easter 2014, Grafenwöhr Germany.
The trees. The mountains. The grass. All of it reminds me how thankful I am for this life and for the knowledge that my Savior lives, he died for me, and we can live again.
At church I taught my class all about Easter and we colored a picture of Jesus.
Pretty flowers in the windowsill.
Janey ate the head off her drawing in Nursery... this girl I tell ya! She's a firecracker!
While Chris cooked a delicious Easter dinner I hung out with the kids.
It was like Thanksgiving all over again! Man I have a good husband :)
Our official (as in, I grammed it! :) Easter family photo.
Frohe Ostern! 
Paige Taylor Evans © // Quinn Creatives DESIGN