Merry and Bright Layout by Phil Donahue


Friday, December 30, 2022

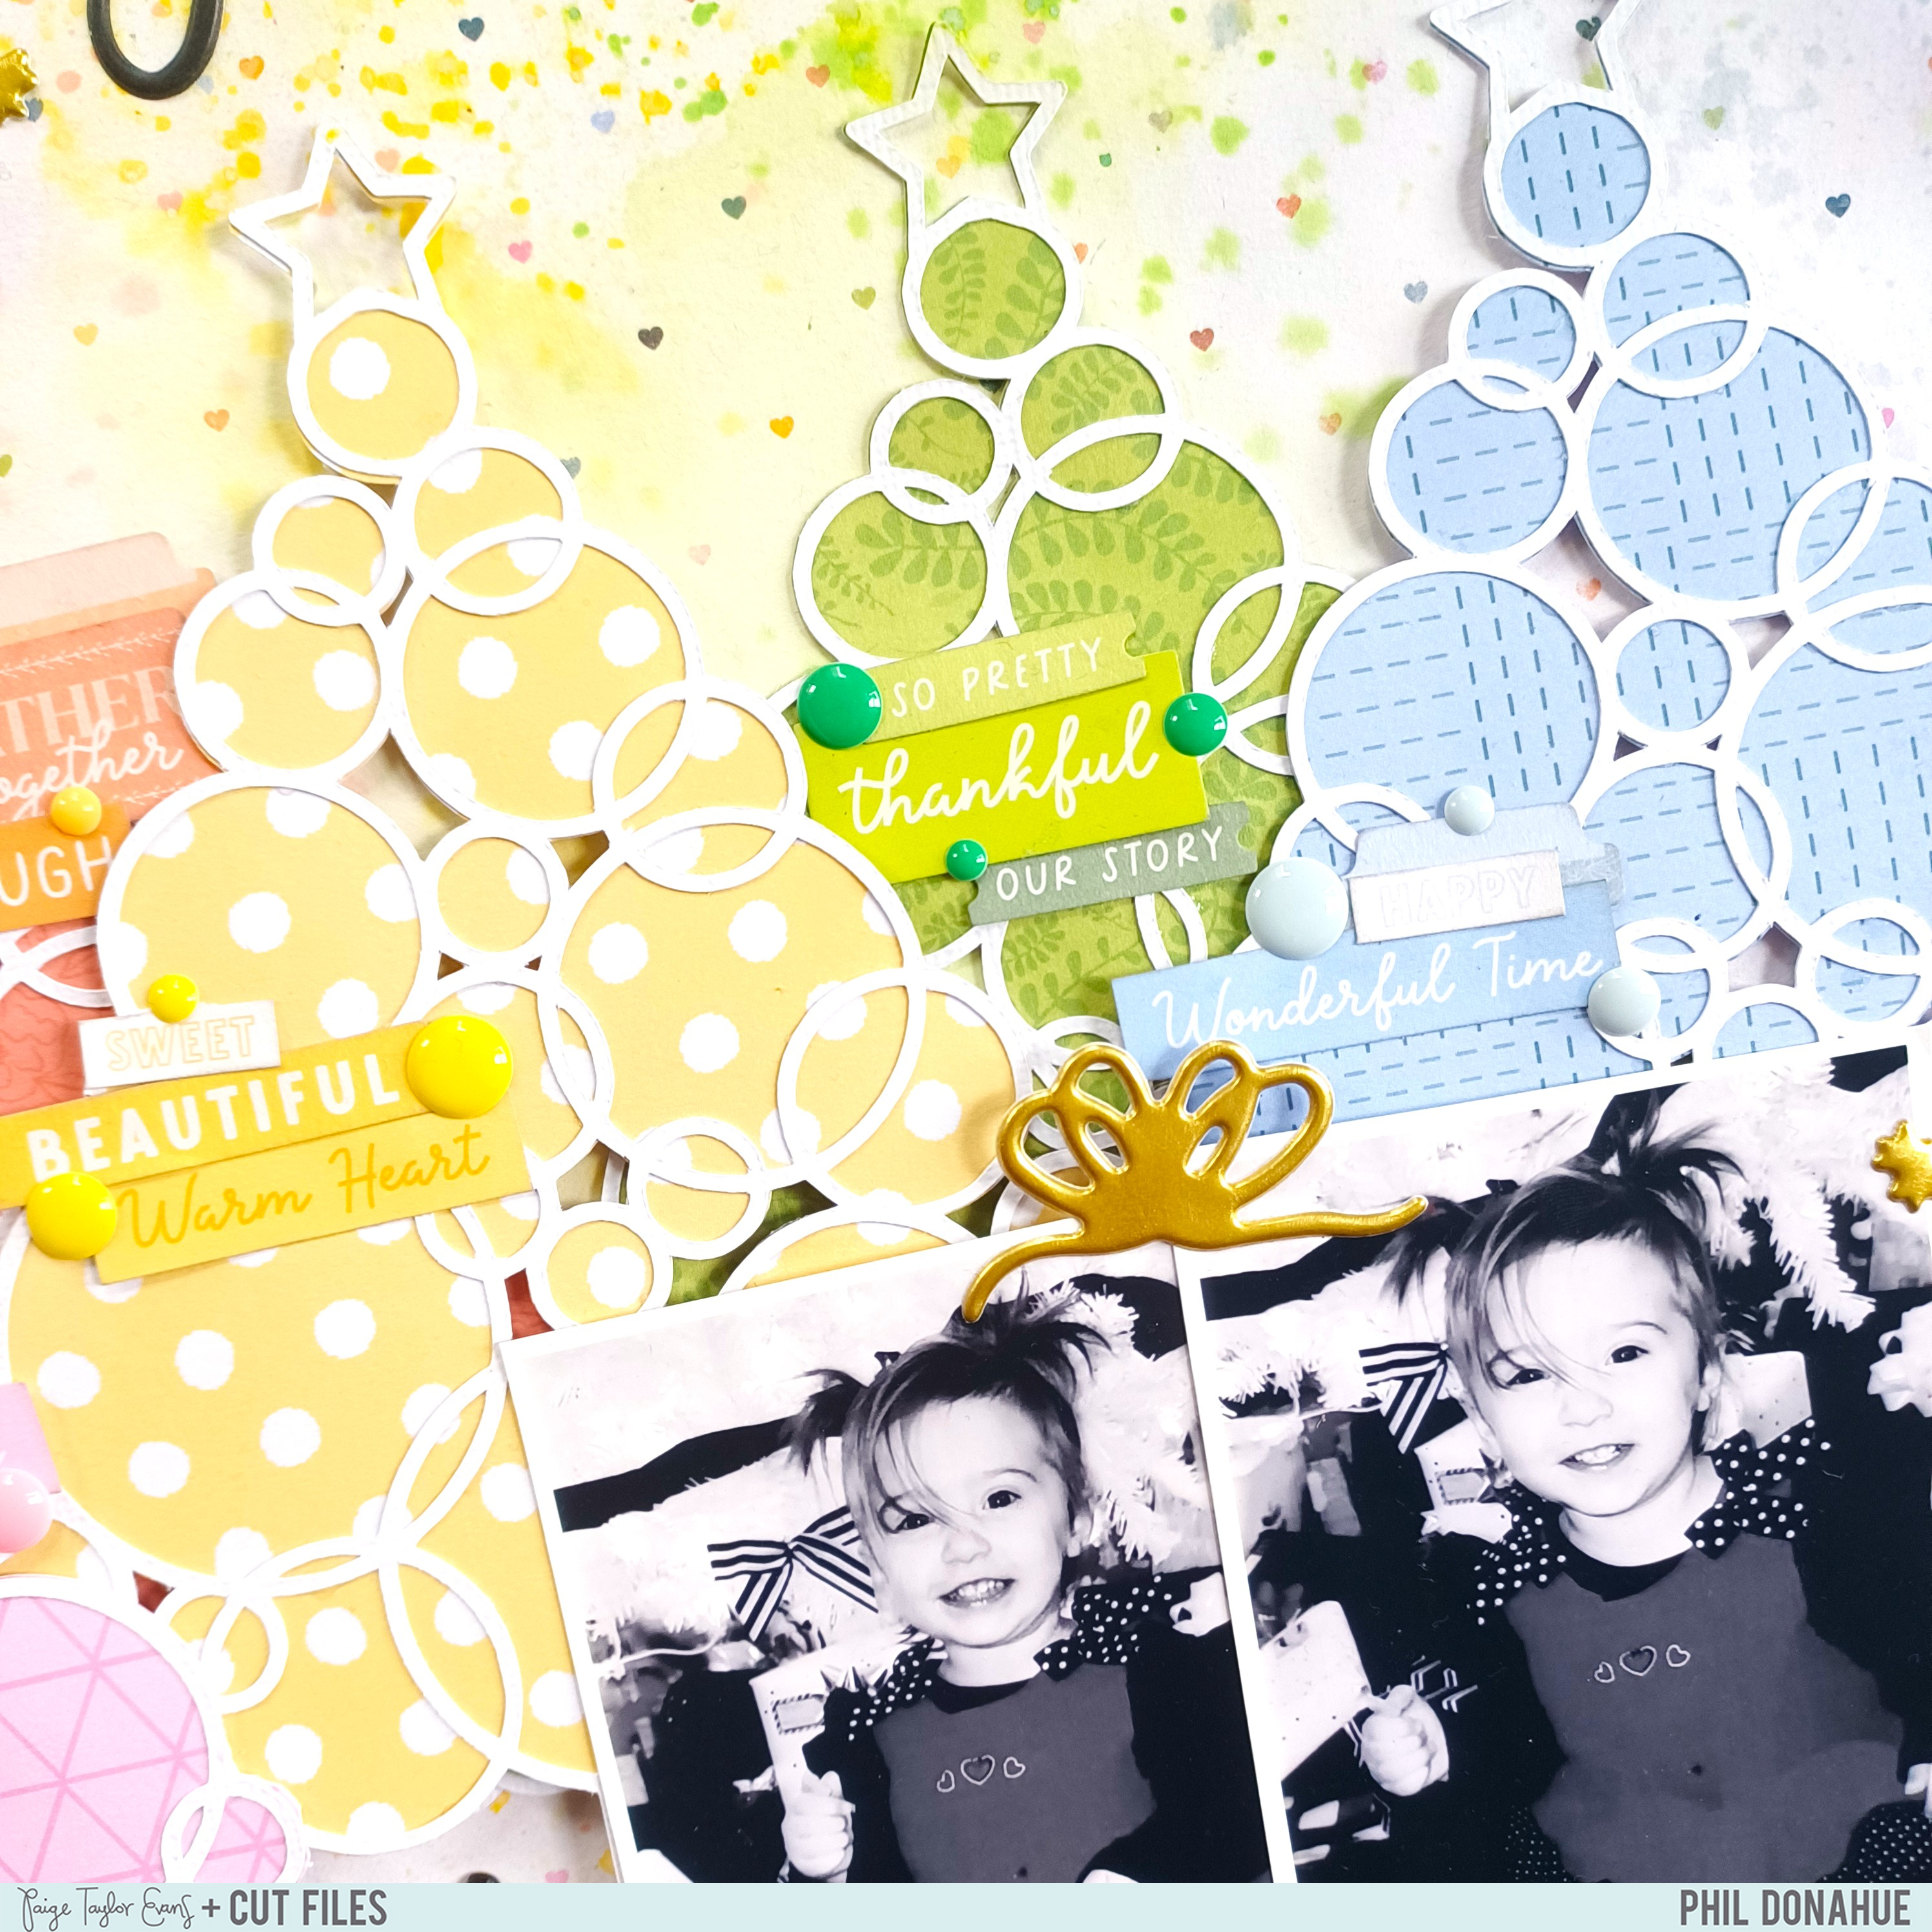
Hello scrappy friends! Phil Donahue here back on the blog with a merry and bright layout featuring Paige's Christmas Tree Circles from the Christmas Cut Files 2019 along with papers and embellishments from her Garden Shoppe collection. This page showcases two black & white photos of my niece sitting next to the tree during her second Christmas ever.

To start, I resized the Christmas Tree Circles to about six-inches tall and duplicated it five times in Cricut Design Space. I cut them in two batches from white cardstock. After experimenting with the contour tool I created a backing file and cut each using a rainbow of five B-side patterned papers from the 12x12 Paper Pad. I aligned and adhered the cut file to each and set them aside to work on the background. The background was made using my favorite combination of papers: both sides of Paper 4. I used the white and rainbow heart side for the middle of the page and I placed a one-inch border of the rainbow woodgrain stripe on the top and bottom of the layout. I applied a layer of gesso to the white heart paper and painted clouds of coordinating Distress Oxides where I knew I'd place each circle tree. After applying the mixed media I glued a row of trees along the middle of the paper, popping alternate ones up with adhesive foam as well as the photos to create more interest and dimension. I decorated each tree with tone-on-tone embellishments from the 8-Page Sticker Book and from my stash of cut-out Paper 23 sentiments. I added enamel dots, gold puffy stickers, and a title from my stash to finish the page.

I hope you found some inspiration in this colorful layout! Thank you for stopping by and have a happy scrappy New Year!


SUPPLIES: Patterned papers, stickers, die cuts, embellishments: GARDEN SHOPPEwhite cardstockDistress Oxides; Cut file: Christmas Tree Circles from the Christmas Cut Files 2019 by Paige Evans

Instagram // Facebook

Candy Cane Layout by Noelle Culp


Thursday, December 29, 2022

 Hi crafty friends! Noelle Culp here today with a new design team layout featuring Paige's Candy Cane from the 25 Days of Christmas Cut Files 2019!

I finally have a family photo with our puppy in it! And of course, it was getting scrapped right away! The Candy Cane is so cheerful and festive, and I wanted to keep the colors to the classic candy cane so I chose red and white. I backed the poinsettia flowers with various pink papers. I also stenciled the background with a mix of red and pink Distress Oxides and splashed a bit of paint around as well. I adhered the cut file down on the background and added a few extra flowers and my photo!

 I love how bright this turned out! Thanks for checking out my project! I hope it inspires you to check out the Candy Cane from the 25 Days of Christmas Cut Files 2019!


Blog // Instagram // Facebook // Pinterest

Truck with Trees Layout by Lisa Fonseca


Tuesday, December 27, 2022

  Hi scrappy friends, did you have a happy and merry Christmas? Lisa Fonseca here today with a layout using Paige's Truck with Trees from the 25 Christmas Cut Files 2019, paired with the Garden Shoppe collection.

For the background, I did a bit of mixed media using watercolors. I backed the Truck with Trees and used Distress Oxides and a pencil to create shadows. I also used Cardstock Stickers and Thickers to embellish and write the title.

Enjoy the last days of the year and have a wonderful New Year!! See you then!


SUPPLIES: Patterned papers, stickers, die cuts, embellishments: GARDEN SHOPPEwhite cardstockDistress Oxides; Cut file: Truck with Trees from the 25 Christmas Cut Files 2019 by Paige Evans

Blog // Instagram // YouTube // Facebook // Pinterest

Merry Christmas Layout by Kelly Daye


Monday, December 26, 2022

Hello friends, I hope you had a wonderful Christmas! Kelly Daye here sharing a layout using Paige’s latest collection, Garden Shoppe, and the Presents from the 25 Christmas Cut Files 2020.

I cut the Presents out of white cardstock and used Garden Shoppe Paper 24Paper 9, and Paper 21 to back all the gifts for a super colorful tree. Leaving three gifts empty, I filled them with my photos. It’s all popped up with 3D foam tape over a shadow made from the Floral Transparency. It’s quite thick acetate, so using a Deep Cut Blade in my Cameo 3, I made a score line that I cut out with scissors. Do some test cuts to see what works best on your machine. Two more photos were popped up onto little polaroid frames from a paper in the 6x8 Paper Pad. The tiny phrases on them were also from a paper in the pad. My background is white cardstock cut to 11.25” square.  All the stars in the background were first drawn with my Cameo 3, then stitched with DMC Floss. I just reused the star in the cut file. Watch THIS video to learn how. Once stitched, I centered the starry background over Paper 9. I love how all the colors are also in the gifts! Using the colorful Thickers in the collection, I adhered ‘Merry Christmas’ to a simple banner made of clear acetate so it could float over the cut file. I also cut it on my Cameo 3 and you’ll see that in my video too.

Thank you so much for stopping by, I hope this layout inspires you to check out the Presents from the 25 Christmas Cut Files 2020 and use non-Christmas collections on your pages such as Garden Shoppe! I can't wait for Paige's official Christmas collection next year :)


SUPPLIES: Patterned papers, stickers, die cuts, embellishments: GARDEN SHOPPEwhite cardstock; Cut file: Presents from the 25 Christmas Cut Files 2020 by Paige Evans

Blog // Instagram // YouTube // Facebook // Pinterest

Light Strand Layout by Jennifer Rambert


Friday, December 23, 2022

 Hello creative friends! Jennifer Rambert here today with a new layout featuring Paige's Light Strand from the 25 Christmas Cut Files 2021. I wanted a very festive layout with traditional Christmas colors.

First, I cut the Light Strand from watercolor paper. I then colored the design with red and green inks for the illusion of a real string of lights. I glued the whole thing to watercolor paper in the top right and popped up the bulbs and wire for a fun dimensional effect. I made big spots with the same inks and added the photo. I added a green grid paper to the left of my page to fill the gap and stitched to provide texture. A few embellishments here and there and a long title that I love make for a bright Christmas page!

I hope this layout inspires you in some way today! I loved making this layout and especially using this cute photo of my children. Christmas is upon us now so I wish you a Merry Christmas!


SUPPLIES: Cut file: Light Strand from the 25 Christmas Cut Files 2021 by Paige Evans


Blog // Instagram // YouTube // Facebook // Pinterest

Christmas Tree Layout by Jackie Ashton


Thursday, December 22, 2022

  Hi friends! Jackie Ashton here with my next design team project using the Christmas Tree from the 25 Christmas Cut Files 2020. For my layout I used the lovely Garden Shoppe collection.

To start, I cut the Christmas Tree from white cardstock and added it directly to a pink striped background paper from the 12x12 Paper Pad. I printed my photographs in black & white and matted them with patterned papers from the 6x8 Paper Pad. To embellish I added Floral Die Cuts, copper foil hearts from the Foam Phrase StickersCardstock Stickers, and pieces from the 8-Page Sticker Book.

I hope this layout inspires you to use Garden Shoppe for your Christmas pages and check out the 25 Christmas Cut Files 2020!


SUPPLIES:
 Patterned papers, stickers, die cuts, embellishments: GARDEN SHOPPEwhite cardstock; Cut file: Christmas Tree from the 25 Christmas Cut Files 2020 by Paige Evans

Instagram // Facebook // Pinterest

O Holy Night Layout by Heidi Lewis


Wednesday, December 21, 2022

Hi friends! Heidi Lewis here on the blog sharing a fun, new, scrappy technique today. Today’s layout was inspired by the idea of a stained glass window. To make this effect, I turned the Angel from the 20 Days of Christmas Cut Files 2020 into a stencil. I applied white modeling paste through the stencil onto black cardstock. Once the texture paste was completely dry, I painted the flowers, wings, and hair on the angel with modeling paste that coordinated with the colors of Garden Shoppe. It took some time to paint each little individual piece, but it was well worth it! I left the main part of the dress white.

Next I placed a 3x4 photo on the left bottom corner with my kitty looking up into the layout. I layered Floral Die Cuts with some Christmas florals around my photo. I love how the embellishments match the floral icons in the angel’s dress! I also made a little embellishment cluster with Ephemera Die CutsCardstock Stickers, and some Christmas elements to balance the photo on the left. I finished off the layout with a title made from Thickers and a few star stickers from my stash in the night sky.

Thanks for stopping by the blog today! I hope you are inspired to try this new technique with the Angel from the 20 Days of Christmas Cut Files 2020 paired with some Garden Shoppe!


SUPPLIES: Thickers, die cuts, stickers: GARDEN SHOPPEblack cardstockmodeling paste; Cut file: Angel from the 20 Days of Christmas Cut Files 2020 by Paige Evans

Instagram // Facebook // Pinterest 

Snow Globe Layout by Audrey Mutschall


Tuesday, December 20, 2022

Hi friends and Merry Christmas! Audrey Mutschall here with a new layout featuring Paige’s Snow Globe from the 25 Christmas Cut Files 2019. I’ve admired this cut file for a long time and was so excited to finally use it. I paired it with the beautiful Garden Shoppe collection and I love how it turned out.

I started by cutting the Snow Globe from white cardstock and I backed it with various patterned papers from the 12x12 Paper Pad and the 6x8 Paper Pad. With the patterned backing completed, I adhered a piece of vellum behind the cut file to give the glass of the snow globe a frosty appearance. I used foam adhesive to attach a piece of transparency behind the vellum and then filled the space with sequins to create a shaker. For the background, I splattered white acrylic paint onto Paper 11 and adhered the cut file to the left side of the layout. I wanted to continue the sequin theme onto the background, so I cut a 3 inch strip of white cardstock, poked holes along the top and bottom edges, and strung yarn and sequins in a criss-cross pattern. I added this to the right side of the layout and used two strips of Washi Tape as a border between the two sections of the background. Lastly, I added a title using Thickers and embellished around my photo using sentiments from Paper 23 and a few fussy cut flowers from Paper 2.

I had so much fun creating this layout and I hope it inspires you to make a shaker element using Paige’s adorable Snow Globe from the 25 Christmas Cut Files 2019!


SUPPLIES: Patterned papers, Thickers, washi tape, embellishments: GARDEN SHOPPEwhite cardstockvellumwhite acrylic paint; Cut file: Snow Globe from the 25 Christmas Cut Files 2019 by Paige Evans

Instagram // Facebook // Pinterest

Peace on Earth Nativity Layout by Ashley Neu


Monday, December 19, 2022

 Hello friends! Ashley Neu here to share my next project for the Paige Evans Cut File Design Team. We just had our Christmas program at our church and I got some really cute photos of the performance and my daughter so I thought the Nativity from the 25 Christmas Cut Files 2020 would be perfect to create a layout!

After cutting the Nativity from white cardstock I backed it with papers from the 6x8 Paper Pad from Paige’s Bungalow Lane collection. I kept the colors very “earthy” as that’s how I envision a Nativity scene. I used a piece of acetate with gold stars from my stash to adhere on top of a piece of black cardstock and then added the cut file with foam adhesive. I positioned the title above the cut file and the photo collage below on a patterned paper also from Bungalow Lane.

Thank you for stopping by the blog today! I hope you are having a wonderful Christmas season! Have a great day!


SUPPLIES: Patterned papers, stickers, embellishments: BUNGALOW LANEblack cardstock; Cut file: Nativity from the 25 Christmas Cut Files 2020 by Paige Evans

Instagram // YouTube // Facebook // Pinterest 

Christmas Tree Layout by Yui Oku


Saturday, December 17, 2022

Hi everyone! Yui Oku here today with a new layout using Paige's Christmas Tree from the 25 Christmas Cut Files 2019 and I challenged myself to use the fall-themed Garden Shoppe collection for a Christmas page!

I felt like making a traditional colored tree so I gathered 4 green papers (Paper 6Paper 8Paper 14, and Paper 18) to back the Christmas Tree that I had cut from white cardstock. The buttons for the ornaments were fussy cut from Paper 18. I chose Paper 15 for the background which I painted with gesso to soften it up and then put the tree on top. Lastly I added photos and embellishments from the Ephemera Die CutsFloral Die Cuts, and the 8-Page Sticker Book.

I hope this layout inspires you to use Paige's Garden Shoppe collection and the Christmas Tree from the 25 Christmas Cut Files 2019!


SUPPLIES: Patterned papers, stickers, die cuts, embellishments: GARDEN SHOPPEgessowhite cardstock; Cut file: Christmas Tree from the 25 Christmas Cut Files 2019 by Paige Evans

Blog // Instagram // YouTube // Facebook

Sixteen Layout by Valerie Bisson


Friday, December 16, 2022

Hi friends! Valerie Bisson here today and I’m happy to share my project with you using Paige's Cupcakes from the 25 Christmas Cut Files 2020 along with the Garden Shoppe collection.

I cut the Cupcakes as well as the Sixteen title from white cardstock and backed them with various patterned papers from Garden Shoppe and a few scrap pieces from Go the Scenic Route. Next I chose Paper 21 for my background and added sequins coming down from the top of the page, hand stitched in place. I added the cut files with dimensional adhesive and for my photos I added coordinating photo mats and placed them across the page. For my embellishments I added the gorgeous layered Butterfly Stickers in three spots around the page and word sentiments fussy cut from Paper 23 on each photo.

I hope I’ve inspired you to try using Paige's Cupcakes from the 25 Christmas Cut Files 2020 along with the Garden Shoppe collection!


SUPPLIES: Patterned papers, stickers, die cuts, embellishments: GARDEN SHOPPEwhite cardstock; Cut files: Cupcakes from the 25 Christmas Cut Files 2020 and Sixteen by Paige Evans

Instagram // Facebook // Pinterest

Best Gift Ever Layout by Phil Donahue


Thursday, December 15, 2022

Hi crafty friends! Phil Donahue here back on the blog with a festive Christmas layout featuring Paige's Light Strand from the 25 Christmas Cut Files 2021! For this layout I wanted to document photos of my niece's first Christmas using elements from two of Paige's collections: Garden Shoppe and Splendid

To start, I found green and teal papers from both collections and my scraps then cut them into 12x1-inch strips. I snipped each about a half-inch to create a fringe effect then layered and adhered them to create a textured background reminiscent of a Christmas tree. I splattered gold and white acrylic paint all over the background to create even more interest and texture. While the background dried, I cut the Light Strand twice from white cardstock. I backed each of the cord portions with Paper 1 and the bulbs with gold-foiled papers from the 6x8 Paper Pad, both from Splendid. The gold-foiled papers really made the bulbs seem illuminated! I adhered the cut files with dimensional foam squares - one in full in the center of the page and the other cut into sections to fill gaps around the page. I backed the photo and title with layers of vellum, elements from the Garden Shoppe Ephemera Die Cuts, and pieces of the Splendid Floral Transparency. I sprinkled multi-color sequins and gold-foil stars all over the page for added embellishments. Three bows made from gold and white baker's twine placed in the main areas of embellishments finished this fun and festive page!

I hope you found some inspiration in this layout! Thank you for stopping by and have a happy holiday season!


SUPPLIES: Patterned papers, stickers, die cuts, embellishments: GARDEN SHOPPE and SPLENDIDwhite cardstockgold and white acrylic paintvellum; Cut file: Light Strand from the 25 Christmas Cut Files 2021 by Paige Evans

Instagram // Facebook

Letter to Santa Layout by Noelle Culp


Wednesday, December 14, 2022

Hi crafty friends! Noelle Culp here today with a new design team layout featuring Paige's "Dear Santa" Letter from the 25 Days of Christmas Cut Files 2020!

Instead of using it as a letter to Santa, I actually wanted to use it more like a Christmas photo card. I backed the cut file with paper that I had in my stash. For the background, I used a snowflake stencil and added modeling paste. I then adhered the cut file to the middle of the page, tucked my photo in the envelope, and added some flowers that I made using Paige's Layered Flower Cut File. I think this flower looks like poinsettias and matched the flowers from the cut file. I added a few scattered flowers as well to finish it up.

Thanks for stopping by! I hope this layout inspires you to check out the "Dear Santa" Letter from the 25 Days of Christmas Cut Files 2020!


Blog // Instagram // Facebook // Pinterest

Always Smiling Layout by Missy Whidden


Tuesday, December 13, 2022

Hey friends! Missy Whidden here with a new layout featuring lots of the Washi Tape from Paige’s Garden Shoppe collection. I wanted to come up with a design to showcase six small photos, so I decided on various sized circles. This is a great way to use lots of the rolls of Washi Tap. I applied the Washi Tap to white cardstock and then used a few different sized circle punches to create the shapes. Very easy! Once I had them arranged, I worked on the background. I used thick smooth white cardstock for the base and I coated it with clear gesso first. I used matching colors of Shimmerz sprays to create a watercolor effect behind the circles.

I added adhesive foam behind all of the circles to pop them off the page. I also bent up the edges to create even more dimension. For the smallest circles I used some of the cute shapes from the Enamel Button Stickers. I also went small with the title: I cut a few phrases from Paper 23 and I cut the main title from Paper 13. The “beautiful” sticker is from the 8-Page Sticker Book and it is a shiny copper. One of my favorite things about this collection is the amount of title options. Titles don’t always have to be large or the focal point and these smaller bits are perfect for that. I also tucked in a bit of green thread here to add a pop of color and texture.

I created my photo strips by adding tissue paper behind them and then attaching them to patterned papers. I used Paper 18 and Paper 24 and I distressed the edges. I added some of those phrases to the photos as well as stickers from the Cardstock Stickers and the 8-Page Sticker Book

The design of this layout was really easy to create and the layers of dimension really help give it that extra complexity. You could create circles from patterned papers and get the same effect. I think the Washi Tape coordinate so well together so I chose to use most of them. I love how it turned out!

I hope this inspires you in some way today and gives you an idea or two to try on your next project!  Thanks for stopping by and have a great day!


SUPPLIES: Patterned papers, stickers, die cuts, washi tape, embellishments: GARDEN SHOPPEwhite cardstockgesso
Blog: littlenuggetcreations.blogspot.com // Instagram: @missywhidden // Pinterest: @missywhidden
Facebook: missy.whidden // YouTube: Missy Whidden

Nutcracker Layout by Lisa Fonseca


Monday, December 12, 2022

 Hi scrappy friends, Lisa Fonseca here today and I hope you're having a wonderful Christmas season! Today I'm back with a layout using two cut files from Paige's 25 Christmas Cut Files 2019: the Starry Sky and the Nutcracker, paired with the Garden Shoppe collection.

I love this Starry Sky Cut File, it's so easy to create a beautiful background with it. I backed it with the super pretty Paper 19 - it has a squared pattern with all of the colors so when putting the cut file on top, you immediately have a colorful starry sky. I backed the Nutcracker with papers mainly in the colors yellow, pink, and blue using a lot of 2x2 squares from Paper 24 and then created a colored border for him to stand out more. I added a few clusters of Floral Die Cuts and used Thickers for the title. Finishing details include a sentiment from the Cardstock Stickers and Enamel Button Stickers.

I hope you like it, let me know in the comments! See you again soon!


SUPPLIES: Patterned papers, stickers, die cuts, embellishments: GARDEN SHOPPEwhite cardstock; Cut files: Starry Sky and the Nutcracker from the 25 Christmas Cut Files 2019 by Paige Evans

Blog // Instagram // YouTube // Facebook // Pinterest

Paige Taylor Evans © // Quinn Creatives DESIGN