Autumn Layout by Audrey Mutschall


Tuesday, October 31, 2023

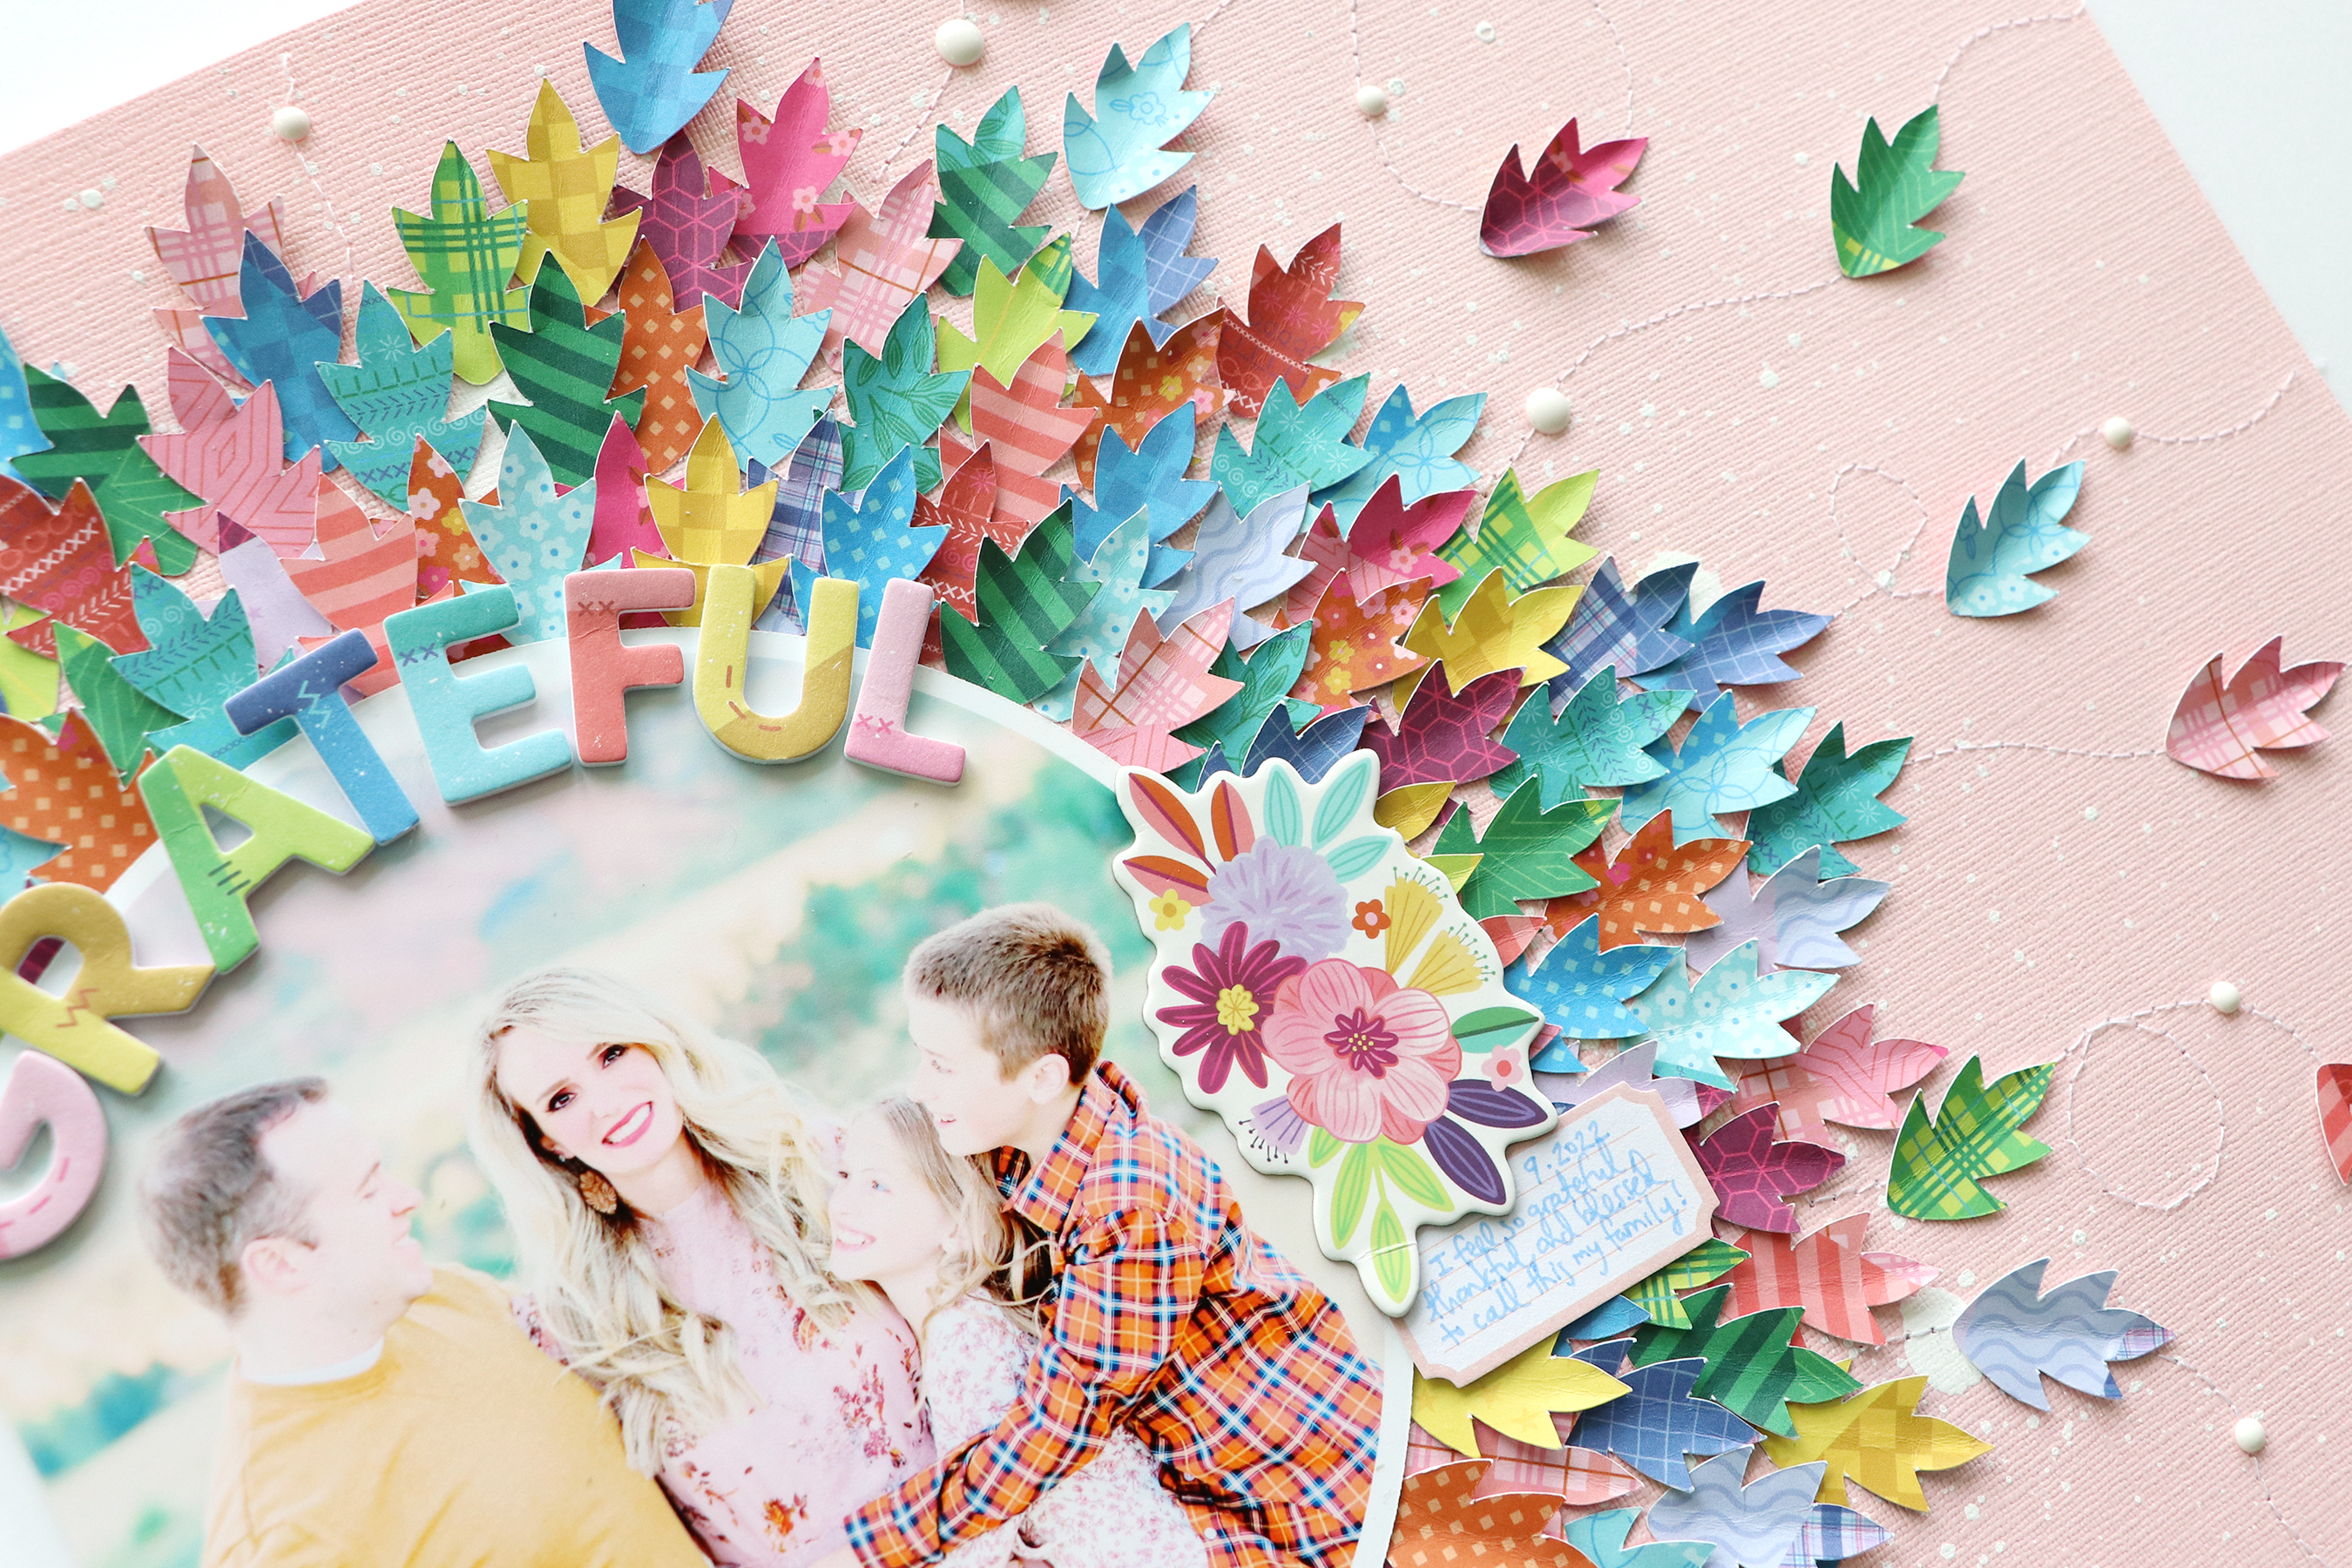
Hello friends! Audrey Mutschall here with a new autumn-themed layout featuring Paige’s Large Leaf cut file and her Autumn Title from the 2021 bundle of 20 Fall/Autumn Cut Files. I used the gorgeous Blooming Wild collection for this layout and I love how it turned out!
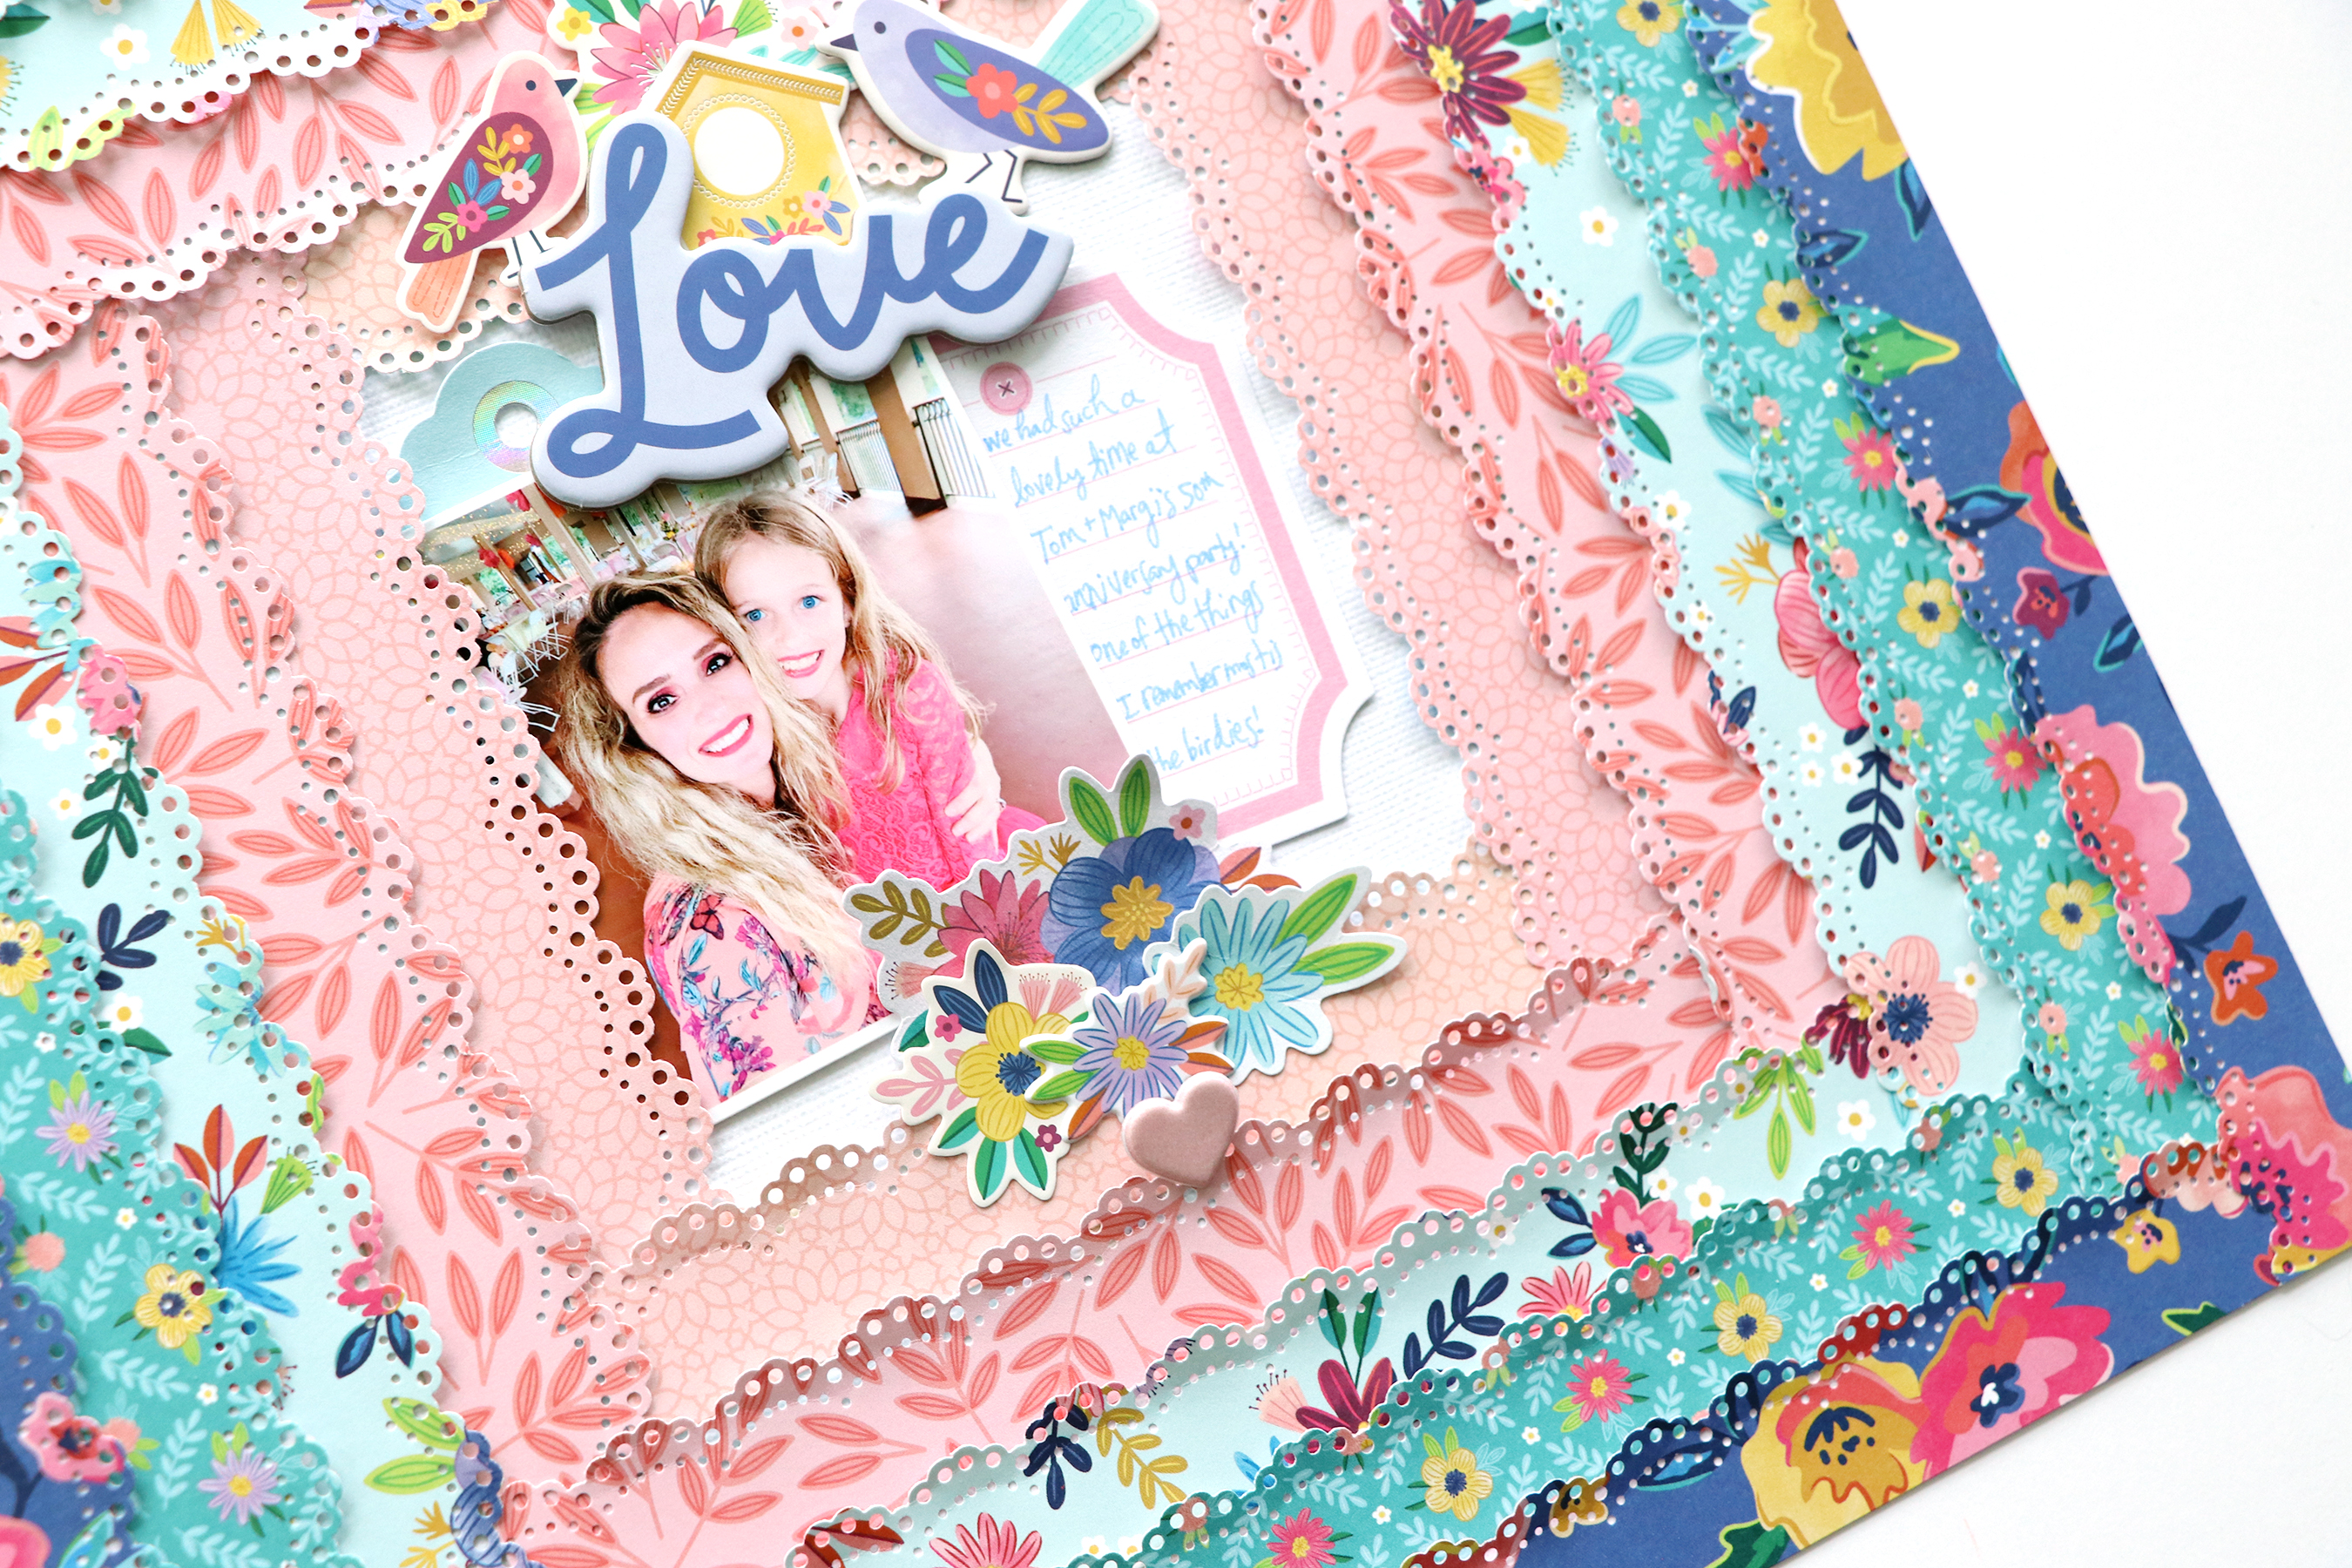
I started by cutting the Large Leaf out of white cardstock. I backed the opening with Paper 21 which has a pretty scalloped pattern in pinks, oranges, yellows, and purples - perfect for a fall layout. I used DMC embroidery floss to chain-link stitch along the borders between the scallops, giving some extra texture and definition to the patterned paper. With the backing complete, I decided to add a running stitch around the edge of the Large Leaf, so I poked holes about ¼” away from the edge of the design and used variegated embroidery floss to stitch around the border. When all the sewing was complete, I adhered the patterned paper behind the leaf using foam tape. I printed my photo 3.5x5” in size and matted it with ombré pink Paper 23. I resized the Autumn Title and cut it out of white cardstock then backed it with a dark pink cardstock. I love how it has the texture of knitting - so cute!! Lastly, I embellished my layout with heart shaped Cardstock Stickers, fussy cut butterflies from Paper 16, a Puffy Phrase Sticker, and a few pennant stickers from the Sticker Book.
I hope this inspires you to check out Paige’s many beautiful Fall/Autumn Cut Files, as well as the gorgeous Blooming Wild collection for all your fall projects!
SUPPLIES: Patterned papers, stickers, die cuts, embellishments: BLOOMING WILD; white cardstock; Cut files: Large Leaf and Autumn Title from the 20 Fall/Autumn Cut Files by Paige Evans

Thankful Layout by Ashley Neu


Monday, October 30, 2023

Hello scrappy friends! It’s Ashley Neu back for the Paige Evans Cut File Design Team to share my next project! I just love fall - from the leaves to the smells to the fun activities! One of our favorite fall traditions is picking apples. These lovely photos are from 11 years ago! Using Paige’s Garden Shoppe collection, I put together this fall banner page. The Leaf Banner cut file is just too cute!
After cutting the Leaf Banner from Paper 8, I backed it with patterned papers from the 12x12 Paper Pad. I adhered this onto white cardstock and slightly bent up the leaves. I printed my photos at 1.5" square with a white border. I wanted them to look like they were strung along the banner. I adhered these flat to the layout. Lastly, I added embellishments along the banner and next to the photos. The embellishments came from the Cardstock Stickers. I also added some of the cute buttons from the Enamel Button Stickers to the holes in the banner that I did not back with patterned paper.
This concludes the process of this fun fall layout! I hope I’ve inspired you to try squeezing many photos onto a single page layout with one of Paige's cut files! Thank you for stopping by and have a wonderful day!
SUPPLIES: Patterned papers, stickers, embellishments: GARDEN SHOPPE; white cardstock; Cut file: Leaf Banner by Paige Evans

The Bellagio Double Page Spread by Paige Evans for SCT


Sunday, October 29, 2023

Here is the last project I made for the Fall 2023 issue of Scrapbook & Cards Today Magazine which you can download and browse for free HERE! I used my Blooming Wild collection to create a double page spread filled with colors, patterns, and flowers!
I cut (24) 1x10" strips of Blooming Wild papers, stitched around each strip using white thread for texture and interest, curled the ends, then arranged them across the bottoms of two sheets of the pastel grid B-side of Paper 5.
I tucked lot of flowers from the Floral Die Cuts and Ephemera Die Cuts up under the rolled paper strips and gave them life and dimension by pinching the petals and leaves.
I was able to add eight photos on this spread! I used a combination of 4x3" and 3x4" photos arranged across the pages and then embellished with Puffy Phrase Stickers placed tone-on-tone.

I made the main title up at the top left corner using Thickers and a subtitle across the bottom of the right page using the silver alphas from the Sticker Book. I wrote journaling next to the title and called this spread finished! Since it's so colorful and busy I didn't want to add too much else to let the papers and photos really shine!
I hope this layout inspires you to check out the Fall 2023 issue of Scrapbook & Cards Today Magazine and try creating a double page spread with my Blooming Wild collection!
SUPPLIES: Patterned papers, stickers, die cuts, embellishments: BLOOMING WILDwhite cardstock

Ruffles of Repetition Layout by Paige Evans for SCT with Tutorial Video


Saturday, October 28, 2023

Here is the layout I made for my Paige's Page article in the Fall 2023 issue of Scrapbook & Cards Today Magazine which you can download and browse for free HERE! I used my Blooming Wild collection and the page features ruffles of repetition. 
Check out the start-to-finish process video and learn how to make this page:
I chose five papers from my Blooming Wild collection to create the ruffles and punched them all with a scallop lace border punch. After arranging the paper strips into a frame on a background of white cardstock, I added a photo in the middle and continued embellishing with Chipboard StickersCardstock StickersPuffy Stickers, and Mini Flower Puffy Stickers.
For the journaling I tucked a Journaling Spot under the right side of the photo and wrote with a light blue pen.
I hope this layout inspires you to check out the Fall 2023 issue of Scrapbook & Cards Today Magazine and try creating ruffles with Blooming Wild papers!
Let me know if you have any questions and thanks for stopping by!
SUPPLIES: Patterned paper, die cuts, stickers, embellishments: BLOOMING WILDwhite cardstockscallop lace border punch

Trick-or-Treat Layout by Yui Oku


Friday, October 27, 2023

Hi everyone! Yui Oku here today with a new layout using Paige's Trick-or-Treat from the 20 Halloween Cut Files along with her Sugarplum Wishes collection!
I wanted to try to use Sugarplum Wishes for a Halloween layout and I found the green stars Paper 10 - the combination of yellow-green and black is so good for Halloween, right?! I die cut the Trick-or-Treat from white cardstock and placed it over a black cardstock background at an angle and it looked cool. I decided to use my sons' costume photo, he was the Hulk, so the colors were perfect together. I cut out the inside part of the O from the cut file and attached the photo. I punched three sizes of stars from the green Paper 10 as well as more black cardstock, distressed all the edges, and placed them in three places around the page for a visual triangle. I wanted to add something around the photo, so I made "BOO" using only green letters from the Blooming Wild Thickers - one "O" was made by cutting a "Q".
It's simple but I love it! This cool layout is perfect for my growing sons! I hope you're inspired to try Paige's Trick-or-Treat from the 20 Halloween Cut Files along with her Sugarplum Wishes collection!
SUPPLIES: Patterned papers, stickers, Thickers, die cuts, embellishments: SUGARPLUM WISHES and BLOOMING WILD; white cardstockblack cardstock; Cut file: Trick-or-Treat from the 20 Halloween Cut Files by Paige Evans

Halloween Layout by Valerie Bisson


Thursday, October 26, 2023

Hi friends! Valerie Bisson here and I’m so happy to share my Snapchat Fun scrapbook layout with you featuring Paige's Polaroids from the 20 Halloween Cut Files paired with her Blooming Wild & Garden Shoppe collections.
I started with Blooming Wild Paper 5 for my background then to grunge it up I misted silver spray ink across the page and also some black watercolors. Then I machine stitched with black thread around the edge 3 times, purposely making the lines crooked and messy. Next I cut the Polaroids from a rainbow of patterned papers from Blooming Wild and Garden Shoppe. In addition I added a black cardstock layer behind each frame. Then I machine stitched with white thread around each frame and backed each with some scrap papers from Garden Shoppe and my photos. For the center frame I decided to make it into a shaker filled with sequins. For this I added a piece of acetate to the back of the frame, then strips of foam adhesive around the edges which creates a space for the sequins. Finally, to close in the sequins, a piece of black cardstock to which I added a title in the silver letter stickers from the Blooming Wild Sticker Book before adding it to the back of my sequin shaker box. For a little dimension I used foam adhesive squares to attach all the polaroids to the background paper. I embellished my layout with several pieces from the Blooming Wild Sticker Book including the silver ric rac, a striped border, word stickers, silver alphas, and a couple of tabs from the Chipboard Stickers. I also fussy cut some tags from Garden Shoppe Paper 13 and flowers from Paper 7 distributed around my page. Final touches include some stamping with Paige’s Halloween Roller Stamp added in a few places and a year and Boo with the Splendid mono foam Thickers.
Thanks so much for stopping by, I hope you’re inspired to create a project using the Polaroids from the 20 Halloween Cut Files along with the Blooming Wild & Garden Shoppe collections!
SUPPLIES: Patterned papers, stickers, Thickers, die cuts, embellishments: BLOOMING WILD and GARDEN SHOPPEHalloween Roller Stampwatercolorsblack cardstock; Cut files: Polaroids from the 20 Halloween Cut Files by Paige Evans

Falloween Girl Layout by Phil Donahue


Wednesday, October 25, 2023

Hello scrappy friends! Phil Donahue here, delighted to be back on Paige's blog sharing an Autumn meets Halloween layout I made using her Pumpkin with Leaves from the 13 Halloween Cut Files! This particular cut file is one of the most versatile in the bunch and perfect for fall or Halloween layouts - or both! The photos of my niece I wanted to feature were taken on a beautiful autumn day where she happened to be wearing a cute Halloween outfit. Because the photos weren't exactly the most Halloween-y I felt this Pumpkin with Leaves cut file would accent them perfectly! I mostly used Paige's Splendid collection which also accented the photos perfectly!
To begin, I flipped through the Splendid papers for some inspiration. I came across Paper 12 which has pink, orange, and aqua floral elements which resonated with autumn vibes! This paper inspired the color scheme of the layout. I cut the Pumpkin with Leaves from white cardstock and backed the main pumpkin with the orange scalloped Paper 11. I left the wreath of leaves around the pumpkin unbacked because I knew I wanted to feature a halo of mixed media behind them. I watered down orange, yellow, and hot pink Distress Oxides and applied the inks in clusters around where the cut file would be adhered. Next I adhered the backed cut file using foam strips to create more dimension over top of the mixed media. I felt the page needed more interest so I cut a one-inch slits on the top right and bottom left of the main page and curled the edges to reveal the pink gingham design on the B-Side of the paper. I backed the entire main background paper on top of the kraft paper/white doily Paper 2 to add more earth tones reminiscent of autumn. I love how the doily pattern peaks through! I cut out pieces from the cut-apart sheet Paper 23 along with a sheet of the miniaturized kraft doily Paper 2 from the 6x8 Paper Pad to back the photo. After distressing the edges of each I layered them under the photo adhered it to the layout in a top left area of the cut file. I used the Garden Shoppe Thickers and Splendid Mini Thickers to create my title. I added Layered Bouquet Stickers in three areas of the layout to create embellishment clusters. These stickers brought all the colors together, even the kraft paper! I even harvested some flowers from the bouquets to add smaller embellishments and interest to the title and other areas around the layout. Final touches were phrases from the Sticker Book and aqua enamel dots around areas of embellishments to complete the layout!
I hope you found some inspiration from this Falloween layout and choose to try Paige's 13 Halloween Cut Files! Thank you for stopping by and have a great day!
SUPPLIES: Patterned papers, stickers, die cuts, ellishments: SPLENDID and GARDEN SHOPPE; Distress Oxideswhite cardstock; Cut file: Pumpkin with Leaves from the 13 Halloween Cut Files by Paige Evans

Dream Big Layout by Noelle Culp


Tuesday, October 24, 2023

Hi crafty friends! Noelle Culp back a new layout! For this page I used Paige's Stars Border from the 20 Halloween Cut Files along with some of her Blooming Wild collection.
 
After cutting the Stars Border from white cardstock I backed the stars with the navy blue Paper 9. It took a little bit longer to back because I wanted the paper to be all oriented the same direction. For my background I used a star stencil and Chipped Sapphire Distress Oxides. I stenciled all over the page to make it extra starry. Then I added some splashes of gold paint. I glued the cut file down and then I backed my photo again with Paper 9 that I lightly distressed and tucked in a Journaling Spot. I added a word sentiment from Paper 23 from the Garden Shoppe collection and a Heart Paper Clip from the Splendid collection. Finally, I added a large title and a few sequins!
I love how this page turned out and I hope it inspires you to try Paige's Stars Border from the 20 Halloween Cut Files along with her Blooming Wild collection!
SUPPLIES: Patterned papers, die cuts, stickers, embellishments: BLOOMING WILDGARDEN SHOPPE and SPLENDID; white cardstock; Distress Oxidesgold paint; Cut file: Stars Border from the 20 Halloween Cut Files by Paige Evans

BOO Layout by Lisa Fonseca


Monday, October 23, 2023

Hey spooky friends, it's Lisa Fonseca here and today I'm sharing this spooktacular layout created with Paige's Haunted House from the 13 Halloween Cut Files along with her Blooming Wild collection!
The photo I used was perfect for this layout as I took it in front of Disneyland Paris's Haunted Mansion. I cut the Haunted House from black cardstock and I didn't back it with papers. I left it as is and created this scene with a hill and spooky clouds where it fit right in. For my title I used the Chipboard Alphabet Outlines and backed them with different patterned papers.
I'm ready for new Halloween photos now! I hope this inspires you to scrap your spooky photos using Blooming Wild and Paige's 13 Halloween Cut Files!
SUPPLIES: Patterned papers, stickers, Thickers, die cuts, embellishments: BLOOMING WILD; Cut file: Haunted House from the 13 Halloween Cut FilesPaige Evans

Grateful Layout by Paige Evans for SCT


Sunday, October 22, 2023

Here is a layout I made for the Fall 2023 issue of Scrapbook & Cards Today Magazine which you can download and browse for free HERE!
I used my
 Blooming Wild collection and featured lots and lots of leaves made with my Leaves Cut File.

First I used my Leaves Cut File to cut two full sheets of leaves from the super colorful B-sides of both Paper 21 and Paper 22. After peeling all the leaves off the mat I bent them slightly to give them texture and dimension. I chose a light pink textured cardstock for the background, splattered white acrylic paint on top, then once the paint dried I adhered a round photo over on the left side. Then I began tucking the leaves all around the photo, gluing them in place one at a time. I love all the colors!
I machine stitched swirls with white thread over the empty parts of the page and added a few straggler leaves on top. I finished with a title made with Thickers around the photo, a floral Chipboard Sticker, journaling written on a label from the Sticker Book, and white enamel dots.
I hope this layout inspires you to check out the Fall 2023 issue of Scrapbook & Cards Today Magazine and try creating a beautiFALL page with my Blooming Wild collection and Leaves Cut File!
Let me know if you have any questions and thanks for stopping by!
SUPPLIES: Patterned paper, die cuts, stickers, embellishments: BLOOMING WILDwhite enamel dotswhite acrylic paint; Cut file: Leaves by Paige Evans

Sketch Challenge #3 with Paige Evans


Saturday, October 21, 2023

I'm so excited to share my third sketch and accompanying challenge!
SKETCH CHALLENGE #3
1) Create a new layout based on this sketch!
2) Upload your layout to your social media by Saturday November 25th 2023 and tag me @paigetaylorevans so I can see. You can use whatever products/collections you have.
3) After you post your finished layout, send me a DM or email (paigetaylorevans@gmail.com) and I will give you a code for $15 off your purchase of digital items/virtual classes in my shop! Open worldwide!
4) Have so much fun!! Can't wait to see what you make for this sketch challenge!!
*******
I have made many layouts with this flower garden concept which I've shared below!
Here is my layout made for my Make Your Memory book that the sketch is based on created with Splendid
All the info about this folded hearts flower garden layout can be found HERE.
All the info about this tulip garden layout can be found HERE.
All the info about this hearts garden layout can be found HERE.
All the info about this flower circles garden layout can be found HERE.
Can't wait to see what you make!!!

Halloween Exploding Box by Kelly Daye


Friday, October 20, 2023

Hi friends, Kelly Daye here with a spooky fun Halloween Exploding Box! Paige’s BOOtiful Garden Shoppe and Splendid collections were used throughout along with various cut files.
I started with Paige’s Exploding Box cut file and began by filling it with the Polaroids from the 20 Halloween Cut Files. After cutting the polaroids from white cardstock I hand stitched each phrase with 4 strands of colorful DMC floss then chain-stitched a frame around each with all 6 strands of white DMC Floss.
 
I wanted the outside of the box to look like two ghostly friends floating through an eerie garden. The flowers are made with Paige’s Layered Flower & Layered Flower cut files and a few fussy cut blooms from Splendid Paper 13. Tiny die cut bats hang on a piece of wire overhead for some extra spooky dimension. Little extras: enamel dots from Paige and Enamel Button Stickers from Garden Shoppe. The cute chipboard tag about friendship is from the Hey Pumpkin Chipboard, also available in Paige’s shop.
Four more boo-tastic paper-backed cut files by Paige fill my Exploding Box with extra spookiness: Sugar Skull, Monster, Witch Hat, and Candy.
Also inside, another box hides a tiny surprise! The box top was decorated with Paige’s Too Cute To Spook Cut File. A wee mini album, just 2.5” square, was made with Garden Shoppe Paper 17 using the hidden hinge technique I learned in this Virtual Class with Paige. I chain stitched the cover for some pretty texture. Team member Amber Mitchell is also a big inspiration. Amber makes super cute mini albums!
Check out my YouTube today for a peek-a-BOO inside!
I hope you’re inspired to make your own Exploding Box and fill it with fun memories using Paige’s cut files and paper collections!

Too Cute to Spook Layout by Kat Flores


Thursday, October 19, 2023

Hello scrappy friends! Kat Flores here! We are officially in Halloween season! I'm so happy to be back on Paige's blog sharing a layout featuring Blooming Wild. For my page I used the Spiderweb from the 13 Halloween Cut Files.
I started cutting by the Spiderweb from white cardstock and backed it with Paper 18. I glued it down with foam adhesive over Paper 20 and added hand stitching for a dangling spider. For visual balance I chose borders from Paper 1 to place along the bottom and used a tag from Paper 9 to write my journaling. To finish I used Chipboard Rounds overlapped to place my title made with Thickers. I placed Cardstock Stickers and holographic stickers from the Sticker Book in the web and made some splatters with white and mint acrylic paint over the page to finish.
I love this colorful and cheerful Halloween page! I hope you get inspired to use your Blooming Wild collection along with the 13 Halloween Cut Files! Have a wonderful day and happy scrapping!
SUPPLIES: Patterned papers, stickers, Thickers, die cuts, embellishments: BLOOMING WILDwhite cardstock; Cut file: Spiderweb from the 13 Halloween Cut Files by Paige Evans
Paige Taylor Evans © // Quinn Creatives DESIGN