Rainbow Layout by Paige Evans


Sunday, March 31, 2024

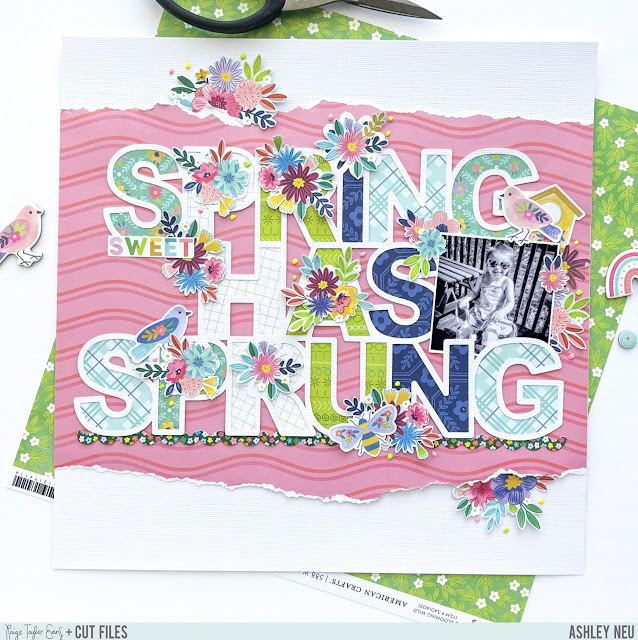
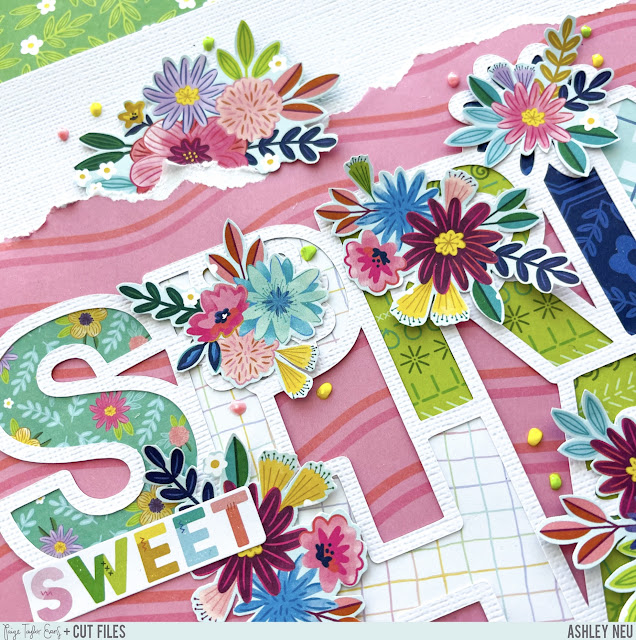
Here's the third of the four layouts we make in class with the Main Character Energy collection by my friend Shimelle!
I do still have kits available so you can create right along with me in the start-to-finish process videos.
Main Character Energy Kit & Classes
4 Layouts Virtual Class Only
This page features a backed rainbow cut file and it's backed in a slightly different way than usual! In class I show you how to make this page from start-to-finish along with 3 more 12x12 layouts! The class includes the digital download for the rainbow cut file but if you don't have an electronic cutting machine, reach out to me to purchase a pre-cut rainbow. During class I walk you through my tips, tricks, and techniques and offer suggestions for changing things up and altering the page to put your own spin on it! After purchasing the kit which comes with the class or just access to the virtual class, Ecwid will email you the PDF that contains a list of supplies, photo sizes, templates, cut files, instructions, and a link to YouTube where the class takes place. The class is pre-recorded so you can go at your own pace, watch it as many times as you need, and access it at any time!
Let me know if you have any questions and I hope to see you in class!
Be sure to pick up the accompanying kit which comes with the class HERE!

Butterfly Rings Layout by Paige Evans


Saturday, March 30, 2024

Here's the second of the four layouts we make in class with the Main Character Energy collection by my friend Shimelle!
I do still have kits available so you can create right along with me in the start-to-finish process videos.
Main Character Energy Kit & Classes
4 Layouts Virtual Class Only
This page features three rings of fussy cut butterflies, three photos, and three clusters of embellishments! In class we learn how to make this page from start-to-finish along with 3 more 12x12 layouts! I walk you through my tips, tricks, and techniques and offer suggestions for changing things up and altering the page to put your own spin on it! After purchasing the kit which comes with the class or just access to the virtual class, Ecwid will email you the PDF that contains a list of supplies, photo sizes, templates, cut files, instructions, and a link to YouTube where the class takes place. The class is pre-recorded so you can go at your own pace, watch it as many times as you need, and access it at any time!
Let me know if you have any questions and I hope to see you in class!
Be sure to pick up the accompanying kit which comes with the class HERE!

Kauai Wildlife Layout by Heidi Lewi


Hi tweet friends, it's Heidi Lewis back on the blog today sharing another birds layout! This time I used the Birds Background cut file and Paige's Blooming Wild collection to document a rooster photo.
I started by cutting out the Birds Background from white cardstock and then I cut the birds apart with scissors. Next, I backed the birds with Paper 22 which is colorful, just like roosters! I hand stitched the beaks as a fun little detail (thanks for the inspiration, Audrey Yeager!) I arranged the birds in a diagonal line across my page and tucked in a 3x4 photo towards the top. Of course I had to use all the little bird and birdhouse stickers from the Cardstock Stickers and Sticker Book. The main title is made of Thickers and mini alphabet stickers. I jokingly call the rooster wildlife because they are EVERYWHERE in Kauai.
Jokes aside, I hope you feel inspired by this "im-peckable" layout. Ok, I'm done with the bird puns now :) I hope you feel inspired to check out Paige's Birds Background cut file and Blooming Wild collection!
SUPPLIES: Patterned papers, die cuts, stickers: BLOOMING WILD; Cut file: Birds Background by Paige Evans

Crop in Orlando Sneaks!


Friday, March 29, 2024

Join me for two in-person classes at a Crop in Orlando on Saturday June 1st 2024! We'll use the stunning Moonlight Magic collection by Crate Paper to create two 12x12 layouts, a traveler's notebook mini album, and photos/instructions for four bonus 12x12 layouts. Find all the details and registration HERE - only 12 spots left!
Above are sneaks of the six 12x12 layouts you'll be able to create with the class kit! We'll create two in class and you'll receive instructions for the other four. From a vellum backed cut file, distressed paper strips, and a ring of stars to a paper-pieced window, hill scene, and heart grid, there's no shortage of techniques you'll love trying out time and time again!
Below is a sneak of the Traveler's Notebook mini album we'll make in the second class using the same Moonlight Magic kit! With over 16 spreads, sequin pockets, interactive flips and flaps, adorable coordinating ribbons, tassels, charms, and plenty of room for photos, you'll love filling up this special album with all kinds of magical memories!
Here is a look at the Moonlight Magic kit before I added all the extra bits like cut files, templates, ribbons, charms, tassels, and more!
Let me know if you have any questions about the Crop in Orlando! Hope to see you there in-person to scrap together!
Register HERE!

Hello Spring Layout by Audrey Mutschall


Thursday, March 28, 2024

Hello friends!! Audrey Mutschall here with a new layout featuring Paige’s Hello Spring from the 20 Spring Cut Files and her beautiful Blooming Wild collection.
I started by re-sizing the Hello Spring cut file to approximately 3 inches in diameter so I could cut a bunch of them and arrange them into a grid on a 12x12 layout. Next I chose patterned papers from the 12x12 Paper Pad and cut the design out 8 times in shades of yellow, blue, green, pink, and purple. I glued the designs onto circles of white cardstock and then cut scalloped circles out of the patterned papers to place behind those. Next I splattered watercolors onto white cardstock to create a background that coordinated with the colors of papers I used. I cut my photo into a 3 inch circle, framed it with a white scalloped doily, and placed it in the center of the layout, making it the focal point. I embellished underneath the doily with Floral Die Cuts and fussy cut flowers from Paper 24. Lastly, I placed fussy cut butterflies from Paper 16.
I hope this inspires you to check out Paige’s gorgeous bundle of 20 Spring Cut Files and her lovely Blooming Wild collection!
SUPPLIES: Patterned papers, stickers, die cuts, embellishments: BLOOMING WILD; white cardstock; watercolors; Cut file: Hello Spring from the 20 Spring Cut Files by Paige Evans

Spring Has Sprung Layout by Ashley Neu


Wednesday, March 27, 2024

Hello scrappy friends! It’s Ashley Neu back for the Paige Evans Cut File Design Team to share my next layout. Spring is in the air, isn’t it?! That’s what I am telling myself as the 10 day forecast has a foot of snow coming to Minnesota, but I am dreaming of flowers, butterflies, and spring air! For today’s layout, I used Paige's Blooming Wild collection paired with her Spring Has Sprung cut file.
Using white cardstock as my base, I grabbed Paper 16 to use as a layering piece. I tore the top and bottom edges of the paper to give a fun and raw edge to the patterned paper. I love to leave the white edge showing. I cut the Spring Has Sprung title from white cardstock and backed it with Paper 5, Paper 13, Paper 15, Paper 18, and Paper 24. I love the way the design turned out with the patterns repeating in a diagonal fashion down the cut file. Happy coincidence! I tucked my adorable black & white photo into the right side of the cut file. I wanted to include many fussy cut flowers from Paper 7 to really bring in all of the beautiful colors included in this collection. I added several on top of the cut file and tucked two under the top and bottom of the torn pink paper. I added a birdhouse, a bee, a couple of birds, and the ‘sweet’ sentiment sticker from the Blooming Wild Project Pad. Lastly, I added a bit of whimsy with three Pops of Color in the colors Sunshine, Key Lime, and Flamingo.
I hope that you enjoyed reading the process of putting this layout together. Paige’s Spring Has Sprung cut file is perfect for documenting all those fun spring photos you may have. Thank you for stopping by and have a wonderful day!
SUPPLIES: Patterned papers, stickers, die cuts, embellishments: BLOOMING WILD; white cardstock; Cut files: Spring Has Sprung by Paige Evans

Deal Of The Week: 50% Off PaigePals2 - 8 Virtual Classes Bundle


Tuesday, March 26, 2024

Use coupon code SCRAPPY when checking out to receive 50% off my PaigePals2: 8 Virtual Classes Bundle from now until April 1st!
TO USE THE CODE: Add the PaigePals2: 8 Virtual Classes Bundle to your bag, go to checkout, and find where it says "Have a promo coupon or gift card?" Click "Redeem your code" and enter SCRAPPY to apply the 50% off discount. Code cannot be applied to past purchases.
DETAILS: Here are the 8 classes included in the PaigePals2 Bundle:
PLEASE NOTE: You are purchasing DIGITAL content, no physical items will be sent to you in the mail. After purchasing, Ecwid will email you all of the PDFs that have the link to the YouTube videos on the first page, a list of supplies to buy or gather from your stash, photo sizes, any homework to complete before class, templates, cut files, and instructions. All of my class videos are saved for re-watching at your convenience.
Let me know if you have any questions, thank you so much, and see you in the classes!

Bloom Wild Accordion Mini Album by Amber Mitchell


Hi crafty friends! Amber Mitchell here today to share with you an accordion-fold mini album that I created using Blooming Wild!
I created the base of this album using a few different materials: medium weight chipboard for the covers, patterned paper for the spine, and a sheet of acetate that wraps around the spine for added texture (this is optional). The covers of this album measure 4.25 x 4.5 inches. To wrap the covers, I used a sheet of patterned paper from the Project Pad (I chose a fun, pastel plaid pattern). I trimmed this sheet down into two smaller pieces that measured 5.25 x 5.5 inches. To create more texture, I machine stitched down the length of each plaid stripe. After wrapping the covers, I moved on to creating the spine. I used two sheets of patterned paper that measured 4 x 5 inches and taped them together back-to-back; this made the spine heavier, and in turn, sturdier. It also allowed me to choose the two patterns from the collection that I wanted the spine to feature. I scored this paper on the 5-inch side at 1.75 inches on both ends and then creased and folded along the score lines. This gives the album a spine that measures 1.5 inches in width. On the spine I added an "I love you" sentiment sticker from the Cardstock Stickers. On the cover, I created a cluster using a handful of flowers and leaves from the Floral Die Cuts. I added a "Sweet" sentiment from the Chipboard Stickers as a title. I also added a rainbow & butterfly sticker from the sticker sheet that is included in the Project Pad as finishing touches.
This next step was optional, but I just had to include it because I love the look of it! I used a sheet of acetate that measured 4 x 6 inches and wrapped it around the spine, adhering it down to the two tabs (panels) that I had previously scored. This is going to create a clear, rounded barrier around the spine. I love adding embellishments such as 3D flowers, stickers, or titles, under this acetate barrier. If you're the same as me in that regard, I recommend adding those embellishments to the spine first before securing the acetate down.
Once the acetate was in place, I added adhesive to the tabs of the spine and then attached them very carefully and as evenly as I could to the insides of both the covers. This part can be tricky, so I suggest using an adhesive that gives you time to make adjustments if needed. To line the inside of the covers, I used sheets of patterned paper that I trimmed down to 4 x 4.25 inches.
With the base done, I moved on to creating the pages. I wanted to leave the spine of this album free of any binding, so I opted for accordion-fold pages that I could attach to the back cover. To create these pages, I used 5 sheets of white cardstock that measured 3.75 x 8.5 inches. I scored these sheets on the 8.5-inch side at 4 and 4.5 inches. The pages will have a ½ inch gusset, which provides plenty of space for embellishments! I adhered the pages together, following the natural folds of each one to create the accordion-fold. I then adhered the back of the last panel to the inside of the back cover. To have my first page face the direction that I wanted it to, I cut off one panel & one gusset on the tail end of the fold. This also helps the pages to fit more nicely into the album as a whole. Next, I matted all of the pages with patterned paper from my scraps pile (great way to use up this smaller pieces) and then I moved onto embellishing!
The pages of this album fold out in two directions: left and right, thanks to the accordion folds. When pulled out right, 4 pages along with the title page are featured. I used these 4 pages to create a fun, large sentiment. I used the Chipboard Alphabet Outlines with Patterned Paper Backing Pieces to spell out the word "LOVE". I then added smaller embellishments around the letters including bits from the Mini Puffy Flower Stickers.
When pulled to the left there are a remaining 4 pages. I added photo mats to three of these pages and embellished with bits and pieces from the Puffy Phrase StickersCardstock StickersSticker BookMini Flower Puffy StickersChipboard StickersChipboard Frame StickersFloral Die CutsEphemera Die Cuts, and Journaling Spots.
I love how colorful and happy this project is! There's also something so fun about accordion-fold albums - I just love flipping through them! Thanks so much for stopping by my post today!
SUPPLIES: Patterned papers, die cuts, stickers, embellishments: BLOOMING WILD
Location: California, USA / Blog: Happy Crafty Studio / Instagram: @bambidearr / YouTube: bambidearr / Pinterest: bambidearr

Amazing Friends Layout by Paige Evans


Monday, March 25, 2024

Here is the finished layout that we made in today's Make With Me Monday featuring a heart flower wreath! This is a layout that I make with all of my collections because, well, I LOVE FLOWERS! I used my Blooming Wild collection with American Crafts and added an entire package of Floral Die Cuts, all of the flowers in the Ephemera Die Cuts, one of each of the six colors of tiny Flower Charms, and a title made with the Puffy Phrase Stickers
Here is the video for re-watching and you can find the Make With Me Monday playlist HERE.
SUPPLIES (affiliate linked):

SCRAPBOOKING BASICS:
12" paper trimmer: https://shrsl.com/334mc
fussy cutting scissors: https://shrsl.com/43jzk
journaling pens: https://shrsl.com/4i2ix
12x12 white cardstock: https://shrsl.com/4a1op

OPTIONAL SUPPLIES:

The layout is based on this sketch:
And the sketch is based on this layout:
Here are the layouts I've made with the flower die cuts from most of my previous collections, whether heart-shaped or traditional round-wreath shaped. Most of these collections are long sold out, but you can still find the elements for download at ACdigitals.com.
Sketches are a great starting point and then you can change the collection, shapes, number of photos, and more, for completely new and unique results! Thank you so much for joining me live today or in the replay!
See you again on April 1st for the next Make With Me Monday!

Spring Birdhouse Layout by Yui Oku


Hi everyone! Yui Oku here today with a new layout using Paige's Birdhouse from the 20 Spring Cut Files along with her spring-themed Blooming Wild collection!
I cut the Birdhouse from white cardstock and backed it with Paper 23 and the roof, hearts and the bottom of the house with Paper 21. I thought the woodgrain lines of the house didn't match the paper I chose, so I cut the lines with scissors. Then for the flowers, I wanted to make them gorgeous, so I topped and backed them with Floral Die Cuts instead of backing them with papers. I chose Paper 2 for the background then I added my photo, made the title with a mix of ThickersPuffy Phrase Stickers, and silver alphas from the Sticker Book, then embellished with Cardstock StickersChipboard Stickers, and Puffy Phrase Stickers.
I loved making a spring-themed page with the Blooming Wild collection and Paige's Birdhouse from the 20 Spring Cut Files!
SUPPLIES: Patterned papers, stickers, die cuts, embellishments: BLOOMING WILD; white cardstock; Cut file: Birdhouse from the 20 Spring Cut Files by Paige Evans

Love - Stitched Circles Layout by Paige Evans


Sunday, March 24, 2024

Here's the first of the four layouts we make in class with the Main Character Energy collection by my friend Shimelle!
I do still have kits available so you can create right along with me in the start-to-finish process videos.
Main Character Energy Kit & Classes
4 Layouts Virtual Class Only
This page features a grid of circles with optional hand stitching then topped with lots of pretty things! In class we learn how to make this page from start-to-finish along with 3 more 12x12 layouts! I walk you through my tips, tricks, and techniques and offer suggestions for changing things up and altering the page to put your own spin on it! After purchasing the kit which comes with the class or just access to the virtual class, Ecwid will email you the PDF that contains a list of supplies, photo sizes, templates, cut files, instructions, and a link to YouTube where the class takes place. The class is pre-recorded so you can go at your own pace, watch it as many times as you need, and access it at any time!
Let me know if you have any questions and I hope to see you in class!
Be sure to pick up the accompanying kit which comes with the class HERE!

Paintbrush Mini Album by Paige Evans


Saturday, March 23, 2024

Here is the mini album that we learn how to create in my Paintbrush Mini Album Virtual Class!
This Paintbrush Mini Album is made up of six lovely and layered pages, flowers galore, and realistic fringe that looks like paintbrush bristles! I love the retro vibes of the Flower Child collection by Jen Hadfield which is what we use to create the album from start-to-finish. 
I documented various photos of Jane with flowers! Two of my favorite things :)
After purchasing the Paintbrush Mini Album Virtual Class, Ecwid will email you the PDF that contains a list of supplies, photo sizes, templates, cut files, instructions, and a link to YouTube where the class takes place. The class is pre-recorded so you can go at your own pace, watch it as many times as you need, and access it at any time from your devices!
Let me know if you have any questions and I hope to see you in my Paintbrush Mini Album Virtual Class!

Registration Now Open for Tricks & Treats Weekend!


Friday, March 22, 2024

Registration is now open for Tricks & Treats Weekend!
Join Paige Evans and Andrea Lake for two spooktacular days of learning, cropping & creating! Plus goodie bags, freebies, bonus content, pop-up shopping, photo ops, and fun with friends! Read all the details below and let us know if you have any questions!
*****
We will use Paige's first Halloween collection with American Crafts called Tricks & Treats to make a bewitching 4x4 mini album, 4 bootiful layouts, and a custom acrylic haunted house mini album! And you'll have lots of leftovers for creating even more projects! Every person gets half of a 6 foot table to craft during the event.
*****
Dates: Saturday November 9th & Sunday November 10th 2024
*****
Location: Delta Hotel by Marriott // 10 E 120th Ave, Northglenn, CO 80233
*****
If you are traveling from out of town and want to stay at the hotel, discounted room rates are available which you can book HERE. Rooms have been blocked from Thursday 11.7 until Monday 11.11. Make sure you select the dates before clicking on the 'Check Availability' button when making your reservation. If you'd like to reserve your room outside this window, please contact Diane Sanborn at 720-221-2744 and she will assist you.
*****
Saturday November 9th 2023
9am-10am: Meet'N'Greet & Early Bird Shopping
10am-1pm: Paige's 4x4 Mini Album Class
1pm-2pm: Lunch Break
2pm-5pm: Paige's Layouts Class
5pm-9pm: Dinner/Crop
Sunday November 10th 2023
9am-10am: Chat, Pictures, Shopping
10am-1pm: Andrea's Haunted House Mini Album Class
1pm-2pm: Lunch Break
2pm-5pm: Andrea's Layouts Class
5pm-9pm: Dinner/Crop
*****
Cost: $375 - includes class materials, bonus content, swag bags, and more! Travel, hotel, and food is not included. Payment plans accepted, please reach out to paigetaylorevans@gmail.com for details.
*****
About a month before the event, you will be sent a PDF with photos and instructions, additional supplies to bring (all materials to create the projects aside from basic things like adhesives and tools will be provided in the event kit), places to eat, and more info.
*****
We can't wait to see you in-person and have an EEKciting time together!
*****

Adventure Layout by Valerie Bisson


Thursday, March 21, 2024

Hi friends! Valerie Bisson here and I’m so happy to share my next design team layout with you featuring the Frame from the 20 Spring Cut Files and the Splendid collection.
I started with Paper 15 for my background - it has such a pretty design perfect for a border around my layout. Then I layered up some cardstock starting with a scalloped gray layer, then a square teal layer, and on top the Frame cut from white cardstock. I rarely don’t back a cut file with pretty patterned papers but in this case it was beautiful leaving it as is. I popped my photo up in the center and added photo corners using the We R Makers Photo Corner Punch. Then I added embellishments by tucking in pieces around and close to the photo creating a good balance and distribution of colors and shapes. Embellishments include pieces from the Epoxy StickersSticker BookEphemera Die Cuts, and Floral Die Cuts. I decided it needed a little something else so I added an orange ombre chain link hand stitched border around the cut file, which to me was the perfect finishing touch. The last thing I added was the date made with the Roller Stamp.
I had so much fun making this page I hope it inspires you to make and create with the 20 Spring Cut Files and Splendid collection! Thanks so much for stopping by and have a wonderful day!
SUPPLIES: Patterned papers, stickers, die cuts, embellishments: SPLENDID; white cardstockWe R Makers Photo Corner Punch; Cut file: Frame from the 20 Spring Cut Files by Paige Evans

Spring Tags Layout by Phil Donahue


Wednesday, March 20, 2024

Hello scrappy friends! Phil Donahue back with another Spring-themed layout featuring elements from the Blooming Wild collection and the Spring Tags from the 19 Spring Cut Files!
This layout showcases three older photos of my niece sitting in a field wearing a cute bonnet. I cut the Spring Tags from white cardstock. Each of the six tags features a unique design with some more intricate and others more graphic. Using pink, yellow, and green Pastel Dreams watercolors, I painted over three of the more graphic designs and backed them with white cardstock. For the more intricate tags, I backed each with pink, yellow, and green coordinating patterned papers - some from the 12x12 Paper Pad and some from the 6x8 Paper Pad. I backed each with foam squares and adhered them to Paper 3as my main background in a 3x2 grid. I adhered my photos and embellished with Floral Die Cuts and Mini Floral Puffy Stickers all around. I created my title using an element from the Cardstock Stickers and the colorful Alpha Thickers. Final touches were placing coordinating yellow, pink, and green baker's twine on three of the tags along with splatters of white acrylic paint around the layout!
I hope you found some inspiration in this layout and want to try Paige's 19 Spring Cut Files along with her Blooming Wild collection! Thanks for stopping by and have a lovely day!
SUPPLIES: Patterned papers, stickers, Thickers, die cuts, embellishments: BLOOMING WILD; white cardstockwhite acrylic paintPastel Dreams watercolors; Cut file: Spring Tags from the 19 Spring Cut Files by Paige Evans
Paige Taylor Evans © // Quinn Creatives DESIGN