20 Days of Fall/Autumn Cut Files!


Saturday, August 28, 2021

 I'm excited to release my next exclusive cut file set: 20 DAYS OF FALL/AUTUMN CUT FILES!

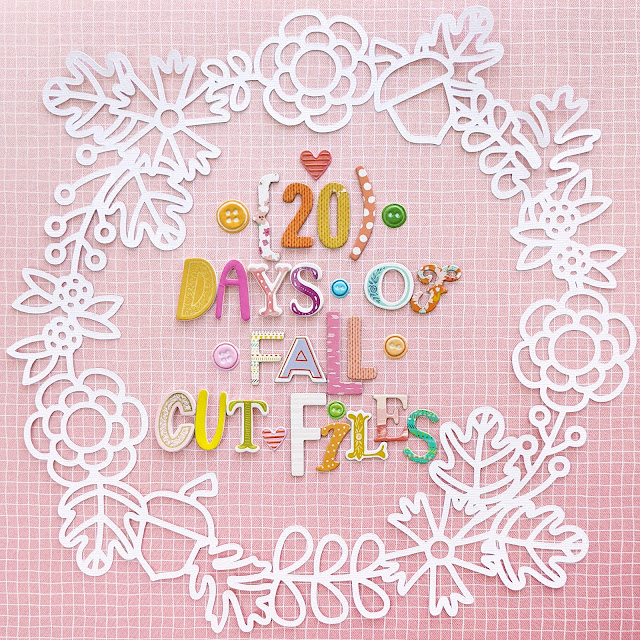
Who loves daily happy mail? I know I sure do! So join me for 20 DAYS OF FALL/AUTUMN CUT FILES! One new and exclusive fall/autumn-themed cut file will be emailed to you every day starting on the first day of Fall/Autumn (September 22nd) through October 11th 2021! The designs include phrases, titles, images, icons, backgrounds, wreaths, and so much more, all fall/autumn-themed! Please note that I used the word "fall" 3 times and also include the same design with an "autumn" version for my international friends. These cut files will only be available as a bundle and not sold individually anywhere else to keep them special and exclusive.


Every day beginning September 22nd and through October 11th 2021 you will receive an email from me with a link to a Dropbox folder to download a .zip folder which when opened will contain the .studio3, .SVG, .PNG, .DXF, and .PDF files - so even if you don't have a cutting machine you can still print and cut out the designs for using on your crafty projects! Please note, more often than not my bulk emails arrive in spam/promotion folders - on a computer, not a phone or tablet or handheld device, do a search for "paigetaylorevans@gmail.com" and the emails with the cut files should show up. If not, please reach out to me and I will reply back ASAP to help. If the email you would like the cut files sent to is different than your payment email, please let me know so I can make sure to send the cut files where you want them. The daily emails will have examples showing how to use the cut files from my design team so you'll get lots of inspiration!


This is my 9th exclusive cut file set! You can find them all HERE.

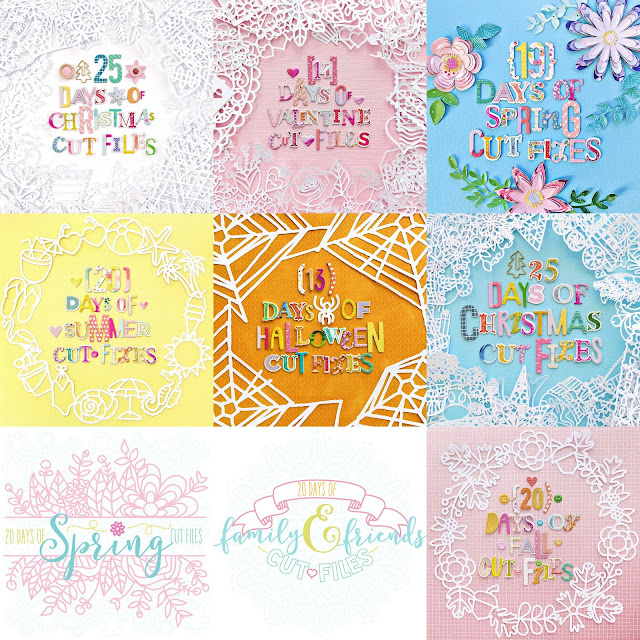
Let me know if you have any questions! Thank you!

Fall Day Mini Album Set by Amber Mitchell


Friday, August 27, 2021

Hello crafty friends, Amber Mitchell here on Paige's blog today to share with you a fun, fall-themed mini album set I created using the Truly Grateful collection (Truly Grateful Digital Collection).

This project was inspired by a past project of mine that consisted of a small bag with a mini album inside. I adapted that idea to fit my vision for this project and I love how it turned out! The storage boxes and the albums with the acetate, embellished straps are so fun!

To create the storage boxes for these minis, I took a sheet of paper that measured 5.5 x 6 inches. I scored on the 5.5-inch side at 1.25 inches on both ends. On the 6-inch side I scored at 2 3/8 inch on both ends. This creates a template that just needs to be assembled by cutting the center squares into tabs and using them to adhere the box together.

To create the mini albums, I started by creating chipboard bases. For each album, I used three pieces of chipboard with the following measurements: (2) 2.5 x 2.5 inch and (1) 1 x 2.5 inch. I wrapped my base using patterned paper and sticky, double-sided tape. Before adding the lining to my albums, I took strips of acetate that measured 1 x 5 inches and scored them on both ends at 3/4 inch. I then added titles to them using the Thickers from the collection, along with some floral clusters, and stitched across them to keep everything in place. After that, I used the tabs on either end to adhere the title strip to the inside of the album. Finally, I layered the lining on top to secure everything down.

This album consists of eight pages that are made by four sheets of paper. Those measurements are as follows, going from the largest to the smallest gusset:

Page 1: 2.25 x 5.5 inches, score at 2.25 and 3.25 inches

Page 2: 2.25 x 5.25 inches, score at 2.25 and 3 inches

Page 3: 2.25 x 5 inches, score at 2.25 and 2.75 inches

Page 4: 2.25 x 4.75 inches, score at 2.25 and 2.5 inches


Once the pages are cut, scored, and creased, I stacked and adhered them one on top of the next from the smallest to largest gusset. Then, using a strong adhesive on the back of the largest gusset, I glued the pages to the inside spine of the album.

To keep the albums closed, I used craft magnets and a strips of paper that measured 1.25 x 4 inches. I wrapped these around the albums starting at the back covers and secured them down on the front covers. With the base of the project done, I moved on to embellishing. I used the Truly Grateful Digital Collection to print and cut my own die cuts using a Cricut. I sized them down to fit perfectly on and in these tiny albums.

To dress up the storage boxes, I created large flower clusters using Paige's Rolled Flower cut file. I love the texture that these add. For the final touch, I added leaf-shaped paperclips that I attached beads, paper tassels, and charms to.

With that, this cute mini album set is all ready for Fall memories! Thanks so much for stopping by my post today. I'll see you next time with another fun project!

SUPPLIES: Patterned papers, stickers, die cuts, embellishments: TRULY GRATEFULTruly Grateful Digital Collection; Die cut machine: Cricut; Cut file: Rolled Flower by Paige Evans

Location: California, USA / Blog: Happy Crafty Studio / Instagram: @bambidearr / YouTube: bambidearr / Pinterest: bambidearr

Rainbow Layout by Missy Whidden


Wednesday, August 25, 2021

Hey friends! Missy Whidden here with a new layout featuring Paige’s new Bungalow Lane collection. This is my first layout using this line and I couldn’t resist creating a fun rainbow design! I started by choosing six patterned papers from the 12x12 Paper Pad. I cut arcs in each color to create the rainbow which stretches horizontally across the entire page. I decided to embellish with small pieces in a tone-on-tone manner to keep the rainbow theme flowing. I also added some matching colors of Shimmerz to create a watercolor effect on the background.

I used thick white cardstock for the base and I coated it with clear gesso first before adding any paint. I used a brush to paint the color on above the red arc and below the blue arc at the bottom. I wanted it to look like the layout was left out in the rain and the rainbow started leaking color. Once that was done, I glued down the rainbow arcs and then machine stitched through each one using matching thread. I also distressed the edges to create some texture. I splattered white acrylic paint to create a weathered effect. Once I arranged the photos, I started going through the embellishments. I tucked in a few of the Epoxy Puffy StickersCardstock StickersLayered Stickers, pieces from the 8-Page Sticker BookFoam Phrase Stickers, and Ephemera Die Cuts all around the photos in the color coordinated areas.

Here you can see more of the watercolor effect. For the title I used this large “Lucky” Foam Phrase Sticker. I love that it was perfect for my rainbow theme and it worked great on this white area. It has gold foiling, which is so pretty. I added more embellishments here at the bottom. I fussy cut a butterfly from one of the 2x2 Paper Pads and popped up several pieces with adhesive foam. I wrote the journaling with a black fine-tip Sharpie and tucked in a few colors of matching thread in a few places.

As a final touch, I hand cut a few little clouds using scrap Bazzill textured white cardstock. I distressed the edges and smudged a bit of a gray gelato to give them depth. I love adding clouds to a rainbow layout! I finished the page off with gold paint splatters.

I hope this inspires you in some way today! Have you gotten your hands on Bungalow Lane yet? It’s perfect for Fall scrapping, but as you can see it’s wonderful for just about any theme you want. I can’t wait to make another layout with it! Thanks for stopping by!


SUPPLIES: Patterned papers, stickers, die cuts, embellishments: BUNGALOW LANEgessoDistress Oxideswhite cardstockgold paintwhite acrylic paint
Blog: littlenuggetcreations.blogspot.com // Instagram: @missywhidden // Pinterest: @missywhidden
Facebook: missy.whidden // YouTube: Missy Whidden

Hello and Thank You Cards by Paige Evans


Sunday, August 22, 2021

 My dear friend Zsoka Marko has a shop called A Pocket Full of Happiness and we did a fun collaboration together! She turned a couple of my cut files into metal dies: Floral Border and Floral Corner!

For this Thank You card, I began by creating a card base from Bazzill smooth white cardstock, cutting it to 4.5x8", and top-folding it over. I die cut two Floral Corner outlines and two solid Floral Corners from Bazzill textured white cardstock. Then I grabbed the Sherbet Paper Pad from the 6 Paper Pads Scrapbook.com Bundle and took out one piece of paper from all 8 colors. Next I die cut a Floral Corner from every color and did the inlay technique. This was the very first time I have tried this technique! Basically you fill in every section with a little piece of colored paper. It took about 3 hours per card. Time consuming for sure, but wow I love the results! It's like a puzzle, so if you like puzzles, the inlay technique is for you :) I adhered the flowers to the card base using foam squares for dimension. To finish, I die cut Zsoka's Thank You solid and inner pieces from Bazzill textured white cardstock, glued the pieces together, and attached them with foam squares to the card base.
The Hello card was created basically the same way! I began by creating a card base from Bazzill smooth white cardstock, cutting it to 4.5x8", and top-folding it over. I die cut two Floral Border outlines and two solid Floral Borders from Bazzill textured white cardstock. Then I grabbed the same Sherbet Paper Pad from the 6 Paper Pads Scrapbook.com Bundle and took out another piece of all 8 colors of paper. I die cut a Floral Border from every color and did the inlay technique. I adhered the flowers to the card base using foam squares for dimension. To finish, I die cut Zsoka's Hello solid and inner pieces from Bazzill textured white cardstock, glued the pieces together, and attached them with foam squares to the card base.
I'm always in need of special "thank you" and "thinking of you" cards to give to loved ones and I am so excited to add these to my box of cards ready to send out! I'm also grateful to Zsoka and her enthusiasm to collaborate and create these amazing metal dies! Be sure to check out all her high quality products in her A Pocket Full of Happiness Shop.
Thanks so much for stopping by! Be back soon with more handmade creations!
SUPPLIES: Metal dies: Floral BorderFloral CornerThank You, and Hello by A Pocket Full of Happiness; Cardstock: Bazzill smoothBazzill textured, and Sherbert Paper Pad; Manual die cut machine: Spellbinders Platinum

Flower Meadow Layout by Stefanie Ried


Saturday, August 21, 2021

Hello and welcome to a new layout by me, Stefanie Ried! My scissors have been put to use again. I love to cut out motifs from papers!

This time I cut out the sweet flowers from the Wonders collection as well as a few butterflies, birds, etc. I mixed these with different stickers. The result is a flower meadow. I wanted the photo to be surrounded by a colored frame. I cut another piece of white cardstock 8.5" square for this. On it the many motifs were arranged like a color gradient. I liked to have the colors flow into each other.

The photo was taken last month when I was collecting daisies in a field with my daughter. We LOVE these flowers.

Thanks so much for stopping by!


SUPPLIES: Patterned papers, stickers, die cuts, embellishments: WONDERSwhite cardstock
Blog: steffiried.blogspot.com / Instagram: @steffiried / Pinterest: @steffiried / Facebook: stefanie.ried.96 YouTube: Steffi Ried

WOW Spread by Krystal Idunate


Friday, August 20, 2021

Hello friends! Krystal Idunate here today sharing a new spread I created using Paige’s WOW cut file along with the Wonders collection. I felt really drawn to this particular file because I loved the opportunity to document a few photos from the same day. For this layout I decided to document my daughter’s new found love for jumping on the trampoline.

To get started, I resized the WOW cut file to fit across a 6x8” piece of plain white cardstock. When I resized the file however there was quite a bit of space at the bottom of the three WOW titles. I created a fourth WOW title by pasting the same file again, positioning it on top of the first but with the third title below the original three, and then welded the shapes together. That allowed the cut file to take up all the space on the page! I cut the file from textured white cardstock. I then printed four photos to back each of the O’s, and then backed all of the W’s with Paper 13.


Once the file was completely backed, I adhered the entire thing down onto a piece of white cardstock cut to 6.875x8.25”, which will allow the page to live outside of the page protectors in my daughter’s 6x8 story album. I finished off the cut file side of this page with a tiny phrase sticker from the Cardstock Stickers and date stamped the edge. In addition to the cut file page, I also printed two extra photos at 3x4” to add to a 6x8 divided page protector. On one photo, I adhered the “Keep on the Sunny Side” die cut from the Ephemera Die Cuts. I finished up this layout by creating two of my own journaling cards with Paper 24 and the Ephemera Die Cuts. I love that this gave me a little bit of space to write about my daughter’s growing confidence in performing trampoline tricks.

I hope this spread inspires you to use cut files as sparks for telling your stories. Thank you so much for stopping by today and I hope you have a wonderful rest of your day!


SUPPLIES: Patterned papers, die cuts, stickers, embellishments: WONDERSwhite cardstock; Die cut machine: Silhouette Cameo; Cut file: WOW by Paige Evans

Location: Michigan, USA / Instagram: @krystal.idunate / YouTube: Krystal Idunate / Pinterest: Krystal Idunate / Patreon: Krystal Idunate

Wonders Cut File Cards by Heidi K. Lewis


Thursday, August 19, 2021

Hello scrappers! It’s Heidi K. Lewis here on the blog today to share some fun summer cards made with the Wonders collection.

The first card is made with Paige's Toucan cut file, which is perfect for a summer card. First, I cut out the Toucan from white cardstock and then I backed it with papers from the 6x8 Paper Pad. I also used the 6x8 Paper Pad to make the base for my card. The toucan is embellished with Puffy Sticker half circles to look like feathers. A punny sentiment made from Whimsical Thickers finishes off the card. 

The second card was inspired by a similar card made by Susan Ropel. I used the Sunburst Rays Background cut file cut from Paper 1 and layered on top of a foiled paper from the 6x8 Paper Pad to make the base. Then I cut the Mountains cut file from Paper 6 and backed it with white cardstock and the 6x8 Paper Pad. To embellish the card, I layered some Puffy Sticker half circles to look like rocks in front of the mountain. I also made some snowcaps for the mountains from upside down heart Puffy Stickers. A bird from 8-Page Sticker Book is carrying a Banner Sticker.

Hope these cards inspired you today!


SUPPLIES: Patterned papers, stickers, die cuts, embellishments: WONDERSwhite cardstock; Die cut machine: Cricut; Cut files: ToucanSunburst Rays Background, and Mountains by Paige Evans

Location: Idaho, USA / Instagram: @heidi.k.lewis / Facebook: Heidi K. Lewis / Pinterest: klipheid09

Butterfly Layout by Jennifer Rambert


Wednesday, August 18, 2021

 Hi paper lovers! Jennifer Rambert back with a new butterfly filled layout for Paige Evans' Cut File Design Team using the Wonders collection and her Floral Butterfly cut file. I wanted the page to be colorful so I came up with the idea of ​​using a lot of butterflies.

I first used my Silhouette Cameo to cut out the Floral Butterfly cut file from white cardstock and then I fussy cut the butterflies from Paper 8 and from the 6x8 Paper Pad to fill in the left part of the butterfly. I sewed the right part of the butterfly with gold thread and glued the butterfly with 3D foam in the center of my page. I used white cardstock for the background which I coated with clear gesso before adding a lot of Shimmerz ink. I applied the inks to the background only on the right side of the butterfly wing and made a rainbow of color to make this wing stand out.

I added the photo to the center of the butterfly after adding crumpled tracing paper underneath. I added words cut from a tag from Paper 12 buried in the little butterflies on the left wing. I added the title "Don't Just Fly Soar" created with the Epoxy Phrase Stickers directly on the photo. I added some butterflies on the right wing to fill this part out a bit and finished with gold and black ink splatters.

I love the way this turned out! The golden seam on the right wing which is reminiscent of a few butterflies on the left wing and all these small intertwined butterflies bring dimension and fantasy to this layout. Hope it inspires you! I had fun creating it. Thanks for stopping by and I wish you a nice & creative day!


SUPPLIES: Patterned papers, stickers, die cuts, embellishments: WONDERSwhite cardstockgessogold paintDistress Oxideswhite acrylic paint; Die cut machine: Silhouette Cameo; Cut file: Floral Butterfly by Paige Evans

Location: France / Instagram: @secretsandcreations / Blog: Secrets & Creations / Facebook: Secrets & Creations / Pinterest: secretsandcreations

Beach Day Layout by Valerie Bisson


Tuesday, August 17, 2021

Hi there! Valerie Bisson here and I'm so happy to be back with another summer scrapbook page for Paige’s Cut File Design Team. For my layout I used the Waves Background cut file and the Wonders collection. This cut file was perfect for a beach day layout.

I cut the Waves Background cut file at 11.5 inches from white cardstock and then centered it on the background Paper 6. Next I added white acrylic paint splatters mostly to the top half of the page, kind of fading out as they got lower on the page. After the paint was dry I added hand stitching along the top edge of each wave in a chain stitch using 5 different colors from white to a dark teal of DMC thread and I used all 6 strands. This creates such beautiful texture on the layout.

Once my background was complete I just needed to add my photos, title, and embellishing. For this I used two instax photos, Thickers for my title, and embellishments from Wonders including the Chipboard StickersFloral Die CutsPuffy StickersBanner StickersLollies, and small dots and the word smile from the Epoxy Phrase Stickers. Lastly I added my journaling along the lines of the waves using a white gel pen.

Thank you so much for stopping by Paige’s blog today and I hope I have inspired your creativity. Have a fantastic day!


SUPPLIES: Patterned papers, stickers, die cuts, embellishments: WONDERSwhite cardstock; Die cut machine: Cricut Explore Air 2; Cut file: Waves Background by Paige Evans

Location: Manitoba, Canada / Instagram: @valeriearts2 / Pinterest: valeriearts2 / Facebook: Valerie Bisson

Bungalow Lane Coptic Book & Kits


Monday, August 16, 2021

 With every scrapbook collection I create a coptic book and here is the Bungalow Lane edition!

I love making these handmade coptic books and giving them away as gifts and to look pretty on my shelf :) You can use them as diaries, "smash books" or art journals, daily gratitude journals, wedding sign-in books, mother-to-be baby shower books, as a scrapbook, making lists, for instax photos, book reviews, and so much more! I made my December Daily 2017 in one and I think it's my most favorite December Daily to date.

 My absolute favorite part is the exposed binding and tying charms, beads, stickers, pearls tassels, buttons, sequins, and more into the binding as I'm sewing.

This book is 4x6" which is perfect for full-sized photos and smaller memorabilia.

The book lays flat when opened which makes it easy to write & "art" in.

These covers are made from wood that my dad cut and then I was inspired to create another cross-stitch cover like I did for my Turn the Page book.

I created a template in Adobe Illustrator with 400 holes (oh my!). 16 rows, 25 columns. It took about 2 hours to drill all the holes and my arm was sore for days afterwards... So, I will need to invest in a drill press or something to make these covers widely available!

Then I spent 3 days stitching the covers with a cross stitch pattern using 15 colors of thread, two times each. These are the DMC thread colors I used and I stitched with all 6 strands. They perfectly match with Bungalow Lane so I'll be using them lots for more hand stitching projects!

On the front cover I stitched through every cross twice, which means each hole had 8 threads through it, and the holes were too small to accomodate all that thread easily, so I had to use pliers to grab the needle and pull it through every single stitch, which again hurt my hand (labor of love for sure!), so on the back cover I decided to only stitch through once and it only took a few hours to stitch the whole back! Much better! And I think I actually like the cleaner look better. Live and learn!

For the bits & baubles on the spine, I placed Embossed Puffy Stickers back-to-back and punched a tiny hole through them to turn them into charms, Heart CharmsBird Paper Clips, as well as a few colorful beads. I love the eclectic vibes!

There's nothing quite like the feeling of making a cute book completely from scratch!

Check out all the previous coptic books made with my collections:

Wonders coptic book // Go the Scenic Route coptic book // Bloom Street coptic book // Truly Grateful coptic book // Horizon coptic book // Whimsical coptic book // Pick-Me-Up coptic book // Turn the Page coptic book // Oh My Heart coptic book // Take Me Away coptic book // Fancy Free coptic book

I have a limited number of Bungalow Lane coptic bookbinding kits available in my Etsy shop! Grab one before they're gone :)

Sometimes bookbinding supplies, especially wooden boards, can be hard to find and even harder to cut down to size and drill holes without power tools. Take the stress and hassle away with this custom coptic bookbinding kit! Included in this kit:

- one pair of 4x6" wooden covers with the holes already drilled and ready to be painted (a piece of sandpaper is included as well)

- 24 double-sided patterned papers trimmed to size
- piercing / drilling template
- 2 skeins of coordinating thread (color may vary from photo)
- curved needle
- package of puffy stickers (36 stickers - adhere some of these back-to-back and punch a tiny hole through them to turn them into custom charms!)
- 8-page sticker book (208 stickers)
- 11 beads
- 2 acrylic butterfly charms (color may vary from photo)
- 2 tassels (color may vary from photo)
- 50 floral/leaf/butterfly die cuts
- 4 heart charms
- 5 bird paper clips
- 1 pushpin for use as a paper piercer

I always love seeing your versions of coptic books! Thanks for stopping by and have a great week!

Paige Taylor Evans © // Quinn Creatives DESIGN