Eat Sleep Scrap Repeat Layout


Tuesday, April 30, 2019

I have a new layout to share today which includes a free cut file (EAT SLEEP SCRAP REPEAT) over on the Scrapbook & Cards Today Magazine blog!
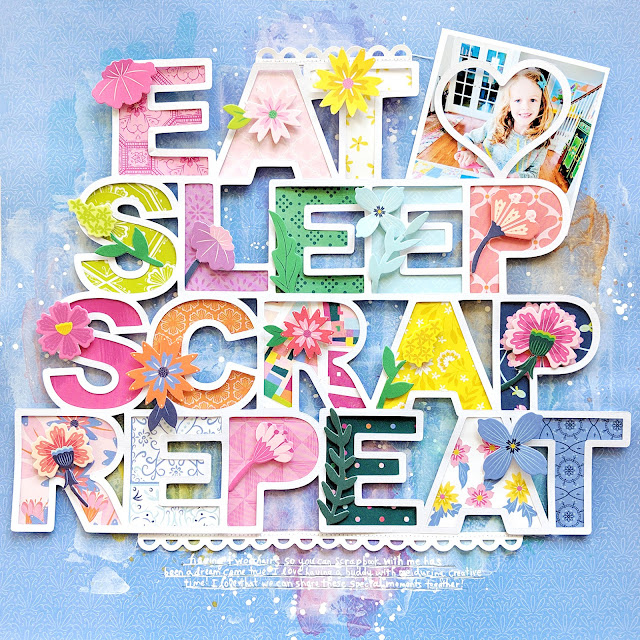
First I die cut the cut file (which you can grab over on the SCT blog for free!) from white cardstock using my Silhouette Cameo 3. To help back the letters quickly, inside Silhouette Studio I ungrouped the shape and deleted everything except the letters, offset the letters slightly, and then trimmed 3" square patterned papers to fill a sticky mat. I ran it through my machine twice to cut all 19 letters in seconds. You can see a tutorial for this process in one of my YouTube videos. I used liquid glue to adhere the patterned paper pieces to the back of the cut file and then turned it over to reveal the magic!
 On the B-side of Horizon Paper 21 (a pretty & subtle periwinkle pattern) I did some mixed media work. I started by scraping white gesso across the background and let it dry. Then I splashed watered down white acrylic paint on top. Once that dried I pooled water all across and dropped & splashed Prima - Pastel Dreams & Tropicals watercolors into the water and dried it all up with a hairdryer. Since this warped the page a lot I ran it through a Minc machine about six times to smooth it out.
 I adhered the backed title onto the layout using dimensional adhesive for shadows and depth. Behind the heart on the top right corner I placed a 3" square photo of Jane scrapping with me. It's my dream come true to have a scrapping buddy! I treasure these shared moments crafting together.
 Then I came in with a new pack of Floral Die Cuts and added a bunch of them color-on-color to the letters using foam adhesive again for more dimension. For a bit of texture I used a scalloped border punch and white cardstock to make two different sized borders and machine stitched them to the top and bottom edges of the title. To finish I wrote journaling with a white pen in the open space at the bottom of the page.
I hope this layout inspires you to 1) check out the Scrapbook & Cards Today blog and grab this free cut file, 2) Join my Happy Scrappy Place Facebook group to get free weekly cut files and loads of ideas, and 3) Pick up my Horizon collection with Pink Paislee and get to scrappin'!
 Thank you so much for stopping by, see you again real soon!
SUPPLIES: HORIZONPaper 01Paper 02Paper 03Paper 04Paper 05Paper 07Paper 08Paper 09Paper 10Paper 12Paper 14Paper 15Paper 16Paper 18Paper 21Paper 23Floral Die Cuts; Scalloped border punch: Fiskars; gessowhite acrylic paint; Watercolors: Pastel Dreams & Tropicals by Prima; white cardstock; Die cut machine: Silhouette Cameo 3; Cut file: Eat, Sleep, Scrap, Repeat by Paige Evans

Peek-A-Boo Layout by Zsoka Marko


Hey there crafty friends, Zsoka Marko here and today I'm sharing a new layout with you that I've created for the Paige Evans Design Team. I've just received the Horizon Project Pad and I'm in love with the solid papers - such gorgeous colors! So I wanted to use them on my project, but couldn't decide on the color... so I used a bit of each haha!
My inspiration was a set of cards I made not so long ago (you can see them here) and Paper 12 which is also in the Project Pad. I cut it apart and used one of the shapes as a template to cut pieces out of the solid papers as well as from Paper 03. I layered three of them together and stitched them down in the middle.
After much deliberation, I chose white cardstock for my background. I wanted to go with patterned paper but I simply loved how the rainbow of colors popped on white. It's what it is. Maybe I'm turning into a white background scrapper, who knows?! Ha! So that my background was not so boring, I made a cut file that is very similar in design to the arrangement of leaves I wanted to go for. I cut it from white cardstock... you pretty much can't see it in these pictures :). I just wanted to add a bit of texture, nothing overwhelming.
I then adhered the leaves to the background as well as my photo. I went through all embellishments in Horizon and pulled out whatever fit the colors or theme of my layout.
I glued down the embellies and tucked some tags behind my photo. Last but not least, I added my title, date, and journaling. To finish off this layout I added copper paint splatters.
That's it! I hope I could inspire you in some small way! Thank you for stopping by!

Blog: apocketfullofscrap.blogspot.com / Instagram: @zsoka_marko / Facebook: Zsoka Marko / YouTube: Zsoka Marko

MemoryDex Cards by Jamie Pate


Monday, April 29, 2019

Hey hey all you MemoryDex fans… or if you are not a MemDex fan YET!!! well. Maybe you should be! Jamie Pate here, and I have been having a blast taking the MemoryDex paper crafting concept and mixing in HorizonWhimsical, as well as several of Paige’s cut files: a Layered Butterfly, Rolled Flowers, and a Flower. For today’s post I have crafted three different cards.

The first card is full of color. I know, right?!?! If you know me I usually play it fairly subtle. Creating these little artist cards is a great way to play with color and patterns one would not normally utilize on a big 12x12 size page. So this was a perfect way to use the Layered Butterfly cut file and just have some fun.

The cut file was sized down so that the largest butterfly was about 4 1/4-inches wide. I chose patterns from Horizon without too much thought. The only real focus was that the patterns were mostly pink. I cut the MemoryDex card from Paper 09 and then layered the butterflies against that painterly pattern. Then a Sticker was used as the title of this card. Ta dah! Card 1 done!

The next card is a fav. Because. Rolled Flowers. I am super loving rolled flowers right now. I cut two of Paige’s files on both Horizon + Whimsical patterned papers. Again, the focus was color. So I stayed mainly with the salmon/coral hues found in both collections. The MemoryDex card was cut out using white cardstock. This was then splattered with watercolors to give it a bit of dimension and color.

A round label from my stash was the anchor of all the elements. Using hot glue I rolled the flowers and then attached to the card. The leaves from the Floral Die Cuts really set the whole thing off. After hot gluing the leaves into place it was like, yes! Perfect. The sentiment is from the Ephemera Die Cuts. And this tag is called good!

The last card I want to share with you is a fun little paper crafting exercise. I cut the card this time from acetate. The Flower was made again using white cardstock. This was then cut in half and adhered to the clear card.

I knew I wanted to use one of the layered Tags on this MemoryDex card. It was a matter of just deciding how to make it work. I could have punched the tag itself at the bottom and let it be a separate element. Instead I went ahead and attached it to the clear card using a pop dot to pop it up off the card. One of the Charms was tied to the top of the tag using seam binding and twine. Just another way to craft a MemoryDex card with all the Paige Evans paper love.

Here’s to playing it safe: Take paper and cut files and craft cards, or like here, MemoryDex cards. Allow your ideas to find a home on these smaller canvases. Inspire yourself with creative play with all the Paige Evans’ things!

Blog: Jamie Pate Designs / Instagram: @jamiepate / YouTube: Jamie Pate / Pinterest: @jamiepate / Facebook: Jamie Pate Designs

Thank You Paper Flower Card


Sunday, April 28, 2019

Hi everyone! I have a new card to share which was inspired by the "NOEL" card by Elodie Lusseau on page 69 of the Winter 2018 issue of Scrapbook & Cards Today magazine, specifically how she used one of my Pink Paislee collections and there are flowers, lots of patterns, and lots of colors - all of my favorite things!
I started by opening a new Silhouette Studio document and sized all 9 of my Rolled Flower cut files to less than 2" each. I used Paper 19 from my Whimsical collection with Pink Paislee as a reference for spacing all of the flowers - there are 30 rectangles of different patterns so I fit one flower in each of the 30 spaces then ran it through the Silhouette Cameo 3.
Then I rolled the flowers up one at a time, using hot glue to keep them together at the bases. Since these flowers are itty bitty it was quite the workout for my little fingers hehe. But totally worth the extra effort to create a small garden of dainty paper flowers!

After creating about 30 flowers I chose a smooth white cardstock for the card base and die cut a heart from scratch cardstock which I traced onto the card front and then left in place while I splashed white acrylic paint & Prima - Pastel Dreams watercolors on top.
Once the paint dried I removed the heart and then used hot glue once again to attach the flowers over the penciled heart. I tried to squeeze as many as I could onto the card however I didn't end up using all 30 flowers so I'll use them on a future project for sure!
To finish I used the colorful Foam Mini Thickers to create a "thank you" sentiment in the middle.
I hope you are inspired by the beautiful layouts, cards, and projects that you see in the Scrapbook & Cards Today magazine! I know I sure was! Thanks for stopping by!

You And Me Mini Album & Process Video


Saturday, April 27, 2019

I am so excited to be the April guest designer for Hip Kit Club! I couldn't wait to get started creating with many of my Horizon embellishments!
 First, check out the process video so you can see how exactly to make this mini album from scratch:
I started with a full 12x12 piece of white cardstock and scored a line every 2" horizontally and vertically. Then I creased the folds with the tool used for scoring. I trimmed at 6" down to the last score line, folded it over in half to create one long page, and then folded it up together accordion style to create the base. I used strong adhesive to turn the middle section into a pocket. This all makes much more sense in the video so be sure to watch it :)
Once I had the base completed I came in with the 2x2 Paper Pads from Horizon - one is filled with phrases and the other patterns. I placed all of the papers first and then filled the rest of the spots with slightly smaller than 2" square photos which I printed at home using Adobe Photoshop and a Canon Pro-100 printer.
 As far as the photos, I searched through and found all of the selfies of me and Jane from the past year. I didn't realize we had so many! Which makes me so happy that she still loves to get her picture taken - I'll take it while I still can! She's also still so cuddly and snuggly. I just love her and this album was made for her to document our special moments together.
Once I had the papers and photos in place, I trimmed down the 2x2" papers ever so slightly so they would fit in the album better and then adhered them in place. A lot of times when I'm scrapping I like to use dimensional adhesive for depth and texture but in this instance I used regular double sided tape to make the album not too chunky - even though I do love a thick album!
 Time for embellishing! The April Hip Kits are filled with so much yumminess. I added paper stickers, chipboard stickers, and puffy stickers throughout the album wherever I could find the space and thought it would look good. To help the tiny stickers stay in place permanently I machine stitched through them and varied between a running stitch and zig zag stitch. I trimmed off the excess threads - sometimes I leave them longer for texture but here I trimmed them up since there is a lot going on already in this album.
Inside the pocket I journaled on two tags from the Ephemera Die Cuts using a blue pen. To help anyone who looks through this know which tag to read first I numbered them with the dark blue puffy alpha/number stickers and then tucked them inside the pocket.

I wasn't sure how I was going to decorate the sides of the pocket at first, but then I just decided to go with the same design and filled the front and back with more 2x2 papers and stickers. Easy peasy!
For the title on the cover I used the super cute & colorful transparency letters to say "YOU AND ME" along with a trio of hearts and machine stitched them in place. To do this I removed the photo and papers on the other side first before machine stitching, and then adhered them back in place once finished.

To keep the album closed I tied a piece of white ribbon from my stash in a bow around the middle and then added some charms adhered back-to-back dangling from pink baker's twine also from my stash. By having the charms stuck together no matter which side is showing it will be cute! All done!
I hope you are inspired to create a mini album from scratch with the Hip Kit Club supplies! This project came together quickly and easily and so many precious memories are stored within it. I can't wait to give it to my daughter when she gets home from school. And since it was so easy to create, I'm definitely going to create one for Fox too :)
Thanks so much for stopping by, see you again soon!

Love This Layout by Jana Maiwald-McCarthy


Hi everyone, Jana Maiwald-McCarthy back again and I have a new layout to share with you. For this page I used two of Paige's cut files: Love This and a Layered Butterfly. I used some bits from the new Horizon line and the Whimsical Collection.
I started by cutting the Love This from white cardstock using my Silhouette Cameo. I wanted to have the Layered Butterfly in some different pink shades so I cut the layers from Paper 02Paper 09, and Paper 14 from Horizon then I stitched the butterflies together. I backed the open heart with a small photo from a cute little Mary Poppins. I left the other letters open because I wanted to have some white on white. Then I added mixed media to my background in two little areas. I grabbed some Shimmerz Paints Colors and a piece of plastic to smudge the color on the paper. The background turned out great and I placed the title on top of it.

Next I grabbed the Floral Die Cuts from Whimsical to add flowers; I used one of the bigger flower clusters and cut off the white boarder around it. I also had a look into the Floral Die Cuts from Horizon. I clustered the flowers together and placed some of them behind the picture. I also added some leaves and matching thread. I found a cute die cut in the Horizon Ephemera Die Cuts which I placed in one of the letters. I scattered some of the butterfly Rub-Ons from Whimsical around the flowers and the photo. I really love how easily they rub onto the paper - even on mixed media! To finish I placed Stickers and some gold heart stickers from the exclusive Project Pad.

I really hope you're inspired to use a cute cut file by Paige very soon. Thanks so much for stopping by and I wish you all a great day!

Blog: Scissors Glue & Paper / Instagram: @janammcc / YouTube: Jana ScissorsGluePaper / Facebook: Jana Maiwald-McCarthy

Family - Chevron Layout


Friday, April 26, 2019

Hey scrappy friends! I have a new layout to share with you along with a process video featuring my Horizon collection and the Project Pad found exclusively in JoAnn stores! In fact, everything you see on this page can be found at JoAnn stores - woohoo!
Here is the process video so you can see how this layout came together:

I started by cutting up Paper 14 into triangles, heavily distressed the edges with scissors, and then arranged them into rainbow order. I ended up needing a few more triangles but didn't want to repeat any patterns so I cut them from Paper 03.
I used the B-side of Paper 08 for my background and measured at 3", 6", and 9" on the left and right edges. At those measurements I created the three rows of chevrons with the paper triangles. To help them stay in place permanently I machine stitched a zigzag over the chevrons using white thread.
I placed my family photo on the right side and then embellished with the tone-on-tone technique: a cluster of yellow bits over the yellow paper triangles, a cluster of orange bits over the orange paper triangles, so on and so forth. I used pieces from the StickersEphemera Die Cuts, a Shaped Paper Clip, and stickers from the Project Pad.
I journaled with a yellow pen inside the yellow journaling spot so it blends into the overall design. For the title I fussy cut a sentiment from Paper 04 and adhered it below the photo. Done & done!
I have made a chevron layout with pretty much every one of my Pink Paislee collections - why change a good thing!? There is nothing wrong with scraplifting your own layouts and I often do when I'm stumped :) With different collections the results will always look different. Thank you so much for stopping by today - I hope you found something inspiring!
Paige Taylor Evans © // Quinn Creatives DESIGN