Hi scrappy peeps! Sometimes I make cards :) Here is one of them from the CARDS chapter in my Make Your Memory book!
This birthday card features a backed cut file in a rainbow of colors - all made with my Splendid collection! The book includes the link to where you can find this cut file and the others used throughout my book! Tone-on-tone enamel hearts and a colorful banner below the sentiment enhance the rainbow colors!
I hope you are inspired to purchase my Make Your Memory book and try the tutorial to make your own birthday cards featuring a backed sentiment cut file!
SUPPLIES: Patterned papers, stickers, die cuts: SPLENDID
Hello scrappy friends! Phil Donahue here back on Paige's blog with a fun aquatic-themed layout featuring a photo of my niece and her cousins at the aquarium during her third birthday celebration! For this page, I used THREE of Paige's cut files: Waves Circle, Leaves, and Coral, along with elements from her Blooming Wild collection.
In Cricut Design Space, I resized the Waves Circle to be about 9-inches wide. Using the contour tool, I inverted the design because I wanted to cut the waves out of a 12x12 patterned paper to create a shaker element behind. I placed the circle in the upper-left corner and cut it from the coral/floral side of Paper 10. This paper perfectly reflects the colorful aquatic theme! After cutting, I upcycled clear packaging from a 12x12 chipboard sheet. Unlike acetate, the thinner plastic created a wavy effect on the film which amplified the theme even more! After using liquid glue to adhere the plastic film, I used adhesive foam strips to create a border around the circle which would soon enclose a colorful mix of sequins. I poured the sequins in the center of the cut file and backed it with a solid piece of coral cardstock from the Blooming Wild Project Pad. To embellish the page and perfectly match the color scheme I was trying to achieve, I copied and resized the Leaves and Coral cut files in solid aqua, pink, and orange cardstock - also from the Project Pad. I adhered these all around the photo and shaker element to create texture and areas of interest. Afterwards, I used a silver-foil journaling piece from the Journaling Pack and placed it over the bottom left cluster of coral. Next, I created my title using Thickers and alpha stickers from the Sticker Book. Lastly, I added silver-foiled border stickers, clear and iridescent sequins and enamel dots, and Mini Floral Puffy Stickers around clusters of coral along with splatters of white acrylic paint to complete the layout. I hope you found some inspiration in this layout and choose to try Paige's Waves Circle, Leaves, and Coral cut files along with her Blooming Wild collection! Thanks for stopping by and happy scrapping!
These mini albums are tiny but mighty! They hold lots of photos, cute embellishments, flip-ups, and are finished with handmade paper tassels which we learn how to make in class via a process video!
And they all fit perfectly into a handmade paper basket for toting around and keeping them safe!
Check out some sneak peeks:
After purchasing the 3 Tiny Chipboard Minis in a Basket Class, Ecwid will email you the PDF that contains a list of supplies, photo sizes, templates, cut files to download, instructions, and a link to YouTube where the class takes place. The class is pre-recorded so you can go at your own pace, watch it as many times as you need, and access it at any time!
Hello creative friends! Monique Lowe here with a brand new colorful layout! I’ve used the bright Blooming Wild collection and two cut files (Soccer and Hexagons Background) to complement the theme of my layout, along with a big splash of bold mixed media!
I started with the Soccer ball cut from black cardstock and used it initially as a stencil to make a few light pencil markings on a sheet of 12x12 mixed media cardstock. I positioned it in the top left corner with the soccer ball partially off the page. I marked the edge, as well as the cut-out Hexagons Background to guide my mixed media. Using Ecoline Liquid Watercolors and working with one color at a time, I dripped the colors within the pencil markings and used a wet paint brush to smoosh the colors around. I slowly added more colors, allowing them to blend slightly, and used a paper towel to dab up and control colors I didn’t want to blend too much. I added black and colorful splatters around the edge of the shape. Once dried, I stuck down the cut file. Next, I machine stitched around my 6x4 photo and backed it with vellum as well as Paper 9 and Paper 5, placing it toward the bottom left of my layout. The silver photo corners from the Chipboard Stickers finished off my photo perfectly. At this point I decided to add a strip of green at the bottom of my page to give the illusion of grass. I cut the bottom of my background at a slight diagonal and filled the missing space with Paper 15. Using a variety of Epoxy Word Stickers from the Wonders collection, I filled the edge of the soccer ball with tone-on-tone words and added in a few text phrases from the Blooming WildSticker Book. To add texture, I machine stitched over each phrase with white thread. To finish off my layout, I added in my title as well as a few color coordinating hexagons, creating 3 little clusters. I used the Hexagons Background Cut File and Paper 22, as well as a few fussy cut hexagons from Paper 4. Last but not least, I added in my date using two little tabs from the Sticker Book and a small tag from the Ephemera Die Cuts, which completed the cluster on the left of my photo and my layout! I never tire of creating colorful pages and this was no exception! Thank you so much for stopping by today and I hope you feel inspired to get creative with Blooming Wild and Paige's cut files too!
I cut the Doily Mandala from vellum to lay beneath my title and photos It works like white gesso, fading the background pape, but unlike gesso, it also adds a little pretty texture. I cut the You Make My Heart Happy title from white cardstock and instead of backing the letters I cut them out of Blooming Wild papers then popped them up with foam tape. I love the dimension this technique adds. I made the hearts 3D by doing an ‘Interior Offset’ in Silhouette Design Studio. Then stitching the top 2 together and popping them up over the cut file for even more dimension. I chain stitched the entire cut file with DMC Color Variations floss. Changing the floss to sort of coordinate with the nearest patterned paper. This might be my very most favorite stitching project of all time. I’m so in love with all the colors and how they mixed together seamlessly. I’ve used DMC 4040, 4069, 4080, 4095, 4170, and 4220.
I cut a thin strip of acetate to adhere "SPRING" letters from the Sugarplum WishesMini Thickers. The large butterflies were fussy cut from Paper 3 of the Splendid collection - they were the perfect match! All other ephemera is from Blooming Wild. I hope you got a couple of scrappy ideas of how you can use Paige’s collections and cut files for your own pretty spring projects!
I started by cutting the Fun in the Sun cut file from white cardstock and backed each letter with scraps of patterned papers from the 12x12 Paper Pad. I then added 3D foam to the back and adhered it to the center of Paper 23. Using a 3x4 photograph, I layered patterned papers behind from the 6x8 Paper Pad, leaving a small border around the edge. I finished my layout with stickers from Sticker Book, Chipboard Stickers, and flowers from the Puffy Phrase Stickers which I tucked around the cut file.
Here is the fourth of the four layouts we make in class with the Discover + Create collection by Vicki Boutin! Purchase access to the virtual class to join in the fun HERE!
I have been backing cut files ever since I got my first Silhouette Cameo when Fox was a baby in 2010! And I haven't stopped backing cut files since :) In each of my monthly classes for PaigePals6 there is a layout featuring a cut file to get you hooked too! This layout also features fussy cutting & some mixed media! In class we learn how to make this page from start-to-finish along with 3 more 12x12 layouts. I walk you through my tips, tricks, and techniques and offer suggestions for changing things up and altering the page to put your own spin on it!
After purchasing the Discover + Create Virtual Layouts Class, Ecwid will email you the PDF that contains a list of supplies, photo sizes, templates, cut files to download, instructions, and a link to YouTube where the class takes place. The class is pre-recorded so you can go at your own pace, watch it as many times as you need, and access it at any time!
Do you love backing cut files? I hope you are inspired to give it a try!
Here is the third of the four layouts we make in class with the Discover + Create collection by Vicki Boutin! Purchase access to the virtual class to join in the fun HERE!
Goodness knows I love hand stitching - there is nothing quite like the texture and homespun feel as a result of taking needle & thread to paper! This page features a hand stitched swirl frame using the chain stitch made with four colors of thread topped with tone-on-tone embellishing! In class we learn how to make this page from start-to-finish along with 3 more 12x12 layouts. I walk you through my tips, tricks, and techniques and offer suggestions for changing things up and altering the page to put your own spin on it!
After purchasing the Discover + Create Virtual Layouts Class, Ecwid will email you the PDF that contains a list of supplies, photo sizes, templates, cut files to download, instructions, and a link to YouTube where the class takes place. The class is pre-recorded so you can go at your own pace, watch it as many times as you need, and access it at any time!
Do you love hand stitching? I hope you are inspired to give it a try!
I also created a few of my own papers using Distress Oxides in shades of red and blue as I didn't have papers on hand in those colors. I had fun playing with the color combos and backing the Popsicles cut file with different papers to pull the colors from my photos!
I am having so much fun putting together a 4th of July 6x8 sequin album kit & class! Each kit will include one of these adorable handmade charms by Emily Inspired Designs! To be on the "first to know" list, please send me an email at paigetaylorevans@gmail.com - easy peasy! I plan to open up kit orders around June 21st and make the class available soon thereafter but my pace is a little slower these days due to migraines, so it could be released later in July, I hope that's okay! Be sure to take LOTS of pics over the 4th of July to put into your 6x8 sequin album!!! 🇺🇸🇺🇸🇺🇸
Let me know if you have any questions, thank you so much, and have a happy scrappy weekend!
Hello friends, it's Heidi Lewis on the blog today! I am a sucker for new cut files and the ones made for International Scrapbook Day 2024 are no exception! The Treehouse cut file actually reminded me of a zipline tower in the treetops. I combined the Treehouse with the Garden Shoppe collection to document some photos of me ziplining in Kauai, Hawaii.
To make this layout, I backed the Treehouse with Paper 15, Paper 16, Paper 20, the 6x8 Paper Pad, and some wood grain paper from my scrap bin. I cut the B-side of Paper 2 in half and adhered it to plain white cardstock to create my background. I added two 4x3 photos and created my title using a mixture of Thickers and alphabet stickers from the 8-Page Sticker Book. For one of the embellishments, I fussy cut a letterboard from Paper 12 and layered it behind my photo. Birdhouses, birds, leaves, and pears from the 8-Page Sticker Book, Ephemera Die Cuts, and Cardstock Stickers all fit the tree theme perfectly. I hope you feel inspired to join Paige's Happy Scrappy Place Facebook Group so you can grab all the free cut files! My first attempt at using a cut file was one of Paige's freebies so I can attest that it's a great way to start if you are new to cut files and want to give it a go!
SUPPLIES: Patterned papers, die cuts, stickers, embellishments: GARDEN SHOPPE
Here is the second of the four layouts we make in class with the Discover + Create collection by Vicki Boutin! Purchase access to the virtual class to join in the fun HERE!
I LOVE a good grid layout and this one is no exception! The repeating element is rectangles made up of patterned papers and black & white photos featuring fantastic Mr. Fox! Look carefully and you'll notices five of the rectangles are wrapped with string for fun texture and interest. Tone-on-tone embellishing is always a go-to technique! In class we learn how to make this page from start-to-finish along with 3 more 12x12 layouts. I walk you through my tips, tricks, and techniques and offer suggestions for changing things up and altering the page to put your own spin on it!
After purchasing the Discover + Create Virtual Layouts Class, Ecwid will email you the PDF that contains a list of supplies, photo sizes, templates, cut files to download, instructions, and a link to YouTube where the class takes place. The class is pre-recorded so you can go at your own pace, watch it as many times as you need, and access it at any time!
I immediately knew I wanted to use this cut file with these snarky pics of my girl. I added a little ink blending mixed media on the background to help it pop off the page. Then some splatters on the top, well because I love splatters. I hope it brings you some crafty inspiration!
Hello friends!! Audrey Mutschall here with a new layout featuring Blooming Wild and Paige’s Peacock cut file. My husband and I went to Victoria, BC, a few months ago and I was so impressed by all the beautiful peacocks roaming around the parks. I took a lot of photos and was really excited to scrapbook them when I got home.
I started by cutting the Peacock from white cardstock and backing it with patterned papers from the 12x12 Paper Pad. I wanted to do something fun on my background so I used my sewing machine to stitch curvy lines of bright colored threads across the middle section of a piece of white cardstock. I gently inked behind where the peacock would be placed and splattered a few watercolors on as well. I matted my photos with Paper 14 and arranged them beside the cut file then stuck everything down with foam adhesive. I embellished the peacock with a Mini Flower Puffy Sticker, Floral Die Cuts, and fussy cut flowers from Paper 2. I added a title using fussy cut letters from Paper 8 and added one of the Puffy Phrase Stickers too. Finally, I added fussy cut butterflies from Paper 16 above my title and beside my photo. I had so much fun creating this page and I hope it inspires you to check out Paige’s Blooming Wild collection and her amazing cut files!
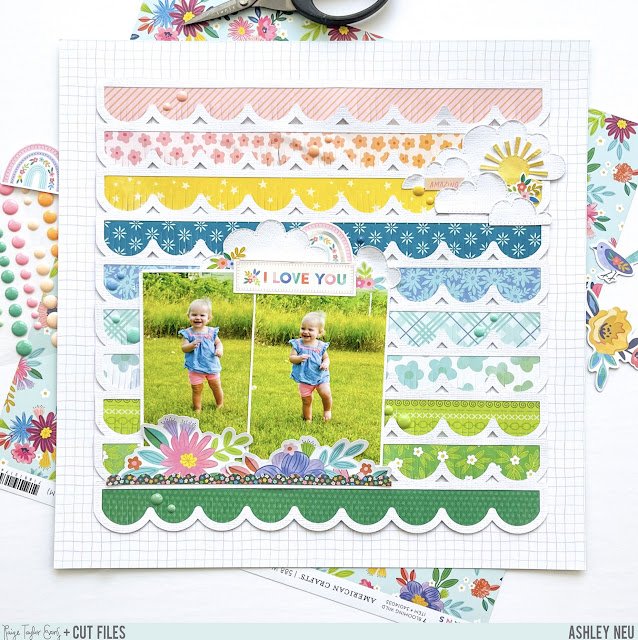
Hello my friends! It’s Ashley Neu here for the Paige Evans Cut File Design Team to share my next layout. I hope you all are enjoying the month of May and are looking forward to summer as much as I am. I went back in time and scrapped these photos from the summer of 2015! I used the Blooming Wild collection and Paige’s Scalloped Border Background cut file to create this fun summery layout!
I started by cutting the Scalloped Border Background from white cardstock and then cut the inner pieces from various patterned papers from Blooming Wild and two from Splendid. I selected the patterned papers based off of what the background looked like in my pictures. Before adding the patterned papers to the cut file, I added interest by using fringe scissors and cutting along the bottom of the scallops. I left the bottom of the fringed scallops free of glue when I adhered them onto the cut file to give even more interest and depth. I used Paper 5 as the background paper. I added my 2 photos on the bottom left to appear to be a part of the “scenic” background that I had created so I used 2 floral pieces cut in half from the Floral Die Cuts and adhered them overlapping the bottoms of the photos. I added in some “grass” by using a green scalloped sticker found in the Sticker Book at the bottom of those floral die cuts. My title comes from the Cardstock Stickers which I adhered at the top of my photos. To continue with the scenic background that I was building, I found a few cloud dies in my stash and cut out a number of them from white cardstock to add above my title. You can create clouds similar to mine by simply drawing them on some white cardstock and cutting them out. I also added in a rainbow sticker from the Cardstock Stickers. I used the same clouds to create an embellishment cluster on the top right of the layout. I added in a die cut sun, a flower from the Mini Flower Puffy Stickers, and a sentiment sticker from the Sticker Book. The last embellishments I added were some enamel dots in a tone-on-tone fashion on top of the patterned papers. That concludes the process of creating this layout! I hope that I have inspired you to use this Scalloped Border Background cut file to create a scene. It was so fun to do! Thank you for stopping by Paige’s blog and have a wonderful day!
Hey scrappy friends! Here is the concentric heart-shaped mini album that we learned how to create at the Crafty Beach Bash in Texas last month using the Poppy & Pear collection by Bea Valint and I have the class PDF available for purchase for $10 in my shop HERE!
Techniques include the saddle stitch, icon-on-icon dimension, a fun photo swivel, tone-on-tone embellishing, hand stitching, cute clusters, and lots more!
This mini album holds 10+ photos in various sizes for an eclectic vibe along with all the various-sized pages making each turn of the page a surprise and delight!
All the colors and patterns pair together beautifully to create an eye-catching and lovely mini album you'll want to share with all your friends and even make more to give as gifts and document all your precious memories!
Take a look through all the spreads and let me know if you have any questions!
For the instructions and the cut files/templates you can purchase the class PDF HERE - PLEASE NOTE: this purchase is for digital content only, no product is included and it's instructions only, no process videos. After purchasing, Ecwid will email you the PDF that contains a list of supplies, photo sizes, templates, cut files, and instructions! Let me know if you have any questions through email at paigetaylorevans@gmail.com, thank you so much, and have a happy scrappy day!
SUPPLIES: Patterned papers, stickers, die cuts, embellishments: POPPY & PEAR by Bea Valint