
Hello my friends! It’s Ashley Neu here for the Paige Evans Cut File Design Team to share my next layout. I hope you all are enjoying the month of May and are looking forward to summer as much as I am. I went back in time and scrapped these photos from the summer of 2015! I used the Blooming Wild collection and Paige’s Scalloped Border Background cut file to create this fun summery layout!
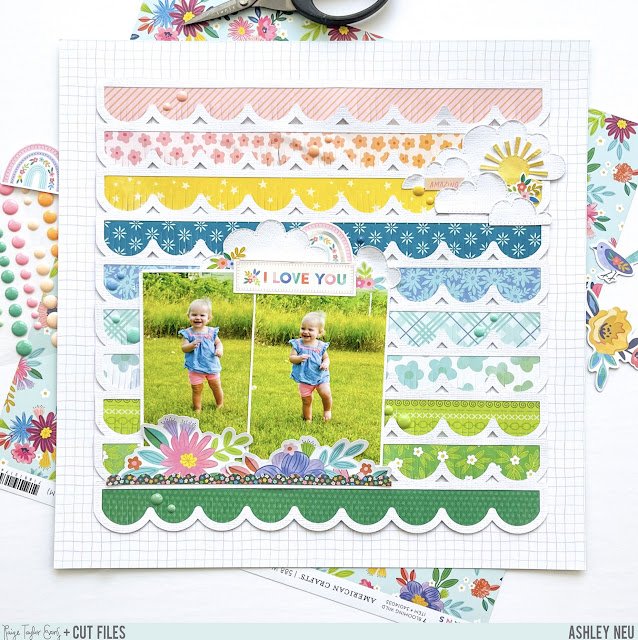
I started by cutting the Scalloped Border Background from white cardstock and then cut the inner pieces from various patterned papers from Blooming Wild and two from Splendid. I selected the patterned papers based off of what the background looked like in my pictures. Before adding the patterned papers to the cut file, I added interest by using fringe scissors and cutting along the bottom of the scallops. I left the bottom of the fringed scallops free of glue when I adhered them onto the cut file to give even more interest and depth. I used Paper 5 as the background paper. I added my 2 photos on the bottom left to appear to be a part of the “scenic” background that I had created so I used 2 floral pieces cut in half from the Floral Die Cuts and adhered them overlapping the bottoms of the photos. I added in some “grass” by using a green scalloped sticker found in the Sticker Book at the bottom of those floral die cuts. My title comes from the Cardstock Stickers which I adhered at the top of my photos. To continue with the scenic background that I was building, I found a few cloud dies in my stash and cut out a number of them from white cardstock to add above my title. You can create clouds similar to mine by simply drawing them on some white cardstock and cutting them out. I also added in a rainbow sticker from the Cardstock Stickers. I used the same clouds to create an embellishment cluster on the top right of the layout. I added in a die cut sun, a flower from the Mini Flower Puffy Stickers, and a sentiment sticker from the Sticker Book. The last embellishments I added were some enamel dots in a tone-on-tone fashion on top of the patterned papers. That concludes the process of creating this layout! I hope that I have inspired you to use this Scalloped Border Background cut file to create a scene. It was so fun to do! Thank you for stopping by Paige’s blog and have a wonderful day!
SUPPLIES: Patterned papers, stickers, die cuts, embellishments: BLOOMING WILD; white cardstock; Cut file: Scalloped Border Background by Paige Evans


Post a Comment