Where to Next Layout by Valerie Bisson


Saturday, July 31, 2021

  Hi there! Valerie Bisson back on the blog today for Paige’s cut file design team. I’m documenting an awesome road side stop on a road trip with my daughter. My layout features the Where to Next? cut file and the Wonders collection. Ever since I got my Cricut in 2019 I have been pretty obsessed with using cut files on my scrapbook pages. They are just so versatile and make it easy to create a layout. Paige has cut files for just about every theme you can imagine!

Jumping right into my process by starting with the Where to Next? cut file and cutting it at 10 inches in height using some woodgrain patterned papers from my stash instead of the usual white cardstock. Then I backed it with papers from Wonders. I love the look of hand stitching on my layouts so I added a backstitch to the signs with matching DMC threads, it didn’t take long at all and adds so much texture and interest.

After the cut file was complete I adhered it with dimensional adhesive to Paper 19 for the background. Prior to this I added watercolor paint splatters to the background. Next I matted my photo with Paper 13 which has a beautiful mix of all the colors. The cut file also naturally created a perfect spot for the photo, just above the title.

Next I embellished with the Floral Die Cuts along the left side of the cut file and to the right of the photo for a bit of balance from one side of the page to the other. I also added word stickers from theCardstock Stickers and the 8-Page Sticker Book inside each of the signs and also the O with a best day sticker. Just below the word next I added a phrase sticker and a floral die cut piece trimmed off from the red flower at the top left.

After this I used a small flower from the Acrylic Stamps to add in three spots around the page helping with that visual triangle and a few enamel dots in the centers. Finally I added journaling with a blue pen right next to the title.

Maybe try a little stitching on your next cut file, it adds a fun texture to your project! Thanks so much for stopping by today, have a fantastic creative day!


SUPPLIES: Patterned papers, stickers, die cuts, stamp, embellishments: WONDERSwhite cardstockwatercolors; Die cut machine: Cricut Explore Air 2; Cut file: Where to Next? by Paige Evans

Location: Manitoba, Canada / Instagram: @valeriearts2 / Pinterest: valeriearts2 / Facebook: Valerie Bisson

Picnic at the Park Layout by Ashley Neu


Friday, July 30, 2021

  Hi scrappy friends! Ashley Neu back with another design team layout for Paige Evans + Silhouette! This layout was made using the Bloom Street collection and Paige’s Picnic cut file which is for sale in the Spring 2021 Bundle! In this Bundle, you get 20 cut files which consist of spring themed images. If you don’t already have this Bundle, you are missing out!

After cutting the Picnic cut file cut file from white cardstock I backed it with papers from the 6x8 Paper Pad. I used a border punch to make grass using Paper 12 and Paper 21 and layered them on top of Paper 22. I used foam adhesive to add the cut file on top of the grass to make a cute picnic scene!

To create the title, I used a combination of the floral foam Thickers as well as the Mini Foam Thickers from Paige’s Pick-Me-Up collection. I love the look of combining different sizes or fonts of letters to create a title. These floral Thickers are one of my favorites to use!

Using some fussy cut flowers from the 6x8 Paper Pad and Paper 2, I layered them over the flowers that sat inside of the vase of the cut file. I love the dimensional look this gives! I used some embellishments from the 4-Page Sticker Book, Cardstock Stickers, and Layered Butterfly Stickers to help finish setting the scene. I adore how it all just fits perfectly!

Thank you so much for stopping by Paige’s blog! I hope you found some inspiration to create a scene layout like I did! Have a wonderful day!


SUPPLIES: Patterned papers, stickers, Thickers, die cuts, embellishments: BLOOM STREETwhite cardstock; Die cut machine: Silhouette Cameo; Cut file: Picnic from the 20 Spring Cut Files Bundle by Paige Evans

Location: Minnesota, USA /  Instagram: @ashleyneudesign / YouTube: Ashley Neu / Pinterest: Ashley Neu Design / Facebook: Ashley Neu Design

Paintbrushes Layout by Marinette M'Boussi


Wednesday, July 28, 2021

Hello everyone! Marinette M'Boussi here! I am excited to share a new project with you as I finally decided to use the awesome Washi Tape from the Wonders collection. I paired them with Paige's Paintbrush cut file.

I started by cutting the Paintbrush cut file 4 times on white cardstock. I backed all the paintbrushes with various papers from Wonders. Then I took another piece of white cardstock and started placing the Washi Tape. I wanted a mix of colors and patterns. I also added Distress Oxides to get more colors.

After placing the brushes on the page, I also backed my picture with papers from the 6x8 Paper Pad. I love this beautiful gold foil pad. As a final touch I embellished the layout with stickers from the 8-Page Sticker BookCardstock StickersChipboard Stickers, and Banner Stickers

Thank you for stopping by, I hope this will inspire you and that you will use more washi! Have fun!


SUPPLIES: Patterned papers, die cuts, stickers, washi tape embellishments: WONDERSwhite cardstock; Die cut machine: Silhouette Cameo; Cut file: Paintbrush by Paige Evans

Location: France / Instagram: @marinettemb / YouTube: Marinette MB / Facebook: marinette.mboussi

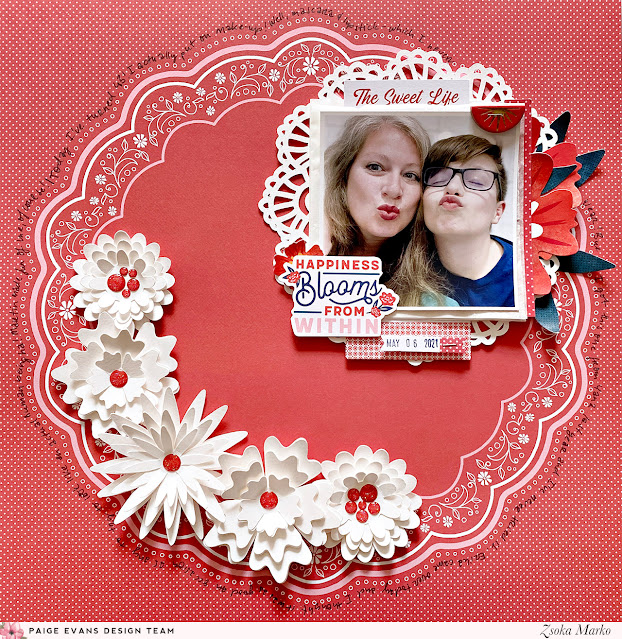
Happiness Blooms From Within Layout by Zsoka Marko


Tuesday, July 27, 2021

 Hi there crafters, Zsoka Marko back today with a new layout I've created for the Paige Evans Design Team! The first thing that caught my eye this time was this gorgeous Paper 10 with white polka dots and a doily design from the Wonders collection. I wanted this paper to shine, so I didn't want to cover a whole lot of it with photos, embellishments, etc.

I've used some cut files to create this page: Doily and several Layered Flowers. I had a bunch of white layered flowers left over from my recent rainbow layout, so I thought I might as well use them on this page! Otherwise I'd just forget!

I created a cluster at the top right, using the Doily cut file as a mat for my photo. I tucked a few Ephemera Die Cuts under my photo, as well as Floral Die CutsCardstock StickersChipboard Stickers, and more. Originally I wanted to go with a red & white color scheme, but when I saw the Happiness Blooms From Within Ephemera Die Cut, I decided to add navy in the mix. Those three just looked great together! I ended up using that die cut as my title, too!

I wanted to add the white flowers somewhere around my photo - bottom left section or so. But I didn't like the look of that, so I decided to place them along the bottom left part of the layout instead. I also added some red enamel dots to the flowers. I think I used all I had in this color haha! I stamped my date and added my journaling, following the curvature of the doily. I used navy ink and a navy pen to match my colors in the layout.

I do have a process video for you as well: https://youtu.be/jQ8yjAfwLK8

That's it for today! I hope I could inspire you in some small way! Thank you so much for stopping by and have a wonderful day!


SUPPLIES: Patterned papers, stickers, die cuts, embellishments: WONDERSwhite cardstock; Die cut machine: Silhouette Cameo; Cut files: Doily and Layered Flowers by Paige Evans

Blog: apocketfullofscrap.blogspot.com // Instagram: @zsoka_marko // Facebook: Zsoka Marko // YouTube: Zsoka Marko

Wonderful You Layout by Paige Evans


Sunday, July 25, 2021

 Hi everyone! Hope your day is going great! Here is the second of my two layouts that appeared in the Summer 2021 issue of Scrapbook & Cards Today Magazine which you can download and browse for free! I created this page with Wonders and my Layered Flowers & Leaves cut file.

I started by spending a few hours creating the flowers. I pulled all of the mostly solid 12x12 patterned papers from Wonders as well as papers from the 6x8 Paper Pad. Each flower is about 2". I added an extra step of pinching/creasing/folding all of the petals and leaves to give them more lifelike texture and then adhered the layers together with liquid glue.
For the colorful border, I used Paper 22 and trimmed a 1" frame. I adhered an 11" square piece of textured white cardstock to the center and machine stitched around the edges with white thread. I splashed blue watercolors on top. Then I trimmed a smaller square of  textured white cardstock, framed it with a smaller piece of Paper 22, and machine stitched the papers to the center of the layout.
I added a photo to the middle, placed "wonderful you" Epoxy Phrase Stickers at the top and bottom of the photo in white space, and added a tab Chipboard Sticker with the date written on it above. I placed the flowers and leaves on opposite corners of the page and then tucked the leaves into the mix. To finish I wrote journaling with a blue pen nestled into the bottom right section of flowers.
I hope you get a chance to download the Summer 2021 issue of Scrapbook & Cards Today Magazine and create a layout with my Wonders collection and Layered Flowers & Leaves cut file!
SUPPLIES: Patterned papers, stickers, embellishments: WONDERSwatercolorswhite cardstock; Die cut machine: Silhouette Cameo; Cut file: Layered Flowers & Leaves by Paige Evans

Mini Album Kits & Virtual Classes with Paige Evans


Saturday, July 24, 2021

I am excited to continue teaching live virtual classes with accompanying kits so you can create the projects along with me! You'll learn the latest and greatest techniques for creating cute and colorful handmade mini albums from scratch for documenting your memories! I'm using past collections from Dear Lizzy, Maggie Holmes, Vicki Boutin, 1Canoe2, and Jen Hadfield. Kits contain at least 12 papers (please note that 12x12” papers have been trimmed down to 6x12” so you get half of every paper to make shipping internationally possible), at least 8 packages of embellishments, plus any templates needed to create the albums so no cutting machines are required. Check out pictures of the kits, sneaks of the mini albums we'll make, and ordering info below! Thank you ever so much for your continued support in all of my scrapbooking endeavors and adventures :)


(KITS SOLD OUT - the virtual class is still an option) Mini Album Kit 1 with 2 Hour Live Virtual Class on Saturday August 28th 11am-1pm Eastern Time featuring the Here & Now collection by Dear Lizzy. In the class I will demonstrate how to create the foundation for a double saddle stitch mini album with the supplies shown above and a sneak of the mini album is shown below. A list of supplies, photo sizes, instructions, homework needed to be completed before the class, and any templates will be emailed at least two weeks prior to the virtual class. The link to the live YouTube video will be emailed about 24 hours before the class and the video will be saved for re-watching. Be sure to check your spam folders for emails from paigetaylorevans@gmail.com as more often than not my emails are hidden.


*****


(KITS SOLD OUT - the virtual class is still an option) Mini Album Kit 2 with 2 Hour Live Virtual Class on Saturday September 25th 11am-1pm Eastern Time featuring the Sunny Days collection by Maggie Holmes. In the class I will demonstrate how to create the foundation for a scalloped waterfall mini album with the supplies shown above and a sneak of the mini album is shown below. A cutting machine is not necessary to create this album, we will make it all by hand with templates included in the kit. A list of supplies, photo sizes, instructions, homework needed to be completed before the class, and any templates will be emailed at least two weeks prior to the virtual class. The link to the live YouTube video will be emailed 24 hours before the class and the video will be saved for re-watching. Check your spam folders for emails from paigetaylorevans@gmail.com as more often than not my emails are hidden.


*****


(KITS SOLD OUT - the virtual class is still an option) Mini Album Kit 3 with 2 Hour Live Virtual Class on Saturday October 23rd 11am-1pm Eastern Time featuring the Kaleidoscope collection by Vicki Boutin. In the class I will demonstrate how to create the foundation for a chipboard hidden hinge mini album with the supplies shown above and a sneak of the mini album is shown below. A list of supplies, photo sizes, instructions, homework needed to be completed before the class, and any templates will be emailed at least two weeks prior to the virtual class. The link to the live YouTube video will be emailed 24 hours before the class and the video will be saved for re-watching. Please check your spam folders for emails from paigetaylorevans@gmail.com as more often than not my emails are hidden.


*****


Mini Album Kit 4 with 2 Hour Live Virtual Class on Saturday November 20th 11am-1pm Eastern Time featuring a mix of several 1canoe2 and Jen Hadfield collections. In the class I will demonstrate how to create the foundation for a butterfly-shaped mini album with the supplies shown above and a sneak of the mini album is shown below. A list of supplies, photo sizes, instructions, any homework needed to be completed before the class, and any templates will be emailed at least two weeks prior to the virtual class. The link to the live YouTube video will be emailed 24 hours before the class and the video will be saved for re-watching. Be sure to check your spam folders for emails from paigetaylorevans@gmail.com as more often than not my emails are hidden.


USA
Kit #4 with virtual class - $80
*all prices include shipping

INTERNATIONAL
Kit #4 with virtual class - $95
*all prices include shipping

VIRTUAL CLASSES ONLY
1 virtual class without the kit - $20
2 virtual classes without the kits - $37 (save $3)
3 virtual classes without the kits - $55 (save $5)
4 virtual classes without the kits - $70 (save $10)


The PayPal request and an email with the link to join a private Facebook group will be sent within 48 hours of sending your order to me. Please be sure to pay the request within 48 hours, after then the request will automatically be canceled. Kits will ship within 72 hours of payment received and you will get an email with tracking info. Some packages reach their final destination in a few days and some take a few months because of covid restrictions. If your country is on THIS LIST chances are it could take 6-10 weeks for a package to reach you. If you haven’t received your box after 10 weeks from when you receive the shipping notification email, please reach out to me for help. Thanks for working with me through these unprecedented times in the shipping industry! Dates and times for the virtual classes are subject to change due to unforeseen circumstances and I will be sure to communicate if there are any changes via email and the Facebook group.


Limited kits available so don't delay :)! To purchase, send an email to paigetaylorevans@gmail.com with the following information:

1) Your name
2) Shipping address
3) PayPal email address or Venmo
4) What you would like to order

Thank you so very much for your support of these kits and virtual classes! Please let me know if you have any questions and I can't wait to create with you virtually and see how you document your memories in mini albums!

Learn & Grow Layout by Paige Evans


Friday, July 23, 2021

 Hi friends! I am so excited to share my first layout made with Bungalow Lane - coming to stores oh so soon!

I started with a large lace scalloped border punch from EK Success and used it on 16 patterned papers - all floral ones from Bungalow Lane. I arranged the punched paper strips into rainbow order and cascaded them down a piece of white cardstock for a fun and intricate background.
I cut out a 4.5" square from the right side, replaced the hole with a piece of white cardstock, and then added my photo inside the frame. From there it was just a matter of clustering embellishments!
Joey appears in the photo so it was ultra fun to use the Shiba Inu Ephemera Die Cut! Teehee! I added a few applicable Chipboard StickersFoam Phrase StickersCardstock StickersEmbossed Puffy Button StickersLayered Stickers, bits from the 8-Page Sticker Book, and more! All the things! Oh and a Bird Paper Clip!
I wrote journaling on a label sticker from the 8-Page Sticker Book and created the word "LEARN" with the Thickers.
Simple, effective, and makes a statement! Loved documenting this tender moment of reading outside with Fox and Joey :)
I'll be back soon with more layouts created with Bungalow Lane!
SUPPLIES: Patterned papers, stickers, die cuts, embellishments: BUNGALOW LANE; Border punch: EK Success

Hexagon Mini Album by Amber Mitchell


Thursday, July 22, 2021

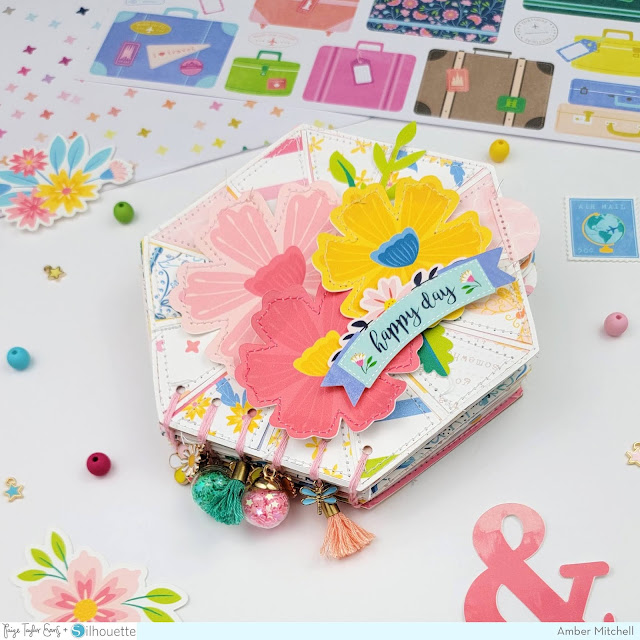
  Hello crafty friends, Amber Mitchell here on Paige's blog today to share with you this fun, shaped book I created using Paige's Hexagon Diced cut file and Coptic Bookbinding Class.

To create the covers of this coptic book, I first resized the Hexagon Diced cut file to roughly 4.5 x 5 inches. I then used my Cricut software to remove the contours of the image so that I would have a flat image I could cut the covers from. For each cover, I cut two pieces of paper patterned and one piece of heavy weight kraft cardstock. I then layered these one on top of the next and adhered them into place. The addition of the kraft cardstock makes the covers of this book more durable and long-lasting.

Next, I took the original cut file image and cut it from white cardstock. I layered that onto the front of the top cover and then added the backing pieces to the empty spaces. To finish off the top cover, I added machine stitching details to each section of the hexagon as well as along the edges of the entire cover. 

To create the signatures of my book, I took two uncountored images of the cut file and welded them back-to-back in my Cricut software. I cut 18 double sided pages using the Horizon Digital Collection. I love the colors in this collection and it's still one of my favorites to work with to date! I split my 18 pages into 6 groups of 3 and then stacked and folded them in half. I also added machine stitching along the edges of all of these pages for some extra texture and added half-circle tabs to them that makes it easier to flip through the book.

To bind the book together I followed Paige's Coptic Bookbinding Class. Although I have made several coptic books now, I still find myself referring to this class with each new one I make. Sometimes it helps to have a refresher and I love how easy the tutorial is to follow.

Sewn into the binding of my book are a bunch of various charms from my stash. I opted to use dragonfly, butterfly, and flower charms to match the Horizon collection. Finally, to finish this cute book off, I printed some bright and happy flowers from the digital Horizon collection and added them to my cover along with a few stickers.

Thank you so much for visiting my post today! I will see you next time with another fun project! 


SUPPLIES: Patterned papers, stickers, die cuts, embellishments: Horizon Digital Collection; Die cut machine: Cricut; Cut file: Hexagon Diced by Paige Evans; Coptic Bookbinding Class

Location: California, USA / Blog: Happy Crafty Studio / Instagram: @bambidearr / YouTube: bambidearr / Pinterest: bambidearr

Paige Taylor Evans © // Quinn Creatives DESIGN