Fantastic Layout by Cristina Sales


Thursday, February 28, 2019

Hi ladies, Cristina Sales here! I have a new layout to share with you using Paige's Fantastic cut file!

Each time it’s really difficult choose only one cut file. I know I often say that, but when I start to think which kind of page to make for my assignment, I start swiping up on all the beautiful cut files in Paige’s Silhouette store and I realize I could use many of them, not only one. These cut files are really amazing and they are also so versatile for any kind of composition, style, and technique. This time I decided to follow my first idea to use my favorite new “complexion” watercolors by Prima, and a stencil with hearts adding modeling paste I colored before with light blue paint.
I added light pink watercolors to my white cardstock background and I thought the blue color that I found in the Whimsical florals matched very well with the light pink so I mixed it with a little bit of modeling paste and I spread it on the base using a stencil with hearts. I really lovely effect! I cut out the Fantastic cut file using my Silhouette Cameo and I added it on the colored base using foam tape to create a 3D effect. I didn’t want leave too much blank space all around the word so then I backed three of the letters using one of my favorite patterned papers - Paper 07.

Then I started to decorate my layout and to create the composition with all the beautiful supplies in the Whimsical collection. This is the part I love the most! I added a Tassel Paper ClipChipboard StickersStickers, and more items from the Sticker Book. A golden touch is my final step every time so I added some gold thread and a tulle flower to complete my decoration.

I hope you like my project and if you have any questions please let me know by leaving a comment below! Thanks for stopping by and see you in my next post!

Blog: Scrap and So On / Instagram: @cristina__sales / YouTube: Cristina Sales
Facebook Page: Scrap and So On / Facebook: Cristina Sales

Floral Layout by Stefanie Ried


Wednesday, February 27, 2019

Hello and welcome to another layout from me, Stefanie Ried! The sun has been shining for a few days now and I am slowly getting spring feelings. I can hardly wait until the first flowers bloom. I really felt like Paper 03 with the flowers from the Whimsical collection.
I did a layout with the flowers at a workshop last year. I like the colors very much. One of my favorite papers. I wanted to make a frame out of flowers. So I only cut out the part in the middle with scissors. It took some time, but it relaxes me a lot :) And did you see, I used a 12x12 size. From time to time I want to use this size. Especially with this paper it looks even better in the larger format.

I glued the cut out flower paper on a white cardstock with 3D glue dots. Additionally, I decorated the frame with cut out flowers and leaves. The cute Rub-Ons and Enamel Shapes were also used. To finish, I wrote journaling in the middle.

Thank you so much for stopping by!

Blog: steffiried.blogspot.com / Instagram: @steffiried / Pinterest: @steffiried / Facebook: stefanie.ried.96 YouTube: Steffi Ried

When I Met Paige Layout by Kim Jeffress


Monday, February 25, 2019

Hello everyone, Kim Jeffress here and I'm back on the blog with a fun new layout using Paige's Rainbow cut file. Since my layout is about meeting Paige at the recent Creativation convention I knew my layout had to be “all the colours” and what better way to represent all the colours than with a rainbow! I paired it with some of the Whimsical collection to add even more fun and colour to my layout!
 Let me share how my layout came together. I enlarged the Rainbow cut file so it took up all the area of my layout. I really wanted to make a bold impact. While that was cutting on my Silhouette Cameo I adhered Paper 20 from the Whimsical collection with the colourful circles onto some white cardstock for even more pops of colour.
I used a variety of patterned papers from my scrap box to back each part of the rainbow and then added pop dots to the back of it before adhering it to my background. I also fussy cut the design inside the cloud out of the cloud to leave just the outline. I then used the word “she” from the She Believed cut file and adhered it inside my cloud.
I chose pieces from the Ephemera Die Cuts and Chipboard Stickers to embellish my rainbow. I chose to do a tone-on-tone finish to my rainbow. To complete my layout I added some of the soft pink Foam Mini Thickers on the pink patterned paper for my title.
I love my bright fun layout! It makes me happy! Thanks for joining me today, I can't wait to scrap again!

SUPPLIES: WHIMSICALPaper 20Foam Mini ThickersChipboard StickersEphemera Die Cutswhite cardstock; Die cut machine: Silhouette Cameo; Cut files: Rainbow and She Believed by Paige Evans
Blog: Glass Half Full / Instagram: @kimjeffress / Pinterest: @kimjeffress / Facebook: Kim Jeffress Designs / YouTube: Kim Jeffress

Reutte, Austria Mini Album


Sunday, February 24, 2019

I have a new mini album to share today documenting our adventures in Reutte, Austria & riding the Biberwier Rodelbahn (it's an alpine slide in the legit Alps!) using my brand new Horizon collection! This was the very first project I created when I received Horizon in the mail back in December. I couldn't wait to scrap with this travel-themed line!
I started by making a star-shaped mini album base. Kind of. I didn't really follow any directions so it's kind of made up lol. But basically I trimmed rectangles of patterned papers - five sets of three concentrically smaller rectangles - and glued them together at the edges only. Then I worked on one spread at a time. It was so fun to dive into all the brand new embellishments!! But first, photos. I printed my pics at home on a Canon Pro-100 printer so that they could be tiny and fit this mini album. 
On this first spread I trimmed a couple flower Chipboard Stickers in half, edged them on the page, then reinforced them with machine stitching. There is a set of Floral Die Cuts in Horizon and I used them prolifically throughout this book. I also added a heart Epoxy Sticker with a staple and tucked a "wanderlust" Ephemera Die Cut underneath. I copied/pasted our blog post recap text, changed the font to Remington Noiseless, then printed it out and trimmed it into strips. I didn't adhere the first and last spreads together so it can open up, and to hold its shape when open I connect it with a flower Shaped Paper Clip
On this next spread I added the three mini photos first and then embellished with a flower Chipboard StickerFloral Die Cut, a strip of Washi Tape, and another stapled heart Epoxy Sticker. Then I added the journaling strips with liquid glue. This is pretty much the routine for the rest of the album!
\
For the third spread I cut a Floral Die Cut in half and machine stitched them on the left and right edges. I tucked two mini photos underneath in the middle and added journaling strips below. Another stapled heart Epoxy Sticker! There's one on every page :) I cut a slit in the right flower and slid in a globe Shaped Paper Clip.

I used a slightly larger photo on this fourth spread. I mean, that view! It needed to be seen. I placed it at an angle and trimmed the excess. I folded a flower Sticker in half to fit in the crease of the page and then added journaling strips down the right side. Can you spot the stapled heart Epoxy Sticker and heart Chipboard Sticker?
The last page has another slightly larger photo on the right (cute kiddos!) and a smaller photo of me and Jane tucked under a globe Ephemera Die Cut with journaling strips on top. You can see the heart Shaped Paper Clip that holds the album open on the right. I machine stitched a "love" Epoxy Sticker at the bottom of the bigger photo and tucked a Floral Die Cut above the globe to finish.
This little book was SO fun to make and only took a few hours! That's the beauty of mini albums! Quick & easy and special memories are preserved in a cute and unique format.
I hope this inspires you to make a mini album with my new Horizon collection which starts shipping next week yay!!

It's Okay Layout by Jamie Pate


Saturday, February 23, 2019

Happy weekend friends! You looking for some creative inspiration? Because you have come to the right place. This is Jamie Pate  and I have a brand new layout + process video to share with you!
Today's layout is one I consider a fairly straightforward sketch. A single photo. A cluster of embellishments. And always journaling. That is sort of the 1-2-3 punch of my memory keeping approach. I am a believer in not always having to re-create the wheel. Having a cache of go-to sketches I think helps us get more stories in our albums. And that is forever a goal of mine.

But I digress. Because what I am really exited to share with you is this here Folk Art Flower Group cut file. I was in search of a floral piece to layer. When I came upon this cut file in Paige's Silhouette shop I knew it was just what I wanted. What's not to love with a couple of flowers to layer up?! And a smattering of leaves to complete the look.

The thing about this flower grouping of floral and leaf cuts is that it is a great match for the floral patterns happening in the Pick-Me-Up collection. The background of this layout is mat against a full on floral pattern. I loved playing these larger cuts up against the tiny pattern.

The cut was made with more Pick-Me-Up patterned paper. Using a hot glue gun, I popped the flowers a top another. The blue-ish-green leaves were tucked under the floral embellishment. And then the vine cut was made with Minc Toner Paper. After cutting that out from the toner paper, I literally cleaned the cuts really well with a wipe before foiling with Champagne Reactive Foil. I love how the foil vines play nicely with the gold foil touches found on this layout. Follow along in this quick video to see how this all came together.

 Be inspired to add a pop of shadow and dimension to your straightforward layout using the Folk Art Flower Group cut file and patterned paper from Pick-Me-Up!

SUPPLIESPICK-ME-UPPaper 162x2 Paper PadsEphemera Die Cutswhite cardstock; Cut file: Folk Art Flower Group by Paige Evans; Die cut machine: Silhouette Cameo
Blog: Jamie Pate Designs / Instagram: @jamiepate / YouTube: Jamie Pate
Pinterest: @jamiepate / Facebook: Jamie Pate Designs

Two Layered Hearts Layouts by Zsoka Marko


Friday, February 22, 2019

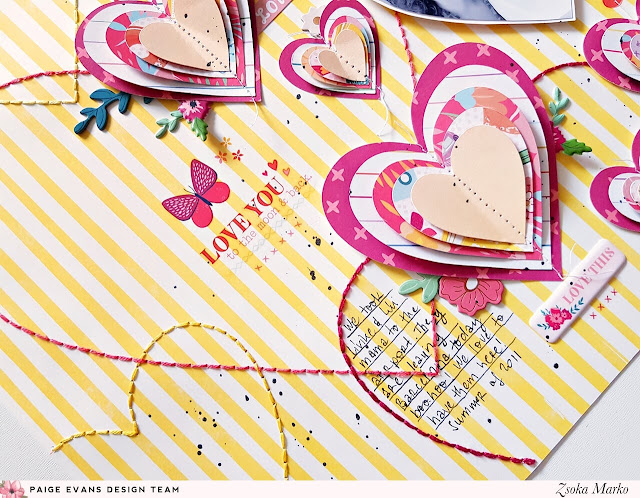
Hey there friends, Zsoka Marko back today with two new layouts! Two layouts that are pretty much the same but they will go in different albums so I don't mind. I wanted to do some layered hearts again, but this time with some stitched hearts in the background. I could not decide on the color scheme... First I sketched the hearts on a pink background, then I changed my mind and thought I'd go green monochromatic. So I sketched the design on a green paper. But then I changed my mind agin, thinking I wanted something colorful, so I sketched the design on a yellow paper too. That's three papers already and I still wasn't sure haha! So I decided to go for two, the green monochromatic and the colorful one. Here are my two pages:

 As I mentioned, I started out by sketching the background design on the patterned papers - I used my Silhouette Cameo and sketch pens for this. I then selected a few different embroidery flosses and hand stitched the background. Nothing fancy, so this was actually not a lengthy process.
I then cut a bunch of hearts in various sizes from different patterned papers. I slightly glued the layers together, just so they didn't move while I ran my sewing machine over them. I arranged them on my background and once I liked the placement, I glued them down. I went through all my embellies and pulled out the ones I thought would work: Floral Die CutsChipboard StickersPuffy StickersStickers, and my most favorite: Rub-Ons. I love the colorful rub-ons in Paige's collections, they are always such a great finishing touch to any page. They are great quality too!
I scattered the chosen embellishments around my pages; some I tucked behind the hearts, others I popped up - all just to add some dimension and interest to my layouts.
To finish them off, I wrote my journaling, stamped the dates, and added some black ink splatters. Et voila! Done!
Blog: apocketfullofscrap.blogspot.com / Instagram: @zsoka_marko / Facebook: Zsoka Marko / YouTube: Zsoka Marko

Altenew Live Your Dream Scrapbook Collection Release Blog Hop + Giveaway


Thursday, February 21, 2019

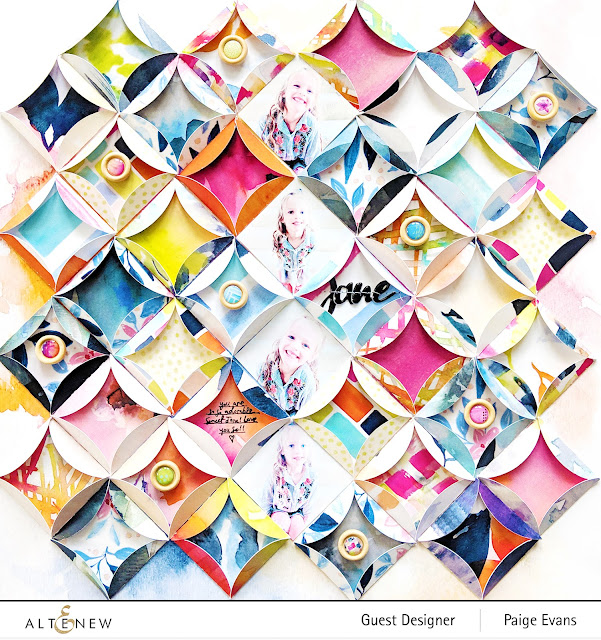
Hello and welcome to the Altenew Live Your Dream Scrapbook Collection Release Blog Hop + Giveaway! Here is the layout I made featuring the new and beautiful Live Your Dream collection:
Check out this short & sweet process video so you can see how this layout came together:

I started by trimming 3" strips from all 12 of the patterned papers and then cutting my Folded Circles cut file from the papers. Then I folded the circles on the perforated lines to create diamonds and arranged them onto a watercolor paper background.
 I added four photos down the middle and then adhered all the pieces in place. I came in with the wooden epoxy buttons and scattered them around the background.
 The title is simply "jane" which was made with the black epoxy stickers and I machine stitched through them to keep them in place. A bit of journaling finishes up this page! It came together super quickly!
The Live Your Dream collection is a bright and elegant line that you can use to document any occasion. From the little daily moments you want to remember forever to bigger milestones like parties and birthdays, this collection contains:
16 sheets of 12x12 double-sided patterned papers (2 of each/16 different designs)
2 6"x12" sheets of puffy alphabet stickers (220 pieces)
2 6"x12" sheets of chipboard stickers (38 pieces)
2 6"x12" sheets of clear stickers (31 pieces)
1 pack of wood epoxy buttons (20 pieces)
1 pack of die-cut cardstock embellishments (32 pieces) 

To celebrate this release, Altenew is giving away a $50 gift certificate to 6 lucky winners! Please leave a comment on the Altenew Card Blog and/or Altenew Scrapbook Blog by 2/28/2019 for a chance to win. 6 winners will be announced on the Altenew blogs on 3/3/2019.

Here is the full hop list:

Paige Taylor Evans © // Quinn Creatives DESIGN