
I have a new layout and process video to share with you today featuring all of the Thickers from my Pink Paislee collections!


First up, here is a process video so you can see how this layout came together:
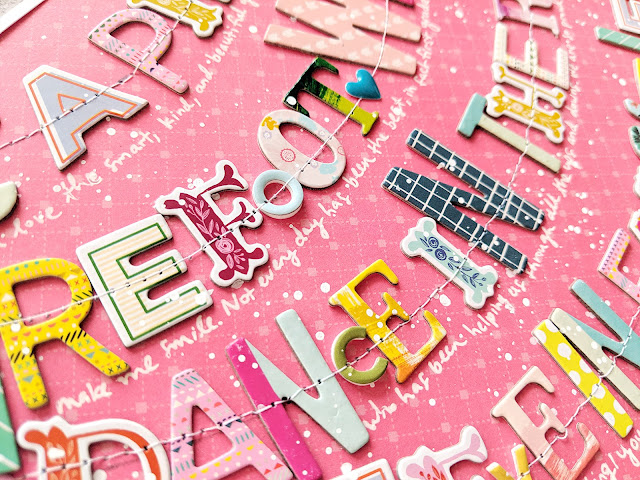
 Once the circles were drawn I peeled the paper off the mat and I grabbed the Thickers from all of my collections with Pink Paislee: Fancy Free, Take Me Away, Oh My Heart, Turn the Page, Pick-Me-Up, Whimsical, and my new collection which will be announced in a couple weeks! I found a quote on Pinterest and started placing the Thickers in random rainbow order over the drawn pencil lines.
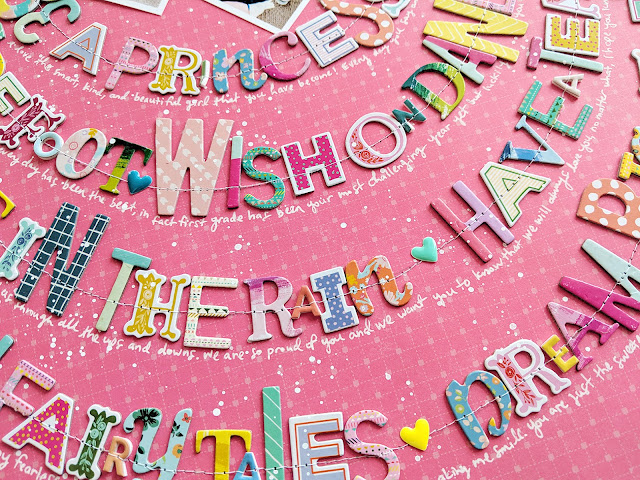
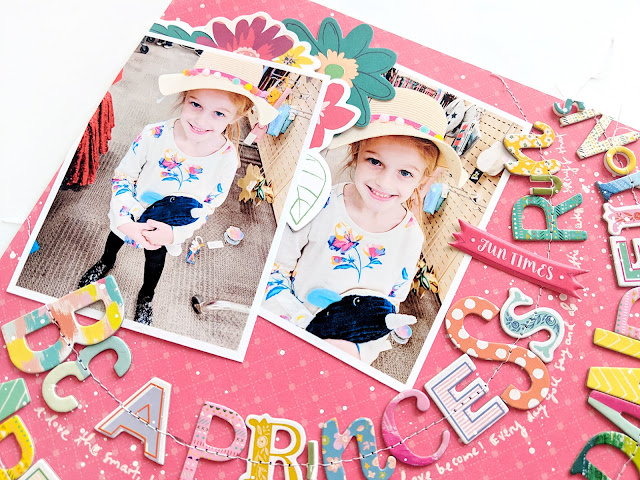
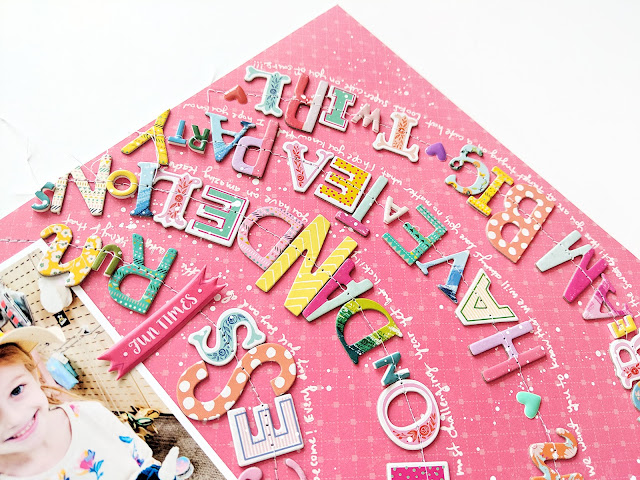
Once all of the Thickers were in place I ran the layout through my sewing machine and stitched through them to keep them in place permanently and I also like the texture stitching adds. I added a pair of photos to the top left corner and tucked in a few of the Floral Die Cuts from Whimsical.
Since the layout had a lot going on already I kept the embellishing to a minimum - I simply added an Enamel Heart Sticker between a few of the words and a "fun times" Puffy Sticker overlapping the right photo. To finish I splashed white acrylic paint around the page and journaled with a white pen below the rows of Thickers.
Thank you so much for stopping by today, I hope you are inspired to use your Thickers!

SUPPLIES: WHIMSICAL: Paper 11, Foam Mini Thickers, Chipboard Thickers, Floral Die Cuts, Enamel Shapes, Puffy Stickers; PICK-ME-UP: Chipboard Thickers; TURN THE PAGE: Thickers; OH MY HEART: Thickers; TAKE ME AWAY: Thickers; FANCY FREE: Thickers; Sewing machine: Brother; Thread: Coats & Clark; white acrylic paint
I started by using my Silhouette Cameo 3 to draw concentric circles with a pencil onto this pretty pink patterned paper from my Whimsical collection (the B-side of Paper 11). You can find the free cut file to download and use by clicking here.


Once all of the Thickers were in place I ran the layout through my sewing machine and stitched through them to keep them in place permanently and I also like the texture stitching adds. I added a pair of photos to the top left corner and tucked in a few of the Floral Die Cuts from Whimsical.

Since the layout had a lot going on already I kept the embellishing to a minimum - I simply added an Enamel Heart Sticker between a few of the words and a "fun times" Puffy Sticker overlapping the right photo. To finish I splashed white acrylic paint around the page and journaled with a white pen below the rows of Thickers.

Thank you so much for stopping by today, I hope you are inspired to use your Thickers!

SUPPLIES: WHIMSICAL: Paper 11, Foam Mini Thickers, Chipboard Thickers, Floral Die Cuts, Enamel Shapes, Puffy Stickers; PICK-ME-UP: Chipboard Thickers; TURN THE PAGE: Thickers; OH MY HEART: Thickers; TAKE ME AWAY: Thickers; FANCY FREE: Thickers; Sewing machine: Brother; Thread: Coats & Clark; white acrylic paint


This is AMAZING!!! LOVING those adorable photos, the way you did the title and how you added the journaling under each row!!! You are WOW!!!!!!!
ReplyDelete