1st Day of School Layout by Jana Maiwald-McCarthy


Thursday, November 29, 2018

Hi everyone, Jana here with you today! Our little one started 3rd grade in the summer and I have never ever scrapped a picture from his first day of school! What?! So, today was the day and I started this project with the Spooky Stars Background cut file.

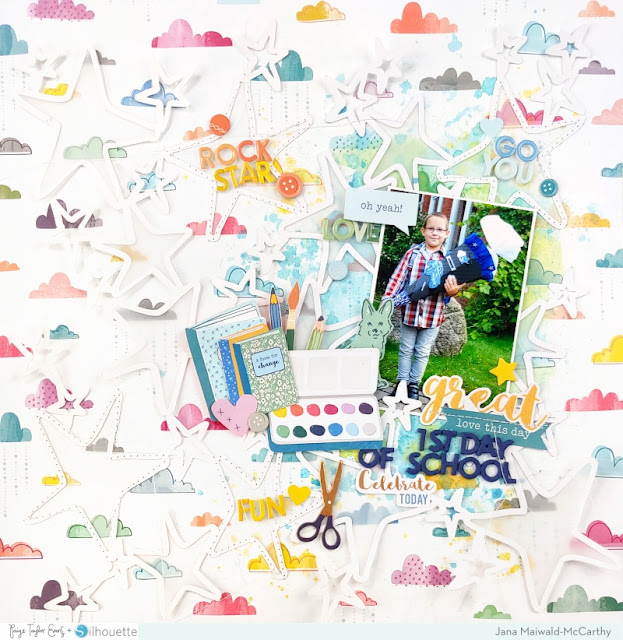
The new Whimsical collection is full of creative things and it is perfect for school pictures. I decided to go with a white cut for the stars because I wanted to use a patterned paper, Paper 15, as my background and I wanted to use a lot of colorful elements. I also decided to add some vellum to some of the stars. This looks so cool and the background is shining through. I always love to use vellum on my layouts. Then I added a thin layer of white acrylic paint to the patterned paper because I wanted to add some mixed media to it. I used greens and blues with a touch of yellow here and there. After I stitched some of the stars down I placed the picture on top and started to build my layering around it.

I used a lot of school-themed images from the Chipboard StickersSticker Book, and Ephemera Die Cuts, like a set of notebooks, some brushes, scissors, and a set of watercolors. I also added some fussy cut details from patterned papers. I tried to do color-on-color with the little titles on the stars and the elements around it. This was a really fun project and I totally love how it turned out. The new Whimsical collection is just awesome and the colors are beautiful!

Thank you so much for stopping by today!


Blog: Scissors Glue & Paper / Instagram: @janammcc / YouTube: Jana ScissorsGluePaper / Facebook: Jana Maiwald-McCarthy

Be the Light Layout by Julie Taylor


Wednesday, November 28, 2018

Hi there scrappy friends, Julie back with you again today with a new layout featuring this lovely Lightstrand Background cut file paired with the Whimsical collection. The lightbulbs are just gorgeous and inspired me to make this layout.
The cut file covers an entire sheet but I decided to use just two strands of bulbs which I cut apart from the full 12x12 cut file. I backed them with the small heart paper from the 6x6 Paper Pad and machine stitched around the edges of the bulbs. I then attached them at angles onto the yellow ombre Paper 10 and cut away the excess.

I added this to a sheet of white cardstock on which I added some mixed media, paint splatters, and a bit of texture paste. I stamped a few lightbulbs coming down the page and added my photo under the second set of light bulbs. I then chose coordinating colored ephemera from the Floral Die CutsSticker BookEphemera Die CutsChipboard Stickers, and Rub-Ons, cascading everything down the page. My title comes from the fabulous Foam Mini Thickers, think I may need to buy multi packs of these, just love them.

Hope you have enjoyed seeing my layout today, until next time!

Instagram: @julie9699 / Facebook: Julie Taylor

Citrus Twist Guest Designer - Pretty Adorable Sweet Layout


Tuesday, November 27, 2018

Hey there! Here is the other layout I created with the November Sunshine on My Mind kits from Citrus Twist Kits!
I started with one of the exclusive cut files - the beautiful Floral Frame, and I cut it from white cardstock using my pink Silhouette Cameo 3. Then I spent some time backing all of the open spaces with the different colors found on the hexagonal Paper 05 from my Whimsical collection.
Then I placed dimensional adhesive all on the backside and stuck it onto another piece of white cardstock for the background. I used my sewing machine to stitch around the frame edges. 
I placed a photo inside the frame. Next I fussy cut lots of flowers and leaves from the floral Paper 03 and tucked them in and around the cut file flowers.
I embellished further with Puffy Stickers and Chipboard Stickers inside the frame. Around the outer frame edges I used the puffy alphabet stickers found in the Sunshine on My Mind to create three words and then wrote journaling above the top edge.
SUPPLIES: Kit: Sunshine on My Mind by Citrus Twist KitsWHIMSICALPaper 03Paper 05Puffy StickersChipboard Stickerswhite cardstock; Cut file: Floral Frame; Die cut machine: Silhouette Cameo 3

Floral Butterfly Layout by Lady Nany


Monday, November 26, 2018

Hey friends, Lady Nany once again and this time I present my first project created with Whimsical by Paige which is a fantastic and colorful collection. I'm extremely in love with the products and based on that I wanted to use them all!
For this project I selected the Floral Butterfly cut file and cut it in my Silhouette Curio three times in two sizes on white cardstock. Then I selected Paper 10 for the base and sprinkled white metallic watercolor. While drying, I was chose three papers from the 6x6 Paper Pad to fill the larger part of the butterfly. On the other side, I placed vellum paper and cut the excess with scissors. I positioned the butterflies in a vertical direction so that they simulated movement and I adhered them in place. I sewed by hand with white embroidery thread on the inner edge. This step took me almost two hours, but it is a relaxing practice and I love the result it generates in my projects. On the right side, I placed the photo with a base of Paper 12 on which I drew a seam with black pen and then I stuck it with dots foam glue.

Decorating is my favorite part, for that I used Puffy Stickers, stickers from the 30-page Paige Evans #StickerBook, cut outs of flowers and butterflies from Paper 06, and Foam Mini Thickers for the title. Some remains of the floral butterfly I distributed on the left edge mainly to give a visual touch to the page. And I used the lower paper strip from Paper 16 cut into scallops on the right edge.

The journaling is divided into two parts, the first part on the edge of the large butterfly that includes the date. And a more sentimental secondary text about my encounter with Amy Tangerine written in black ink. I hope you liked it and found inspiration to create yours too. Until next time!
Blog: Lady Nany Art / Instagram: @ladynanyart / Facebook: Lady Nany Art / YouTube: Lady Nany Art

Hohenschwangau Mini Album for JOANN


Sunday, November 25, 2018

This blog post is sponsored by JOANN.
I made a new mini album using mostly my Pink Paislee Take Me Away collection that I found in my local store and online at JOANN.com!
Here is a walk through of the album so you can see how it looks "in real life":
This little leaf-shaped book is all about our adventure at Hohenschwangau castle in southern Bavaria, Germany back in October of 2013. Wow how time flies!
 I started by using a Silhouette Cameo 3 and die cut 11 leaves of different shapes and sizes from smooth White Cardstock. Then I die cut 11 matching inner leaves from the Take Me Away 12x12 Paper Pad as well as the 6x6 Paper Pad. I adhered the inner leaves onto each coordinating cardstock leaf and then pierced holes around the outer edge of every patterned paper leaf. The holes were spaced about 1/8" apart. I spent some time doing a chain link stitch with DMC Floss on every leaf, matching the colors of thread to the patterned papers and using a different color of floss for every page. I arranged the leaves from smallest to biggest, more or less, and then punched a hole through the top of each one to connect them together with a binder ring.
For the cover I die cut another large leaf from a plain sheet of Vellum and then used a Sewing Machine with white thread to stitch around the edges. I used rose gold Ms. Sparkle & Co. Alphabet Stickers to create the title and then adhered two thin strips of patterned papers from the Take Me Away 6x6 Paper Pad underneath. To embellish I added a bunch of Buttons below the title in colors to match the patterned papers.
Every page was decorated with one or two 2" square photos and just a few embellishments along with some typed and printed journaling strips. On this first page I fussy cut flowers and a heart from the Take Me Away 6x6 Paper Pad and layered them underneath a pair of photos. I glued journaling strips on top to introduce what the album is about.
The back of the first page is the only back page I decorated because I wanted to include some information about Hohenschwangau castle - I simply copied and pasted from our blog post recap and then trimmed the journaling into strips. I added another thin strip of patterned paper below and then adhered some tiny leaves punched from the Take Me Away 6x6 Paper Pad.
Here is a closer look at the journaling page.
On this tiny leaf page all I did was add a 2" square photo and a "love ya" and tiny bow fussy cut from the 6x6 paper pad.
Here I had two photos I wanted to include but not a whole lot of room so I stapled them together and then added fussy cut flowers to tuck under the right side. A small caption adorns the top photo.
On this page I added a photo, fussy cut flower and bow, and little caption.
This next page includes two photos, fussy cut embroidery hoop (the "travel far" sentiment was perfect!), heart, and flower, along with two typed captions, one for each photo.
I thought the purples in these photos would be great for this purple floral paper leaf! I matted the photos with more purple papers and added a fussy cut flower and caption on top.
Two more photos adorn this page along with a fussy cut heart and bow, topped with captions.
After I finished printing my pictures I realized I didn't even print my favorite photo from the day! Instead of printing it out in a small square like all the other photos I printed it into a 3x4" rectangle and inserted it between two leaf pages. I punched a hole at the top and glued on a caption.
Here I fussy cut a pink frame, topped it with a photo, and glued it on this intricate leaf page.
On this page I added two photos and a fussy cut flower tucked between. The photo on the left has a caption and is matted with green patterned paper.

This page includes one photo and a bunch of fussy cut elements that I thought fit the picture. I also added two tiny punched leaves on the left side. Again the sentiment ("adventure") on the fussy cut embroidery hoop fits the theme of this album quite well!
On the last page I added two more photos and a few fussy cut flowers along with a torn patterned paper strip. Journaling strips with a farewell conclusion wrap up the album!
Here are all the leaf pages laid out so you can see them individually.
I had so much fun making the mini album and documenting another one of our adventures! I hope this has inspired you to visit your local JOANN store and check out the scrapbook selection!

Cat Mini Album by Cristina Sales


Saturday, November 24, 2018

Hi friends! Cristina here today with a new mini album using the Whimsical collection! I wanted to have fun with the Mini Album Card with Tags cut file and dedicate it to the newcomer in the Sales house, Milo, a small kitty with red hair, blue eyes, and much love to give and receive. He captured my heart and is always behind me wherever I go.
The vibrant and bright colors of Whimsical were really the right combination for the result I wanted to achieve. I cut the base from white cardstock then I decided to use the 12x12 Paper Pad especially some foiled patterns to decorate all the pages. I used full-page photos to enhance the close-ups and concentrated the decoration on the opposite page, leaving a lot of empty space that allows me to focus on decorative elements. The embellishments of this beautiful collection are really my favorite part of this album. I enjoyed so much using them all because the decoration is what I dedicate myself to most. Here there are many pictures so take time to see all of them and I hope you like my project!

Thanks for stopping by and see you in my next post!

Blog: Scrap and So On / Instagram: @cristina__sales / YouTube: Cristina Sales
Facebook Page: Scrap and So On / Facebook: Cristina Sales
Paige Taylor Evans © // Quinn Creatives DESIGN