Love This Girl So Much Layout


Sunday, July 30, 2017

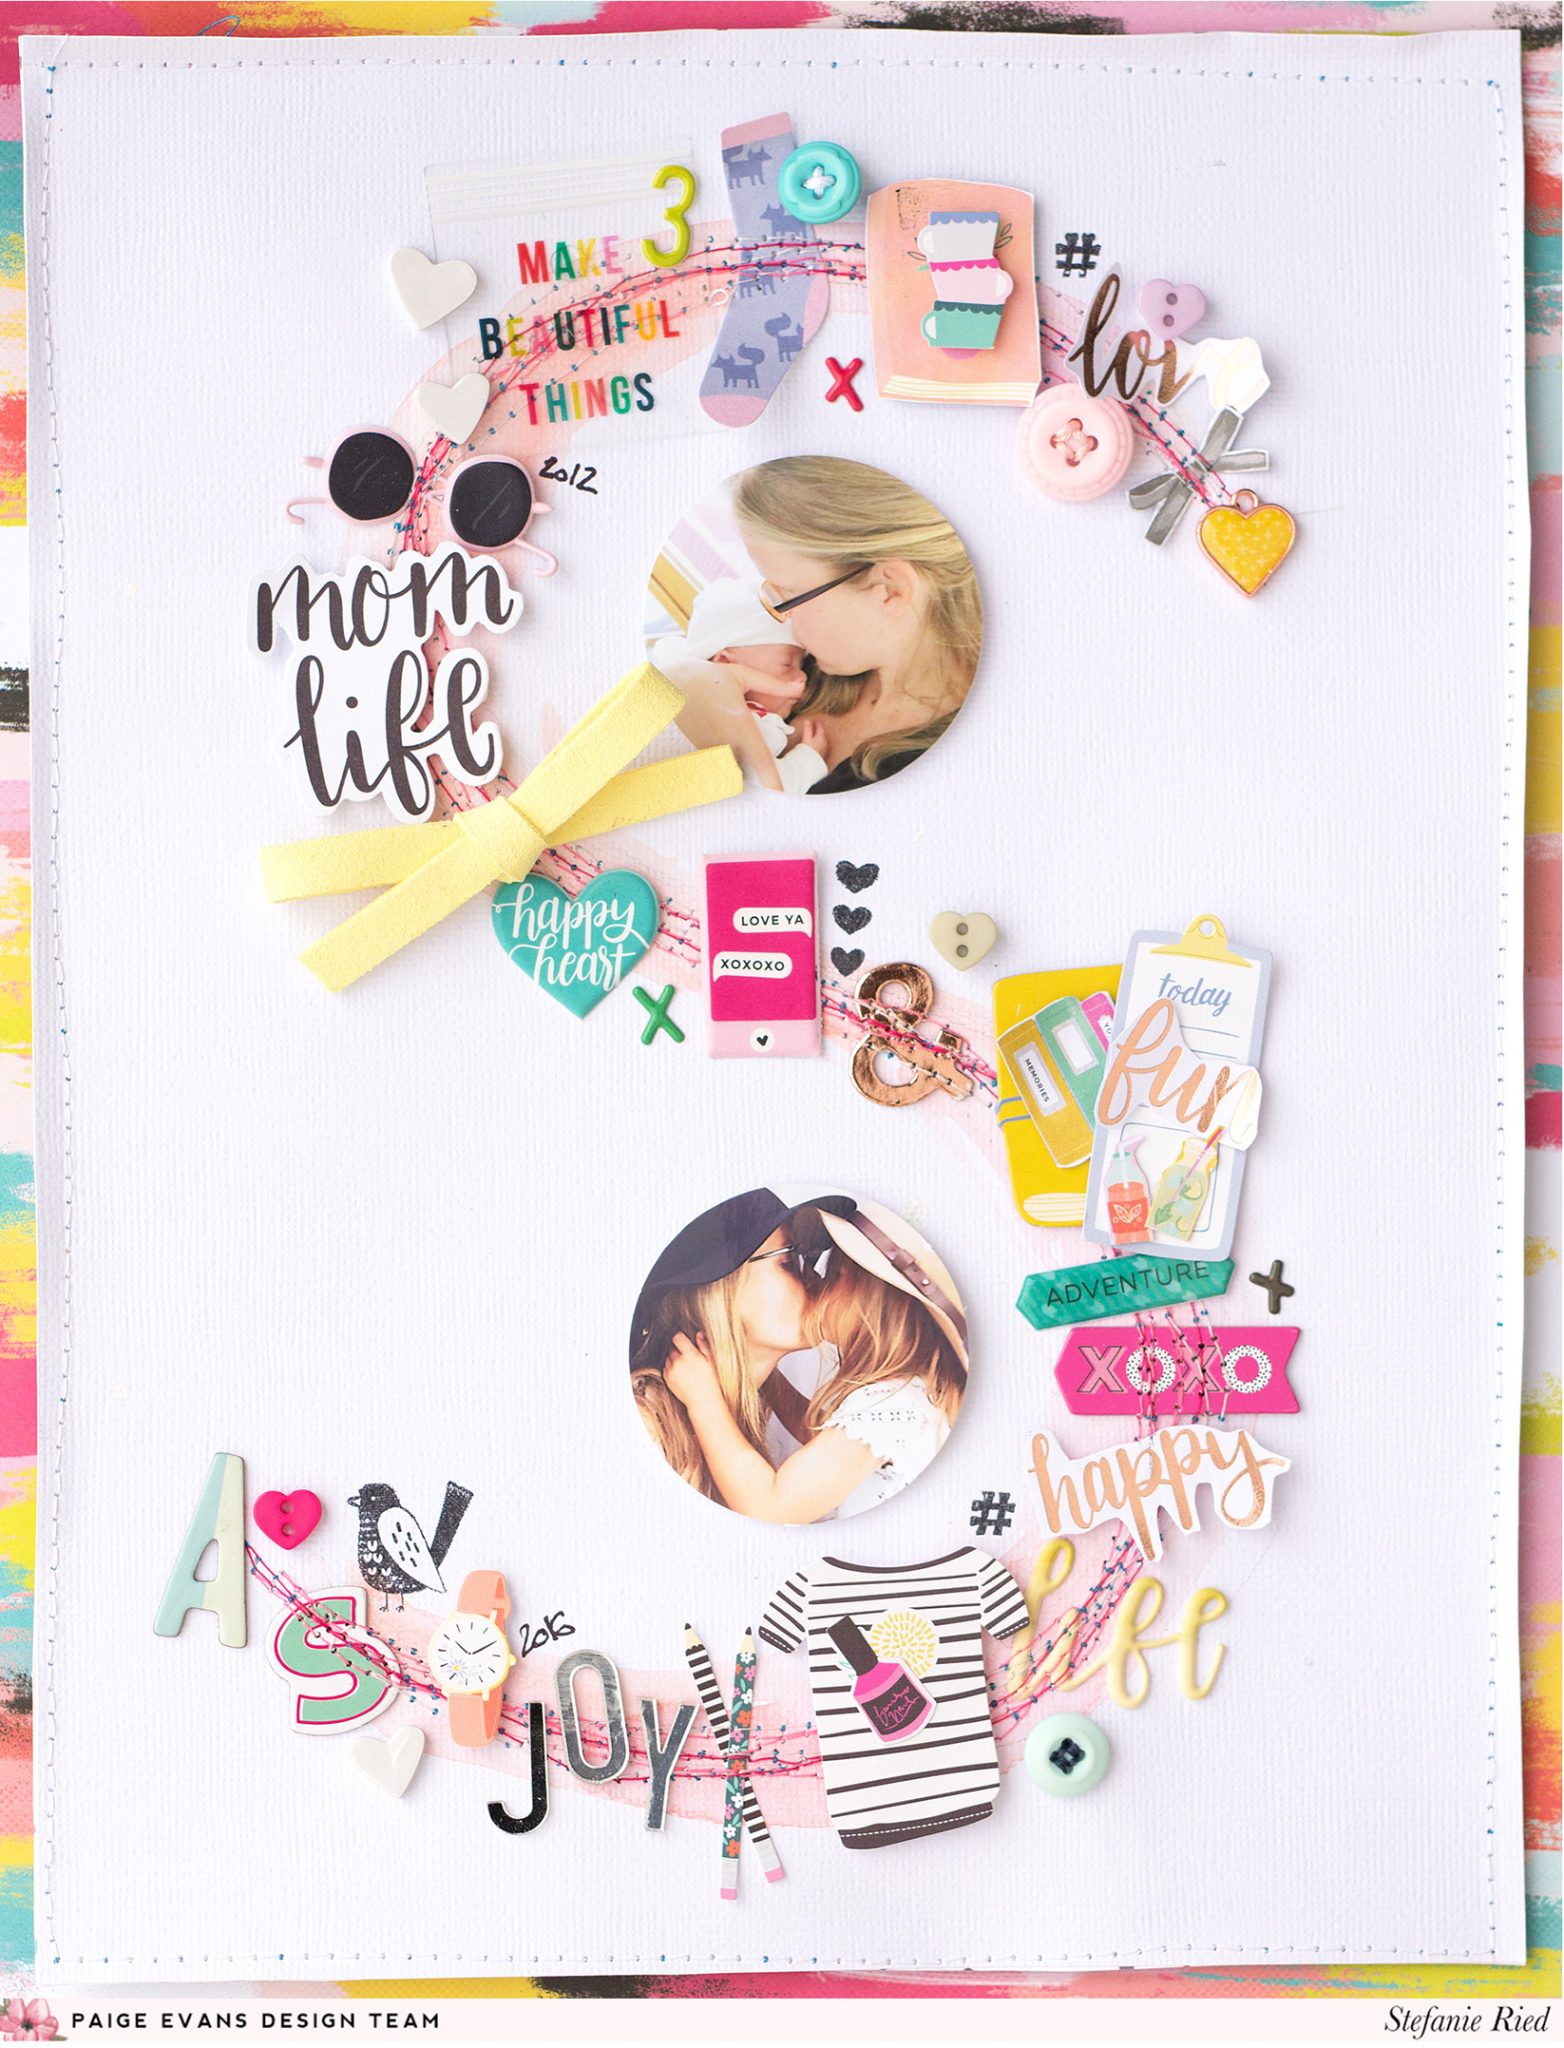
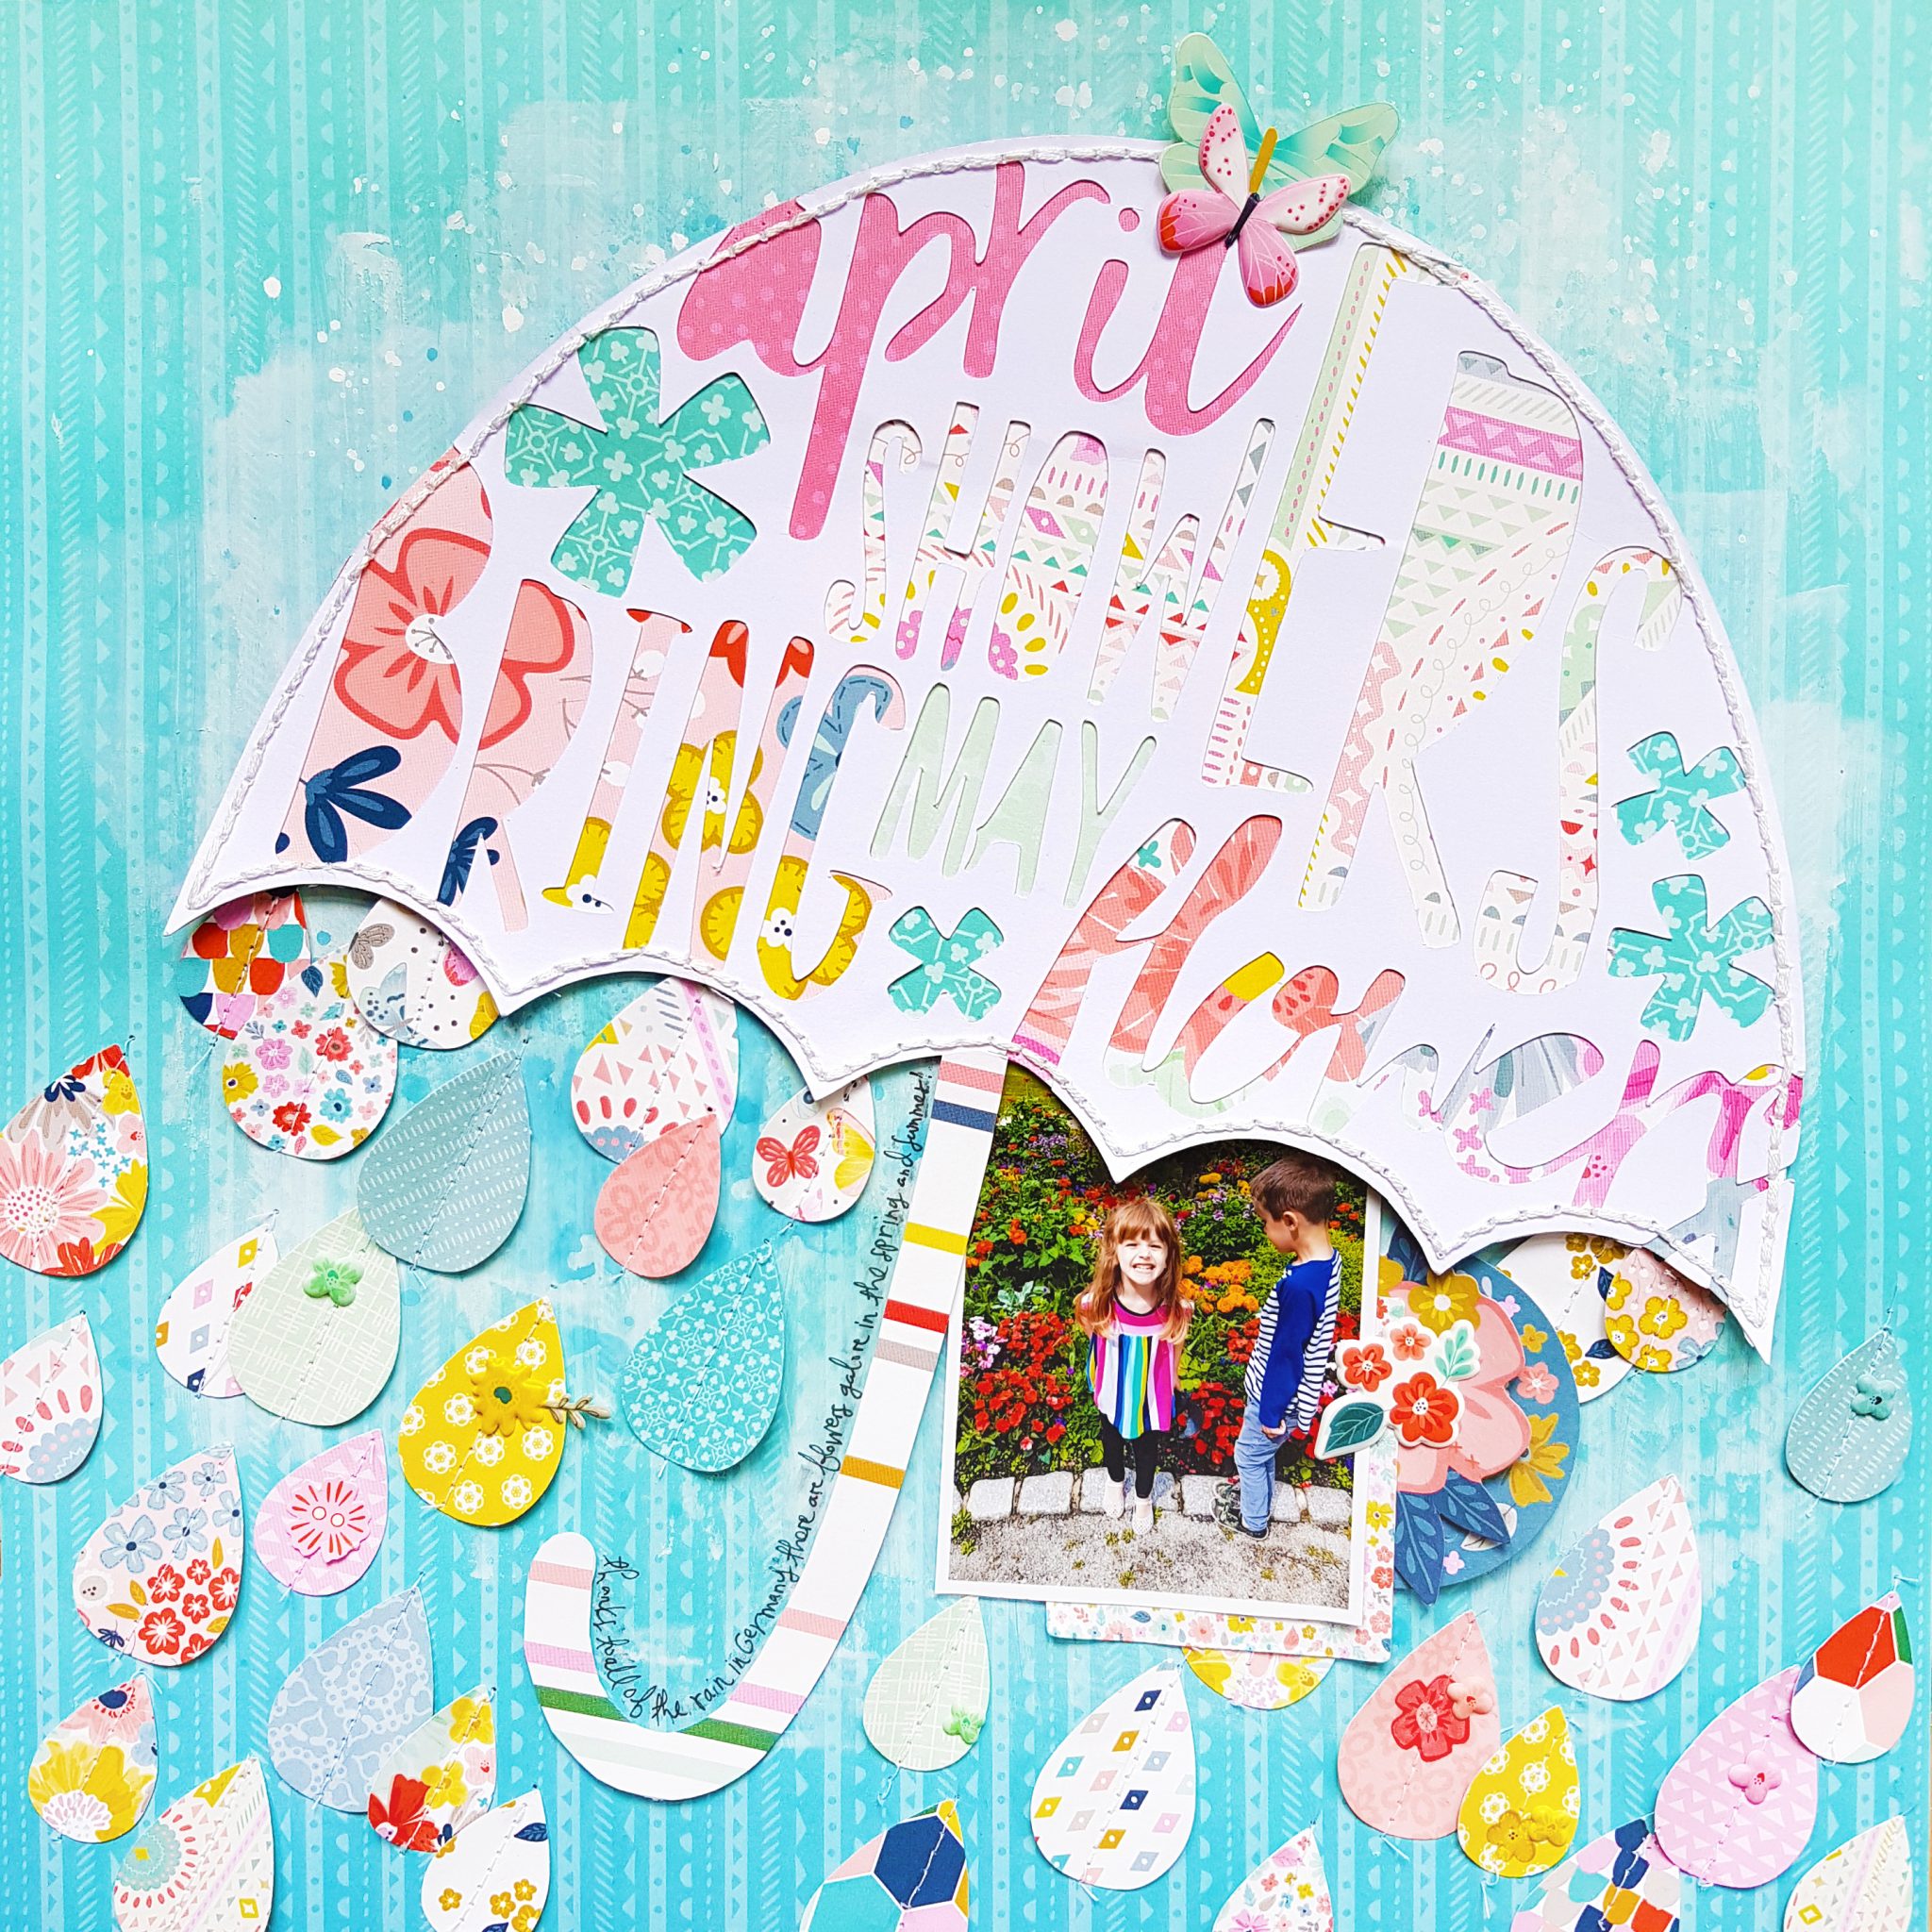
I have a new layout to share today using my brand new Turn the Page collection with Pink Paislee!
First take a look at the process video so you can see exactly how this layout came together:
Fussy cutting is one of my favorite things to do - yes it might be a tad tedious, but I also have a hard time just sitting down and watching TV so it's a great multi-tasking project! It's kind of like my version of a fidget spinner (even though I've never tried one! Are they cool?)

Supplies: Patterned paper, wood veneer, paper clip, Thickers, sticker, washi tape, die cuts: Turn the Page by Paige Evans / Pink Paislee; Gesso: Liquitex; Watercolors: Loew Cornell; Sewing machine: Brother; Thread: Coats & Clark; Font: Remington Noiseless; Adhesive, fine-tipped scissors: American Crafts; Embroidery floss: DMC

Jane at 5


Saturday, July 29, 2017

I feel like it was just yesterday I was writing her 4 year post and then I blinked and she turned 5! Why does time fly by so fast?!
 Jane is SOMETHIN'! We turn to each other and laugh because of something Jane said or did at least 3 times a day. She cracks us up and we love her sweet little voice and bold personality.
A day in the life of Jane:
6:00am - wake up (early to bed, early to rise!)
7:00am - eat "mommy's cereal" (Frosted Mini Wheats)
8:00am-12:00pm - play play play. It's summer time!
12:00pm - lunch. She and Fox are the world's pickiest eaters and she really doesn't have any favorites right now...
1:30pm - nap time! She still takes a 2.5-3 hour nap every day! For reals!
4:00pm - play with Fox, read with mom, color, etc.
5:00pm - dinner
6:00pm - play with Dad, watch a show, play games on the iPad
6:30pm - bath time!
7:00pm - popcorn time!
7:30pm - bed time!

Here are some funny things Jane has said over the past year:
“Daaaad!? Can you wipe my butt?”
“What’d you said?”
“I can’t know how!”
“Where are we going when we sleep?” (translation = what are we doing tomorrow)
“Mom I really really really like you.”
Sees Chris with a Dr. Pepper. “Dad. Can I….” (pause) I LOVE YOU I LOVE YOU I LOVE YOU! GIMME A HUG!”
YEARLY Q&A:
What is your favorite color? Pink.
What is your favorite toy? Unicorn Surprise.
What is your favorite food? Pizza. (Don't know why she said that, I don't think she's ever eaten the pizza we've made her!)
What is your favorite show? Oso.
What is your favorite game? Plants vs Zombies.
What is your favorite candy? Sour Patch Kids.
What is your favorite animal? Birdies.
What is your favorite book? The Nose Book.
What is your favorite song? Silent Night (I sing that to her every night at bedtime!)
What is your favorite holiday? Iceland because it has a swimming pool. (Haha! She thought I meant vacation!)
Who is your best friend? Evelyn and Tessa (same as last year - even though they both moved away months ago).
What do you like to do outside? Play.
What is your favorite drink? Dr. Pepper!
What do you want for dinner? Nachos.
What do you like for breakfast? Mommy's cereal (frosted mini wheats).
What do you want to be when you grow up? Pterodactyl. (Last year was a dragon, so, we're making some serious progress here... ;)
Love you so much Janey!

Mom Life Layout by Steffi Reid


Friday, July 28, 2017

Even without flowers, Stefanie Ried sure knows how to make an amazing layout! By combining little bits and pieces from my first three collections, she created a large monogram layout that is equal parts amazing and awesome!
Welcome to a new project from me (Steffi)! I am very excited about the new collection "Turn the Page". I can’t wait to touch all the papers and embellishments :) But before that time I wanted to create a project with many embellishments from all three previous collections (Fancy FreeTake Me AwayOh My Heart). I love to use a lot of stickers, buttons, alpha Thickers, and words on my layouts. I think the collections can be combined very well.

Creating a layout without flowers is not as easy as I thought. When I was almost finished with the layout, I noticed that on the books were small flowers. I had to laugh :) Sometimes I simply overlook the small details. Then I cut out small cups, books, and bottles from the Oh My Heart 6x6 Paper Pad and put them on the books to hide the flowers to fulfill the assignment.

In the past I have already created layouts with decorated shapes (such as an ampersand, circle, and heart). I like the effect very much. For this layout I used the letter "S" (for my initial letter). First I sketched the letter and then added peach and pink watercolors.

The title "Mom Life" is from the Ephemera Die Cuts. I used two of my favorite photos of me and my daughter on this layout. I love them so much. I punched the photos into circles and glued them with 3D sticky dots.

The words I cut out from a paper from the 12x12 Paper Pad. There are some papers covered with copper foil that shimmer so beautifully. They fit well with the colorful colors of the other embellishments.

The little buttons from Fancy Free and Take Me Away are also my favorites. I think I've used them on almost every project!

I think you can see how much I love all the embellishments from Paige's collections. They are so versatile. I love them! Thank you for looking :)
Blog: steffiried.blogspot.com / Instagram: @steffiried / Pinterest: @steffiried / Facebook: stefanie.ried.96 YouTube: Steffi Ried
I love the idea of creating a large monogram for a focal point on the background, and maybe adding a flower or two ;) Although this layout proves you don't need flowers to create a stunning page!

April Showers KBS Layout


Thursday, July 27, 2017

I received a big box of my 4th Pink Paislee collection called Turn the Page the other day and had so much fun sifting through all of the products - it legitimately felt like Christmas! The very first layout I made with Turn the Page will be published in the Fall 2017 issue of Scrapbook & Cards Today Magazine, and here is the 2nd page I made for my July project at Kerri Bradford Studio!
I was browsing through Kerri's newest cut files and came across the April Showers set and fell in love with the umbrella with the cute phrase on it that we know so well: April showers bring May flowers! In Germany it rains a lot. Like, a lot a lot. But that means there are TONS of flowers all throughout the spring and summer and even into early fall!
 To make this layout I traced the PNG of the umbrella and erased some of the tiny brush strokes that got traced inside the letters. Then I die cut it from smooth white cardstock. You all know the next step: backing the cut file with patterned papers! It's a tried and true technique that ALWAYS looks awesome. Then I handstitched around the umbrella using white floss and covered the handle with colorful stripey paper. On an aqua paper background (thanks Malm for helping me choose which paper to ultimately use!) with the pattern going vertical to resemble rain drops, I spread some gesso and then used the packaging technique to apply blue watercolors.
I punched a bunch of raindrops from the signature patterned paper I always include in my collections with all the squares of different patterns - SO perfect for punching! I also punched more raindrops from the mini 2" square pattern swatchbook - my favorite new product! Next I stitched all the raindrops below the umbrella and tucked a photo under the edge. I embellished minimally with a few floral bits here and there and topped the umbrella with a couple butterflies. To finish I wrote the journaling next to the handle. I hope you check out the April Showers cut file by Kerri Bradford - it includes cute flowers and leaves too!
SUPPLIES: Patterned paper, stickers, die cuts: Turn the Page by Paige Evans / Pink Paislee; Umbrella cut file: April Showers by Kerri Bradford; Die cut machine: Silhouette Cameo 3; Cardstock, pen, adhesive: American Crafts; Sewing machine: Brother; Thread: Coats & Clark; Gesso: Liquitex; Acrylic paint: Apple Barrel; Watercolors: Loew Cornell; Floss: DMC

Punched Paper Clouds Layout


Wednesday, July 26, 2017

I made a layout with the new Pink Paislee Summer Lights collection for the Technique Spotlight feature that I post every other week at Stamp & Scrapbook Expo!
I love the colors of this collection - so versatile and bright and happy!
HOW TO: Punch different sized circles from the 6x6 paper pad. Trim strips of scrap paper and cover them with adhesive. Layer the circles, largest to smallest, over the sticky strips and then trim the excess. Make as many clouds as you like! Arrange the clouds over a patterned paper background and zigzag stitch over the bottoms for texture and to attach them in place permanently. Tuck two photos into one of the clouds and embellish that cloud heavily with bits and pieces from Summer Lights. Journal on the bottom right corner and add a tiny sentiment sticker too. Punch half clouds from vellum and scatter them around the page to finish.
JOURNALING SAYS: St. Peter's Pool in Southeast Malta was so cool! The natural "chairs" in the rocks and the beautiful fresh water... so stunning!
Check out the process video for my page below:

SUPPLIES: Patterned paper, stickers, die cuts, chipboard: Summer Lights by Pink Paislee; Pen, adhesive: American Crafts; Sewing machine: Brother; Thread: Coats & Clark

Fantastic Layout by Flóra Farkas


Tuesday, July 25, 2017

Last week was all about flowers and this week is the exact opposite: NO flowers! Quite the challenge if you ask me! I hope the gals are up for it :) Design team member Flóra Farkas took the theme and ran with it and I LOVE the layout she made!
Today’s layout is very special as the assignment was not to use any flowers. I usually add some floral elements to my layouts, especially if I use Paige’s collections because they always include tons of beautiful flowers and floral patterned papers. My second all time favorite icon is hearts, so I die cut a fun background for my project and backed it with Oh My Heart Paper 05Paper 09, and Paper 18. Once that was done I added hand stitching around some of the hearts.
I adhered the background with foam tape to add extra dimension. After I placed the photo I embellished the page with Take Me Away Chipboard Stickers and Oh My Heart Ephemera Die Cuts. The cute kitty was cut out from Paper 01 which I placed on the top of the heart background. 
Around the colorful hearts I scattered Take Me Away chipboard golden heart stickers and different size enamel dots. Also the yellow "fantastic" title comes from the Chipboard Stickers.
To finish I wrote my journaling on hand stitched lines. I love the lovely colors of my layout and the final result.
Thanks for stopping by today! Hope you got new ideas for your next project!
Blog: pinkandpapergift.blogspot.com Instagram: @floramfarkas Pinterest: @floramfarkas
Facebook: pinkandpapergift YouTube: Flora Monika Farkas
Could you do it? Make a layout without flowers?! I have been issuing challenges on my Facebook recently and I think this topic will be the next one so do play along!

Seattle


Sunday, July 23, 2017

We took a quick trip into Seattle yesterday! The weather has been immaculate since we arrived nearly two weeks ago, I hope it stays this way forever :) I love the rain too though so it's a perfect place to be.
Old red brick buildings and skyscrapers.
First stop: lunch at Mae Phim. My dad discovered this place when he worked for Adobe in downtown Seattle. It's a hole-in-the-wall which almost always equals delicious.
Without fail I always get #14, the Mae Phim special. It's some kind of curry with chicken, cashews, peppers, onions, and carrots, served over white rice.
"Fox Friday" (even though it was Saturday?). Jane hugging animal statues. It's what she does.
Love all the greenery in such an urban setting.
After lunch we huffed it to Pike Place Market. It was too crowded to bother walking around inside, so we took an obligatory family selfie and then went just around the corner to...
The Gum Wall.
Equal parts nasty and awesome. I mean, on the one hand, eeeeew! But on the other, I actually really love all those colors!!
Floating staircase.
Then we walked down to the waterfront. This ferris wheel was only built in 2012 so we have yet to ride on it. Another adventure for another day!
The kids in various places.

I got my much needed dose of flowers!
Strike a pose Jane.
Crossing the I90 floating bridge to get back to faux-home.
We stopped at Yogurtland on the way back and loaded up on fruity flavors of ice cream topped with fresh fruit and yogurt chips. Perfect way to end a fun morning!

#evansfamilyeuropeanadventures


Saturday, July 22, 2017

Chris just shared this on his instagram and I thought it was really neat to see a map of the places we went the 4 years we lived in Germany. 
Believe it or not there are still cities on our bucketlist that we didn't make it to such as the Matterhorn, Sicily, Bilbao, Porto, Warsaw, Gdansk, Telč, Český Krumlov... so I guess we'll just have to go back! I miss it so much already!! I blogged about all of our adventures here: http://www.paigetaylorevans.com/p/our-travels.html.
In every city we visited we got a magnet - I didn't take a photo before we took all the frames down, but we filled up all four of these frames plus half of one more. Hunting down and finding a magnet was one our favorite things to do while adventuring and I'm so glad we have a little visual reminder in addition to all the photos and map pins of the places we went.
"Better to see something once than hear about it a thousand times."
We really tried to make this our motto while living in Germany. We knew it was only temporary and we had to make the most of our limited time. One of the first things I did when we moved to Europe was print 4 years worth of calendars and penciled in everywhere we wanted to go, then every 3 or 4 months we would plan the trips: book flights, find airbnbs, get pet sitters, and hash out the detailed itinerary so we knew exactly when and where to go so we'd see it all! The Army in Europe has 4 day weekends every single month, sometimes even two a month - we went somewhere nearly every single 4 day. You can see a LOT in 4 days! We swore by Rick Steves travel books for where to go and what to see and LOVE his self-guided walks through town that hit all the major attractions. I often get asked how we could afford to travel so much but the thing is traveling in Europe is so much cheaper than in the US. Budget airlines such as Ryanair had flights for $9.99 round trip sometimes, I kid you not!! Airbnbs are the way to go instead of expensive hotels and we brought our own food. Also... savings... more like what savings?!? Again, we knew this was a limited time in our lives and focused more on seeing and doing than scrimping and saving. Maybe not the wisest choice but we're happy with our decision. Towards the end of our time in Germany I was simply DONE traveling and Chris had to drag me out the door to get to Iceland and Norway, but I'm so very glad he pushed me to go. Now I just want to stay home for the next 4 years to recover! (as I'm simultaneously planning our trip to Mexico City to teach and sightsee, lol). We are so grateful for the time we had in Germany, I can't say it enough!

Summer 2015 Mini Album by Missy Whidden


Friday, July 21, 2017

As you know I've been in a mini-making-mood lately and since Missy Whidden's first mini album was a knock-out, I asked her to make another one! It's another winner!
Hey there, friends! Missy here and I have a fun mini album to share. This week the focus is on flowers, so I made sure to include a lot of them here. I went with a summer theme since I have so many pool photos of my girls. I must say that mini albums don’t come easily for me, so I wasn’t sure where to start. I finally decided to start going through the Oh My Heart 12x12 Paper Pad and I chose several bright and summery papers. I had several different sized photos printed, so I knew I’d be mixing and matching things. The size of the album is 4x6" so I cut a few papers in that size. I made a few of them smaller and I punched a few. I liked the look of having different sized and shaped papers.  I also used papers from the Fancy Free 12x12 Paper Pad and the 6x6 Paper Pad. I wanted to add some fun die cut elements to the album, so I used the laser die cut sheet from the Oh My Heart 12x12 Paper Pad. I did lots of machine stitching, especially on the cover. I stitched some of the Take Me Away Thickers for my title.

On the inside cover, I went simple with some fussy cut flowers from the Oh My Heart 12x12 Paper Pad and Chipboard Stickers. I punched a fun little heart and added a rose gold sticker from the Oh My Heart Sticker Book. The first page is a smaller piece that I tore and then added some watercolor and flowers.

On the back I kept it white with some embellishments: a fussy cut circle from the Fancy Free 12x12 Paper Pad, a rose gold phrase from the Oh My Heart 12x12 Paper Pad, and some Oh My Heart Puffy Stickers. The sequins are from SpiegelMom Scraps and I used them throughout the album. On the right, I watercolored a piece of white cardstock and added two photos. I made this piece a little bit wider so I could use a border punch on the side and fold it in. I held it together with a Take Me Away Epoxy Paper Clip. When you remove it, the photos are visible. I added some of the Oh My Heart Sticker Book washi tape and a puffy sticker.

I used a flower stencil and some watercolors for the back of that piece and added some Oh My Heart Chipboard Stickers, a die cut, and some more sequins. I added in one of the Oh My Heart 12x12 Paper Pad die cut pieces and backed it with various patterned papers. On the back, I punched  a lot of circles from a Fancy Free 6x6 Paper Pad paper and created some fun scallops. The page behind that has a longer photo that I embellished. I fussy cut another circle from the Fancy Free 12x12 Paper Pad and added an Oh My Heart Chipboard Sticker. That pretty yellow and pink layer is from the Oh My Heart Ephemera. I finished this page off with some metallic gold Take Me Away Foam Phrase Thickers.
For the next page, I kept it simple with just added a few paper strips around the edges, a punched heart, and an Oh My Heart Chipboard Sticker. I mixed in a circle punched piece here just for fun.  The right side is a piece of paper from the Fancy Free 12x12 Paper Pad that I watercolored. I added an Oh My Heart Ephemera floral die cut and a fussy cut flower. I layered in some vellum and tissue paper as well as an Oh My Heart Puffy Sticker.

Next up is another die cut piece from the Oh My Heart 12x12 Paper Pad that I backed with patterned papers. I added an Oh My Heart Ephemera die cut and some Take Me Away Foam Phrase Thickers. On the opposite side I journaled on a cut apart piece from the Oh My Heart 12x12 Paper Pad and stitched through it. When you flip it, you see a fun photo with some Oh My Heart Puffy Stickers and some Oh My Heart Sticker Book washi tape and alphas. On the right I used another die cut piece and backed it with papers. I kept it simple with just a few ink splatters, the photo, and a fussy cut heart from the Fancy Free 12x12 Paper Pad.

The next spread is another fun mix of color.  I used a floral paper on the left from the Fancy Free 12x12 Paper Pad and added some tissue paper behind my photo.  I tucked in another fussy cut flower and another rose gold sticker.  The page on the right is a combination of papers from both paper pads and an Oh My Heart Puffy Sticker.

On the back of the pink page, I added in a few smaller pieces just for fun. I fussy cut more large flowers from the Fancy Free 12x12 Paper Pad and paired those with a cut apart from the Oh My Heart 12x12 Paper Pad and added some thread.  I fussy cut those circles together and threw in another cut apart from Fancy Free. I added in another piece of watercolored cardstock next. I wanted to create a fun sky and sun with sprays. I had this cloud die cut sitting on my desk, so I added that in.  I finished it off with an Oh My Heart Puffy Sticker and a few sequins.
I love how this next page turned out. I had another longer photo so I folded the outer edge and added a punched tab. I hid some Oh My Heart Puffy Stickers underneath the folded part. I sprayed the paper with some bright pink spray and bordered the photo with some washi tape from the Oh My Heart Sticker Book. The right side is another journaling piece. When you flip it over, there’s another photo behind it. Behind that is another die cut piece from the Oh My Heart 12x12 Paper Pad that I stitched on using different color thread.


The final bit here is more watercolored die cut pieces, fussy cut flowers, and puffy stickers. I assembled the entire album using a Cinch machine.

I hope this inspires you to try your hand at a mini album! I struggle with them, but the more I got into it, the more fun it was. I always appreciate a challenge, and this hit the spot!
Blog: littlenuggetcreations.blogspot.com  Instagram: @missywhidden  Pinterest: @missywhidden
Facebook: missy.whidden  YouTube: Missy Whidden
Everything Missy makes is golden! From mini albums and layouts to cards and DIY projects - I'm so lucky to have her on my team and share her projects with you! Thanks for stopping by today, be back soon!
Paige Taylor Evans © // Quinn Creatives DESIGN