Love Layout by Lisa Fonseca


Tuesday, January 31, 2023

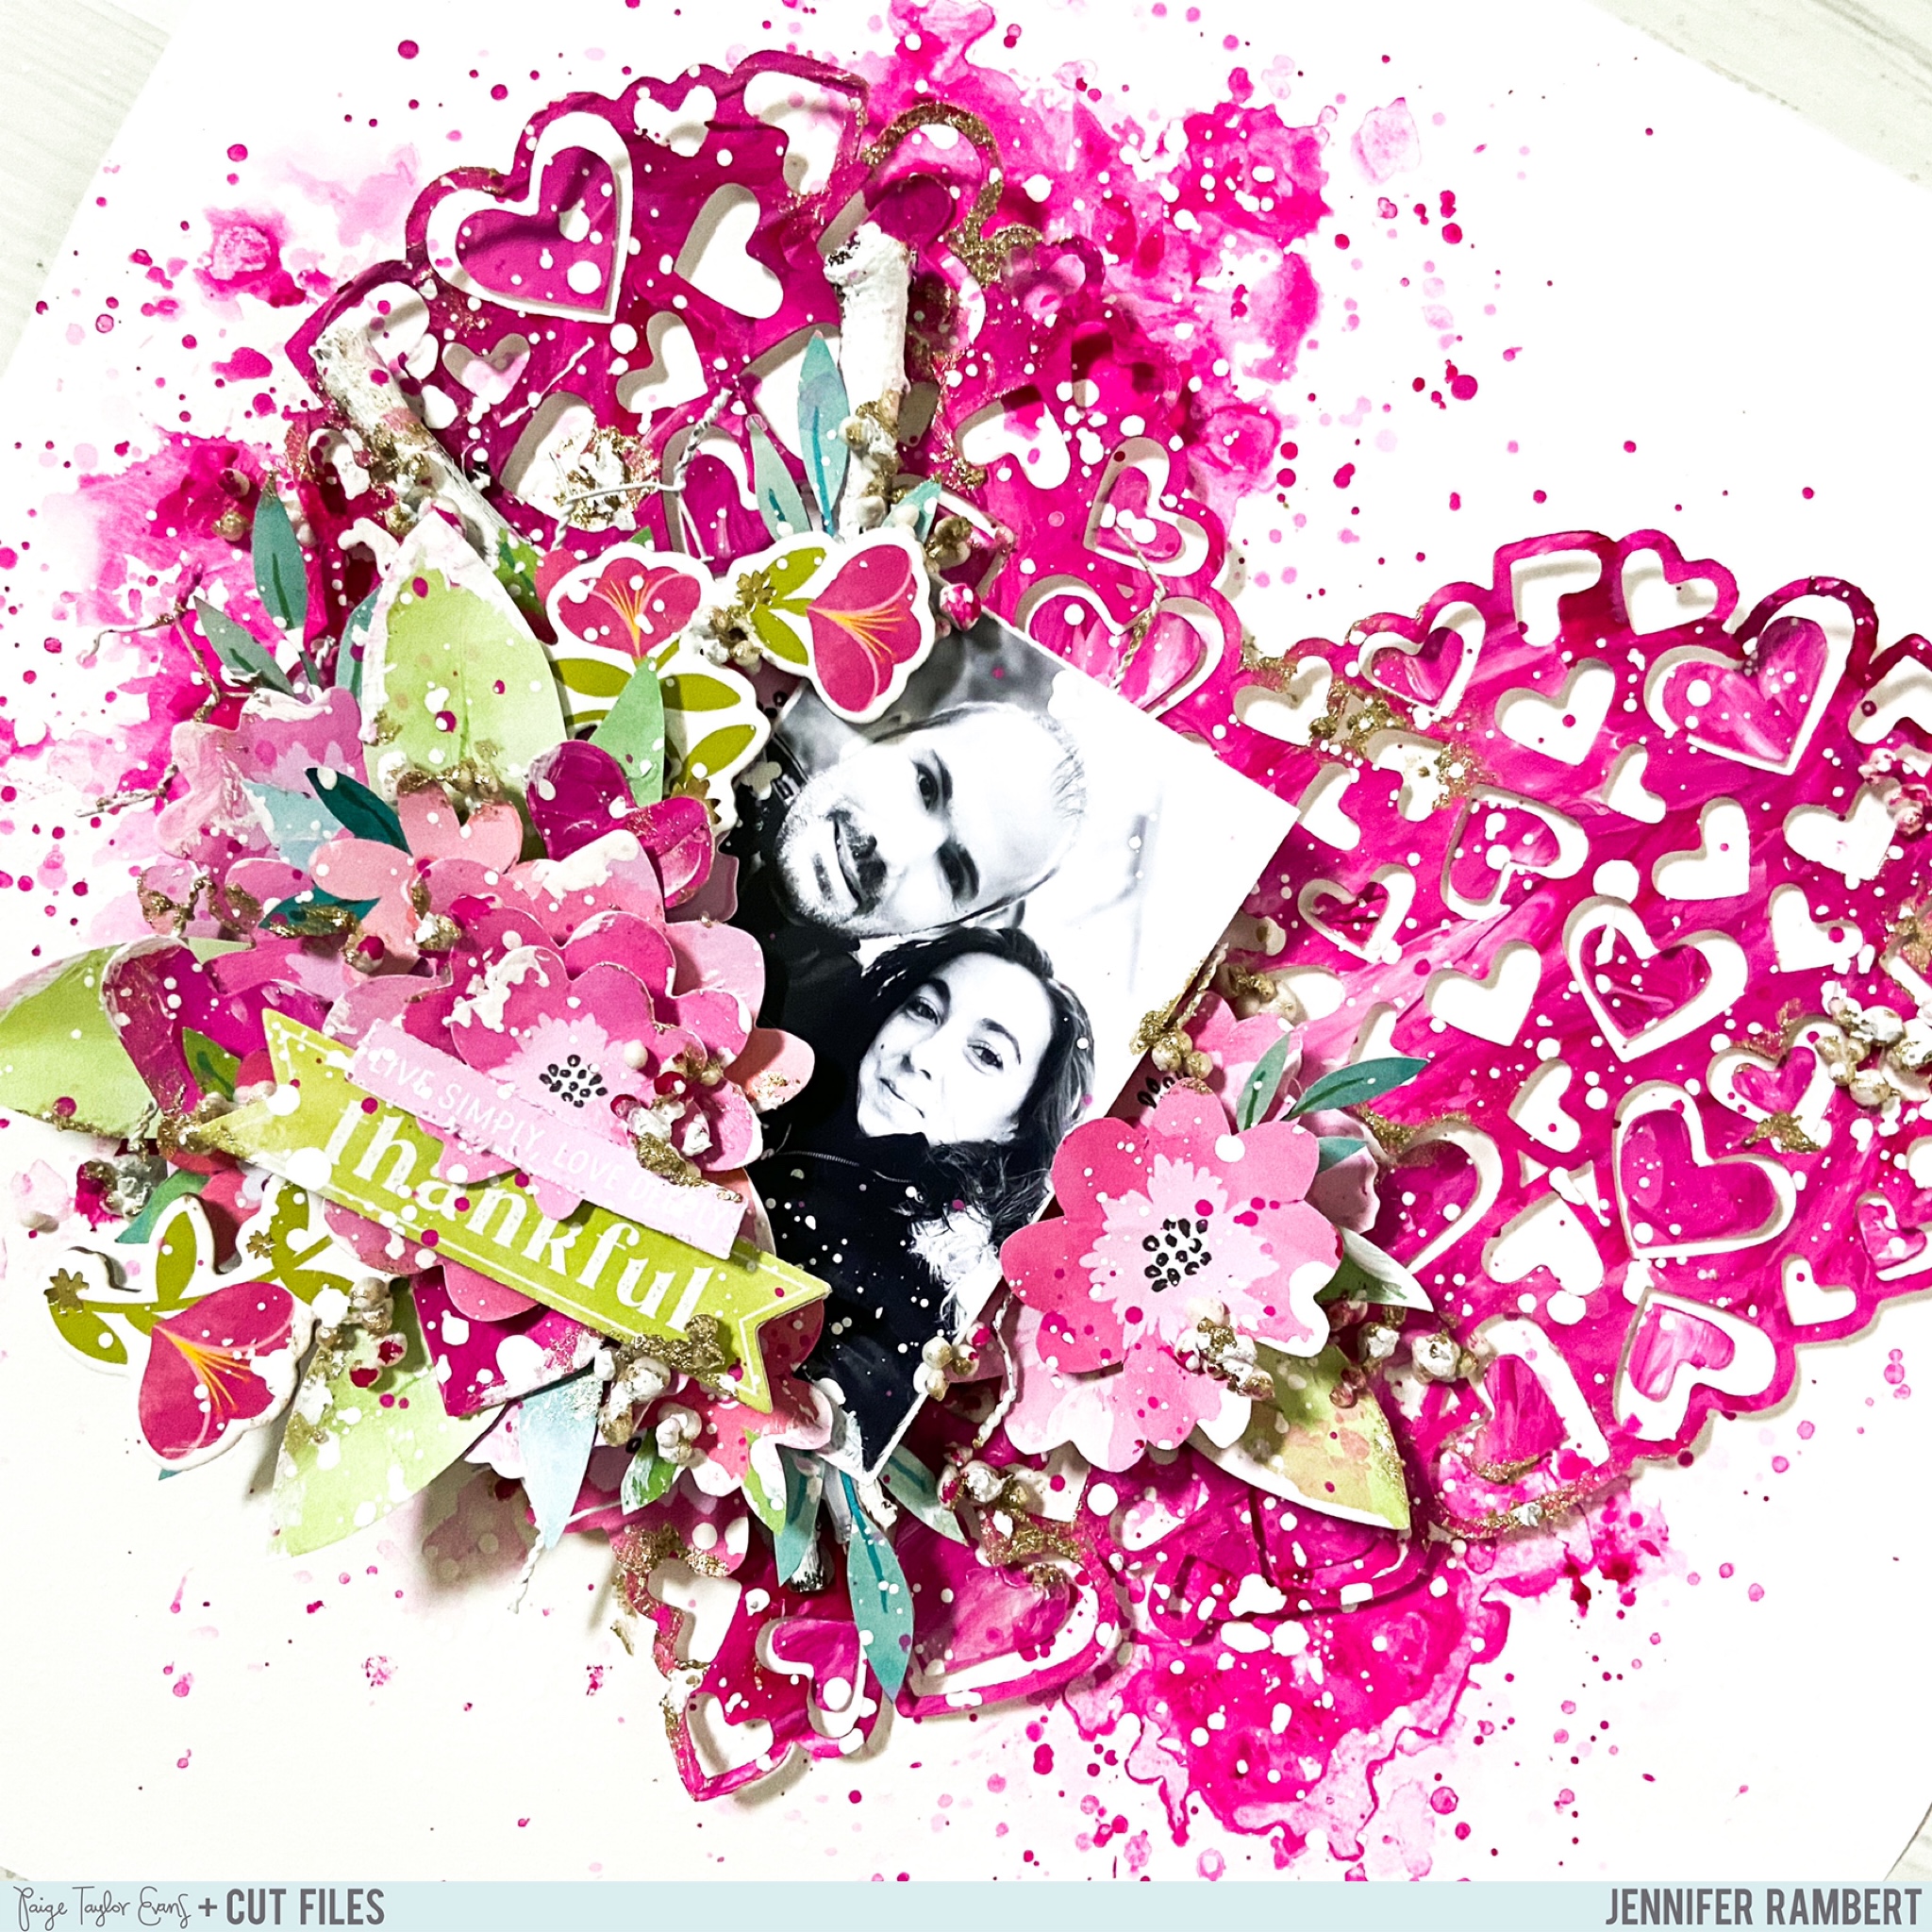
Hi scrappy friends! Lisa Fonseca here and today I'm sharing a layout featuring Paige's Love Lined from the 12 Love Cut Files along with her Garden Shoppe collection!
I really enjoy backing cut files like this one with a lot of patterned papers from the same color. It's super fast and always looks good! I backed the cut file with pink and red-ish patterned papers from Garden Shoppe and then I cut out a lot of the flowers from Paper 2. I added some leaves from the Floral Die Cuts after adhering all my flowers. I then drew branches with leaves all around my flower clusters and then used a brush with water to go over these branches and give them a mixed media look!
I LOOOOVE how it turned out and hope you are inspired to use Paige's Love Lined from the 12 Love Cut Files along with Garden Shoppe!

SUPPLIES: Patterned papers, stickers, die cuts, embellishments: GARDEN SHOPPEwhite cardstockwatercolors; Cut file: Love Lined from the 12 Love Cut Files by Paige Evans

Roses Layout by Kelly Daye


Monday, January 30, 2023

Hello friends, it’s Kelly Daye here sharing a new layout made with Paige’s Roses and Stamps from the 14 Valentine Cut Files along with her Garden ShoppeSplendid, and Horizon collections.
To start, I made a simple oval frame in Silhouette Studio and copied it three times, overlaid all three, and welded the ovals together to make an oval wreath. Then I made an off-set of the Roses and welded that to the lower right corner of the wreath. The Roses were cut out of white cardstock and paper-backed with a variety of patterned papers from three of Paige’s collections:
Once paper backed, I back stitched the roses and leaves with 3 strands of DMC Floss. I only used 3 strands so that I could use a very fine needle. I just love mixing thread colors on paper. I also chain stitched the wreath then popped up the finished Roses with 3D foam on top of it. My photo is framed with one of the Stamp cut files in the 14 Valentine Cut Files. I love the texture the deckled edge added to the layout. Once sized for my photo, I did an internal offset of the cut file so that I could layer two colors together under my photo. More color + more pattern = more interest, don't you think?! My background is made with one part of Paige’s Layered Plaid Background cut file. I cut it out of Garden Shoppe Paper 24 and laid it over another sheet of white cardstock. To add extra texture, I added some colorful cross-stitching here and there. Finally, I embellished with lots of pretty Garden Shoppe goodies including Floral Die CutsFoam Phrase StickersCardstock StickersButterfly StickersEphemera Die Cuts, and Enamel Button Stickers.
Thank you so much for your visit! I hope you are inspired to use Paige's Roses and Stamps from the 14 Valentine Cut Files along with her Garden ShoppeSplendid, and Horizon collections!

SUPPLIES: Patterned papers, stickers, die cuts, embellishments: GARDEN SHOPPE and SPLENDID; white cardstock; Cut files: Roses and Stamps from the 14 Valentine Cut Files and Layered Plaid Background by Paige Evans

Snow Happy Layout & Process Video by Paige Evans


Sunday, January 29, 2023

I have a new layout & process video (YES! a process video!!) made with Garden Shoppe to share with you today!!!
Check out the process video to see how this page came together from start-to-finish:
I began by punching Paper 19 with 3 different scalloped Border Punches into a whole bunch of paper strips and then layered them up diagonally over the left half of the pink checkerboard B-side of Paper 20. I didn't glue anything down yet though - I took a picture to refer back to and then removed them from the background.
I applied white gesso to the bottom right section, let it dry, and then dropped Pastel Dreams and Tropicals watercolors to match the colors of Garden Shoppe on top and let it dry.
Then I machine stitched the paper strips in place using matching colors of thread. After stitching, I lifted and bent each row of scallops up to create beautiful texture & interest. Time for photos and embellishments! I added two 3x4" photos onto the bottom right and then placed a bunch of embellishments on and around to balance the colorful punched papers.
Specifically I embellished with ThickersFoam Phrase Stickers, buttons from the Ephemera Die CutsCardstock Stickers, bits from the 8-Page Sticker Book, and Enamel Button Stickers. I wrote journaling with a periwinkle pen on a journaling spot sticker to finish.
I hope this layout inspires you to use my Garden Shoppe collection with Border Punches!
Let me know if you have any questions - happy to help!
SUPPLIES: Patterned papers, stickers, die cuts, embellishments: GARDEN SHOPPEgesso; Watercolors: Pastel Dreams and Tropicals by Prima; Border PunchesSewing machine: Brother; Thread: Coats & Clark

Caribbean Cruise & Crop!!


Saturday, January 28, 2023

IT'S HAPPENING!! Join me on an amazing Caribbean Cruise & Crop June 2nd-9th 2024! We'll set sail from Port Canaveral, Florida on the world's largest cruise ship, the brand new Wonder of the Seas, then on the two days at sea enjoy 4 classes learning how to make 2 mini albums and 4 layouts! All of the details, itinerary, registration & more can be found by clicking HERE!
Every person gets a 6 foot table with the cropping room open 24/7!
Non-scrappers are welcome on the cruise too! I'm bringing my whole family, can't wait for you to meet them :)
I'll have giveaways, goodies, and a pop up shop!
Limited spots available!
Let me know if you have any questions & hope to SEA you there!

Hearts Heart Layout by Jennifer Rambert


Friday, January 27, 2023

Hello creative friends! Jennifer Rambert here today with a new layout featuring Paige's Hearts Heart from the 12 Love Cut Files and her sublime Garden Shoppe collection. Valentine's Day is approaching so I opted for hearts and pink!
I started by cutting the Hearts Heart from watercolor paper and then with pink paint I coated it. I then removed the small hearts and glued the large one onto white cardstock with 3D foam to add dimension. I added a few small hearts in the holes to complete the background. I then added my photo on pieces of wood and decorated all around with Floral Die CutsCardstock Stickers, and Foam Phrase Stickers for the title. I finished this layout by adding some areas of pink paint here and there close to the heart.
I hope this page will inspire you for a future project to use Paige's Hearts Heart from the 12 Love Cut Files and Garden Shoppe! A layout with hearts is always a good idea! I wish you a beautiful creative day!

SUPPLIES: Patterned papers, die cuts, stickers, embellishments: GARDEN SHOPPE; white cardstock; modeling paste; gesso; Cut file: Hearts Heart from the 12 Love Cut Files by Paige Evans

You Make My Heart Happy Layout by Jackie Ashton


Thursday, January 26, 2023

Hi friends! Jackie Ashton here with my next Design Team layout using Paige's You Make My Heart Happy from the 12 Love Cut Files along with Garden Shoppe!
To start my layout, I cut the You Make My Heart Happy from white cardstock, backed it using Paper 19, then added 3D foam behind the cut file to give it dimension. Before adding it to my cardstock, I used Paige's past Heart Stencil and Distress Oxides to add some color underneath the cut file. I printed my photograph at 3x4" and matted it with patterned papers from the 6x8 Paper Pad, leaving a small border for each layer. Before I added my photograph to the cardstock, I added some more color using another one of Paige’s past Heart Stencils to add additional details. I chose two patterned papers from the 12x12 Paper Pad to add to the bottom of my layout which I distressed the top edge and then machined stitched to the white cardstock. I love Paper 23 with all the phases, so I cut a few out to use on my page. I finished with embellishments from the Ephemera Die Cuts and Enamel Button Stickers.
Thanks so much for stopping by! I hope you are inspired to use Paige's You Make My Heart Happy from the 12 Love Cut Files along with Garden Shoppe!

SUPPLIES: Patterned papers, stickers, die cuts, embellishments: GARDEN SHOPPE; white cardstock; Cut file: You Make My Heart Happy from the 12 Love Cut Files by Paige Evans

You Make My Heart Happy Layouts by Heidi Lewis


Wednesday, January 25, 2023

Hi friends! Heidi Lewis here on the blog today sharing two layouts I made with Paige's You Make My Heart Happy from the 12 Love Cut Files along with Garden Shoppe!
I typically get into a creative rut in January. When in doubt, I scraplift Paige! Her original layout can be found HERE and I used Garden Shoppe instead of Splendid. To begin, I backed the You Make My Heart Happy Cut File with a variety of papers from the 112x12 Paper Pad. Then I punched and stitched some heart buttons from Paper 10 to use as embellishments on my letters. I picked Paper 13 for the background because the colorful cut file really pops against the black-and-white stripes. I finished off my layout with two 3x4" photos and embellishments from the Floral Die Cuts8-Page Sticker Book, and Cardstock Stickers.
Rather than wasting inner pieces of the cut file, I decided to use the white letters to make a second layout!
To begin, I cut Paper 24 into squares and then cut the squares into triangles. I distressed the edges of triangles then arranged half of the triangles onto a second sheet of Paper 24. I love how the background looks like a quilt! Next I arranged the letters onto the grid and adhered them with foam adhesive to help them pop from the busy background. I used a circle punch to transform my photo into the letter “O.” Lastly, I added Cardstock Stickers using the tone-on-tone technique to keep the layout from becoming too busy.
If you, like me, are feeling the creative blues feel free to scraplift one or both of these pages featuring Paige's You Make My Heart Happy from the 12 Love Cut Files along with Garden Shoppe! As soon as you start creating, the ideas will come! 

SUPPLIES: Patterned papers, die cuts, stickers, embellishments: GARDEN SHOPPE; white cardstock; Cut file: You Make My Heart Happy from the 12 Love Cut Files by Paige Evans

Love Heart Layout by Audrey Mutschall


Tuesday, January 24, 2023

Hi friends! Audrey Mutschall here with a new layout featuring Paige’s Love Heart from the 14 Valentine Cut Files. I fell in love with this cut file as soon as I saw it and couldn’t wait to pair it with the gorgeous Garden Shoppe collection!
I cut the Love Heart from white cardstock and backed the flowers and hearts with a variety of papers from the 12x12 Paper Pad. With that complete, I glued a piece of vellum behind the design. I wanted to do something fun with the scalloped edge of the heart so I backed it with strips of pleated Washi Tape. To do this, I cut a piece of clear transparency in the same shape as the heart, making it slightly larger than the cut file. I stuck the washi tape to the edge of the transparency, making pleats as I went around it. I used foam tape to adhere this layer behind the cut file, giving it a little extra dimension. I added a dimensional heart to the center of the cut file by cutting three hearts from Paper 20, bending them in half, and gluing them together. I also fussy cut three blue hearts from Paper 17 and used the same technique to make a smaller dimensional heart which I glued to the larger one. This is a really fun and simple technique to help make an element pop off the page! With the heart design complete, I got to work embellishing. I added buttons and Enamel Button Stickers to the cut file and used Paper 11 for the background. I saved the tear-away strip and glued it to the right side of the design then added a chain link stitch as a border. I matted my photo with Paper 19 and adhered it to the right side of the page, adding some sentiments from Paper 23, a Foam Phrase Sticker, and some Cardstock Stickers.
I wish you all a very happy Valentine’s Day and hope you find inspiration to use the Love Heart from the 14 Valentine Cut Files and Garden Shoppe!

SUPPLIES: Patterned papers, stickers, washi tape, embellishments: GARDEN SHOPPE; white cardstock; Cut file: Love Heart from the 14 Valentine Cut Files by Paige Evans

Pinkfresh Studio January 2023 Stamp, Die, Stencil, and Hot Foil Release


Monday, January 23, 2023


Hello and welcome to the January Pinkfresh Studio Blog Hop!
You may have arrived here from Lea Lawson's blog and next is Susi Becerra Jimenez.
BLOG HOP LINK LIST
This hop is extra exciting for me because I have a fun collaboration with Pinkfresh Studio: we turned two of my cut files into products:
I paired my products with the beautiful new Flower Market collection by Cassidy Demkov.
For this Happy Day card I used my Floral Outline Frame Die with white cardstock and a Spellbinders Platinum Machine, then added it to a white cardstock card base using spray adhesive to make sure all the narrow bits stuck in place. I layered Floral Ephemera around the inner frame using foam squares and added a sentiment from the Ephemera Pack with foam squares to the center. 
To begin this Love You Most card, I used my Floral Lace Hot Foil Plate with pink foil on white cardstock, fussy cut around the image, then added it to an orange floral paper base with foam squares for dimension using the Spellbinders Platinum Machine & Glimmer Hot Foil System Bundle. This was my first time using the Glimmer Hot Foil System and I think I'm addicted!! I love the effect! I layered Floral Ephemera, Vellum Ephemera, a flower Puffy Sticker, and a sentiment sticker from the Cardstock Stickers in the middle.
To make this Love You card I used my Floral Lace Die with a colorful striped paper from the 6x6 Paper Pack and a Spellbinders Platinum Machine, then added it to a white cardstock card base. Next, I trimmed off part of a sentiment from the Ephemera Pack to say "Love" then added it with foam squares to the middle. I placed blue Puffy Alpha Stickers underneath to complete the sentiment then topped it with a piece of Floral Ephemera. To finish I added a small Enamel Dot to the center of every flower.
For this Thank You For Being a Friend card, it's basically the same as the other example with my Floral Outline Frame Die, only this time landscape instead of portrait. I cut it from white cardstock using a Spellbinders Platinum Machine then added it to a white cardstock card base. I layered Floral Ephemera around the inner frame using foam squares and added a sentiment from the Ephemera Pack with foam squares to the center. 
To make this Love You card I used my Floral Lace Hot Foil Plate again with the Spellbinders Platinum Machine & Glimmer Hot Foil System Bundle but this time with silver foil on white cardstock, fussy cut around the image, then added it to a colorful floral paper base with foam squares for dimension. I layered Floral Ephemera, Vellum Ephemera, a tag from the Ephemera Pack, and a round Chipboard Flair Sticker in the middle.
Lastly, for this You Are So Loved card I used my Floral Lace Die with the same colorful striped paper from the 6x6 Paper Pack as the previous card with this die, using a Spellbinders Platinum Machine, then added it to a white cardstock card base - this time landscape instead of portrait. Next, I tore and layered a piece of a narrow tag from the Ephemera PackFloral Ephemera, and a flower Puffy Sticker on the middle. To finish I added an Enamel Dot to the center of every visible flower.
I hope you are inspired to check out the Floral Outline Frame Die, Floral Lace Hot Foil Plate & Glimmer Hot Foil System, Floral Lace Die, and Floral Lace Stencil, along with the Flower Market collection!! I didn't get a chance to use the stencil yet but I'm excited to try!

GIVEAWAYS:
- Pinkfresh Studio will be giving away the full release on the Pinkfresh blog & YouTube channel.
- Pinkfresh Studio will be giving away a total of 10 $25 gift cards along the hop. The winners will be picked from the comments.
- Pinkfresh Studio will pick the winners & post them on January 31, 2023 on their GIVEAWAY PAGE.
Winners must check that page & claim their prize within 2 weeks.
BLOG HOP LINK LIST
Thanks for stopping by! Next on the hop: Susi Becerra Jimenez

Sweet Dreams Layout by Ashley Neu


Sunday, January 22, 2023

Hello friends! Ashley Neu here to share my next project for the Paige Evans Cut File Design Team! I used this adorable Gnome from the 14 Valentine Cut Files along with Paige's Garden Shoppe collection to get started.
The theme of this layout is a sleepy Gnome all ready for bed. The original cut file had a heart attached between the hands but I wanted to add a teddy bear. I added a combination of liquid adhesive and foam adhesive to back the cut file and used Paper 1Paper 17Paper 21, and Paper 22. To create the teddy bear, I found a cute teddy bear clipart image, traced in onto some patterned paper, and positioned him between the gnome's hands. To create the background, I grabbed Paper 19 and tore it to create a white edge. I adhered it to white cardstock and added faux stitching with a black marker. Next, I freehanded some clouds and cut them out of white cardstock, added foam adhesive, and adhered them to the top portion of the background. After adhering my photo to the layout, I added a title using Thickers and the word "sweet" from a Thickers pack in my stash. I adhered 3 butterflies from the Butterfly Stickers around the layout then added border stickers from the 8-Page Sticker Book under each cloud. to bring color and depth to those clouds. I finished off the layout by adding a few more embellishments including sentiments, gold hearts, and beautiful florals from the Cardstock Stickers.
That completes the layout! This Gnome is just too cute for words. I hope you enjoyed the process and have a great day!

SUPPLIES: Patterned papers, stickers, Thickers, embellishments: GARDEN SHOPPE; white cardstock; Cut file: Gnome from the 14 Valentine Cut Files by Paige Evans

Home Sweet Home Layout by Yui Oku


Saturday, January 21, 2023

Hi everyone! Yui Oku here today with a new layout using Paige's Home Sweet Home Cut File and Garden Shoppe collection.
I love this rainbow woodgrain Paper 4 and I was thinking to back the cut file with it. But then I wanted to try something new! So I backed the Home Sweet Home Cut File with vellum and put it on the rainbow patterned paper. Yes, love it! I embellished with Cardstock Stickers, pieces from the 8-Page Sticker Book, and added Washi Tape on the top and bottom of layout.

I love the results! I hope this layout inspires you to use Paige's Garden Shoppe collection and the Home Sweet Home!


SUPPLIES: Patterned papers, stickers, die cuts, embellishments: GARDEN SHOPPEwhite cardstockvellum; Cut file: Home Sweet Home by Paige Evans

Blog // Instagram // YouTube // Facebook

Winter Grid Layout by Valerie Bisson


Friday, January 20, 2023

 Hi friends! Valerie Bisson here today and I’m happy to share my winter scrapbook page using Paige's Winter in Grid Cut File along with the Garden Shoppe collection.

I started by cutting the Winter in Grid Cut File twice, once from white cardstock and a second offset layer from Paper 14. I backed it with pink and blue scraps from Garden Shoppe and then splattered white acrylic paint all around for that wintery look. Next I added in 4 photos from around my neighborhood capturing the season. I layered up the letters on top with dimensional foam adhesive. I chose Paper 1 for my background and adhered the completed cut file. Next I hand stitched on the blue flower Sequins from Splendid to the middle of all the snowflakes giving them some sparkle and shine. I also added hand stitching around the photos to help draw a little attention to them. Lastly I embellished with a few stickers from the 8-Page Sticker Book and white foam hearts.

I hope this inspires you to try the Winter in Grid Cut File along with the Garden Shoppe to capture your neighborhood!


SUPPLIES: Patterned papers, stickers, die cuts, embellishments: GARDEN SHOPPE and SPLENDIDwhite cardstockwhite acrylic paint; Cut file: Winter in Grid by Paige Evans

Instagram // Facebook // Pinterest

Paige Taylor Evans © // Quinn Creatives DESIGN