Happiness Cards by Jennifer Rambert


Wednesday, March 31, 2021

 Hi friends! Jennifer Rambert here to share my latest designs for Paige's Silhouette Design Team! I made 3 cards with Paige's cut files. I wanted cards that give a smile with pops of colors & funny puns - in this period of time I think we really need them! These "Happiness Cards" were created with the Go the Scenic Route collection and the Cactus, Llama Love, and Lemon Slice cut files. For each card I used Distress Oxides for the background and added the mandala stamp from the Acrylic Stamps.

For the "Free Hug" card, I cut out the Cactus cut file and then I dressed it with different papers from the collection. I made a blue background by adding the mandala Acrylic Stamp here and there. I glued the cactus with 3D foam and added the title with stitched Puffy Word Stickers. A few hearts and splashes of white acrylic paint finish it off!

For the "You're The Zest" card, I cut the Lemon Slice two times: from white cardstock for the outline and Paper 8 for the inside. I made a pink background but left an empty space in the middle of the card for the title, without forgetting the mandala Acrylic Stamp here and there. I glued the outline of the half lemon at the bottom and at the top of the card, then I added the inside by gluing each piece with 3D foam. I added the title with stitched Puffy Word Stickers and finally I added hearts and dots from the Puffy Phrase Stickers and splashes of white acrylic paint.

And for the "No Drama LLama" card, I cut out the Llama Love cut file then I dressed it with different small pieces of paper from the collection. I sewed the llama by doing a loop stitch to give it a more realistic look. I created a rainbow background by first dabbing the cascading mandala Acrylic Stamp, then running the ink. I glued the llama with 3D foam. I added paper hearts and the title with stitched Puffy Word Stickers and finally some white acrylic paint splatters.

I hope these cards made you smile today and gave you an idea for a future project! I liked making these cards (even if I rarely do) full of cheerfulness and colors! Thank you very much for your visit and have a good day full of creativity!


SUPPLIES: Patterned papers, stickers, acrylic stamps: GO THE SCENIC ROUTEwhite cardstockwhite acrylic paintDistress Oxides; Die cut machine: Silhouette Cameo; Cut files: CactusLlama Love, and Lemon Slice by Paige Evans

Location: France / Instagram: @secretsandcreations / Blog: Secrets & Creations / Facebook: Secrets & Creations / Pinterest: secretsandcreations

Hello Spring Layout by Valerie Bisson


Tuesday, March 30, 2021

Hi there, Valerie Bisson with you today! I am happy to be back with another colorful layout for you using Bloom Street, the lovely Hello Spring Wreath cut file, and Layered Butterfly cut files. The perfect combination for a spring scrapbook page!

I don’t know about you, but where I live spring is very gray and brown so what better way to brighten up some spring photos than with some pretty papers!? Starting with Paper 22 for the background and watered down white acrylic paint, I splattered the paint with a round paint brush, sprinkling on the page in a circle. If you’ve never added paint to a scrapbook page I highly recommend it. It’s one of the easiest ways to add a little fun and texture to your layout. I used white cardstock to cut out the Hello Spring Wreath cut file at 10.5" wide. The cut file was backed with Bloom Street patterned papers. I also cut out the inside of the letters with Paper 10 and popped them up with foam adhesive after backing the word "spring" in white cardstock first. For the yellow flower I used a paper from the Go the Scenic Route 12x12 Paper Pad, then popped the whole cut file up with dimensional foam adhesive which makes it stand out from the background paper.

I added two photos at 2.25x3" and matted them with Paper 10 and white cardstock. The photos tucked in nicely in the upper right corner of the page. Next, right below the title seemed to be a perfect spot to add in a little bit of journaling. I typed it out in the font Remington Noiseless, printed in a light purple on white cardstock, cut the words out into strips, and adhered them to the page.

Time for some embellishing! I made butterfly embellishments using three of the Layered Butterfly cut files with the same papers I used for the flowers. I sized the largest layer of butterfly for three of them close to 1.5" and another three at close to 1". I machine stitched the butterfly layers together, used a small ball stylus to shape and give them dimension, and then adhered them. I also added word strips from Paper 13 and heart sentiments from Paper 01. Final touches to the page include a bow paper clip and enamel dots from the Embellishment Mix and Puffy Photo Corner Stickers from Paige’s Memory Explosion Box line with Michaels.

Thanks so much for stopping by, hope you’re inspired to create something colorful!


SUPPLIES: Patterned papers, enamel dots: BLOOM STREET; Puffy photo corners, bow paperclip, enamel dots: Memory Explosion Boxwhite cardstockwhite acrylic paint; Die cut machine: Cricut Explore Air 2; Cut files: Hello Spring Wreath and Layered Butterflies by Paige Evans

Location: Manitoba, Canada / Instagram: @valeriearts2 / Pinterest: valeriearts2 / Facebook: Valerie Bisson

Life is Beautiful Layout by Ashley Neu


Monday, March 29, 2021

 Hi scrappy friends! Ashley Neu here with another layout for the Paige Evans + Silhouette Design Team! For this layout, I used Paige’s Geometric Heart cut file and Bloom Street collection. I wanted to document a photo of my girls and our puppy on his second birthday!

In Silhouette Studio, I altered the cut file by removing the outside heart and keeping the inside pieces intact. After cutting the heart from white cardstock, I pierced holes all the way around and on the inside of the heart. I took 3 strands of white embroidery floss and did a simple backstitch to help the heart really stand out!

After attaching the stitched heart onto colored paper from the Project Pad with foam adhesive strips, I used the Washi Tape to create a pattern on the negative pieces cut from the heart. I then adhered the washi tape pieces into place.

Lastly, I added my photo, some Floral Die Cuts, and the title which was from the Project Pad. I also added some enamel dots on the washi tape as the finishing touch!

Thank you for checking out this layout and I hope you have an amazing day!


SUPPLIES: Patterned papers, stickers, washi tape, enamel dots, embellishments: BLOOM STREETwhite cardstock; Die cut machine: Silhouette Cameo; Cut file: Geometric Heart by Paige Evans

Location: Minnesota, USA /  Instagram: @ashleyneudesign / YouTube: Ashley Neu / Pinterest: Ashley Neu Design / Facebook: Ashley Neu Design

Explore EPCOT Layout by Adam Westwood


Saturday, March 27, 2021

Happy Saturday Scrappers! ScrappyAdam back with another layout using some of Paige's cut files! If you have followed me on Instagram or in Facebook groups then you'll know I love to scrap Disney and Paige's collections are some of my favorites to use! So I grabbed the Go the Scenic Route collection and pondered which cut file I wanted to use. I really liked the Triangles Background cut file so I started with it and sized it to around 10" so it would sit nicely on my page and cut it on white cardstock.

I backed the Triangles with various papers from the 6x8 Paper Pad. I did use a couple of sheets from the Horizon 6x8" Paper Pad too as I wanted to get some shades of green into the cut file. I started with Paper 15 from Go the Scenic Route and used the blue side. I trimmed 1cm from two sides to give me a border around the page and matted this on the pink side of Paper 20. I gutted the middle from this sheet to use on a future project. This is something I always do, making the paper stretch further! I used some texture paste and a stencil to add triangle details to the page but ended up covering most of it with the cut file - but you can see some popping through the page which gives a little extra interest. I popped the Triangles Background cut file up on foam pads to give the page lots of dimension.


I then decided I wanted to use the Camera cut file which I sized down to quite a small size and cut on a scrap from the 6x8 Paper Pad. I then cut it again with Paper 3 which I used to back it. I used some of the Paper 20 to back the strap part of the camera cut file. I popped the camera up on foam pads and placed it as if 'hanging' from one of the triangles in the top right of the page. It's a cute little addition to the page and ties in as these photos were taken by Disney photographers at EPCOT.

Thinking about my title, I chose the Explore cut file and again, resized to suit my page and cut it on scraps of Paper 20. I loved this title as the photos are of us exploring EPCOT! So it worked well for me. I cut the cut file again from a scrap of Paper 3 and used the letters to pop them up in the white paper on foam pads. This page has so much dimension, I love it!

I decided on two photos which I initially thought were taken on the same day but looking at them later, they weren't - we're dressed in different clothes! But it was the same trip so I'm good with that! I backed my photos with a thin white border and then again with the blue foil paper from the 6x8 Paper Pad. I tore the bottom of the right hand matte to give a bit of added texture. I added my title to the bottom left, overlapping the photos, and added EPCOT using Foam Thickers. I popped a blue foiled heart Cardstock Sticker in the center of the globe on the cut file.

I used a combination of Chipboard and Cardstock Stickers to embellish the page as well as two small cards cut from Paper 1 with those gorgeous colorful birds! I loved the cut apart banners from Paper 1 so I cut these and also the same banners from the 6x8 Paper Pad, layered all six, and used my Crop-a-Dile to punch them all together, adding some twine through and popping this as an attachment to the triangle, tucking in one of those bird cards behind. From the same paper, I cut a couple of the cards and popped these behind my photos with some sentiments on them. I added a Chipboard Sticker bird perched on a triangle, a couple of strips of Washi Tape at the bottom, and called the layout done!

That's all from me today - you can find so much inspiration here on Paige's blog from an absolutely awesome Design Team! If you'd like to see more from me, you can follow me on Instagram, Facebook and Pinterest (links below)! I appreciate all the love on and follows on social media so much - thank you!

SUPPLIES: Patterned papers, Thickers, stickers, embellishments: GO THE SCENIC ROUTEwhite cardstock; Die cutting machine: Silhouette Cameo; Cut files: Triangles BackgroundCamera, and Explore by Paige Evans
Location: Manchester, England / Instagram: @scrappyadam / Facebook: Adam Westwood / Pinterest: Scrappy Adam

Loving This Life Page by Krystal Idunate


Friday, March 26, 2021

 Hello friends! Krystal Idunate here today sharing a spread I created using Paige’s Leaf Background cut file along with the Hand Drawn Flowers cut file. I loved the idea of pairing these all together to document a story for my niece's 3x8 Story Album about her relationship with my husband.

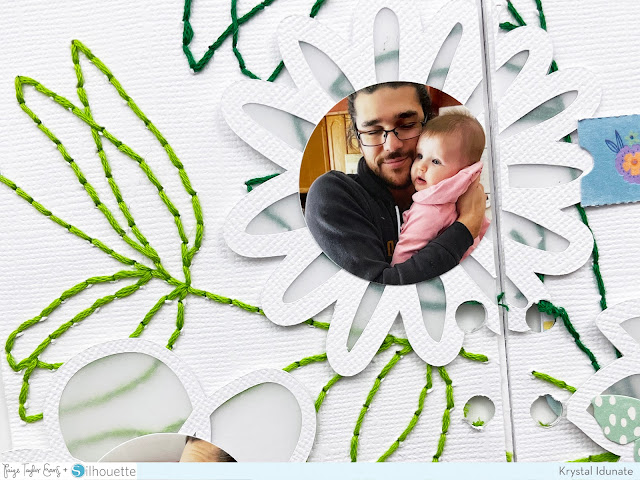
As soon as I saw the Leaf Background cut file, I knew I wanted to stitch it onto textured white cardstock. So, I adjusted the size of the cut file in my Silhouette software to fit over a two page spread in a 3x8 album (roughly 8.25x8.25”). Then, instead of having my Silhouette cut the file from my cardstock, I switched out my blade for the pen holder tool and put a sharpened pencil inside. I placed my cardstock upside down on my sticky cutting mat so my machine would actually trace the file on the back of my paper and sent it through.

Next, I opened up the Hand Drawn Flowers cut file and arranged them on my Leaf Background file in Silhouette so I could scale them to the size I wanted. I then took the newly resized files and cut them from the same textured white cardstock with my Silhouette.

With everything cut out and ready to go, it was time to work on hand stitching the Leaf Background. I cut down my traced file into two panels, each sized at 3.875x8.25”. This would allow me to hole punch the pages and add them into my 3x8 album, outside of the page protectors. I made the mistake of not immediately hole punching BEFORE starting to stitch… so, if you decide to do a spread like this, I definitely recommend hole punching first and then stitching.


Using an awl (or poking tool), I punched holes into my cardstock right inside the traced lines, about every millimeter. If you don’t have an awl, you can also use a thumb tack - how’s that for a crafty hack! While watching a few (okay… MANY) episodes of a new show, I backstitched the lines using all six strands of green embroidery floss. I chose two different tones of green to give the pattern even more added interest.

With the background piece finished, I then turned my attention to those Hand Drawn Flowers cut files. Originally I was going to back them with some patterned papers from the Memory Explosion Box Paper Pads, but ultimately felt like that would detract from my background. After all that time stitching, I wasn’t about to cover it all up. So instead, I backed each of the flower cut files with vellum. I LOVE the softness the vellum brings to this spread so, so much.


For my photos, I printed 5 small photos of my husband with my niece. Then, I punched them into 1.5” circles. I knew I wanted the photos to become the centers of the flowers for this spread… and LOVE how it turned out! I finished off the layout by lightly embellishing using a few butterflies and a small ticket title piece from the Memory Explosion Box Travel Die Cuts and the Birthday Die Cuts.

It is impossible for me to create a scrapbook layout and not include some longer journaling. So for this spread, I took a large white tag I had in my stash and added a scalloped die cut from the Travel Die Cuts to the bottom of the tag, along with a ticket shaped label that I could stamp the date on. I decided that since this was a story about my husband and my niece, my husband should be the one to do the writing. I gave him the tag and instructions to write about our niece and his feelings for her. He did a great job!


To store the tag, I created a pocket that would go in-between the backside of this spread and the backside of the next spread. I first added an extra layer of white cardstock on the back of both panels for this layout. That will make storing it much easier and cleaner in the album. Then, I cut a green floral paper from the Memory Explosion Box 12x12" Paper Pad to the same size as one panel (3.875x8.25”). I added super strong ⅛” scor tape to the two sides and the bottom of the paper. Then, I adhered the patterned paper to the backside of the layout - that created a pocket between the layers for my tag to slip into.

I am obsessed with this spread and I’m SUPER glad I took the time to stitch that background. I think it makes this whole layout really special and gives it all the beautiful texture you could want. I hope this spread inspires you to use Paige's cut files in creative ways to help you tell your stories. Thank you so much for stopping by and I hope you have an awesome day!


SUPPLIES: Patterned papers, die cuts, embellishments: MICHAELS MEMORY EXPLOSION BOXvellumwhite cardstock; Die cut machine: Silhouette Cameo; Cut files: Leaf Background and Hand Drawn Flowers by Paige Evans

Location: Michigan, USA / Instagram: @krystal.idunate / YouTube: Krystal Idunate / Pinterest: Krystal Idunate

Flutter Layout by Marinette M'Boussi


Thursday, March 25, 2021

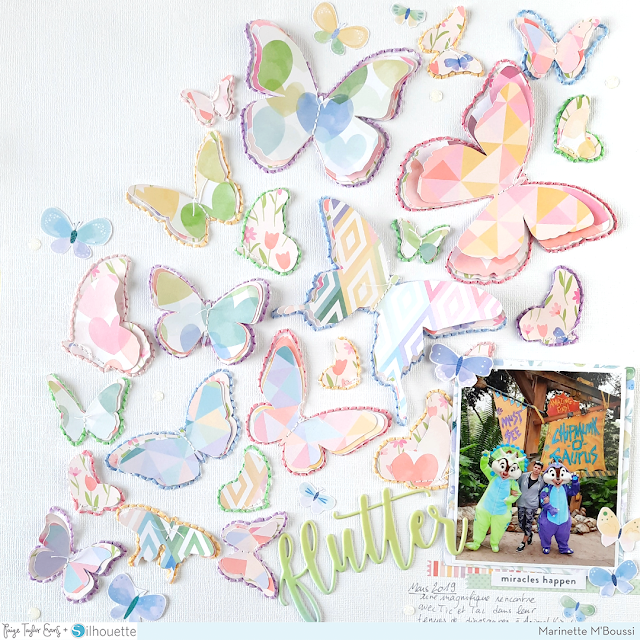
 Hello everyone! Marinette here! Today I’m sharing my new layout for Paige’s Cut File Design Team. This time I used the beautiful Bloom Street collection to make plenty of butterfly layers with just one cut file. You can find the Sketch & Stitch Butterflies Background in a bundle in Paige's Etsy shop.

When you open the file in Silhouette Studio you will see that you have two different outlines for the butterflies, one for the stitching holes and the other one for the sketching. I separated those two and used the sketching lines to cut different sizes of butterflies on colorful Bloom Street patterned papers. And then I cut the stitching holes on white cardstock with my Silhouette Cameo.

Once I had everything cut I did the stitching by hand using DMC embroidery threads. I used 6 different colors to match the beautiful colors of Bloom Street. Then I layered all the butterflies and I machine stitched them in the center. I also fussy cut more butterflies from Paper 08 and to mat my picture. I embellished the layout with washi strips from the 4-Page Sticker Book, and Enamel Dots. To finish I used Flutter as a title from the Puffy Vinyl Stickers because I love the way it pops out.

Thank you for stopping by today, I hope this will inspire you to do some hand stitching on your next creation!


SUPPLIES: Patterned papers, stickers, washi tape, enamel dots, embellishments: BLOOM STREETwhite cardstock; Die cut machine: Silhouette Cameo; Cut file: Sketch & Stitch Butterflies Background in a bundle by Paige Evans

Location: France / Instagram: @marinettemb / YouTube: Marinette MB / Facebook: marinette.mboussi

Wonders at ScrapbookCom


Wednesday, March 24, 2021

 Wonders is now available at ScrapbookCom!

Take a look at everything in my new Wonders collection as I walk and talk through it in a new YouTube video:
I'm soooo excited to see what you make with my 11th scrapbook collection!!

Love Pocket Page by Amy Jo Vanden Brink


Tuesday, March 23, 2021

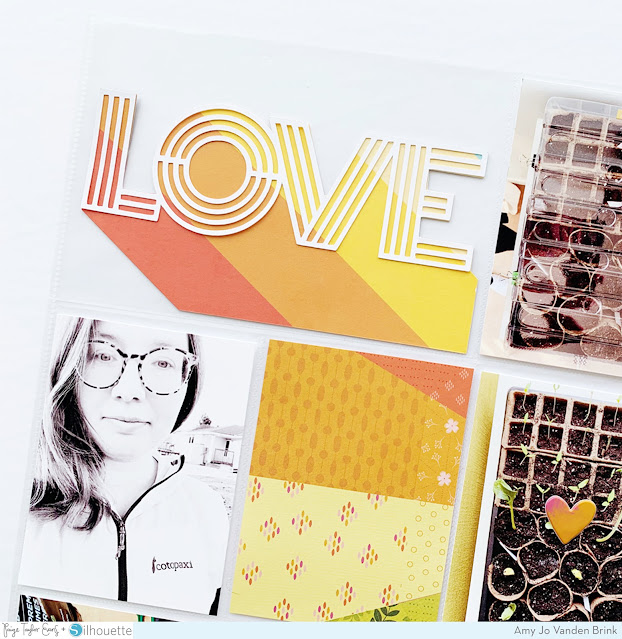
Hello everyone! Amy Jo Vanden Brink back today with another pocket page layout featuring the LOVE cut file from Paige's Etsy shop.

To start with, I sized the LOVE cut file to fit into the 4x6 pocket of my page, then I carefully hand cut the backing paper so that the bottom would shadow into the bottom right corner. The stripes on the paper didn't line up perfectly, but the effect was still what I was looking for. Then I found the same colors in my stash, the cards here I cut from Truly Grateful Paper 08.

Above is the left side of the layout, featuring the yellows and oranges. I thought that the best way to organize the spread would be to have the shades work together, so I looked for puffy stickers in the same colors.

The right side started sliding into the greens (which is perfect as the layout was about garden planning!), and used more pieces of Paper 08 to make the two sides work well together.

I just can't get over that great LOVE cut file title card! I hope you find this inspiring and a great way to incorporate cut files into your pocket pages. Let me know if you have any questions about how I put this page together!


SUPPLIES: Patterned paper, stickers, die cuts, embellishments: TRULY GRATEFULwhite cardstock; Die cut machine: Silhouette Cameo; Cut file: LOVE by Paige Evans

Location: Edmonton, Canada / Instagram: @thevanblife / YouTube: Amy Jo Vanden Brink / Facebook: Paper & Spool / Pinterest: amyjovb

Greeting Cards by Neftali Zambrano


Monday, March 22, 2021

 Hello crafty friends, Neftali Zambrano back with you today sharing a fun and eclectic set of greeting cards. I decided to create a set of four cards that bring all the Spring feels! Let's get crafty!

I used three of Paige’s doily cut files to add some fun focal points to my cards: Doily Halves cut file, Mandala Half cut file, and Half Flower Circle cut file. My idea with the doilies was that it would help create cohesiveness to my cards, even though each one would be unique in its own way.

For my card bases, I used a mixed selection of the Boxed Cards from the Bloom Street collection. I love this boxed set of cards because you can use them just as they come, or you can add some fun to each one like I have done. To embellish each card, I used Bloom Street Cardstock Stickers. I used a different mix of stickers for each card, which is why I like calling them “eclectic.”

For two of the cards I included the gorgeous swede bows from the Take Me Away collection. I also added some finishing touches with lovely gems and pearl stickers. I also brought out the Layered Butterfly Stickers to add awesome dimension. After embellishing, I ended up with this gorgeous set of greeting cards that are sure to spread some cheer this spring!

I hope that you are feeling inspired to bring out your supplies to create your very own eclectic set of Spring greeting cards. If you do create something, we would love to see your creations, so please come share them on Paige's Happy Scrappy Place Facebook Group! Thank you so much for stopping by today and stay crafty friends!


SUPPLIES: Patterned papers, stickers, embellishments, boxed cards: BLOOM STREET; Suede bow: Take Me Away; Die cut machine: Silhouette Cameo; Cut files: Doily HalvesMandala Half, and Half Flower Circle by Paige Evans

Location: California, USA / Blog: alltheneffyness / Instagram: @alltheneffyness / YouTube: Neffy Crafts + Scraps / Facebook: alltheneffyness / Pinterest: alltheneffynessscrap

Birthday Memory Explosion Box Zoom Class with Michaels


Sunday, March 21, 2021

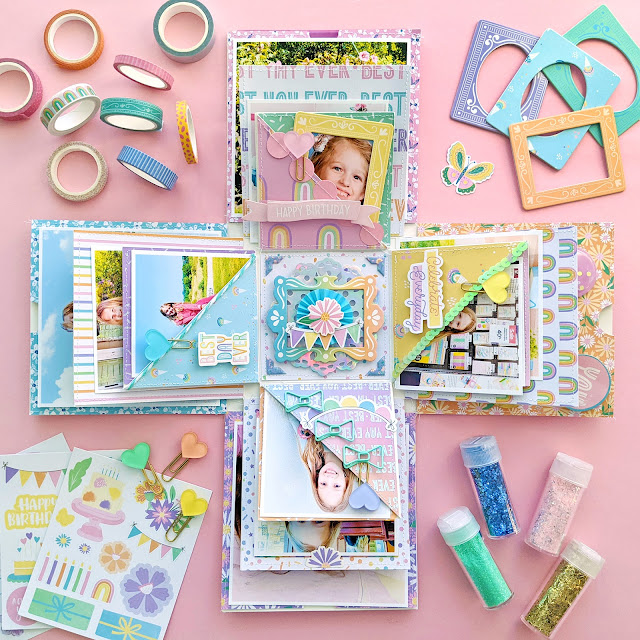
CLICK HERE to join my second free Zoom class with Michaels on Sunday March 28th at 2pm Eastern Time! In this 1 hour long class, we'll build on the previous class where we covered all of the flaps and lids of a Small Memory Explosion Box with this next step of adding embellishments and photos in special ways! This time I am embellishing a Large White Memory Explosion Box instead of a Small Box. Be sure to watch the previous class to see how to cover all of the Memory Explosion Box flaps and lids in preparation for adding photos and embellishments: https://www.youtube.com/watch?v=NW8IDEhXvEo. Find the cut files for the Large Box here and the Small Box here which makes covering the sides and lids soooo much easier and quicker!

We'll make a fun balloon bouquet.
Create a simple chipboard photo frame.
Make a sequin shaker pocket.
Create an accordion folding photo pull-out tucked into flower tabs.
Embellish with trims.
Layer, layer, and layer!
Here are the clickable product links to all of the Memory Explosion Box supplies:

See you in class in a week!
Paige Taylor Evans © // Quinn Creatives DESIGN