
Adam is actually officially on my cut file design team now but we still wanted to showcase his guest designer projects so here we go!!
Hello! I'm Adam aka ScrappyAdam and I am absolutely thrilled to be here as Paige's cut file guest designer for March! You can find me on Instagram, Facebook, and Pinterest. I had such a hard time reaching a decision on what projects to make as I love all of Paige's cut files so much! But I finally settled on a few cut files and I'm so happy to bring my layouts to you today! Those of you that have followed me on social media for a while will know that I am definitely a "more is more" kinda guy when it comes to my scrappy style! These layouts introduce you to my style perfectly!
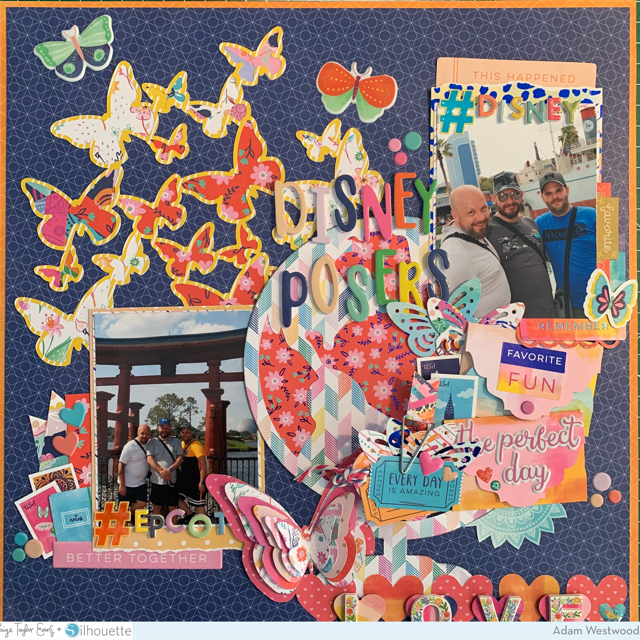
For my first layout I decided to use a few of Paige's cut files along with her fab Go the Scenic Route collection. I started with Paper 4 from the collection and trimmed 1cm off two sides, matting it onto Paper 7 (I always gut the middle when I do this to get the maximum from my paper!). I first cut the Butterflies Border cut file from Paper 8 and then backed it with various papers from the 6x8 Paper Pad. I cut the Globe cut file with Paper 17, backing it with Paper 16 from the 6x8 Paper Pad as I wanted the blue foil effect. I then layered the butterflies flying out from behind the globe. I decided to use the Layered Butterfly cut file which is so awesome! I cut each layer from a different paper of scraps from the 12x12 Paper Pad and popped each layer up on foam dots for added dimension - it is bulky but I absolutely love how it looks!

I wasn't done with cut files yet! I decided to add a couple of interactive elements and so I cut Paige's Heart Mini Album, resizing it to suit my project. I added three mini heart shaped photos and some embellishments inside. I simply tucked this into the bottom of the globe so it pulls out. I used some of the tickets from the Ephemera Die Cuts and a Flag Paperclip from the collection on the front of the album along with an eyelet and some twine. I also cut two Envelopes from Paper 21 and I love that when you open the envelope you get to see all the travel inspired words! I tucket hidden journaling in one envelope and a ticket die cut from the Ephemera Die Cuts in the other.

I then went crazy with all the fun embellishments in the collection! I've used some of the Puffy Phrase Stickers, Puffy Word Stickers, Cardstock Stickers, Chipboard Stickers, and Enamel Dots. I have added my title but then added various subtitles using Mini Foam Thickers and Floral Foam Thickers from Bloom Street. Finally, I added a couple of puffy butterfly Puffy Stickers from Truly Grateful.

For my second layout, I have toned down the "more is more" style yet used bold colors and a script background. I started with Paper 21 and gave it a black border right around the page, something I often do as I find it frames a page for me. I then cut Paige's Ampersand cut file in black cardstock. I resized the cut file to just fit on the page - I knew I wanted it to be big and bold! I backed the cut file very simply with red textured cardstock from American Crafts. I matted my photos with one of my favourite papers from Go the Scenic Route, Paper 16.

This is quite a simple page which allows the incredible cut file take center stage on that awesome phrase background! I tucked my photos in and around the cut file and used the Foam Thickers from the collection to add in my title. I also used the Puffy Word Stickers to add some phrases in. I brought my 30-page Paige Evans #StickerBook and used some stickers including the hearts, numbers, and pattern strips. I fussy cut tickets from Paper 17 and added them as well as lots of bits from the Cardstock Stickers, Chipboard Stickers, Puffy Phrase Stickers, and Ephemera Die Cuts. You'll also find a chipboard sticker sneaked in from Pick-Me-Up!

Moving on to my third and final layout, I decided to document some seriously awesome news... joining Paige's Cut File Design Team! That's right! Whilst I am here today as Paige's guest designer for March, I will be back soon with my first project part of the Cut File Design Team! I wanted something special for such a special memory and so I returned to my signature "more is more" style and then some! I started with one of my most favourite papers from Paige ever - Paper 03 from Horizon!

I just love the Sunburst cut file and wanted to use it so much - it just speaks happy to me like rays of sunshine! I cut it from Bazzill white cardstock. I wanted to add color to the cut file so I grabbed Tim Holtz distress inks in Carved Pumpkin and Fired Brick and added the orange first with an ink blending tool and then added the red on top towards the ends of the rays - I'm quite a clean scrapper and haven't ventured far into mixed media but I love the result of this!

This layout has three of Paige's cut files: I cut the BeYOUtiful cut file from more white cardstock and then doodled (very roughly) around each letter with black pen. I backed the words with Paper 14 and Paper 2. I added the word "team" on top of the cut file using Thickers from Truly Grateful. Finally, I took some paper scraps from the 12x12 Paper Pad and 6x8 Paper Pad from Go the Scenic Route and cut one of Paige's Layered Flowers cut files. I popped an Enamel Dot in the middle of the flower. I assembled the flower slightly differently though - opting to vary the petals to create a burst of petals alongside the Sunburst cut file!

I matted my two photos - one of the design team announcement graphic from Paige and the other the photo of me from that graphic and matted them on black and Paper 20 from Bloom Street. I took out my drawer of Paige's florals and went to town with them and some fussy cut florals fromGo the Scenic Route, concentrating on the area above the photos and to the left of the photos. I added lots of different colors, sizes, and types of flowers - it is most certainly a colorful, vibrant page! I also added some of the florals from the Chipboard Stickers and Cardstock Stickers as well as some phrase and icon stickers. I decided to add a further title to the top of the page - "Paige Evans DT" using the Floral Foam Thickers from Bloom Street as well as a Puffy Word Sticker on top of my photo. I sprinkled some of the Enamel Dots around the page and three fussy cut stamps from Paper 3 and added a handwritten note and that was the page done!
I have loved doing these layouts for my guest designer spot for Paige and I am so happy to be able to share them all with you today! I really appreciate you being here and having a read as well as all the support on social media. Thank you to Paige for this incredible opportunity and I am thrilled to be coming back as part of the 2021 Design Team! See you soon!


Bravo on your guest spot Adam and looking forward to following along your upcoming DT posts too! It's fun to see your designs with a big mix of pattern and colour. Cheers!
ReplyDeleteAbsolutely gorgeous! I love all of the color!
ReplyDeleteLove it
ReplyDelete