Guest Designer | Valerie Bisson


Sunday, May 31, 2020

Hi there, my name is Valerie Bisson and I’m from Winnipeg, Canada. I am super excited to be a guest designer with Paige’s cut files today. You can find me on Instagram, Facebook, and Pinterest. I have three layouts to share with you using a mix of Paige’s Pink Paislee collections. For my first layout I used four cut files including the Flower Picture Frame and Layered Flowers and Leaves.
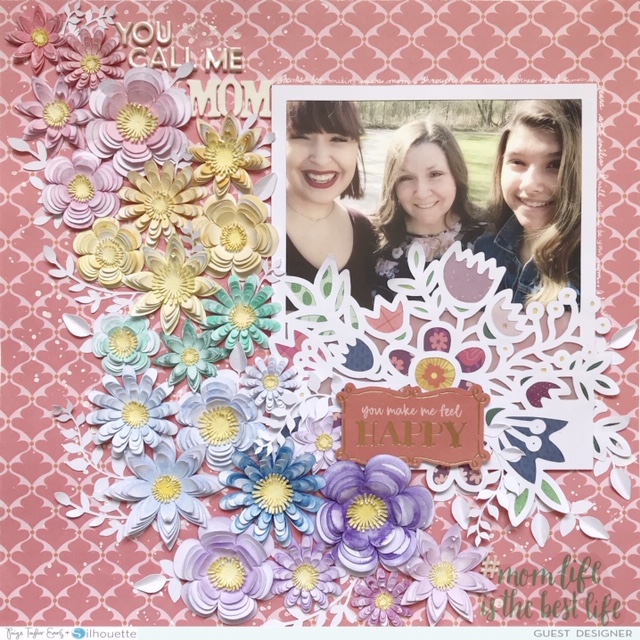
After having my Cricut cut out all the flowers and leaves in varying sizes from white cardstock I watercolored them in a rainbow of colors. After the flowers were dry I layered them up and shaped them to give them dimension. I used Paper 07 from Horizon for my background and added paint splatters on it. Then I added the flowers to the background with adhesive dots. I backed the flower picture frame with papers from the Truly Grateful 6x8 Paper Pad, some vellum, my photo, and adhesive foam for dimension, and adhered it to the background. Then I added a title with Thickers, a piece of ephemera from Pick-Me-Up, and a clear sticker from Paige’s 30-page #StickerBook. To finish off the layout I tucked in the leaves here and there and added my journaling around the photo.


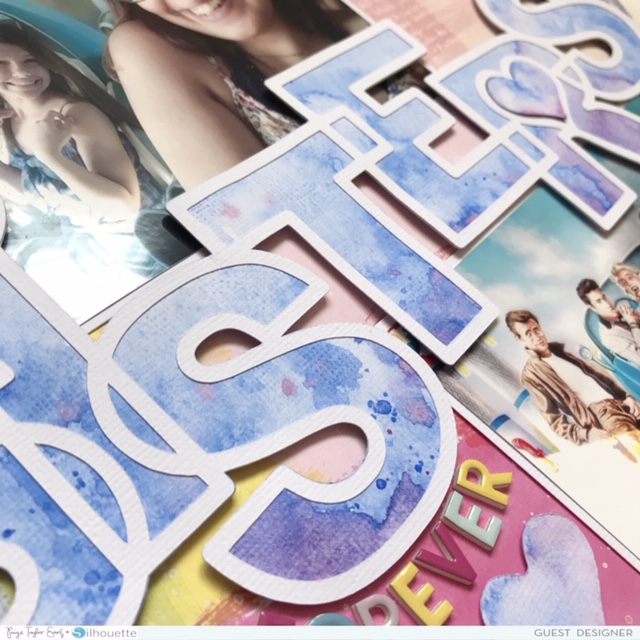
My second layout features the Sisters cut file, making it nice and big to stretch across the page.

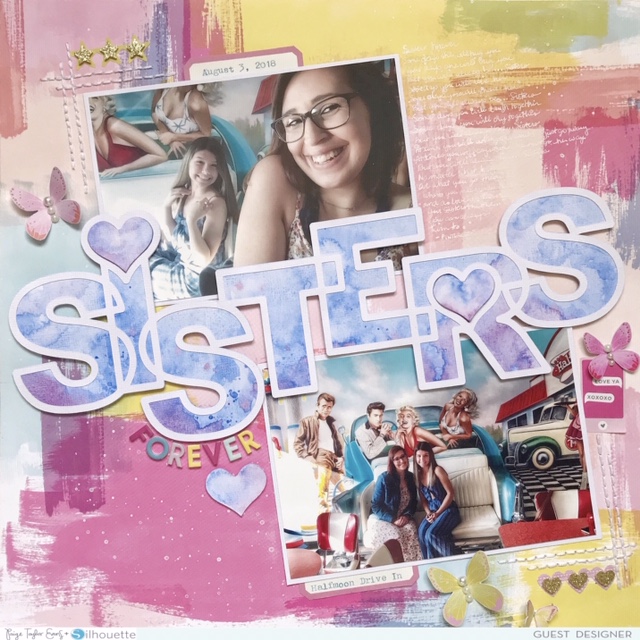
 I used textured white cardstock for the cut file and the backing which I painted using my Kuretake watercolors, wetting the paper with a bit of water then adding the paint. After it was dry I cut it out with my Cricut then adhered it to the back of the cut file. I also added adhesive foam for dimension. Then I applied my photos and cut file on a bit of an angle for added interest to the background which is Paper 24 from Horizon, on which I also added paint splatters. I added the word "forever" using the Happy Life Thickers from Whimsical. For extra texture I added some hand stitching using a backstitch on two corners. I embellished by fussy cutting a butterfly from the Turn the Page swatch books and using Paige’s 30-page #StickerBook. I also added some adhesive pearls to the butterflies. I wrote out a poem I found on Pinterest, aptly titled “Sisters Forever,” with a white gelly roll pen. I typed on a label with the date and the location and added it to the top and bottom of the photos.


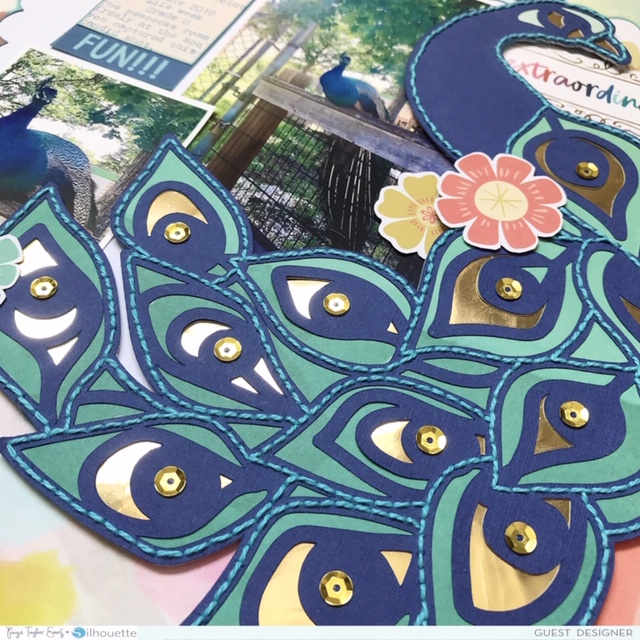
For my third layout I used the Peacock cut file. I layered the cut file with blue and green cardstock and some gold foil paper. For added detail I hand stitched the peacock using a backstitch, then adhered sequins for some sparkle.

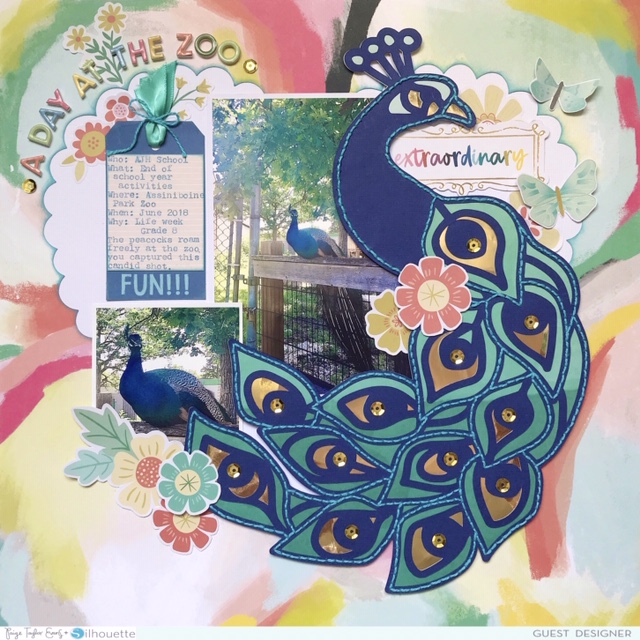
 The background paper is from Fancy Free, Paper 10. I had used this paper previously to cut a scalloped heart shape out of it for another project and used the remainder of the paper to my advantage using the existing cut out as part of the design. To make it stand out a bit more I inked the scalloped edges in distress oxide ink. Then I layered up all my elements onto the background including a tag from the Pick-Me-Up Ephemera Die Cuts and added the journaling with my Typecast Typewriter on a paper from the 6x6 Paper Pad. I also added a piece of ribbon and thread in a bow to complete the tag. The flowers and butterflies are from Paige’s 30-page #StickerBook, some of them I put directly on the layout and some I put on cardstock and then cut out so I could lift them off the page a bit. To finish off the layout I added a title using the Happy Life Thickers from Whimsical.

It was such a pleasure being a guest here! I hope I’ve inspired you to use Paige’s cut files on your scrapbook pages and projects. If you’d like to see more from me, please stop by my InstagramFacebook, and/or Pinterest! Have a great day!

SUPPLIES: Cut files: Flower Picture FrameLayered Flowers and LeavesSisters and Peacock by Paige Evans; Scrapbook collections: TRULY GRATEFULHORIZONWHIMSICALPICK-ME-UP, and TURN THE PAGE30-page Paige Evans #StickerBookwhite cardstockTypecast Typewriterwatercolors

Best Day Ever Layout (Backed Cut File)


Saturday, May 30, 2020

Here is a new layout made with Bloom Street and my Best Day Ever cut file!
I started by die cutting my Best Day Ever cut file from textured white cardstock and then backed each letter with a different patterned paper from my Bloom Street collection.
Before adhering the large title in place, I did some mixed media on the background of a sheet of smooth kraft cardstock. I splashed Pastel Dreams and Tropicals watercolors along with watered down white acrylic paint across the entire background and let it dry.
Then I adhered the backed cut file at an angle using foam squares for dimension and trimmed off the bits that were hanging off the edges. I overlapped two 3x4" photos on the left side, tucking them into the "E". To embellish I grabbed a few Ephemera Die Cuts and Cardstock Stickers and sprinkled them around the page as shown.
To finish I wrote journaling with a blue pen in the gap on the right side. All done! I hope you are inspired to pick up my Bloom Street collection and Best Day Ever cut file! Thanks for stopping by and see you again soon!
SUPPLIES: Patterned papers, die cuts, stickers: BLOOM STREET; Watercolors: Pastel Dreams and Tropicalswhite acrylic paintwhite cardstock; Cut file: Best Day Ever by Paige Evans

Hummingbird Layout by Elsie Robinson


Hey everyone, it’s Elsie Robinson here with another cut file focused 12x12 layout using the Bloom Street collection. I was inspired to use this sweet Hummingbird cut file because of the hummingbird embellishments that are in Bloom Street. Having such a large cut file makes such an impact on a layout, and is also so fun to create! Let me talk you through everything…
I started by cutting the Hummingbird cut file from white cardstock and then backed it with patterned papers. I used both the 12x12 Paper Pad and 6x8 Paper Pad versions of Paper 05 to get two slightly different shades of pink. I used this to my advantage when backing the hummingbird, because I used the slightly lighter shade of pink to back the wings and tail, which adds subtle dimension and interest.

I recently bought a pack of holographic foil cardstock and I had to use it to back the beak and spot details on the hummingbird, since it matches with the holographic foil in the Bloom Street collection. And of course, I couldn’t resist hand-stitching around the cut file with white thread. I feel like this always adds some awesome texture and even more detail to a cut file. Plus, it gives me an excuse to binge watch a couple of episodes of Netflix whilst I stitch!

I used Paper 02 as my background. I love how the purple background contrasts nicely with the white cardstock hummingbird, which highlights the intricacy of this beautiful cut file. To embellish I added some of the silver adhesive gems from the Mixed Embellishments on the wings of the hummingbird; I love how whimsical this looks! I also added some Floral Die Cuts and leaf Puffy Vinyl Stickers around my photos to help frame it and I created a little embellishment cluster with stickers from the 4-Page Sticker Book on the top left of the page to finish off my design!

Thanks so much for stopping by. I hope you’re all keeping safe and scrapping lots!

SUPPLIES: Patterned papers, stickers, die cuts, jewels, embellishments: BLOOM STREETwhite cardstock; Die cut machine: Silhouette Cameo; Cut file: Hummingbird by Paige Evans
Location: England / Blog: Hey Elsie Instagram: @heyelsie_ / Facebook: Elsie Robinson / YouTube: Elsieeee / Pinterest: heyelsie

Chocolate Nation Layout by Zsoka Marko


Friday, May 29, 2020

Hi there friends, Zsoka Marko back today with a new layout for the Paige Evans Design Team! It feels like I rarely scrapbook anymore so I'm always excited and happy when I actually have something to share! I started out with the Bloom Street collection and mixed it with lots of Horizon papers. I haven't used Horizon in ages so this page makes me super happy!
This gorgeous floral Paper 23 from Bloom Street is one of my favorites from the collection and I haven't used it yet, so I was determined to do so on this layout! I picked out this super cool cut file by Paige called Heart Swirls, which kind of reminded me of rainbows, so I backed it in that manner.

It turned out to be a bit too busy for the floral paper so I only used a wider strip at the top and a thin strip at the bottom. I thought it paired well with the pink/yellow watercolor B-side of Paper 22. I added foam to the cut file and adhered it to the background. I layered some tissue paper behind my photo as well as a tag from the Ephemera Die Cuts, then glued it down.

I documented a photo from our summer holiday last year. We took the kids (my best friends' twins and Maxim) to Chocolate Nation in Antwerp. This is the coolest and most fun museum we've been to! Well to be fair we don't go to museums all that often, but all of us loved this one so much! It's interactive, the way you're guided through each room is awesome. Super entertaining, the kids were glued to their headphones. And of course, there were several stops where you can try all kinds of chocolates. My goodness, heaven! Belgian chocolate is my favorite, so yeah, I didn't mind going hehe! They also showed us how to make pralines and we could try them too. There were photo booths with props, for instance there was this one where you could "fake" lift a huge jute bag filled with cocoa beans (it was hanging from an invisible thread and you just moved it to the height you wanted) in a tropical kind of setting - the kids loved posing for photos! At the very end there was a room filled with all kinds of melted chocolate - from white to dark and everything in between! And you could eat as much as you wanted! I will say though, even taking a teaspoon full from each (and I haven't tried the super dark ones) you felt full. And there was ruby chocolate OMG! Have you ever tried it?! It's super hard to find it still but it's so worth it. It's pink and fruity and reminds me of raspberry. It's all natural though, so no artificial fruit flavor. It's so good! Then of course there's a shop as you exit the museum and you can buy so many things, we spent ages there. The kids picked up some S'mores kit to try and they were so happy they were allowed to barbecue alone. If you're ever in Antwerp, definitely check it out!

Phew that was a long story, sorry for getting off track! Back to the layout now :) I used the white mini foam Thickers from the Pick-Me-Up collection to create my title following the curve of the cut file. I wrote my journaling on the opposite side. For embellishments I mostly used Floral Die Cuts which I layered next to the photo, alternating between liquid and foam adhesive to create some dimension. I then cut out colorful sentiments from Paper 13 and adhered these down too. Last but not least, some white glitter Enamel Dots, they are sooo pretty!

That's it! I hope I could inspire you in one way or another with my layout today! Thank you for stopping by! Happy scrapping!

SUPPLIES: Patterned papers, die cuts, stickers, embellishments, enamel dots: BLOOM STREET; Patterned papers: HORIZON; Thickers: PICK-ME-UPwhite cardstock; Die cut machine: Silhouette Cameo; Cut file: Heart Swirls by Paige Evans
Blog: apocketfullofscrap.blogspot.com // Instagram: @zsoka_marko // Facebook: Zsoka Marko // YouTube: Zsoka Marko

Stay Positive Layout by Brianna Lepper


Thursday, May 28, 2020

Hi crafty friends! Brianna Lepper here today to share a layout documenting the strange times that we are all living in. Our family has been staying home and keeping safe and most of all, choosing to make the best out of our situation. That includes playing outside when weather permits, playing board games, and watching movies together. Using Paige's gorgeous Bloom Street collection and cut files makes it so much fun to document these uncertain times.
I took this photo of my two sons when they were sitting in our kiddie pool laughing about something. Candid shots are always my favorite, secretly capturing those special moments. I knew right away that I would use Paige's Stay Positive cut file and it would be perfect for this photo! I've been completely addicted to creating rainbow-themed layouts lately, so I thought backing the cut file with Paper 06 (for this layout, I used the same paper available in the 12x12 Paper Pad).

Continuing on with the rainbow theme, I wanted to add some mixed media to the background so I broke out the modeling paste and shimmer sprays from my stash. Paige designed this awesome Flower Stencil Background cut file and I knew right away it would be perfect for my rainbow background. I cut it on the same white cardstock from the first cut file and ta-da! Instant stencil! I colored the modeling paste with the sprays and applied each color in rainbow order onto another sheet of thick white cardstock.

I made sure to apply the colored pastes in a way that when the backed cut file piece was put on top of it, all of the colors would match and align with that gorgeous heart paper. I love all of the texture and color! Modeling paste tends to dry fairly quickly so I had to move fast after I applied one color and started mixing the shimmer spray and paste for the next color. I even added a homemade tassel and looped it through the first cut file. So fun!

I embellished tone-on-tone around the page using the 4-Page Sticker BookCardstock Stickers, and the Layered Butterfly Stickers. I kept the embellishing pretty light since my background was a little busy. I wanted a bit more sparkle and texture so I adhered sequins from the Mixed Embellishments around the page and added some tangled thread underneath those layered butterflies.

You can watch my process video here:

Thank you so much for stopping by today! I hope I've inspired you to use some mixed media with one of Paige's cut files or to create a rainbow-themed layout. See you in my next post!

SUPPLIES: Patterned papers, stickers, die cuts, sequins, embellishments: BLOOM STREETmodeling pastewhite cardstock; Die cut machine: Silhouette Cameo; Cut files: Stay Positive and Flower Stencil Background by Paige Evans
Location: Louisiana, USA / Blog: I Love Paper Blog / Instagram: @briannalepper / Facebook: Brianna Nichole
YouTube: Brianna Lepper / Pinterest: Brianna Lepper

Best Friends Forever Layout by Shimelle


Wednesday, May 27, 2020

Hello crafty friends! It's Shimelle here and I have a story to tell of best friends and a simple way to start incorporating mixed media with your pages. It starts with Paige's Best Friends Forever cut file and that gorgeous rainbow stripe Paper 20 from Bloom Street!
My son will always tell you that he and Mickey Mouse are "BBBBBBBBBFFs" - best, best, bestest friends forever. I recently made a page with Paige's BFFS cut file and a variety of pictures of him and Mickey together over the years, and it made me realize I would love for the best friends motif to be something that has its place in my albums for every visit, just like meeting the main mouse is his highlight of every visit. I'm in luck, because Paige has several best friend designs to keep me going!

I started with Paper 20 (also available in the 12x12 Paper Pad) and brushed most of it with a layer of clear gesso to make a base for adding color. The orange background is a super easy, non-scary way to get started with mixed media! After the gesso dried, I used orange dye ink by stamping the ink pad directly onto my acrylic stamping block, though you could also use a craft mat or some plastic packaging. Then add a bit of water and mix for a wetter ink, much like watercolor paint. Grab some cling film from the kitchen and smoosh it (technical art term!) into something you can hold, then use it like a stamp - load up the ink and push it onto the gesso-treated paper! Let that dry, then come back when you are ready to stamp. This is why I use an ink pad instead of watercolors for this technique: now when I ink my stamps, it will be a perfect match and the stamped images are simply a more saturated shade of the exact same colour! I used the Acrylic Stamps for the floral designs around the curves of the title lettering.

I cut the Best Friends Forever cut file from smooth white cardstock and backed it first with two black and white photos, then with the ombre yellow floral Paper 14. To highlight the bright colors in my larger color photo, I matted it with Paper 02 and added a journaling card from the cut-apart side of Paper 17. I love how the shape of the cut file makes a perfect spot to nest the photo into the curves of the letters at the top right.

The 4-Page Sticker Book has an amazing page with strips of beautiful patterns in every color, so I used the red dotty strip to add a perfectly Mickey touch to my color scheme. Other finishing touches include Floral Die Cuts, heart Enamel Dots, and puffy circle stickers from the Truly Grateful Puffy Stickers. I like to include the letters for the corresponding Disney resort on my layouts, so I added 'DLP' in the Oh My Heart Thickers since these photos are from Disneyland Paris. We've managed to find Mickey in Paris, California, and Florida - we still have the three Asian resorts on our 'someday' list! You can see this entire page come together in this video:

Thank you so much for taking a look at my page and I'd love to hear from some of you who look adoringly at the beautiful mixed media pages out there but don't know where to start! I promise this technique is easy on the supplies, it's very forgiving, and not scary at all. Make sure you share your results if you take your first step into the inky background arena!

SUPPLIES: Patterned papers, stickers, stamps, die cuts, enamel hearts: BLOOM STREET; Puffy circle stickers: TRULY GRATEFULwhite cardstock; Die cut machine: Silhouette Cameo; Cut file: Best Friends Forever by Paige Evans
Location: London / Blog: Shimelle / Instagram: @shimelle / Facebook: Shimelle / YouTube: Shimelle Laine / Pinterest: glittershim

Hello Summer Layout by Missy Whidden


Tuesday, May 26, 2020

Hey friends! Missy Whidden here with a fun & bright layout featuring Paige’s new 6x6 Fish Stencil. It’s perfect for summer pages! I combined it with Paige’s Fish Background cut file. I mixed and matched a few of her collections including Bloom StreetTruly Grateful, and Horizon. My pool photos were a great match for my design idea. I began by covering the smooth white cardstock with clear gesso. Then I scraped some modeling paste over the Fish Stencil on the bottom of the page. The “water” was going to take up the bottom half, and once the fish were dry, I mixed Distress Oxides with Shimmerz to create all the blue area. I cut the Fish Background cut file from Horizon Paper 12 to get every bright color of fish.
Once the blue area was dry, I wanted to enhance some of the textured fish. I used a foam ink blending tool to lightly smudge white acrylic paint over some of them. I love how this makes some of the fish more visible and also looks like bubbles in the water. I added quite a few of the die cut fish all through the water. I added adhesive foam behind some of them and I arranged them in different directions. I used a few Truly Grateful Cardstock Stickers as layers around my photos and I tucked in a few colors of tangled thread for added color & texture.

I wanted my title to be as bright as the fish, so I mixed and matched Bloom Street Puffy Vinyl Stickers with the Truly Grateful Thickers. I fussy cut a floral cluster from a Bloom Street 2x2 Paper Pad and added it beside the title along with tangled blue thread.

I added yellow Distress Oxides and Shimmerz above the photo to mimic the sunshine. I added a big puffy sun from the Truly Grateful Epoxy Stickers, which I popped up for dimension. I also looped yellow thread under it. I added in a matching Bloom Street Cardstock Sticker above the photo.

Check out the process video:

I love how this page turned out so much! If you love making summer layouts you must get your hands on this Fish Stencil. You can find all of her stencils including all 7 new ones HERE. I hope you are inspired by this! Bright summer colors are my favorite! Have a great day and thanks for stopping by!

Blog: littlenuggetcreations.blogspot.com // Instagram: @missywhidden // Pinterest: @missywhidden
Facebook: missy.whidden // YouTube: Missy Whidden

Hello Beautiful (Watercolor & Flower Heart)


Monday, May 25, 2020

Hey everyone! I have a new layout to share with you today featuring the Floral Die Cuts from my Bloom Street collection and my favorite watercolors: Pastel Dreams! This is a layout that I've made many times before with my previous collections - what can I say?! You can't go wrong with watercolors and flowers in the shape of a heart!
Check out the process video to see how this layout came together from beginning-to-end:
I started by die cutting a Heart from a random gray colored cardstock and then used it as a template to trace with a pencil onto a white textured cardstock background. Then I pooled tons of water all around the heart. I didn't prep the background with gesso or anything to get this specific look with the watercolors. Next I dropped the Pastel Dreams watercolors into the pools of water in rainbow order and splashed the colors on top. I let the watercolors dry overnight since I used so much water. I could have sped the process up with a hair dryer, but then it wouldn't achieve these same results with the watercolors. In the morning the background was dry and I was ready to keep creating!
I grabbed a new package of Floral Die Cuts and placed the largest flowers around the heart first, spacing them pretty evenly apart. Then I added the medium sized flowers on top, followed by the smallest flowers. I took a picture with my phone to refer back to in case things got moved around. I adhered the flowers with thick foam squares to get lots of dimension and bent and folded the petals and leaves to get even more texture and interest.
Inside the heart I tucked a photo of Jane and then used the Puffy Vinyl Stickers to create the "hello beautiful" title with a green leaf sticker below. These stickers are very bendable so I shaped them to fit in the curve of this top section of the heart. In the top right area I wrote journaling with a dark blue pen, added a white flower border sticker from the 4-Page Sticker Book below, as well as a "capture beauty" sentiment.
To finish, I added two more trios of stickers to create two visual triangles: three ladybugs around the outside and three tiny flower stickers on the inside of the heart, all from the 4-Page Sticker Book. All done! This layout took about 22 minutes to create once the watercolors were dry. Easy, breezy, beautiful! Thanks for stopping by and see you again soon!
SUPPLIES: Die cuts, stickers: BLOOM STREET; Watercolors: Pastel Dreams; Cut file: Heart by Paige Evans; white cardstock

1 Piece of Paper Mini Album with Tags by Anita Bownds


Sunday, May 24, 2020

Hi crafty friends, Anita Bownds here with you today sharing a one sheet of paper mini using the beautiful Bloom Street collection from Paige. I’m in love with mini albums at the moment, they are just so cute!
I created this diagram to share where to cut and fold the sheet of 12x12. The 1 1/2 inch score lines to make a pocket edge to turn it into a tag mini album.
This mini album is a great way to use the one-sided 12x12 Paper Pad papers and you just cut covers to size for the front and back and add ribbon before adhering it down. I decorated my cover with papers from the 6x8 Paper Pad, Cardstock Stickers, and Puffy Word Stickers, and chose Paper 20 for my album as those watercolor dots as so lovely. I used a cute Layered Flowers and Leaves cut file to be the feature in the middle along with a heart Enamel Dot.
For my tags inside my mini I decided on some mixed media. I cut out the Wonky Hearts Background from thick cardstock and applied modeling paste to each, giving them a cute little heart design. Then I simply added different colors of watercolors over the top in different patterns. After they were dry I added vellum over the top and machine stitched around the edges giving it a softer look.
Next, using the 2x2 Paper Pads with the fun little phrases, I add one to each tag them some floral stickers from the 4-Page Sticker Book. For inside, on the tag pocket edge, I added more patterned paper from the 12x12 Paper Pad to decorate and a strip of Washi Tape to add more color. Here are a look at all the spreads:
I hope I’ve given you some fun inspiration and I will try to make a tutorial for YouTube soon!

SUPPLIES: Patterned papers, die cuts, stickers, enamel dots, washi tape, embellishments: BLOOM STREET; Cut files: Layered Flowers and Leaves and Wonky Hearts Background by Paige Evans
Location: Australia / Blog: Neat-N-Crafty / Instagram: @anitabownds / Facebook: Anita Bownds
YouTube: Anita B / Pinterest: Anita Bownds
Paige Taylor Evans © // Quinn Creatives DESIGN