Bloom Street Planner Spread by Mik Godinho


Tuesday, March 31, 2020

Hi friends! It’s Mik here from Papermiks with new planner inspiration! Are you a planner or spontaneous person? I’m a planner girl and today I’ll show you how you can make your weekly layout using Paige’s Bloom Street collection and Flower cut file.

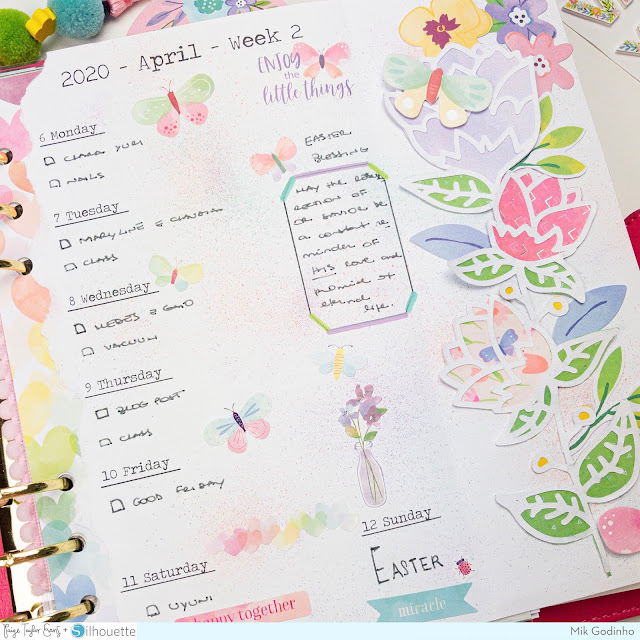
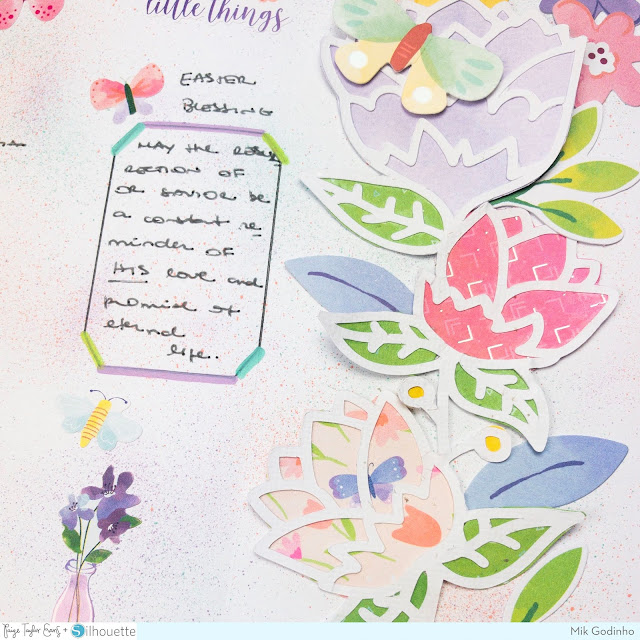
I started by die cutting the Flower from white cardstock and I backed it with papers from the 6x8 Paper Pad which have an iridescent foil. After gluing the flower on my page, I decorated it using Ephemera Die Cuts and Layered Butterfly Stickers.

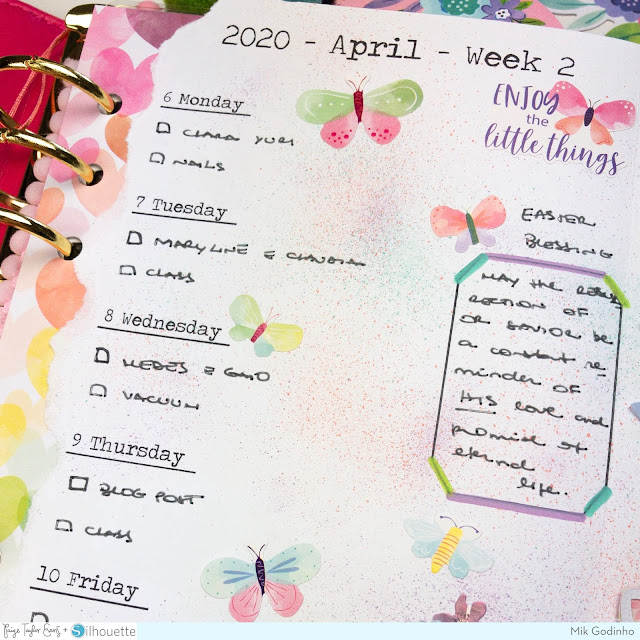
Before finishing, I ripped the right side of my page, glued it on some pieces of Paper 06 and punched holes to use in my A5 planner. Now you have a weekly page to use on your planner! When I plan my week I like to use stickers on my spread, so here as you can see I used some of them from the 4-Page Sticker Book with iridescent foil accents.

 I hope you’ve got some inspiration from this idea and enjoyed it! Thanks for stopping by and have a creative day!

SUPPLIES: Patterned papers, stickers, die cuts, embellishments: BLOOM STREETwhite cardstock; Die cut machine: Silhouette Cameo; Cut file: Flower by Paige Evans
Location: Bolivia / Instagram: @papermiks / Facebook: mik.godinho.papermiks 

Ten Things I Love About You Mini Album by Maija Männistö


Monday, March 30, 2020

Hi there! Maija Männistö here to share a mini album made with Bloom Street. My daughter turned 10 this month and I wanted to make a mini just for her with as many photos as possible. Together with the photos I added ten special things about her, my sweet girl.
I used the Mini Album Tabbed Edges cut file that has five pages. But as I wanted to do a ‘ten’ themed mini I added one more page to get 10 pictures in the mini. For the pages I chose six different 12x12 patterned papers to get lots of colors and patterns. To get six pages I cut the second page twice and then just hand cut the scalloped edges. For a finishing touch I added one of the Tassels from the collection, I love dangling pieces on mini albums! For each page I added hand stitching in different colors. I also added some white gesso and white acrylic paint to not only to bring a little texture but also tone down some of the busier patterns.

For the cover I wanted to add a big and fun title so I chose two different cut files for it: Ten and the Scroll Banner. I cut them from white cardstock and backed them with patterned papers from the 6x8 Paper Pad. The papers I chose have the iridescent details on them so they really make the title pop! For the tiny alphas I went back to Paige’s Whimsical collection and used the Foam Mini Thickers. I love how the colors match perfectly!

For each page I put a photo each and backed them with patterned papers from the 6x8 Paper Pad. I used several different pieces of embellishments, varying from page to page.

From the 2x2 Paper Pads I used both the patterned pieces as a whole or as a pennant and also the phrase pieces for fun quotes and sentiments.


I used the Washi Tape for some DIY embellishments. I adhered the butterfly washi onto white cardstock and then cut the individual butterflies and added two of them to each page. From the word washi I made a fun sentiment banner and from other patterns I made pennants in different sizes. I used several pieces from the Ephemera Die Cuts and Floral Die Cuts, adding lots of flowers especially!


I also used the Cardstock Stickers and the Puffy Vinyl Stickers for embellishing. You can never have too much of embellishments in a mini, right?!

Thank you so much for stopping by today, remember to live your life in full bloom!

SUPPLIES: Patterned papers, stickers, embellishments, die cuts, washi tape: BLOOM STREETwhite cardstock; Die cut machine: Silhouette Cameo; Cut files: Mini Album Tabbed EdgeTen, and Scroll Banner by Paige Evans
Location: Finland / Blog: Mai Makings / Instagram: @maimakings / YouTube: Mai Makings / Pinterest: Mai Loves

Happy Birthday To You Layout


Sunday, March 29, 2020

Hey everybody and happy birthday to Scrapbook & Cards Today Magazine! I'm here to share a new birthday-themed layout featuring a large title cut file and lots of colors - two of my favorite things!
Check out the process video to see how this page came together from start-to-finish:

I started by die cutting my Happy Birthday To You cut file (which you can find for free on the SCT blog!) from white cardstock by American Crafts - it's my favorite cardstock for cutting with a Silhouette Cameo, it cuts like butter every time!
Next, in Silhouette Studio, I ungrouped the cut file, spread all the inner pieces out, and then offset them a bit to make them slightly larger. I placed the pieces into the grid spaces so that I could cut coordinating pieces of patterned paper. I grabbed my Bloom Street and a few supplemental colored patterned papers and trimmed them to mirror the design in Silhouette Studio. For example, the "H" took up a 2.5" square grid, so I cut my patterned paper to 2.5 x 2.5" and placed it on the sticky mat in the same place as shown in Studio. This way, I could run the mat through the machine only once and have it cut out all of the backing pieces in one go! Even though it takes awhile to cut all of the individual patterned papers, I still think it's much faster than fussy cutting all of the backing pieces by hand.
I applied liquid glue to the back of the cut file and then placed the backing pieces. Turning the finished backed cut file over is always such a fun "ta-da!" moment! Always worth the time and effort. I grabbed a piece of Vicki Boutin White Foundations Media Paper and poured water on top. I dropped in coordinating watercolors from Prima in Pastel Dreams and Tropicals and let it dry. Once dry, I applied modeling paste through my Star Confetti Stencil to create even more texture and interest on the background. I trimmed wedges from the ombre rainbow hearts Paper 06 in my Bloom Street collection and stitched them to the edges to create a colorful border to help keep your eyes on the layout and not wander off the edges.
To finish, I added three photos around the title, wrote journaling across the bottom with a blue Zig pen, and applied heart stickers (from the 4-Page Sticker BookCardstock Stickers, and Puffy Vinyl Stickers - all found in Bloom Street) tone-on-tone to provide pops of color. I hope this layout inspires you to use my Happy Birthday To You cut file, pick up my new Bloom Street collection, and celebrate the ones you love! Happy birthday SCT!
SUPPLIES: Patterned paper, stickers: BLOOM STREETwhite cardstock; Cut file: Happy Birthday To You by Paige Evans; Die cut machine: Silhouette CameoVicki Boutin White Foundations Media Paper; Watercolors: Pastel Dreams and Tropicalsmodeling paste

Bible Journaling Spread by Paula Fiihr


Saturday, March 28, 2020

Hello friends! Paula Fiihr here with my next Bible Journaling page for Paige! Here I focused on Philippians 1:9 = LOVE!
Paige has so many great cut files to use for this verse. I chose the Layered Hearts cut file using  Bloom Street Paper 20 and the pink dots paper from the 12x12 Paper Pad. That pink dot paper is one of my favorites - I also used it for the Heart Lines cut file. I backed it with scraps and a few hearts from my Paige stash. After cutting the files, I prepped my page by sprinkling some watered down pink acrylic paint and then adding a few swipes with a water brush. The verse was outlined and I added some black letters for my sentiment.

After sewing around the edges, I  stamped “should” on a scrap of paper. Before attaching the layered hearts, I hand stitched them. For the tag, I used the Mason Jar cut file and attached it to Paper 03. The picture of me and my daughters is a perfect one to emphasize LOVE and is layered with a few flowers from the Truly Grateful collection. The wooden accents are also from that collection's Mixed Embellishments. I added a tab to the page with the word "important" from the 30-page Paige Evans #StickerBook.

I loved creating this page and hope you enjoyed reading about it. Have a lovely day and let me know if you have any questions!

SUPPLIES: BLOOM STREET and TRULY GRATEFUL; Die cut machine: Cricut; Cut files: Layered HeartsHeart Lines, and Mason Jar by Paige Evans
Location: Texas, USA / Instagram: @psplannergirl / Pinterest: pfiihr / Facebook: Paula Fiihr

Hello Summer Layout by Stefanie Ried


Friday, March 27, 2020

Hello everyone! Stefanie Ried here and I am very happy to show you a new layout I made with the beautiful new Bloom Street collection. The green and blue papers are the best. They radiate something fresh. I like that! That's why I very quickly realized that I wanted to create a layout with the papers in a different color combination. The cool colors reminded me of water. And so I used a photo from our holiday by the sea in Greece.
I printed the photo and since my daughter is on the edge, it was perfect for this kind of layout. First I sketched the wavy frame on Paper 10. Then I cut out this one. After that I put vellum under it and cut out waves again. I cut it so that you can see the vellum peeking through underneath the patterned paper. Finally the photo was added. This one was also put under the blue paper and vellum and the wavy edge was cut out.

After all papers and photo were cut, I used watercolor brush pens and applied them onto plastic packaging. I mixed it with some water and pressed the packaging with the paint onto white cardstock.

While the paint was drying on the cardstock, I added whipstitching around the patterned paper edges with colored threads. Then I glued the papers and the photo onto the cardstock with foam tape between all the layers. The depth between the layers makes the waves look even better.

The beautiful Acrylic Stamps were also used. I inked the sun with two stamping inks and cut it out with scissors.

Finally, the frame is decorated with many embellishments such as Floral Die CutsLayered Butterfly StickersCardstock Stickers, pieces from the 4-Page Sticker BookMixed Embellishments, and Enamel Dots.

I wrote journaling in the middle with a black pen and the title is "hello" from the Cardstock Stickers and "summer" from the mini alphabet in the 4-Page Sticker Book popped up with foam adhesive for dimension.


I hope you like today's project. See you next time!

SUPPLIES: Patterned papers, stickers, die cuts, enamel dots, sequins, stamp, embellishments: BLOOM STREETwhite cardstock; Printer: Canon Pro-100; Photo paper: Canon
Blog: steffiried.blogspot.com / Instagram: @steffiried / Pinterest: @steffiried / Facebook: stefanie.ried.96 YouTube: Steffi Ried

Stitched Star


Thursday, March 26, 2020

I started this stitched star back in October and worked on it here and there between assignments. So happy to finally have it finished and on the wall!
 To create this piece, I used my Sketch & Stitch Geometric Star cut file. First, on a piece of smooth white cardstock, it drew the heart and inner geometric pieces with a pencil in the left tool holder, then it cut the tiny holes with a ratchet blade in the second tool holder. I have a tutorial for using my Sketch & Stitch cut files HERE.
To make stitching easier, I very carefully cut around the star. I suppose I could alter the cut file to have the machine cut it out for me now that I think about it :) Next time!
 Then I grabbed my boxes of embroidery floss and one by one, I stitched "string art" style, all of the triangles. It probably took a good 24 hours in total to stitch. "String art" means I stitched a basic back stitch around the outer triangle shape and then stitched back and forth and sideways and diagonally etc through the same holes.
 I used all six strands of the floss to create the most amount of texture. The star is very bumpy and pops off the page! But it's still thin enough that it fits behind the glass of a 12x12 frame.
This star is now framed and on the wall in my scrap room along with five other hand stitched pieces:
This star was a labor of love but the results were worth it! Off to find another stitching project :)

My Sweet Friends Layout by Kelly Daye


Hello friends, it’s Kelly Daye here to share a layout I designed with Paige’s irresistible new collection, Bloom Street. I wanted to make a layout for my dear friend Nadine. She’s super kind, always generous, fun, and loving. I just think the world of her and if you could meet her, you’d think so too.

I started by paper-backing Paige’s Floral Umbrella cut file with a whole lot of Bloom Street papers and a few papers from the 6x8 Paper Pad too. Basically, you should just get the whole gorgeous collection, ha! It’s popped up with foam tape on a background made by layering strips of white cardstock punched with a scalloped border punch. It hadn’t seen the light of day for some time. Dig them out and get them working for you again!

I imagined a colorful floral umbrella floating through clouds that have parted to reveal a sunny day and rainbow. I used Paige’s Cloud Trio cut file and backed them with a pretty iridescent raindrop paper from the 6x8 Paper Pad. The sun is popping out of the clouds with a message, “Shine Bright”. It’s one of 40 pieces included in the Ephemera Die Cuts. So many pretty things to help your memories shine! The rainbow was made with Paige’s Rainbow cut file. I used the Knife Tool in Silhouette Studio to cut it in half and remove the clouds. Once I had that, I used the inside bands to cut out 5 colors from Paper 10 and Paper 22. I just love the soft painterly colors of these two papers. The bands were taped to a piece of vellum and then hand stitched with matching DMC embroidery floss.

Finally, the extra little details that make my heart happy. Like the Enamel Dots. I used three of the enamel flowers as centers for the flowers in the umbrella. My title is made by mixing letters from the Puffy Word Stickers. There isn’t a letter F in the pack, but I trimmed up an E for (F)riends. Of course, there must always be sequins! The silver ones are from the Mixed Embellishments and a few colored ones from my stash.

It’s officially spring, let’s enjoy the beauty all around!

SUPPLIES: Patterned papers, stickers, die cuts, enamel dots, sequins; BLOOM STREETwhite cardstock; Die cut machine: Silhouette Cameo; Cut files: Floral UmbrellaCloud Trio, and Rainbow  Paige Evans
 Location: Edmonton, Canada / Blog: Kelly Made It / Instagram: @kellymadeit / Facebook: Petals Daye / Pinterest: Kelly Made It

Lisbon, Portugal Mini Album


Wednesday, March 25, 2020

I finished up another mini album! This one is about our trip to Lisbon, Portugal and I used my travel-themed Horizon collection. In fact, a lot of the inspiration behind Horizon comes from the colorful tiles of Lisbon, so I thought it would be super fitting to document our trip with the collection inspired by it!
Sometimes I make mini albums for the sake of making art and beautiful things, other times I really want to get to the heart of documenting an adventure. I feel like this mini album is more of the latter - same ol' techniques, lots of stickers, just trying to get it done. But I still love it!

Check out this video of me walking through the album to see how it looks "in real life" :)
The covers are made from two pieces of 4x8" plexiglas which I drilled two holes through and sanded the edges and corners so they weren't sharp. Then I trimmed a whole bunch of Horizon patterned papers to 4x8" as well as from the 6x8 Paper Pad which has the lovely gold foiling details. I laid out all my photos, picked paper pages to match, and machine stitched the pages back-to-back. I punched holes through all of the pages in the same place as the covers and assembled the book together with two yellow binder rings. I slid Shaped Paper Clips and Charms onto the binder rings for decoration.
On the cover, I used "travel" and "to" Epoxy Stickers and Thickers to write "LISBON PORTUGAL." If you look very carefully at the little extra pieces in the title, you'll see the round stamp says Portugal on it as does that little green square. So fun to have pieces that coordinate perfectly!
I started creating this album over a year ago but lost my mojo once I put the pictures inside, so I set it aside, took it out many times to work on it over the past year, never made any progress, and set it back aside. Now that I've finished up assignments for a couple weeks and we're quarantined for the foreseeable future, I am working on finishing up all my works-in-progress! Which is still a little funny to me, I never used to have unfinished projects and now I have around 10! Crossing them off my to-finish list gives me great satisfaction :) Anyway! Back to this mini album!
Here are all of the spreads. I also included some pocket pages in which I slipped 3x4" photos and journaling cards from the cut-apart papers. Machine stitching pieces in place adds texture and helps things stay in place permanently.
As with all of my mini albums, I copied and pasted the journaling from our blog post re-cap about Lisbon, printed it in the font Remington Noiseless as size 8, trimmed it into strips, and glued the strips in place where they belonged with the photos.
Everything you see is from my Horizon collection, from the papers to the StickersChipboard StickersEpoxy StickersFloral Die CutsEphemera Die CutsTags, and Washi Tape.
I trim my photos to keep a white border around them to help them stand out from the backgrounds. I use my Canon Pro-100 and Canon photo paper and print at home.
Once in awhile, particularly on journaling cards, I wrote journaling with a black pen.
I always have a lot more photos that I want to include than seem possible, so here I made my own 2" pocket square page to hold photos.
To help make turning the thin photo strip easier I stapled two round stickers to the edge. Fun page turner!
Here is another pocket page I made from a page protector to hold small photos of so many tiles! Tiles tiles everywhere and oh so beautiful!!
If I were to make this album again, I would include more full 4x8" photos for bigger impact. This one of me is the only one lol.
I used a pink flower Shaped Paper Clip stapled to the edge for reinforcement as a page turner on this custom photo pocket page.
Here is the back page, a fancy patterned paper with foil details from the 6x8 Paper Pad and I added a little journaling sentiment closure.
Do you enjoy making mini albums? I sure do! Onto the next!!
Thanks for stopping by, let me know if you have any questions about anything, I'm here and happy to help!
SUPPLIES: Patterned papers, stickers, die cuts, embellishments, washi tape, Thickers, paper clips, charms: HORIZON
Paige Taylor Evans © // Quinn Creatives DESIGN