
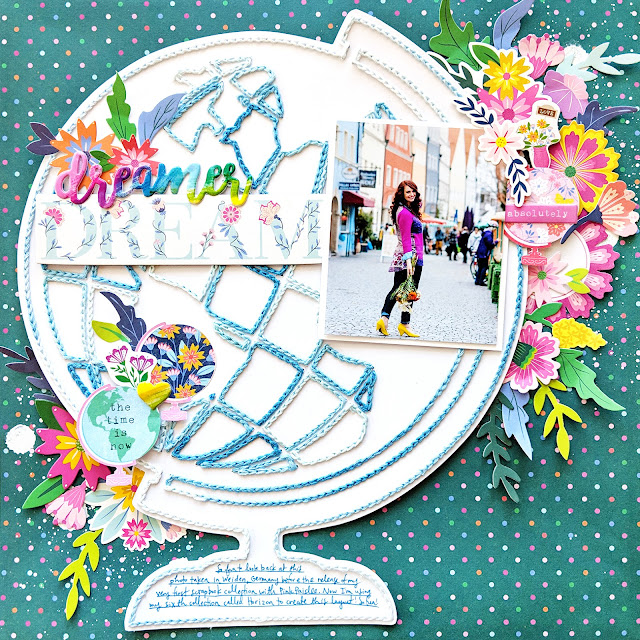
I have a new layout made for the Silhouette Blog using my brand new Horizon collection (which will be revealed on Monday and starts shipping early March!) and my Sketch & Stitch Globe cut file!

If you love hand stitching on your layouts, cards, and projects, these Sketch & Stitch cut files are perfect for you! Previously when I did complex stitching designs on layouts I found that when the holes were too close together, I didn’t know where to stitch next. But with these Sketch & Stitch designs, the guesswork is taken out of the equation! The Silhouette Cameo 3 will first draw the design with a Sketch Pen or Pencil Tool and then pierce the holes for stitching with a cutting blade! Now you won’t need to know where to stitch next because the design is drawn right on there. Easy peasy!

Here is the process video so you can see how to use the Sketch & Stitch cut files and then how this layout came together:
I started by using my Sketch & Stitch Globe cut file to have the Silhouette Cameo 3 draw the design and then pierce the holes. Then I did a chain link stitch following the pattern and using variegated blue thread. It took probably around 8 hours to stitch the entire design. Once I finished stitching I fussy cut the globe out so I could use it on a different background instead of white.

I chose a dark green paper with colorful polka dots from my Horizon collection as the background and then splashed white acrylic paint across the background. Once that dried I added the globe on top.

To embellish I placed a bunch of flowers under and around the globe as well as a few stickers - all from Horizon :) I created the title with two chipboard stickers and then journaled in the empty space at the bottom of the globe.


I hope you are inspired to check out my Sketch & Stitch cut files!

SUPPLIES: HORIZON (I'll add links here once they're available at scrapbook.com!); Cut file: Sketch & Stitch Globe by Paige Evans; Die cut machine: Silhouette Cameo 3; white acrylic paint


You are seriously my idol!!! This is AMAZING! LOVING that globe, the flowers, that photo of you and that FABULOUS stitching!!! Just GORGEOUS!!!!
ReplyDelete