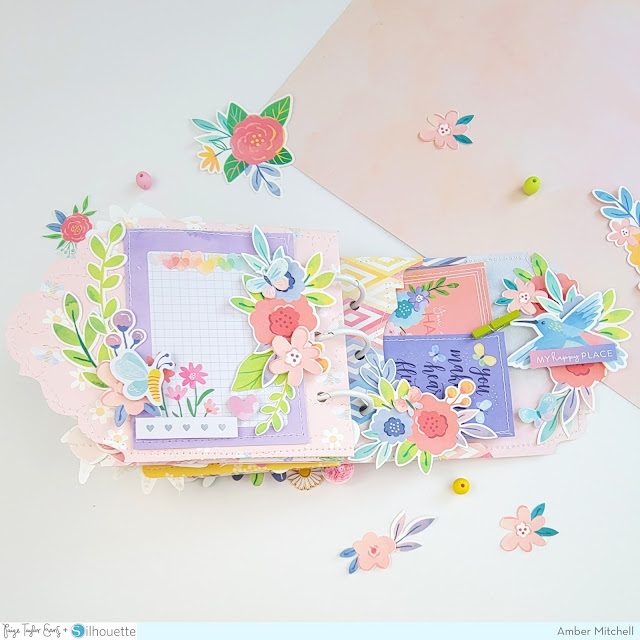
Hello crafty friends, Amber Mitchell here on Paige's blog today to share with you a cute and quick mini album using Paige's Envelope cut files and her Bloom Street collection.
It's no secret that I love making mini albums; they're just so fun to make! What might come as a surprise though, is that I find quick and simple mini albums to be the most fun to create. Having a project come together in just one day is really satisfying (not to mention convenient when you're short on time)! So, if you're like me, then you'll love this envelope mini!
I used five of Paige's Envelope cut files to create the base of this mini album. I started by resizing each file so that all of my envelopes measured about 4 inches in width (or height when rotated like in the album). I then cut them using patterned papers from the Bloom Street collection and machine stitched along all the edges of each one for added texture.
Once the envelopes were assembled, I stacked them from shortest in width to longest. This adds a layered effect to the album that allows fun elements to peek through from all views.
Since this album is designed to be quick and easy, I used white binder rings to hold it together. To give the front cover of the album a more finished look, I added purple eyelets to match the collection.
When it came to embellishing this project, I decided to go for a very floral theme; you can never go wrong with flowers! Each page of my album is decorated with floral die cuts and embellishments. These can be found and printed as many times as you'd like from the Bloom Street Digital Collection. I dressed the pages up even more by adding small butterfly and bee die cuts along with some stickers. I used the Cardstock Stickers and the 4-Page Sticker Book to layer up some sentiments.
I wanted the cover of my album to really pop and catch the eye, so I created a large, 3D floral cluster using Paige's Layered Flower and Leaves cut files. And of course, I added some charms and tassels to each binder ring for some extra fun!
For journaling, I used some cut apart cards from the 6x8 Paper Pad, 2x2 Paper Pads, and Paper 17. I machine stitched along the edges of all of these as well and left the backs of them blank for documenting.
Thank you so much for stopping by my post today! I'll see you next time with another fun project!
SUPPLIES: Patterned papers, stickers, die cuts, embellishments: BLOOM STREET; Die cut machine: Cricut; Cut files: Envelopes and Layered Flower and Leaves by Paige Evans
Location: California, USA / Blog: Happy Crafty Studio / Instagram: @bambidearr / YouTube: bambidearr / Pinterest: bambidearr


What a beautiful album. Great details in the tutorial. Very much appreciated.
ReplyDelete