Tallinn, Estonia Mini Album


Wednesday, February 21, 2018

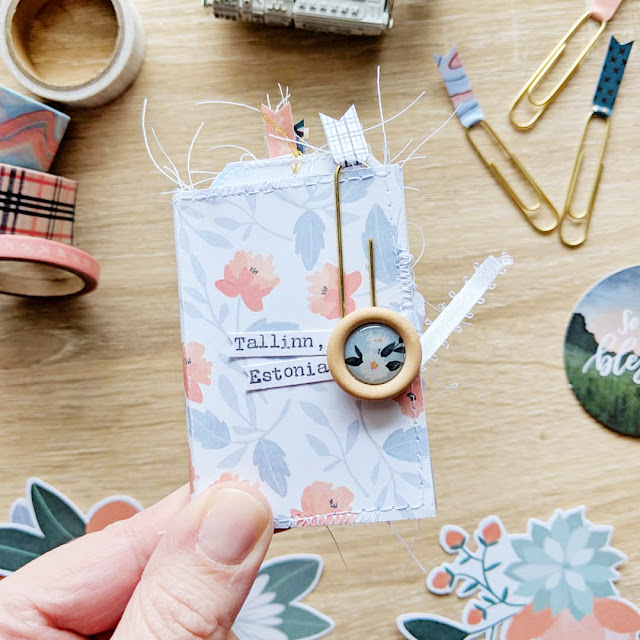
I just finished up a MINI mini album - it's only 2x3"! I used the new & gorgeous Twilight collection by 1canoe2 with lots of beautiful pinks and blues and florals. I was searching through our travel photos trying to find pictures that would coordinate and noticed lots of pinks and blues in our day Tallinn, Estonia back in 2015 - it's never too late to document precious memories! So I narrowed down my favorite photos, printed them at 2x3", and got to work!


First, you can watch a short little flip through of the album to see how it looks in real life :)

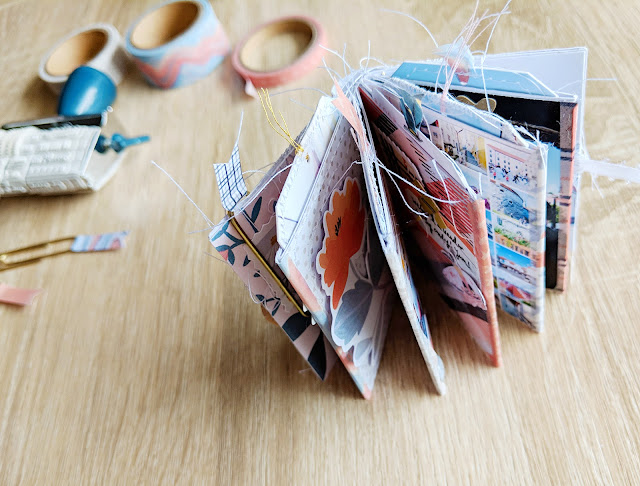
I found the tutorial for making the base of this mini album by Eva Pizarro on the Pebbles blog - it only uses a half sheet of cardstock! I altered it a little bit - instead of gluing the entire pages back-to-back, I added adhesive around the edges only to turn them into pockets - I always need more room for photos and journaling so pockets are a great way to make more space.
I made the mini album base from white smooth cardstock and then wrapped it with a pretty floral paper from the 6x6 Paper Pad - I added machine stitching to the edges before adhering it in place and kept the thread ends long here and throughout the album. To help keep the album closed I added a Wooden Epoxy Button to the front and stitched ribbon to the back page to wrap around it. To make the title I typed "Tallinn, Estonia" on smooth white cardstock using my Typecast Typewriter and then trimmed it out, notched the ends, and tucked them under the button.
For consistency I decided to add a full photo to each spread and then adhered a coordinating piece of patterned paper on the opposite side. On this spread I added an Ephemera Die Cut stamp and "adventure" gold foil & pink heart Stickers backed with some messy white string. I trimmed the flag from the Paper Clip a little bit shorter and then clipped it at the top. On the right I wrapped the edge with Washi Tape, stamped the date of our visit using the Roller Stamp with black StazOn ink at the bottom, placed one of the epoxy centers from a Wooden Epoxy Button above, applied an "x" gold Rub-On above that, and then placed a gray "x" Sticker on the side. 
It only took a few minutes to place all the photos throughout and then pick papers - I used patterns from the 6x6 Paper Pad because they're smaller scale. At that point all I had to do was embellish - this mini album only took about 3 hours to make from start-to-finish! I couldn't believe it, I had budgeted in about 5 or 6 hours. But yay for fast projects! On the left side of this spread, I machine stitched messily on the patterned paper before adhering it in place and then added a floral Die Cut on top using dimensional adhesive. All I did on the right side photo was wrap it with Washi Tape - I love how this makes the edges look a bit cleaner and gives them more color and interest - win win win!
On this spread, I trimmed a piece of a floral Die Cut for the bottom left corner and added another epoxy center from a Wooden Epoxy Button on top. On the right page patterned paper, I created a cluster using a trimmed label Sticker, a stapled a yellow "x"Sticker, and an Ephemera Die Cut stamp. Then I stitched along the right edge of the label sticker before adhering the page in place. I fussy cut a moth from one of the 6x6 Papers and placed it below the hand written journaling. I should have let the ink dry, it's a bit smudged. I wrapped the edge with Washi Tape to finish this spread.
I had so many photos I wanted to include. I made a 2x3" collage of more favorites and adhered it to the right page. On the left patterned paper page (isn't that paper so pretty?!) I stamped a bunch of sentiments and borders using the Roller Stamp with black StazOn ink. Before I adhered the paper in place I stitched a gold foil heart Sticker above the stamping. Not seen below but on the next photo I once again wrapped the edge with Washi Tape.
On this spread I applied a gold foil sentiment Rub-On to the center of the pretty floral paper page, stitched a "today" Sticker above, and added a trimmed floral label Sticker below. On the right photo page I added a "favorite" Sticker at the top and stapled a gold foil heart Sticker next to it. Can you guess what I did next? I wrapped the edge with Washi Tape! Repeating design elements is key!
On the last spread all I did was stitch heart Ephemera Die Cuts and Stickers to a patterned paper then adhered it in place. On the right photo page you can see where I stitched the ribbon in place that keeps the album closed.
And then in all of the pockets I added more photos! There are five pockets in total - four of them hold back-to-back photos that I shaped into tags and added machine stitching around the edges. I also either stapled Washi Tape or tied thread through holes punched in the top to add more texture, color, and make it easier to pull the tags out of the pockets. I added a few Stickers and Rub-Ons to the white space of some of the photos and fussy cut a tiny "slow down" from a 6x6 Paper. These photo tags are slightly thinner than the pages - they're about 1.5" wide so they can tuck into the pockets easier.
I wrote journaling on a tag Die Cut with a .03 black precision pen and then applied gold foil border Rub-Ons and angled Washi Tape to the back. 
Detail of the tags.
That's about it! So easy, fast, and fun to make!
I hope you are inspired to check out the Twilight collection by 1canoe2, check out the mini album base how to by Eva Pizarro, and then report back here and share what you've made! :)

1 comment

Paige Taylor Evans © // Quinn Creatives DESIGN