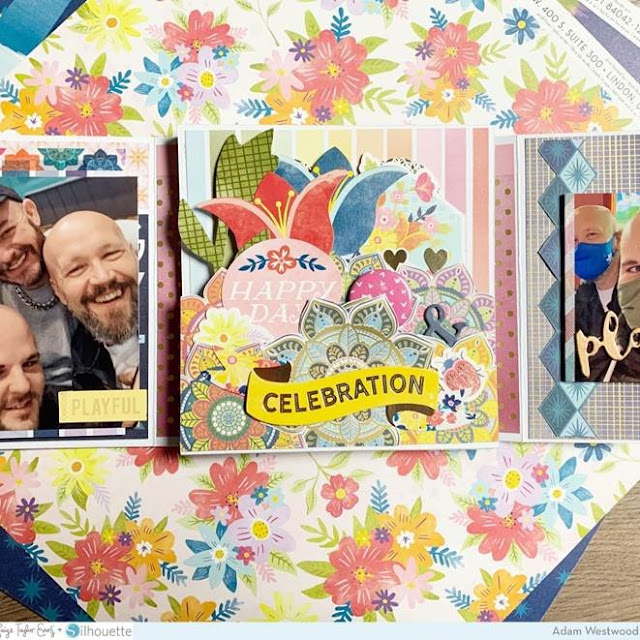
Hello! ScrappyAdam back with you all! This is a particularly exciting post for me because I’m sharing my first ever mini album for Paige’s blog today! I am a big fan of mini books, tag minis, and all manner of mini albums!
I took inspiration for my mini album originally from Paige’s Suitcase Mini Album. I have to admit that I made so many changes to make it my own that it ended up nothing like Paige’s fab template. But I love it all the same and managed to get seven photos in the 5x5” mini album – plus lots of extras and surprises! The mini album is made from one sheet of 12x12” white cardstock which I then scored and folded along similar lines to the suitcase mini album – quite simply, I have a 5x5” square middle and then have a 0.5” spine on all four sides and two flaps at 4” and two at 2”. Once I had the basic design of the mini album together, I used various papers from the 6x8 Paper Pad and 12x12 Paper Pad scraps and I did use many of the foiled papers to cover my book. I decided to avoid creasing the paper by folding around corners and instead matted each page/spine. I wanted something different for the centre of the book inside, something to take centre stage and so I decided I would turn it into a shaker pocket – and I love it!
To make the shaker pocket, I created a pocket using a page protector cut to size and my fuse tool, before sealing the pocket entirely, I used some sequins from Paige’s older collections - Truly Grateful and Turn the Page - which offered a vibrant mix of yellow and pinks. I sealed the pocket and cut a frame from a foiled yellow paper from the 6x8 Paper Pad and there was my shaker pocket! I decided I wanted to incorporate a cut file and loved one in the recent 20 Family & Friends Cut Files and cut the “You’ve Got a Friend in Me” from a green paper from the 6x8 Paper Pad at just under 3.8” square – super dinky and cute! I adhered this to the centre of my middle page and then the shaker pocket above it. Whilst you can’t read what it says completely, you can shake all the lovely sequins and it offered some cute interest – just what I wanted! I didn’t back the cut file so it really popped against that navy floral background!
It was then a case of embellishing the little book and adding in my photos. I used photos from a birthday trip last November (since we’re only just coming out of lockdown in the UK, we haven’t had many recent trips!) and decided to use the Washi Tape to add five photos in a waterfall on the right side flap which I had adhered an ephemera piece to the front for an overlapping closure. I then added another strip of Washi Tape to provide a photo on a flap to the left side with a cut apart underneath it. When you open the book there are two opposite flaps to open (upward and downward) and I used these pages to really go to town on my embellishing – adding lots of Floral Die Cuts, fussy cut foiled mandalas, and a Banner Sticker as well as some Cardstock Stickers to the upper part – including some of those awesome big hearts!
Inside, I added a title using the Thickers along with lots of bits and pieces and some enamel hearts from Truly Grateful. I also added a Banner Sticker to the shaker pocket. On the front of the album, I wanted to add more interest and so I used a section of the Doily cut file from the 20 Spring Cut Files to the corner of the cover along with a chipboard piece from an older Paige collection and a butterfly from the Ephemera Die Cuts. I love how this turned out just for a little bit of added detail and texture. I added another Ephemera Die Cut to the opposite side of the gatefold opening album along with a beautiful Lollies dimensional sticker and a large floral Chipboard Sticker.
Finally, I wanted to add something to the back and so I added a frame using the vibrant dark blue paper from the collection and decided to use Paige’s Heart Confetti Background cut file as a stencil and some ink on a square of white cardstock to create lovely hearts and added a cut apart with an older release floral – very simple but finished the album off nicely!
That’s it – my first design team mini album and I absolutely loved making this from scratch! I also love to add cut files to mini albums – don’t be afraid to resize cut files to suit your project – they really do give another dimension to any project and offer so much texture and interest!
Thanks for taking the time to read my blog post today! I’ll be back with another project very soon! Take care, stay safe!
SUPPLIES: Patterned papers, stickers, die cuts, embellishments: WONDERS; Die cutting machine: Silhouette Cameo; Cut files: 20 Family & Friends Cut Files and Doily by Paige Evans


Post a Comment