Good Times with My Girl Layout by Missy Whidden


Tuesday, March 5, 2019

Hello again, friends! Missy Whidden here with some new Whimsical inspiration for you. How often do you start a layout with a cut file and let it create your design for you? I’ve been wanting to use Paige’s Half Flower cut file on a page, so I cut it really big on some white cardstock with a Silhouette Cameo 3. I wanted to use all the colors from the Whimsical collection, so I used papers from the 6x6 Paper Pad as well as several other papers to fill in all the flower spots. I didn’t actually back the cut file. I traced each shape onto a different paper and then placed the shapes on top of the cut file. I glued down the inside edges so the outer edges could be bent up for dimension.
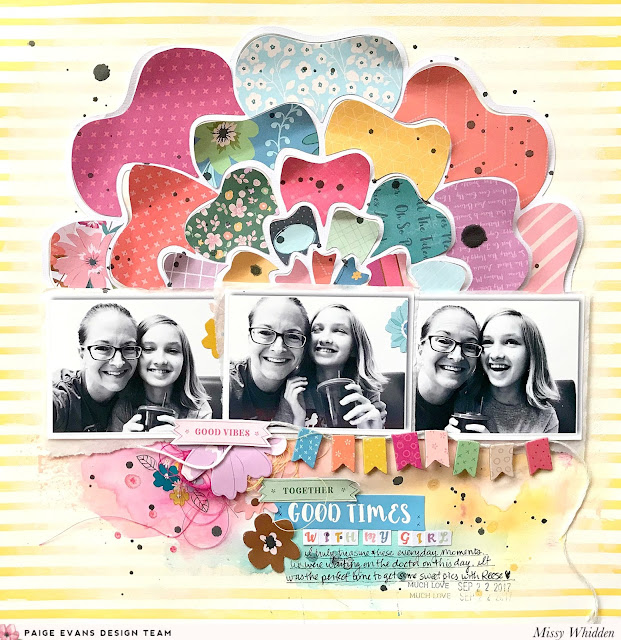
I placed three horizontal photos along the bottom of the flower so all of the petals were above them. Here you can see all the dimension created from the petals. This is a fun and easy way to use lots of different colors and patterns on one layout without it becoming too busy.

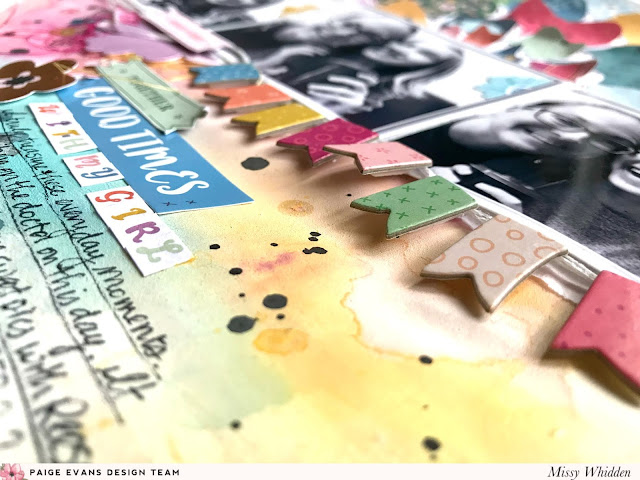
I wanted to bring some of the colors down below the photos, so I did some mixed media work on the background here. I used Distress Oxides and spray inks to add in yellow, blue, and pink shades. I have been waiting for the right page to use these pennant shaped Chipboard Stickers. I used them all and added adhesive foam behind them to create a fun little banner. I glued white embroidery thread behind the tops of them to make it drape below the photo. I used Stickers for my title as well as a few small alpha stickers from the Sticker Book.

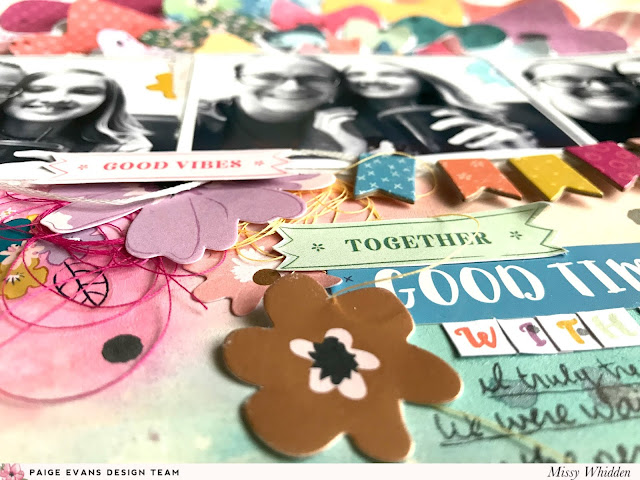
I continued adding bits and pieces below the photo over to the right side as well. I tucked in a big purple flower from the Floral Die Cuts and added a Rub-On, a Sticker Book sticker and another flower from the Floral Die Cuts. I also added in more texture with tangled thread.

I hope you inspired by this in some way! The colors in Whimsical just instantly inspire me every time I look at them and when you add a cut file in with it and it’s like magic! Next time, try using a big cut file like this to help your design get started. It’s great because it limits where you can place everything else and helps you to narrow down what products to use.

Thanks for stopping by!

Blog: littlenuggetcreations.blogspot.com  Instagram: @missywhidden  Pinterest: @missywhidden
Facebook: missy.whidden  YouTube: Missy Whidden

Folded Paper Rosettes Layout


Monday, March 4, 2019

Hey everyone! I have a new layout to share today featuring folded paper rosettes made with my Whimsical collection.
I started by creating about 30 folded paper rosettes which you can see how to make in this short'n'sweet process video:

It took a few hours to make all of the rosettes but they're so addicting to create - once I started I couldn't stop! Then I had to choose a background for my page and I chose this blue design with tiny white flowers (the B-side of Paper 23) - it helps bring out the blue tones in the picture.
I glued the rosettes onto the background in a diagonal from the top right to the bottom left, starting with the largest ones and then adding the smaller ones on top.

I tucked the photo into the top left side and then added a title "The Happy Life" Chipboard Sticker beside it. Since there was already so much color, dimension, and patterns going on, I kept the embellishments to a bare minimum and only added some Chipboard Sticker dots and button Stickers to a few of the rosette centers.

The final step was writing journaling on the bottom right. All done!

I hope you are inspired to learn how to make these folded paper rosettes and use them in a fun and unique way on your projects!

SUPPLIES: WHIMSICALPaper 01Paper 02Paper 03Paper 04Paper 05Paper 06Paper 07Paper 08Paper 09Paper 10Paper 11 , Paper 12Paper 13Paper 14Paper 15Paper 16Paper 17Paper 18Paper 19Paper 20Paper 21Paper 22Paper 23Paper 24Chipboard StickersStickers

Happy Love Layout by Julie Taylor


Sunday, March 3, 2019

Hello there, Julie Taylor back with you again today sharing a new layout using the Whimsical collection & Paige’s Love Heart cut file!
I have always loved Paper 16 with the multi coloured stripes ever since I first saw it and had the idea of cutting the cut file out in that and adding stitching to match the colours.
I drew around the heart onto white cardstock and poked small holes around the cut file and the perimeter of the cardstock. I then sewed all different colours of thread to match the colours on the heart, around the edge and out the border, overlapping some. I then backed the whole page onto the B side of Paper 16, showing those cute multi coloured hearts and sewed on my machine around the edge.
 My photo is of myself showing my delight at getting new watercolours so the Whimsical collection is just perfect with all its art themed ephemera. I backed my photo with a couple of papers from the 6x6 Paper Pad and tucked it inside the cut file then added Ephemera Die CutsChipboard StickersStickersPuffy Stickers, and Rub-Ons all around my photo.
I love how this page turned out and other than the stitching, which was done while watching a film, it came together really quickly! Until next time!

Instagram: @julie9699 / Facebook: Julie Taylor

Always Good Times with Friends Layout by Lady Nany


Saturday, March 2, 2019

Hi friends, it's Lady Nany with another layout using Paige's Heart Flower cut file and the Whimsical collection. For me friendship is a source of joy, happiness, laughter, and many pleasant moments and I tried to capture these emotions for this project.
I started with the idea of creating a rainbow of colors and for that there's nothing better than flowers. In Paige's gallery there are many designs inspired by them, so I tried to create something different. I chose the Heart Flower cut file and sized it to 3" and another at 1 ½" and cut them out with my Silhouette Curio on white cardstock. Using the same file I ungrouped it and stayed with the shape to cut out the rest of the flowers. I combined papers from the 6x6 Paper Pad with Paper 04Paper 19, and Paper 20, making the flowers within the same color in different tones and in the center I placed buttons sewn with matching string.
For the background I chose Paper 24 and I scattered watercolors in the area where I would put the flowers so as to make sure there is color on the whole page. Once dry, I started to stick them down with foam tape to make shadows and I deformed them a little by folding the petals forward, thus giving the sensation of movement. Finally, I added thread under three of them forming a visual triangle. I put the photo in the center to the right and decorated tone-on-tone. For this I used Chipboard StickersStickersSticker Book, and Enamel Shapes.
I substituted the usual journaling for feelings or phrases that I put on each flower, highlighting "Always Good Times" as the title and below I completed it with the alphabet in the Sticker Book.
And that's all friends, I hope you find inspiration in this project to create your own designs. Thank you very much for visiting us, see you next time!

Blog: Lady Nany Art / Instagram: @ladynanyart / Facebook: Lady Nany Art / YouTube: Lady Nany Art

February 2019 Highlights


Friday, March 1, 2019

Another month has come and gone - here is what our family has been up to and some of my side projects!
Side project 1: I made these books using the WeR Bookbinding tool for an upcoming somethin' somethin'! :)
 With Valentine's in February, I designed these free conversation heart cut files for my Happy Scrappy Place Facebook group and when my sister saw the pic of them she requested I cut her some for her fireplace. You betcha Allie!
 Twice a year dads are officially invited to each lunch with their kids and then buy some baked goods. I tried to find out the lunch times early enough in advance so Chris could request the time off but alas, I only heard back two days before and the dental office books out way in advance, so I went and ate lunch with Jane and then Fox and it was a blast to hang with them!

Goof ball.
 Some times I take the kids to PetCo or Petsmart just to look at the pets and have to resist so much temptation to buy all the animals.
 What are Saturdays without Cafe Rio?!
 Even with the snow, it was actually almost 60 degrees this day so we took the kids to a park we hadn't been to before.
 Every first Saturday of the month at Home Depot (note to self, that's this Saturday!) they offer a free kids' craft! So we got two kits to go and Chris helped them paint and assemble these fun wooden Valentine's Day boxes.
 Super Bowl Sunday at Tom & Margi's house. So.Much.Food! So much fun.
 My mini album basket is almost full! I found a 5 tiered basket thing at Costco which I plan to spray paint this summer so I can keep making and storing more minis!
On February 9th I wrote a Facebook post about my current journey to getting healthy. 5.7 pounds until I reach my goal of 130! I haven't been at that weight since after working hard to lose weight after Jane was born back in 2012. Click on that above link to see how I'm doing it without stepping foot in a legit gym! #notsponsored :)
A virus went around the school and of the 19 kids in Jane's class, 7 were down for the count! So Janey girl ran some errands with me while she got over the bug.
 Ice cream in bed with dad watching shows makes everything better.
 I did an instagram campaign for Caboodles!
 My nephew is adorable.
 So is my niece. And to all my other nieces and nephews, I promise I love you and think you're cute too!!
 Valentine's Day sugar high!
 Zsoka shared this and I love it. It really resonates with me. Numbers drive me CRAZY sometimes! Need to not worry about it.
Amid the 16 degree days we've had some 60 degree days which we take full advantage of by walking to the school playground.
 The third Saturday in February we took the kids to Casa Bonita in Denver. I've been once before, when I was 19 years old and visiting Chris when we were dating. It was such a trip to look back through my "vintage" scrapbooks and see the memories! We were babies! Now we have babies!
Us in 2019 at Casa Bonita.
Us in 2004 at Casa Bonita. WOW, 15 years later?! That's insane! Also, please admire my mad scrapbooking skillz ;)
 The kids had a total blast and if they're having fun, we have fun. The cliff divers were entertaining to watch. But really, I came for the sopapillas. Mmmmmm. What diet?! :)

When we walked inside Casa Bonita it was a sunshiney beautiful day. When we walked out it was snowing! I loved this pink wall with vines and the Italian feel so Chris snapped a pic of me. Thanks babe!
Old Town Dental is being named in the 5280 Magazine as TOP DENTISTS for 2019! I took a new pic of Chris, Shawn, and Mike for the feature.

Speaking of Old Town Dental, probably the most exciting news of the month is Chris officially bought into the practice! He's now 1/3 part owner! If you need fillings, cleanings, even botox and lip fillers, Chris is your guy!
 Later that day we took the kids to go swimming at one of the four rec centers by us for the first time. The kids absolutely loved it and so did we because again, when they have fun, we have fun!

We were famished after swimming so without even going home to dry off we went to Cafe Rio for lunch. It's a Saturday tradition!
 This is our first winter here in Colorado and in this home so it's been fun to see the changing seasons and how the views pop up now that the trees are leafless. Hello Rocky Mountains!
 Joey is alive and well :)
 Yesterday, the last day of February, I woke up and the walls were pink so I looked out the window and there was a beautiful sunrise right before my eyes. WOW!
 February was a great month! Excited to see what's in store for March!
Paige Taylor Evans © // Quinn Creatives DESIGN