
This blog post is sponsored by JOANN.
I'm so excited to share my 4th layout made with scrapbooking supplies that I found at JOANN stores!
 I have a process video so you can see exactly how this layout came together:
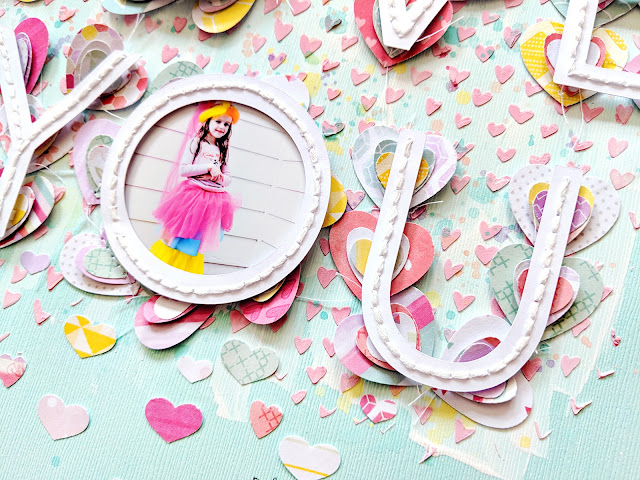
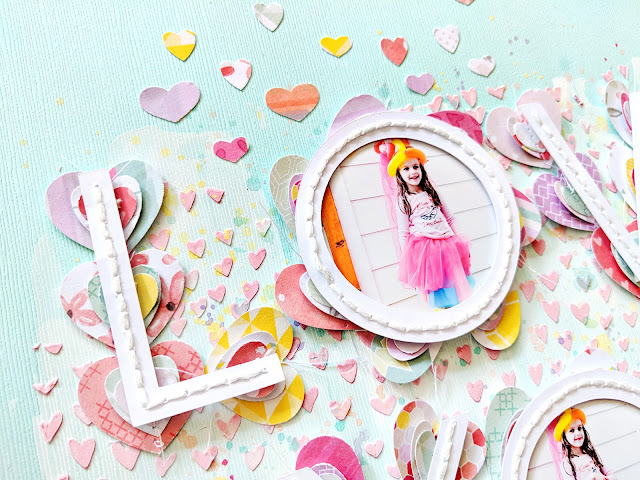
I started with the Take Me Away 12x12 Patterned Paper Pad and found the paper with all the squares of different patterns. I trimmed that paper into columns and then used the Confetti Hearts by EK Success to punch hearts from every square. I sorted the three larger hearts into piles and then made layered hearts by stacking sets of three together. Then I used my Brother sewing machine to stitch through all of the layered hearts and bent the flaps to create lots of dimension.
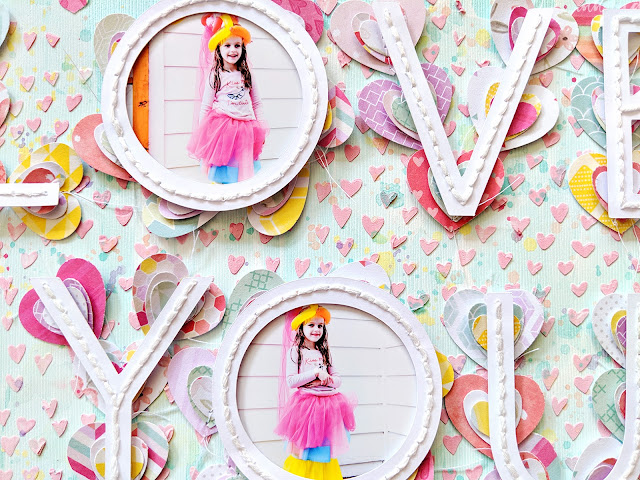
Then I got to work on the background. On a 12x12 piece of mint blue textured cardstock I used white acrylic paint and scraped it across the middle section. I modified my Wonky Hearts Background cut file by repeating it 4 times and then cut it from scratch cardstock using my Silhouette Cameo 3. Using that background as a stencil, I scraped modeling paste tinted with pink acrylic paint onto the background. Once all that dried (with the help of a hair dryer cuz I'm impatient haha!) I splashed watercolors in colors to match the hearts on top of the mixed media.

Next I arranged the layered hearts to spell "LOVE YOU" on top, but I couldn't really tell what it said. So I designed a cut file called Love You with Stitching Holes and cut it from smooth white cardstock. With the holes already pierced I got straight to work back stitching through them using white DMC embroidery floss. I used foam squares to attach the stitched letters over the hearts and now the title stood out and was legible :)

Oh, before adhering the "O" letters I backed them with photos of cute Jane being her cute self. I used a pencil to draw lines for journaling and then wrote my journaling with a gray pen.
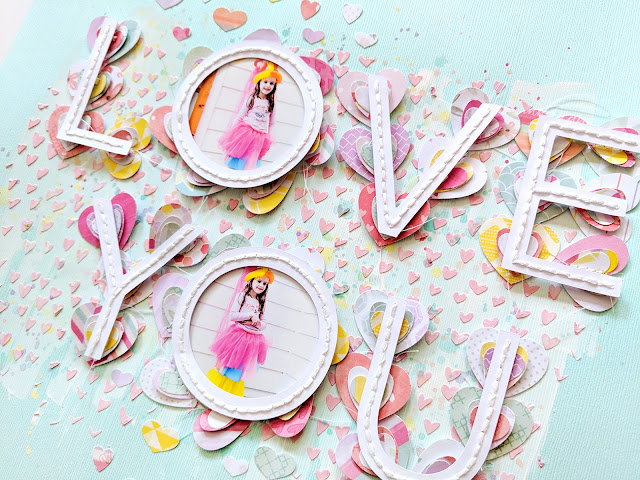
The layout didn't seem quite finished so I sprinkled more of the tinier punched hearts around the top and bottom edge using Tombow Liquid Glue to adhere them in place. All finished!
I hope you are inspired to visit your local JOANN store and find the supplies I used to make this layout (listed below!). It was so fun to put together and I love how it turned out!
SUPPLIES: Take Me Away 12x12 Patterned Paper Pad; Modeling Paste; White Acrylic Paint; Watercolors; Embroidery Floss; Punch: Confetti Hearts by EK Success; Cut files: Wonky Hearts Background and Love You with Stitching Holes by Paige Evans; Die cut machine: Silhouette Cameo 3; Sewing machine: Brother; Tombow Liquid Glue

I started with the Take Me Away 12x12 Patterned Paper Pad and found the paper with all the squares of different patterns. I trimmed that paper into columns and then used the Confetti Hearts by EK Success to punch hearts from every square. I sorted the three larger hearts into piles and then made layered hearts by stacking sets of three together. Then I used my Brother sewing machine to stitch through all of the layered hearts and bent the flaps to create lots of dimension.

Then I got to work on the background. On a 12x12 piece of mint blue textured cardstock I used white acrylic paint and scraped it across the middle section. I modified my Wonky Hearts Background cut file by repeating it 4 times and then cut it from scratch cardstock using my Silhouette Cameo 3. Using that background as a stencil, I scraped modeling paste tinted with pink acrylic paint onto the background. Once all that dried (with the help of a hair dryer cuz I'm impatient haha!) I splashed watercolors in colors to match the hearts on top of the mixed media.

Next I arranged the layered hearts to spell "LOVE YOU" on top, but I couldn't really tell what it said. So I designed a cut file called Love You with Stitching Holes and cut it from smooth white cardstock. With the holes already pierced I got straight to work back stitching through them using white DMC embroidery floss. I used foam squares to attach the stitched letters over the hearts and now the title stood out and was legible :)

Oh, before adhering the "O" letters I backed them with photos of cute Jane being her cute self. I used a pencil to draw lines for journaling and then wrote my journaling with a gray pen.

The layout didn't seem quite finished so I sprinkled more of the tinier punched hearts around the top and bottom edge using Tombow Liquid Glue to adhere them in place. All finished!

I hope you are inspired to visit your local JOANN store and find the supplies I used to make this layout (listed below!). It was so fun to put together and I love how it turned out!

SUPPLIES: Take Me Away 12x12 Patterned Paper Pad; Modeling Paste; White Acrylic Paint; Watercolors; Embroidery Floss; Punch: Confetti Hearts by EK Success; Cut files: Wonky Hearts Background and Love You with Stitching Holes by Paige Evans; Die cut machine: Silhouette Cameo 3; Sewing machine: Brother; Tombow Liquid Glue


This is GORGEOUS! LOVING those adorable photos and that fabulous stitching!!!
ReplyDelete