Pages from Paige's Pages 06


Monday, February 22, 2016

Today I'm sharing the 4 layouts that I created for Paige's Pages 06 at Big Picture Classes! The start-to-finish videos plus free cut files, tips, techniques, and more, can all be found on the class website, so take a look at the layouts here then head over to Paige's Pages 06 to watch and learn and be inspired!

 photo IMG_20160131_191211.jpg
 OH THE THINGS YOU SAY by Paige Evans

In the first lesson we gather up leftover Thickers and use spare letters, numbers, and symbols to create a radiating, eye-catching, concentric-circles background (say that 10 times fast!).

**************************************************

 photo IMG_20160128_183408.jpg
BEAUTY by Paige Evans

In the 2nd lesson we try one of the new techniques I’ve seen popping up all over the scrapbooking world that I like to call the “cut and fold.” Basically, you cut half of an image and when you fold it over you create the complete image! I designed this free background cut file for you to use (included in the class!) and it features flowers, butterflies, and bees (hold the birds!). 

**************************************************

 photo IMG_20160221_021403.jpg
MISCHIEF MANAGED by Paige Evans

I hope banners never go out of style, because I love, love, love them! They’re so easy to make and a great way to use lots of photos and patterned papers (a win-win!), and best of all, they create a fantastic page in no time at all.

**************************************************

 photo Love You to the Moon by Paige Evans.jpg
LOVE YOU TO THE MOON by Paige Evans

In the last lesson we create a page entirely on an angle! I designed another cut file for it, but don’t fret if you don’t have a Cameo because large letters are easy to cut out by hand or just place on top of cardstock instead of using the backing technique.

**************************************************

All of these layouts are available to learn how to make in start-to-finish videos at Paige's Pages 06 at Big Picture Classes! Paige's Pages 07 (with exclusive products!!!) will be live on March 14th 2016!

Melk, Austria


Sunday, February 21, 2016

Over President's Day weekend we took a quick trip to Vienna, Austria to see a few things that we missed the first time back in November 2013. It started out cold and snowy in Germany.
By the time we got to Melk it was a beautiful, sunny, and warm day! We totally lucked out, it had been rainy almost the entire drive (and was predicted for our entire trip) and then suddenly the clouds were gone and our spirits lifted 1000%! Sunshine is so good for the soul :)
 We found a parking lot in the middle of town and made our way up the hill.
Melk's restored abbey, beaming proudly over the Danube, is one of Europe's great sights. Established as a fortified Benedictine abbey in the 11th century, it was later destroyed by fire (seriously though, what wasn't destroyed by fire back in the day?!) and what you see today is 18th century baroque. The abbey church with its 200-foot-tall dome and symmetrical towers, dominates the complex - emphasizing its sacred purpose. 
During the off-season you can only visit the abbey as part of a guided tour which they offer twice a day. We got there with a few minutes to spare then headed off with our tour group. 
PINK! LOVE!
Hallways that seem to go on forever.
The first part of the tour took us through the Abbey Museum. It displayed some of the abbey's treasures and books. A couple rooms had cool scale models of the abbey: Old model of Melk on the left and a current model on the right.
A grand restoration project was completed in 1996 to celebrate the 1,000th anniversary of the first reference to a country named Austria. This room reminds me of Beauty and the Beast!
The Marble Hall's ceiling is a treasure painted by the Tirolean Paul Troger in 1732. It effectively uses trompe l'oeil to make the ceiling look higher and more curved than it really is. 
Jaaaaane. She wasn't on her best behavior during the tour. We got many "looks". It happens. We still love to travel.
My favorite part, well, one of them, of the tour was when we walked outside, soaked up the sun and the views, and got a great look at the abbey (ignore the scaffolding lol).
The views oh the views!

A 360 view from the terrace of the Melk Abbey:
Continuing on the tour and into the other side of the abbey!

We entered the precious library which was super super super duper cool. No pictures allowed, so here's one from the www:
For Benedictine monks, the library was - except for the church itself - the most important room in the abbey. They invested a great amount of money just into the elaborate decor, not to mention the thousands of books. In the Middle Ages, monasteries controlled information and hoarded it in their libraries. At a time when most everyone else was illiterate, monks were Europe's educated elite.

Check out this spiral staircase!
The final stop of the tour was the chapel. Um... WOW!!
The church is not only the final stop on the tour, but also the grand finale with its architecture, ceiling frescoes, stucco marble, grand pipe organ, and sumptuous chapels adorned with cherubs. All these elements combine in full Baroque style to make the theological point: A just battle leads to victory. The ceiling shows St. Benedict's triumphant entry into heaven.  High above, the painting in the dome shows the ultimate victory: the Holy Trinity surrounded by saints of particular importance to Melk in heaven. 
Our family at the Melk Abbey on Friday February 12th 2016.
We made our way back to the car and spent about 20 minutes driving all over town trying to find THE perfect view of the abbey, but none are as good as ones from the world wide web so here ya go :)
Then we drove to our hotel in Vienna - post of what we did there coming soon!

Quick Pic Collage From Melk/Vienna


Saturday, February 20, 2016

It's been one of those crazy busy weeks! Filming 4 layouts and doing the editing then voiceovers and completing Paige's Pages 07 (coming next month!!), a trip to IKEA which is over an hour away but still so happy to even have one that close!, moving tons of furniture around (spring cleaning is in full swing even though it's not spring yet), no school on Thursday, meetings with Pink Paislee creating the next line (yay!!), so on and so forth. I haven't made the time to blog about our most recent trip quite yet so here is a quick collage of our quick trip to Melk and Vienna Austria last weekend!

I'll work on the full recap now!

You Are My Everything Layout


Tuesday, February 16, 2016

Raise your hand if you like fussy cutting!
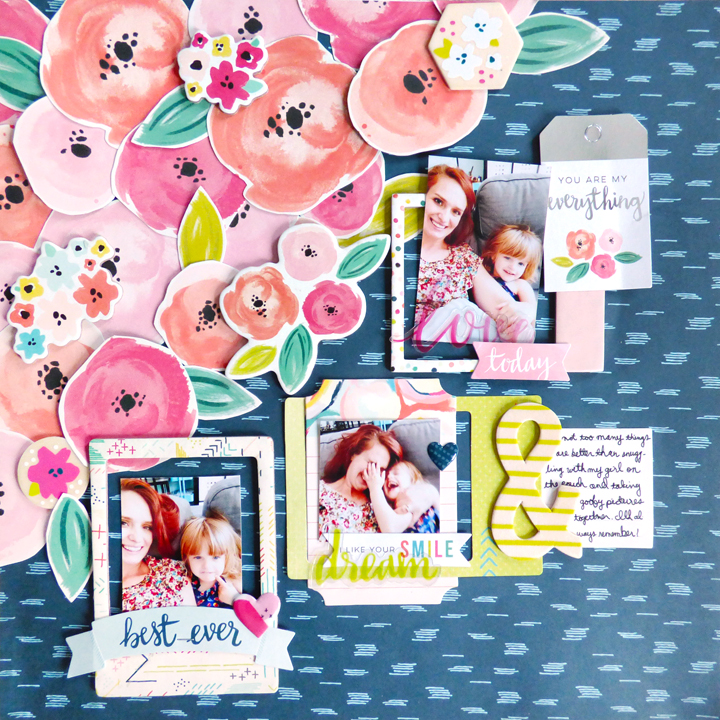
 YOU ARE MY EVERYTHING by Paige Evans

DESCRIPTION: When we designed this large floral paper I envisioned fussy cutting it so that's exactly what I did here!

JOURNALING SAYS: Not too many things are better than snuggling with my girl on the couch and taking goofy pictures together. I'll always remember!

HOW TO: Cut out the flowers and leaves from the floral paper and layer them over the top left corner of the dark blue textured paper, using dimensional adhesive for some of them. Embellish with chipboard and wood veneer flowers. Place a trio of photos on the layout and frame with chipboard or die cuts. Embellish with more die cuts, chipboard, wood veneer, etc. Journal on a tag and add it to the middle photo.

SUPPLIES: Patterned paper, chipboard, puffy stickers, die cuts, tags, wood veneer: Fancy Free by Paige Evans/Pink Paislee; Adhesive, pen: American Crafts

DETAIL SHOTS:


So many possibilities for this floral paper, fussy cutting is just one! And even if you fussy cut too, there are infinite possibilities of placement. That's what I love about scrapbooking - we can all use the same supplies but everyone's pages look unique and different.

50% Off "Patterned Paper Play" & "Silhouette Savvy" Classes!


Monday, February 15, 2016

Almost a year ago I flew to Denver to film two scrapbooking classes for Craftsy - Silhouette Savvy and Patterned Paper Play! Today I'm offering the classes for 50% off! Click on any of the links in this post to go to the class page :) 


Class info: Is your Silhouette still sitting in the box? Or are you looking for some new techniques and ways to use your beloved Cameo? Join me in Silhouette Savvy and learn virtually everything there is to know about your Silhouette! 


*********************************************************************************


Class info: Put your scraps to work, and make stunning layouts with innovative patterned paper techniques. Join me for my online Craftsy class, Patterned Paper Play, and create your own bold, bright, stash–busting pages today!


I'll be updating this post in a week from today to be $5 off links, so be sure to take advantage of the 50% off links STAT :)

Play Layout


Saturday, February 13, 2016

Just a few more weeks until Fancy Free is available!
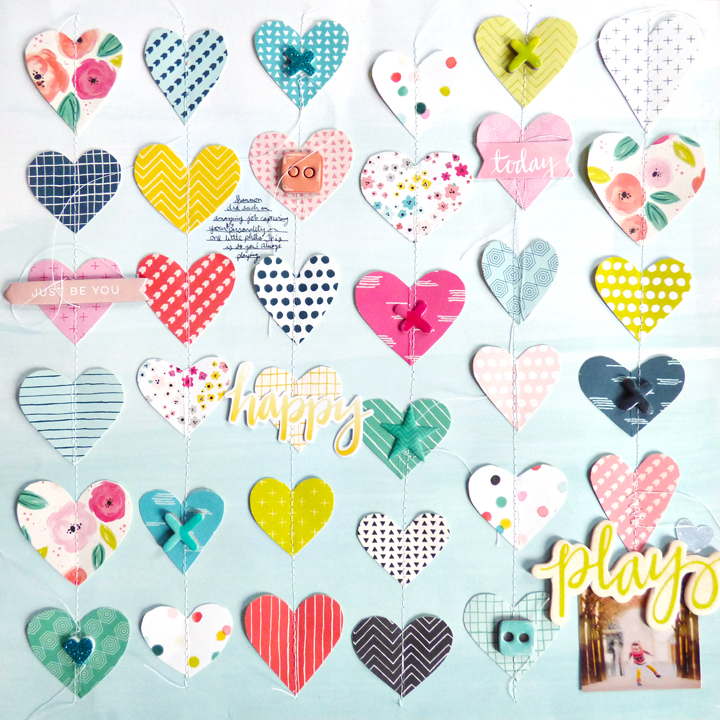
PLAY by Paige Evans

DESCRIPTION: The patterned paper with 36 squares of mini patterns is one of my absolute favorites in Fancy Free! So many possibilities with ALL of those patterns on one single sheet! Instead of cutting a little heart from 36 full-sized patterned papers, I've cut them all out from one paper. Nooice!

JOURNALING SAYS: Shannon did such an amazing job capturing your big personality in one little photo! This is so you! Always playing.

HOW TO: Trim the 36 squares paper into strips, fold each strip in half, then cut hearts from the folded edge (you know that technique?!). Arrange the hearts across the blue ombre paper then stitch them down for a garland effect. Leave the threads long for whimsy. Embellish with the color-on-color technique using chipboard, glitter foam stickers, and die cuts. Add a photo to the bottom right corner and place a wood veneer "play" piece on top. Journal between some of the hearts to finish.

SUPPLIES: Patterned paper, chipboard, Thickers, puffy stickers, die cuts, wood veener: Fancy Free by Paige Evans/Pink Paislee; Adhesive, pen: American Crafts; Sewing machine: Brother; Thread: Coats & Clark

DETAIL SHOTS:

Patterned paper lovers: I'm so excited to see how you use this paper!!!

Return of the X-Files


Friday, February 12, 2016

I'm a big X-Files fan. I remember borrowing all of the episodes that my aunt recorded on VHS tapes. Totally old school. That tells ya how long I've been obsessed. Sunday nights we would all gather around the tele and tune into the latest and greatest X-Files. It was a fun tradition that I'll always hold dear to my heart. And no, I didn't find them scary or creepy, I've always loved all things "spooky" (get it "Spooky"? --- inside X-Files joke). And, to top it off, I have a son named Fox. So there ya go. You can only imagine my excitement when they announced the return of the X-Files! 6 episodes in January/February 2016. I counted down the days until the the first two episodes became available on Hulu (because we don't get live American TV here in Germany, only one of the very few things I miss about living in the states). At long last the moment arrived!! We put the kids to bed and parked our bums on the couch. When the theme music and opening credits came back on... Oh man. I honestly teared up! And I took pictures of our TV to document :)


Sometimes when I'm scrapping or folding laundry and the kids are playing together downstairs or watching something on their iPad I'll watch X-Files. I'm proud to say that Fox Mulder and Dana Scully are part of my kids' everyday vernacular. Proof:

Yay for the return of X-Files! If only there were MORE than 6!!

Memories Layout


Thursday, February 11, 2016

Here's another layout I made with Fancy Free!
 MEMORIES by Paige Evans

DESCRIPTION: I love using lots and lots (and lots) of patterned papers on my layouts. This page looks like I used a bunch of patterned papers doesn't it? But guess what? All of the paper strips are from ONE SINGLE piece of paper! We designed some of the papers with this purpose in mind so people who, like me, love to use bits and pieces of papers can get the same look and save lots of money :)

JOURNALING SAYS: Take time to stop and smell the roses right? Or just stand by them for the perfect photo op so mom can have some pictures to scrap!

HOW TO: Trim the different patterns from the paper out into strips then place them in a circle over a subtle patterned paper. Stitch over the strips several times to lock them in place. Add a photo at the bottom and tuck journaling cards and a wood veneer heart into the top then add a "memories" die cut on top for the title. Arrange silver glitter Thickers in a ring around the layout then journal on one of the tags to finish. 

SUPPLIES: Patterned paper, tags, Thickers, wood veneer, die cut: Fancy Free by Paige Evans/Pink Paislee; Adhesive, pen: American Crafts; Sewing machine: Brother; Thread: Coats & Clark

DETAIL SHOTS:

Which comes first for you - the photo or the layout?

Stitched Raindrops Paper


Wednesday, February 10, 2016

I finally have a plan for all these stitched paper projects I'm doing: I'm going to create four of them and then put them in white frames and hang them somewhere - TBD on the location, but most likely in Jane's room.

Here is the newest stitched paper, STITCHED RAINDROPS:


I actually love the way the back looks a bit more than the front!


Now I'm on the hunt for the next pattern to stitch... any recommendations?!
Paige Taylor Evans © // Quinn Creatives DESIGN