Halloween Layout by Lucile Peignon


Wednesday, October 31, 2018

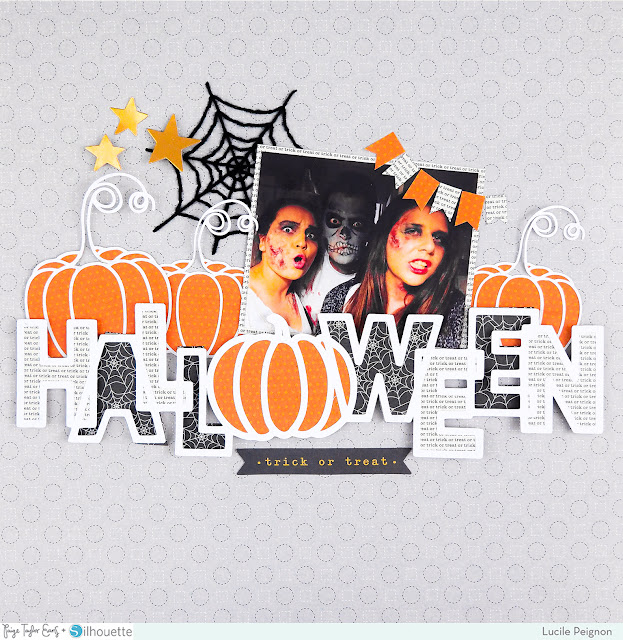
Hello everyone, it's Lucile! Today, I have a Halloween layout to share! I love this holiday and the festive atmosphere. With my friends we love to disguise ourselves with make up to party. I had not used my photos last year and I was excited to make this layout. I used two cut files: the Halloween cut file and the Pumpkin cut file.
The first step was to fill my cut outs. I stayed in the colors of Halloween. For the title I decided to play with relief by putting the letters on several levels with 3D foam squares. For my photo I made a frame with a lighter paper to highlight it.

For decoration I drew a spider web that I hand stitched. I cut pennants from paper scraps to create a banner. Finally, I added stars using 3D foam squares and a "trick or treat" tag.

I hope you enjoyed this layout and it gave you ideas to decorate your Halloween layouts!

SUPPLIES: TURN THE PAGEPaper 07; Cut files: Halloween and Pumpkin by Paige Evans; Die cut machine: Silhouette Cameo

Instagram: @dejolieschoses18 / YouTube: Lucile Peignon / Facebook: dejolieschoses18 / Pinterest: dejolieschoses18

Cheers Layout by Zsoka Marko


Tuesday, October 30, 2018

I am so excited to welcome Zsoka Marko to my Paige Evans Design Team! Her use of cut files and color palettes is like no other and she is sure to bring tons of inspiration over the next year! 

Hi there friends, Zsoka here with you today with my first post on the Paige Evans DT! That's right, I've moved from the Paige Evans + Silhouette Design Team to the Paige Evans DT! You won't really see the difference, maybe more projects, and I might not use cut files on all of them, but otherwise I will be working with Paige's collections, creating layouts and cards as before!!
As for today's layout, one more with older supplies! By the time this post goes live I will have the beautiful new Whimsical collection, but since I work ahead, this page is still created with a previous collection! I haven't used Turn the Page in awhile, so I thought I'd do that now!
I've chosen the Flower cut file and decided to cut lots of smaller flowers instead of one big one and create a grid type of layout with them. I can't believe I went with a white background, but I just didn't find a patterned paper I liked with all these colors. Except for pinks, and I didn't want to use pink. Plus the texture of this Bazzill cardstock is so awesome, I had to use it for something anyway, ha!

I glued down all the flowers, but only in the middle so they lift off the page a little. First I wanted to add a grid kind of machine stitching but I liked the airy look of the flowers, so I decided against it. Since the background is so busy and I did not want to cover it up, I kept the rest of the page very simple. I layered some tissue paper behind my photo as well as some journaling spots/tags and glued them in place. I decorated the photo with a couple of Chipboard Stickers and Puffy Stickers on the right side.

I trimmed down a label, stamped my date on it, and tucked it under the photo. Cardstock stickers I always glue on a piece of heavy weight cardstock and fussy cut them out so they can be used as die cuts. This is what I did with the "Coolio" banner, that I then mounted on my photo using foam adhesive. I created my title the same way and I used foam adhesive to glue down those letters too. Last but not least I placed a chipboard arrow on my photo, mainly to add some color to the left side which kind of separates the photo from the background if that makes sense.

I wrote my journaling on one of the tags and as a last step I splattered some navy ink all over the page. I hope I could give you an idea on how to use up lots of different patterned paper scraps on a page! Thanks for stopping by today! Have a lovely day!

SUPPLIES: TURN THE PAGEPaper 01Paper 04Paper 08Paper 09Paper 13Paper 21Paper 24Journaling SpotsSticker BookChipboard StickersPuffy Stickers; Cut file: Flower; Die cut machine: Silhouette Cameowhite cardstock
Blog: apocketfullofscrap.blogspot.com / Instagram: @zsokamarko / Facebook: Zsoka Marko / YouTube: Zsoka Marko

Friendship Layout by by Flóra Farkas


Today is Flóra's last Paige Evans Design Team layout! It has been SUCH a pleasure working with her and sharing her stunning projects over the past two years! I want to wish her the best!!

Hi ladies! Today I'm sharing my last layout and I used the new Whimsical collection. I mainly used patterned paper and turned them into embellishments. 
I picked Paper 17 for my background and placed in the middle a 3x4 photo. I fussy cut florals from Paper 03 and arranged them around the page. Under the photo I placed a journaling card that I cut out from Paper 01 and then I decorated it with a small bouquet fussy cut from Paper 13. I cut out many half circles from Paper 23 and turned them into buntings. I fixed them with liquid glue but later went over them with a sewing machine. 
Next to the photo I added a quote that I cut out from Paper 01 and completed it with Rub-Ons. The title is from Pick-Me-Up Chipboard Stickers - I just love the gold foil on it. I added Puffy Stickers and fussy cut clouds from Paper 15 to the photo to complete the little scene. In the end I scattered fussy cut butterflies from Paper 21.
I am impressed by what you can make using mainly these wonderful patterned papers! It was so fun to make and I hope you like it!

Blog: pinkandpapergift.blogspot.com Instagram: @floramfarkas Pinterest: @floramfarkas
Facebook: pinkandpapergift YouTube: Flora Monika Farkas

Oh How She Loved to be Home Layout by Lorilei Murphy


Monday, October 29, 2018

Hello! Lorilei here today sharing my first layout with the new Whimsical collection by Paige Evans & Pink Paislee! Whimsical is fantastic! I love the colors, the artsy-crafty theme, and the slight vintage touch to some of the papers and ephemera! I knew right away which cut file of Paige's to choose for my first time using Whimsical, the Oh How She Loved To Be Home cut file.
I started by cutting the design from Paper 05 on my Silhouette Cameo 3. Next, I added a border to the cut file (.125) and cut the border from white cardstock. I used liquid glue to adhere the words to the white border piece. I left some of the edges of the patterned words unglued for dimension and shadow. While the cut file was drying, I used my Vicki Boutin Art Crayons and made custom mixes to match the colors in Whimsical. I used the packaging technique to add the paint to the white cardstock background.

I chose to use a photo of my crafty space. I love to be home and especially love to be in my craft room! I backed the photo with a piece of green floral paper from the Whimsical 6x6 Paper Pad, some tissue paper, and a doily. I popped up the photo cluster on some craft foam. I tucked the photo into the cut file spot above the "L", seemed like a perfect fit! I fussy cut the floral image from the 6x6 Paper Pad, added one of the GORGEOUS-MUST HAVE Tassel Paper Clips to the edge of the photo, and a Chipboard Sticker that says "Dream Plan Create" above the tassel clip.

To finish off my page, I used quite a few Rub-Ons! They are the cutest designs and are the perfect way to add interest to cluster or feature areas. I added three tiny hearts to the bottom right above the washi tape and chipboard ruler, scalloped rub-ons under the left edge of the photo, a floral rub-on under the fussy cut flowers, and three perfectly pink hearts near the top right of my photo.

Thank you for joining me today, be sure to pair Paige's cut files and Whimsical for a fun way to be creative!


Blog: roseyposeystudio.com / Instagram: @roseyposey_studio / Pinterest: @roseyposeygirl /
Facebook: 
Rosey Posey Studio / YouTube: Lorilei Murphy

Google Layout


Sunday, October 28, 2018

Here is the second layout I have in the Fall 2018 issue of Scrapbook & Cards Today Magazine which you can download for free!
This layout was super fun to make and document all of my dad's cool accomplishments. Currently he works at Google and previously worked at Microsoft, Adobe, and Apple, among others. He wrote the original Android YouTube app and now works on Messaging, Talk, and Hangouts. All apps I use every single day!
To make this layout I used the My Bright Life collection by Jen Hadfield / Pebbles. The abundance of primary colors was perfect for creating the Google logo. First I googled the google logo and then turned it into a cut file. I cut the inner letters from white cardstock using a Silhouette Cameo 3 and then cut offset letters from primary colored patterned papers. I did a chain link stitch around the white letters using matching colored threads.
On the letters were finished I did some mixed media work on the background with white gesso and watercolors. Underneath the title I tucked two photos of the kids on a trip to visit my dad at the Google campus in Kirkland where he works. Between all of the navy blue stripes, so on the white stripes, I added typed/printed/trimmed journaling strips. To finish I added a few embellishments around the title.
I hope this page inspires you to check out the Fall 2018 issue of Scrapbook & Cards Today Magazine as well as the My Bright Life collection by Jen Hadfield / Pebbles!
SUPPLIES: Patterned papers, stickers, die cuts: My Bright Life collection by Jen Hadfield / Pebbles; Google cut file: Paige Evans; Die cut machine: Silhouette Cameo 3white cardstockgessowatercolors; Thread: DMC embroidery floss

Spread Your Wings & Fly Layout by Donna Espiritu


Saturday, October 27, 2018

Hello, everyone! Donna here once again sharing another scrapbook layout for Paige Evans + Silhouette Team.
I'm not certain which inspired me most while creating this layout - the photo, the wings, or both! When I saw Paige's newest Wings cut file I knew I wanted to use one of my daughter's photos with her arms spread open like she's flying.

I had this vision of the layout with an airy kind of vibe so I just used papers with really light colors and small patterns backing the wings and the Flower cut files. I converted the photo into black & white so the colors will not clash.

I added a splash of colors onto the white cardstock using super diluted watercolors, creating almost pastel-toned splatters. Then I traced the wings with a mixture of blue, purple, and pink watercolor so it looks like a silhouette when I adhered the wings. I've fussy cut some pink and purple flowers, the only embellishment in the layout, and then used white alpha stickers for the subtitle and gold alpha Thickers for the word "fly". I always show my daughter the layouts I make and she recognized herself in the photo. She said she looks like she's flying because of the wings. She loved her layout.

That's all for today and I hope you liked my layout! May it inspire you to create something simple and light but beautiful at the same time. Thanks for dropping by and happy crafting!

SUPPLIES: OH MY HEART: Paper 13, Paper 15; Cut files: Wings and Flower by Paige Evans; Die cut machine: Silhouette Cameowhite cardstockwatercolors
Blog: Scrappy Donna / Instagram: @iampinay25 / YouTube: Donna Espiritu / Facebook: DesignsByDonnaEspiritu

Six Years Old Layout for JOANN


Friday, October 26, 2018

This blog post is sponsored by JOANN.
I made a new layout using mostly my Pink Paislee Pick-Me-Up collection that I found in store and online at JOANN.com!
First, here is a process video showing how to create this layout from start-to-finish:

I began by tearing out the solid colored papers and a few white ones from the 12x12 Paper Pad and then used a multitude of Border Punches to make decorative strips of patterned paper.
Next I sprayed each strip with water and then crinkled it up, flattened and squeezed it, and then opened it back up into a strip and let it dry. This makes the paper look like crepe paper and super textured! It's a fun technique, you definitely have to try it out :)
Then I arranged the papers into rainbow order and starting at the bottom of a smooth White Cardstock background, I used a Sewing Machine to stitch each paper strip in place and worked my way up the page, leaving about 2" empty at the top.
I adhered my photo on the top left corner and backed it with flowers from the Ephemera Die Cuts. Above the photo I created the title using the white mini Foam Thickers.
To help draw more interest around the page I added more tone-on-tone die cuts here and there and popped them up with dimensional adhesive. I wrote the journaling with a pencil (I still need to go over it with a pen and make it permanent) at the top of the page in the white space. I hope this layout inspires you to check out the Pick-Me-Up collection in stores and online at JOANN.com and create a textured page with a bunch of border punches!

SUPPLIES: PICK-ME-UP12x12 Paper PadEphemera Die CutsFoam ThickersWhite CardstockBorder PunchesSewing Machine

Halloween Mini Album by Jana McCarthy


Thursday, October 25, 2018

Hi everyone, Jana here with you today! Are you ready for Halloween? We are! I created this awesome spooky 6x8 mini album for our Halloween party and ideas. My little one is celebrating his birthday today and we will have a Halloween party a few days later. Paige has a lot of Halloween cut files and I went a bit crazy and grabbed mostly all of them!
The album was made out of black cardstock and big rings. This allows me to add many more pages and photos. The cover was decorated with orange tulle and a Halloween title cut file on top. I really love how this look. The album itself is filled with a lot of empty pages because this is for this year. So, there a tons of photos coming… yay! I decorated each of the pages with some cut files or Halloween-themed papers.
I made a little shaker pocket out of a bag, filled it with spider sequins , added a spider web, a Happy Jig bat, and some Chipboard Thickers. This looks so cool, right?! My little one helped me and he had so much fun with this project. He also drew some zombies – can you spy them somewhere?

I added some empty pages for our party planning, some Halloween recipes, and guest lists. This is going to be great! We can't wait!

If you're a Halloween fan you need to check out all of Paige's Halloween cut files! There are so many! I will leave you with some photos now.

Blog: Scissors Glue & Paper / Instagram: @janammcc / YouTube: Jana ScissorsGluePaper / Facebook: Jana Maiwald-McCarthy

Hello Layout by Julie Taylor


Wednesday, October 24, 2018

Hi there scrappy friends, Julie back with a new layout! I just love using circles on my layouts - I like the fluidity they give to a page and knew I could make the Hello Circle cut file work for me.
 I first cut it out singularly but decided I wanted to add multiple circles and weld them together to make one large die cut. First I added lots of circle stamps to my background and colored them all in using Distress Oxides. My other love in life is coffee. I don’t function without it so I decided to make this layout all about it.

I added lots of stamped words to my background all about coffee and then added the welded die cut over the top, stitching it down using different colored thread of messy stitching.

I colored each Hello word in various colors and went over them in a black pen to help them stand out. I then layered lots of embellishments, from all of Paige’s collections, anything that went with my theme of coffee and enjoyment.

I hope you’ve enjoyed seeing my layout today and how I’ve used the cut file. Thanks for stopping by, until next time!

Instagram: @julie9699 / Facebook: Julie Taylor
Paige Taylor Evans © // Quinn Creatives DESIGN