Bride to Be Layout by Nidia Rubio


Wednesday, July 31, 2019

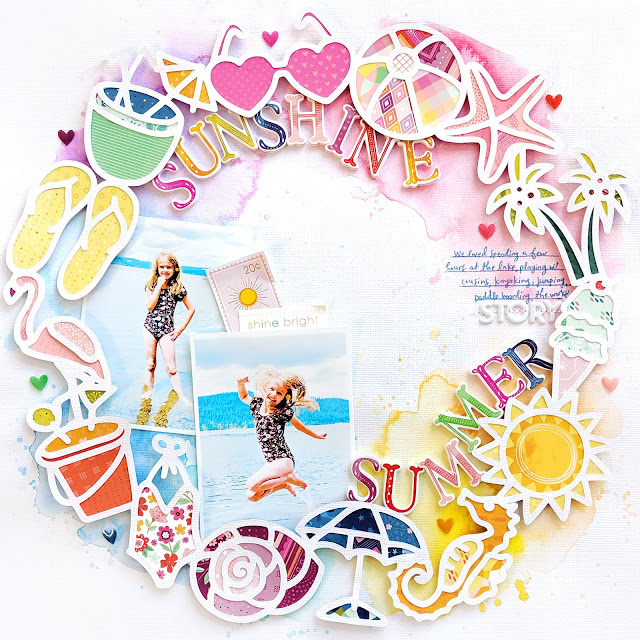
Hi, friends! I am Nidia Rubio, from Scrapamundi, and this is my first post here so I'm very excited about it! For this layout I chose the very colorful palette from Horizon to show you my happiness about the wedding of my best friend and a couple different cut files from Paige.

I used Paper 20 to create the background and I covered it with gesso to create the contrast with the colorful heart silhouette. Over it I placed a white cardstock that I cut using the Flower Heart cut file and painted like a rainbow. In fact, I painted the cardstock before cutting it and I was afraid that my Silhouette Curio couldn't cut it, but it can do everything :) You can see the intricate result of this flowered heart.
Once I created all the background of the layout, I joined it to the cut cardstock with a lot of 3D foam pieces. I spent a lot of time doing this but it surely was worth it. It was a therapeutic task, I would say. I chose black & white photographs because I like the contrast created against the colorful composition. In this case I created the frame for those pics, and you can see the story of the bridal shower weekend. It was very fun :)

For the title of the layout I used the Banner cut file and I painted it with watercolors in some areas. On the banner I put the DIY chipboard letters. For them, I used the 2x2 Paper Pads from Turn the Page to create the letters and I overlayed layers of letters. The result is this pretty title. To finish I added some leaves from the Floral Die Cuts and wrote the journaling. Et voilá!

Thanks for stopping by. I hope you like it!

SUPPLIES: HORIZONPaper 20Floral Die CutsTURN THE PAGE2x2 Paper Padsgessowatercolorswhite cardstock; Die cut machine: Silhouette Cameo 3; Cut files: Flower Heart and Banner by Paige Evans
Location: Spain/ Blog: Scrapamundi / Instagram: @scrapamundi Facebook: Scrapamundi / YouTube: Scrapamundi / Pinterest: Scrapamundi

Celebrate Planner Dashboard by Mik Godinho


Tuesday, July 30, 2019

Hello friends! It’s Mik here from Papermiks on the blog today! It’s my first blog post and I’m so happy! First of all, I'd like to say that I'm glad to be part of this team, sharing all my creations and also learning with you. Working with Paige is a dream come true!! So, let's celebrate? In my first blog post I’m sharing an A5 planner dashboard using Paige’s Horizon collection and Celebrate cut file.
I started by die cutting the Celebrate cut file from white cardstock using a Silhouette Cameo 3. I backed the letters with patterned papers and patterns from the 6x8 Paper Pad.

While the cut file was drying, I took another white cardstock now to make my A5 planner dashboard. I cut in 8 1/4 x 6 1/8" to make the background. In order to add some texture I used a sewing machine to stitch around the page and then painted with watercolors to match the collection papers and create a background. I can’t forgot to tell you that I also used a reinforce hole punch to add some colors and protect my dashboard.

Once the background was dry, I attached the cut file down using some 3D foam squares because I love the dimension and shadows it creates. Now with my background ready and the cut file glued I started to decorate my dashboard with Floral Die Cuts and Ephemera Die Cuts. Oh! I almost forgot that I also used an Enamel Heart Shape from the Whimsical collection.

So there we have it, my A5 dashboard for my Carpe Diem Planner! I hope you got some inspiration from this idea and enjoyed it! If you have any questions or want to talk some more about planner dashboards, leave a comment below the post or check out my IG account. Thanks for stopping by and have a nice day!

Location: Bolivia / Instagram: @papermiks / Facebook: mik.godinho.papermiks 

DIY Butterfly Embellishments by Maija Männistö


Monday, July 29, 2019

Hi everyone, Maija Männistö here to share my first project as a member of the Paige Evans + Silhouette Design Team. I am so honored to be a part of this team and very excited to share my creations with you!
For my first project I decided to go with one of my favorite projects: DIY embellishments! I used the Layered Butterfly cut file to make embellishments in different sizes with the Whimsical collection. I used papers from the 12x12 Paper Pad to cut several butterflies.

I wanted to add more texture on the butterflies so I added stitching around each butterfly with my sewing machine. I also stitched the butterflies together in the middle. I made the little pennants attached to a paper clip and embellished them with the smallest butterflies from the cut file.

To embellish the butterflies I used Paper 08 from the Whimsical collection to cut out the phrase banners. I also used the Stickers as well as the stickers from the Sticker Book. From the Ephemera Die Cuts I also found perfect additions to my butterflies! For more splashes of color I added some thread underneath the stickers and put a few Enamel Shapes here and there for a different texture.

These DIY embellishments are perfect for your scrapbooking layouts as well as cards! I made a card with few of these, a perfect summery hello to a friend!

SUPPLIES: WHIMSICALPaper 0812x12 Paper PadStickersSticker BookEphemera Die CutsEnamel Shapes; Die cut machine: Silhouette Cameo 3; Cut file: Layered Butterfly by Paige Evans
Location: Finland / Blog: Mai Makings / Instagram: @maimakings / YouTube: Mai Makings / Pinterest: Mai Loves

Sunshine Summer Layout (How to Back a Cut File Tutorial)


Sunday, July 28, 2019

A question I get asked a lot is "How do you back a cut file?" and so I thought I'd do a video tutorial showing how to do just that! For this layout I'm using my Summer Wreath cut file which you can grab for free in my Happy Scrappy Place Facebook Group paired with my brand new Truly Grateful collection + a pinch of patience and a dollop of fun!
First things first - the tutorial!:

I started by die cutting my Summer Wreath cut file from American Crafts white textured cardstock using a Silhouette Cameo 3 and then carefully peeled it off the mat. My mat is well used so not very sticky which made it much easier to peel off. But take your time to make sure the intricate design doesn't rip or tear. If it does, carefully put it back together with liquid glue. Then I grabbed another sheet of 12x12 American Crafts white textured cardstock and pooled water in a circle onto it. I didn't prime it with gesso or anything first, just straight up added lots and lots of water. Then I dabbed, dropped, and splashed my favorite watercolors (Pastel Dreams by Prima) into the water and let them blend together. Instead of speeding up the drying process with a hair dryer like I normally do, I set the background aside and let it air dry - this creates a really cool effect in the watercolors.

While the background was drying, it was the perfect time to go ahead and back the cut file! In the process video I show three different techniques for backing an intricate cut file such as this Summer Wreath. For cut files that don't have as many different-sized shapes or for shapes that are all the same, you can actually have your Silhouette Cameo 3 cut the backing pieces for you which I show how to do in this process video.

It took about an hour, maybe two hours, to back the entire cut file by hand. I used three different patterned papers from Truly Grateful to do this since they had ALL the colors and ALL the patterns. The more color and patterns the better! I used Paper 08Paper 09, and Paper 14. To help making picking and choosing the patterned papers I wanted to use faster & easier, I cut up all the different colors and patterns into their individual pieces and assorted them into piles in rainbow order.

The background finished drying, I finished backing the cut file - next step: adhere the cut file onto the background. To do this I used tiny adhesive foam squares to lift the wreath off the page and create dimension and shadows which you can see in the detail photos. I love this little bit of depth foam adhesive adds and it doesn't make your layouts very bulky at all.

Time to add photos, embellishments, and journaling! I printed two 3x4" photos and trimmed them out leaving a white border then overlapped them into the wreath on the bottom left side. I used the Truly Grateful Thickers to create the title "SUNSHINE SUMMER" and tucked them along the shapes of the wreath. I wrote journaling with a blue pen on the right side and stitched "STORY" letters from the Puffy Phrase Stickers underneath. I added heart enamel stickers from the Mixed Embellishments tone-on-tone around the wreath and finished with a sun stamp die cut from the Ephemera Die Cuts and a "shine bright" sticker from the 6x12 Stickers between the photos.

I hope you are inspired to try backing a cut file! (Be sure to grab this one from my Happy Scrappy Place Facebook Group!) It may be a bit time consuming, but the results are always worth it. Plus it's a great way to add lots of colors and patterns to your pages and feature a favorite scrapbook collection. Also note how I used my fall-themed Truly Grateful collection to create a summery vibe! By picking and choosing select patterns and colors, this collection can be adapted for almost any theme. I'm excited to create Christmas pages and projects with Truly Grateful :) Challenge accepted!

SUPPLIES: TRULY GRATEFULPaper 08Paper 09Paper 14ThickersPuffy Phrase StickersMixed EmbellishmentsEphemera Die CutsStickers; Watercolors: Prima - Pastel Dreams and Tropicalswhite textured cardstock;  Die cut machine: Silhouette Cameo 3; Cut file: Summer Wreath by Paige Evans

My Favorite Rainbow Layout by Lilly Sanchez


Saturday, July 27, 2019

Hey Guys, its Lilly Sanchez, welcome to my very first post as a new designer for Paige Evans. Ahh!!! If you follow me on my social media accounts you know I don’t normally do scrapbook layouts, but I wanted my first project as a designer for Paige to be inspired by her beautiful layouts she constantly shares with us. In this layout I am using the Horizon collection and Rainbow cut file.
This layout features my daughter getting ready to start enjoying her summer of 2019. I used Paper 03 as my background and stitched every line with its matching color to match to give some extra texture. I went with this paper because of its brightness and the patchwork, it just makes me smile and reminds me of my daughter’s personality.

To add more attention and brightness to the layout I also used the Butterfly Background cut file. The paper used for the butterflies is Paper 02 and I think they bring the perfect accent to the layout. Other bits and pieces used to decorate are from the Ephemera Die Cuts. I added tons of layering pieces from vellum rosettes, enamel dots, to handmade embellishments. On the Rainbow cut file I made stitching details with colored pencils for a little extra touch. I used Thickers to spell out "My Favorite Rainbow".

I hope you guys enjoyed my very first post and look forward to many more. Happy crafting!

SUPPLIES: HORIZONPaper 02Paper 03Ephemera Die CutsProject Pad; Die cut machine: Cricut; Cut files: Rainbow and Butterfly Background by Paige Evans
Location: New Jersey, USA / Instagram: @craftingwithliller / Facebook: Crafting with Liller / YouTube: Crafting with Liller / Pinterest: Crafting with Liller

Circles Layout by Stefanie Ried


Friday, July 26, 2019

Hello and welcome to a new layout from me, Stefanie Ried! I love circles on my layouts. I don't think that will ever change. I think the circle shape is always very harmonious. And with the great embellishments from the Horizon collection you can create so many great circle elements.
First, I chose a cardstock in bright rose. I wanted the layout to be light and bright. It goes so well with the summer. For this project I used the beautiful Heart Confetti Stencil by Paige. It makes a beautiful background.

 I fixed the decorated circles on white cardstock. First I made small cuts on the edge of the so the yarn does not slip. At the circle elements I punched small holes where I threaded the yarn. I fixed the yarn on the backside of the white background with Washi Tape. This was the easiest way. The embellishments are great with photos from our travels. Like here when we were at the airport. Just arrived home from vacation.

Many thanks for stopping by!

Blog: steffiried.blogspot.com / Instagram: @steffiried / Pinterest: @steffiried / Facebook: stefanie.ried.96 YouTube: Steffi Ried

Travel Together Layout by Kelly Daye


Thursday, July 25, 2019

Hello friends, it’s Kelly Daye and I’m so happy to be here and sharing a layout using Paige’s gorgeous Horizon collection and Globe cut file. The Globe was perfect for designing a layout about traveling with my best friend Alys. Instead of paper-backing the cut file (which I also love to do), I decided to use colourful Paper 08 to cut the Globe, then taped it on a white cardstock background.
I backstitched around and through the entire cut file with gold metallic thread. I just love the detail hand stitching adds. The cluster on the lower right edge, includes layers of Floral Die Cuts popped up with 3D foam. I just got the new Foil Quill along with the Paige Evans Design Drive. There are 200 gorgeous designs! I used it with gold foil to make the hummingbird with a piece of Paper 03.

I sanded the edge of my photo to reveal a bit of white. Then matted it with another piece of Paper 03 and half of a polaroid frame from the Ephemera Die Cuts. I topped it off with one of the cute Shaped Paper Clips. I used my pan of watercolours to add touches of colour around the cluster and a tiny bit of splatter.

My upper cluster includes a bicycle and flower shop facade from the Ephemera Die Cuts and another flower from the Floral Die Cuts. The amazing hydrangeas in the photo are at the Empress Hotel in Victoria BC. I also added the edge of Paper 08, leftover from cutting the globe, to the left side of my layout. I couldn’t resist adding sequins, again with hand stitching. ‘Travel Together’ and ‘New Roads’ are from the Epoxy Stickers. How gorgeous are they? The butterfly and dragonfly are from the Stickers. Finally, to anchor the globe (so it didn’t look like it was floating on the page), I added a very small cluster near the bottom. That little green overnight bag, from the Ephemera Die Cuts, has my heart.

Thank you so much for coming by. There’s loads of inspiration and a weekly free cut file at Paige’s Happy Scrappy Place Facebook group, come join the fun! Please let me know if you have any questions!

 Location: Edmonton, Canada / Blog: Kelly Made It / Instagram: @kellymadeit / Facebook: Petals Daye / Pinterest: Kelly Made It

NEW Paige Evans Bookbinding Guide!


Wednesday, July 24, 2019

I am excited to announce my NEW pink bookbinding guide! This tool has everything you need to make your dream planners, books, and journals a reality. Create saddle stitch, Japanese, and coptic bound books with ease using this unique versatile tool!

 It comes with the bookbinding tool, instructions for each stitch type, waxed thread, a straight and coptic needle, an awl, and a storage pocket to keep everything organized! Grab it now for a limited time for 40% OFF! Sale ends July 31.
If you're a beginner, the saddle stitch is the perfect way to introduce yourself to book binding! See how I made it here. A planner would also be a perfect thing to create with this stitch!
Check out this quick and super duper easy tutorial for creating a saddle stitch:

Use the coptic stitch to add charms, beads, or even paper clips to your mini album. You can also use all kinds of different cover material. More info here.
The Japanese bound stitch is great for traveler's notebooks or journals. I love how it creates a gorgeous design on the edge.
Decorate the covers with your favorite supplies from my new Truly Grateful collection :)
So excited about this new bookbinding tool - hope you are too!

Guest Designer | Nicole Martel


Tuesday, July 23, 2019

Good morning, everyone. My name is Nicole Martel and I live in Maryland. You can find me on my blog at www.nicolemartel.blogspot.com or on Instagram as @nicolemartel1978. I am beyond thrilled to be guest designing for Paige this month using her cut files! I feel guilty that my Silhouette Portrait has been sitting on my desk for awhile now, untouched... This year, I am working on changing that!
For my first layout, I used Paige's Horizon collection along with the Heart Confetti Background cut file. I set the Silhouette Portrait up so it would print the hearts on half of the white cardstock. I did not want a full page. Less work for me to pluck those tiny hearts out. :) 
Once I was satisfied with the placement of embellishments, I mounted them down and then I added a few puffy hearts from the Epoxy Stickers within the hearts to make them stand out more.

For my next project, I created a mini album using photos from my sister's baby shower in June. She's having a baby boy and I couldn't be more excited!! I used pieces from the Heart Confetti Background cut file and the Layered Butterfly cut file to create this adorable mini album.
I used mostly Tags for the album pages, but ran out so I had to get creative... I used the tags to trace around the patterned papers to create a template then punched a hole at the top using my hole punch.
I used a few of the butterflies throughout the mini. I LOVE butterflies so I had to use them. To decorate the mini album, I used lots of StickersEpoxy Stickers, and Ephemera Die Cuts. I used several foam squares to pop them off the pages.

I used the Cut and Fold Butterfly cut file to create a fun, whimsical layout! I love butterflies and I love how this looks. I splattered watercolor paint all over the butterflies across the page to add a bit of color. To complete the layout, I layered several embellishments from the Horizon collection. Love how bright and pretty this collection is! It's perfect for scrapbooking those special times with your friends and love ones.
Initially, I was worried that the butterflies wouldn't leave me with enough space for the photo and embellishments, but it actually helped me create this fun design! I decided to work around the butterflies to make it work for me.
I used the circle stamp from the Acrylic Stamps to create a border of half circles across the bottom of the page. I'm not sure why I felt the need to add some black, but I like it!

I used a few hearts from the first layout to create a card. To begin, I used the floral circle stamp from the Horizon Acrylic Stamps and stamped it on the hearts then layered them together using a foam square. I put those aside then stamped several circles on a 3x4" card (white cardstock) to create a fun background. Then I covered the bottom corner using a variety of Floral Die Cuts, trimming the edges so the flowers did not hang over the edges of the card. To complete the card, I mounted the layered heart to the center of the card.
I cut the "hello" sentiment from the Horizon Tags to pull the card together. I think it adds a nice touch.
Thank you for visiting today! I hope I inspired you to use your digital cutting machine if you haven't done so in awhile. You just might surprise yourself! It's definitely a great way to kick your mojo up a notch!
Paige Taylor Evans © // Quinn Creatives DESIGN