
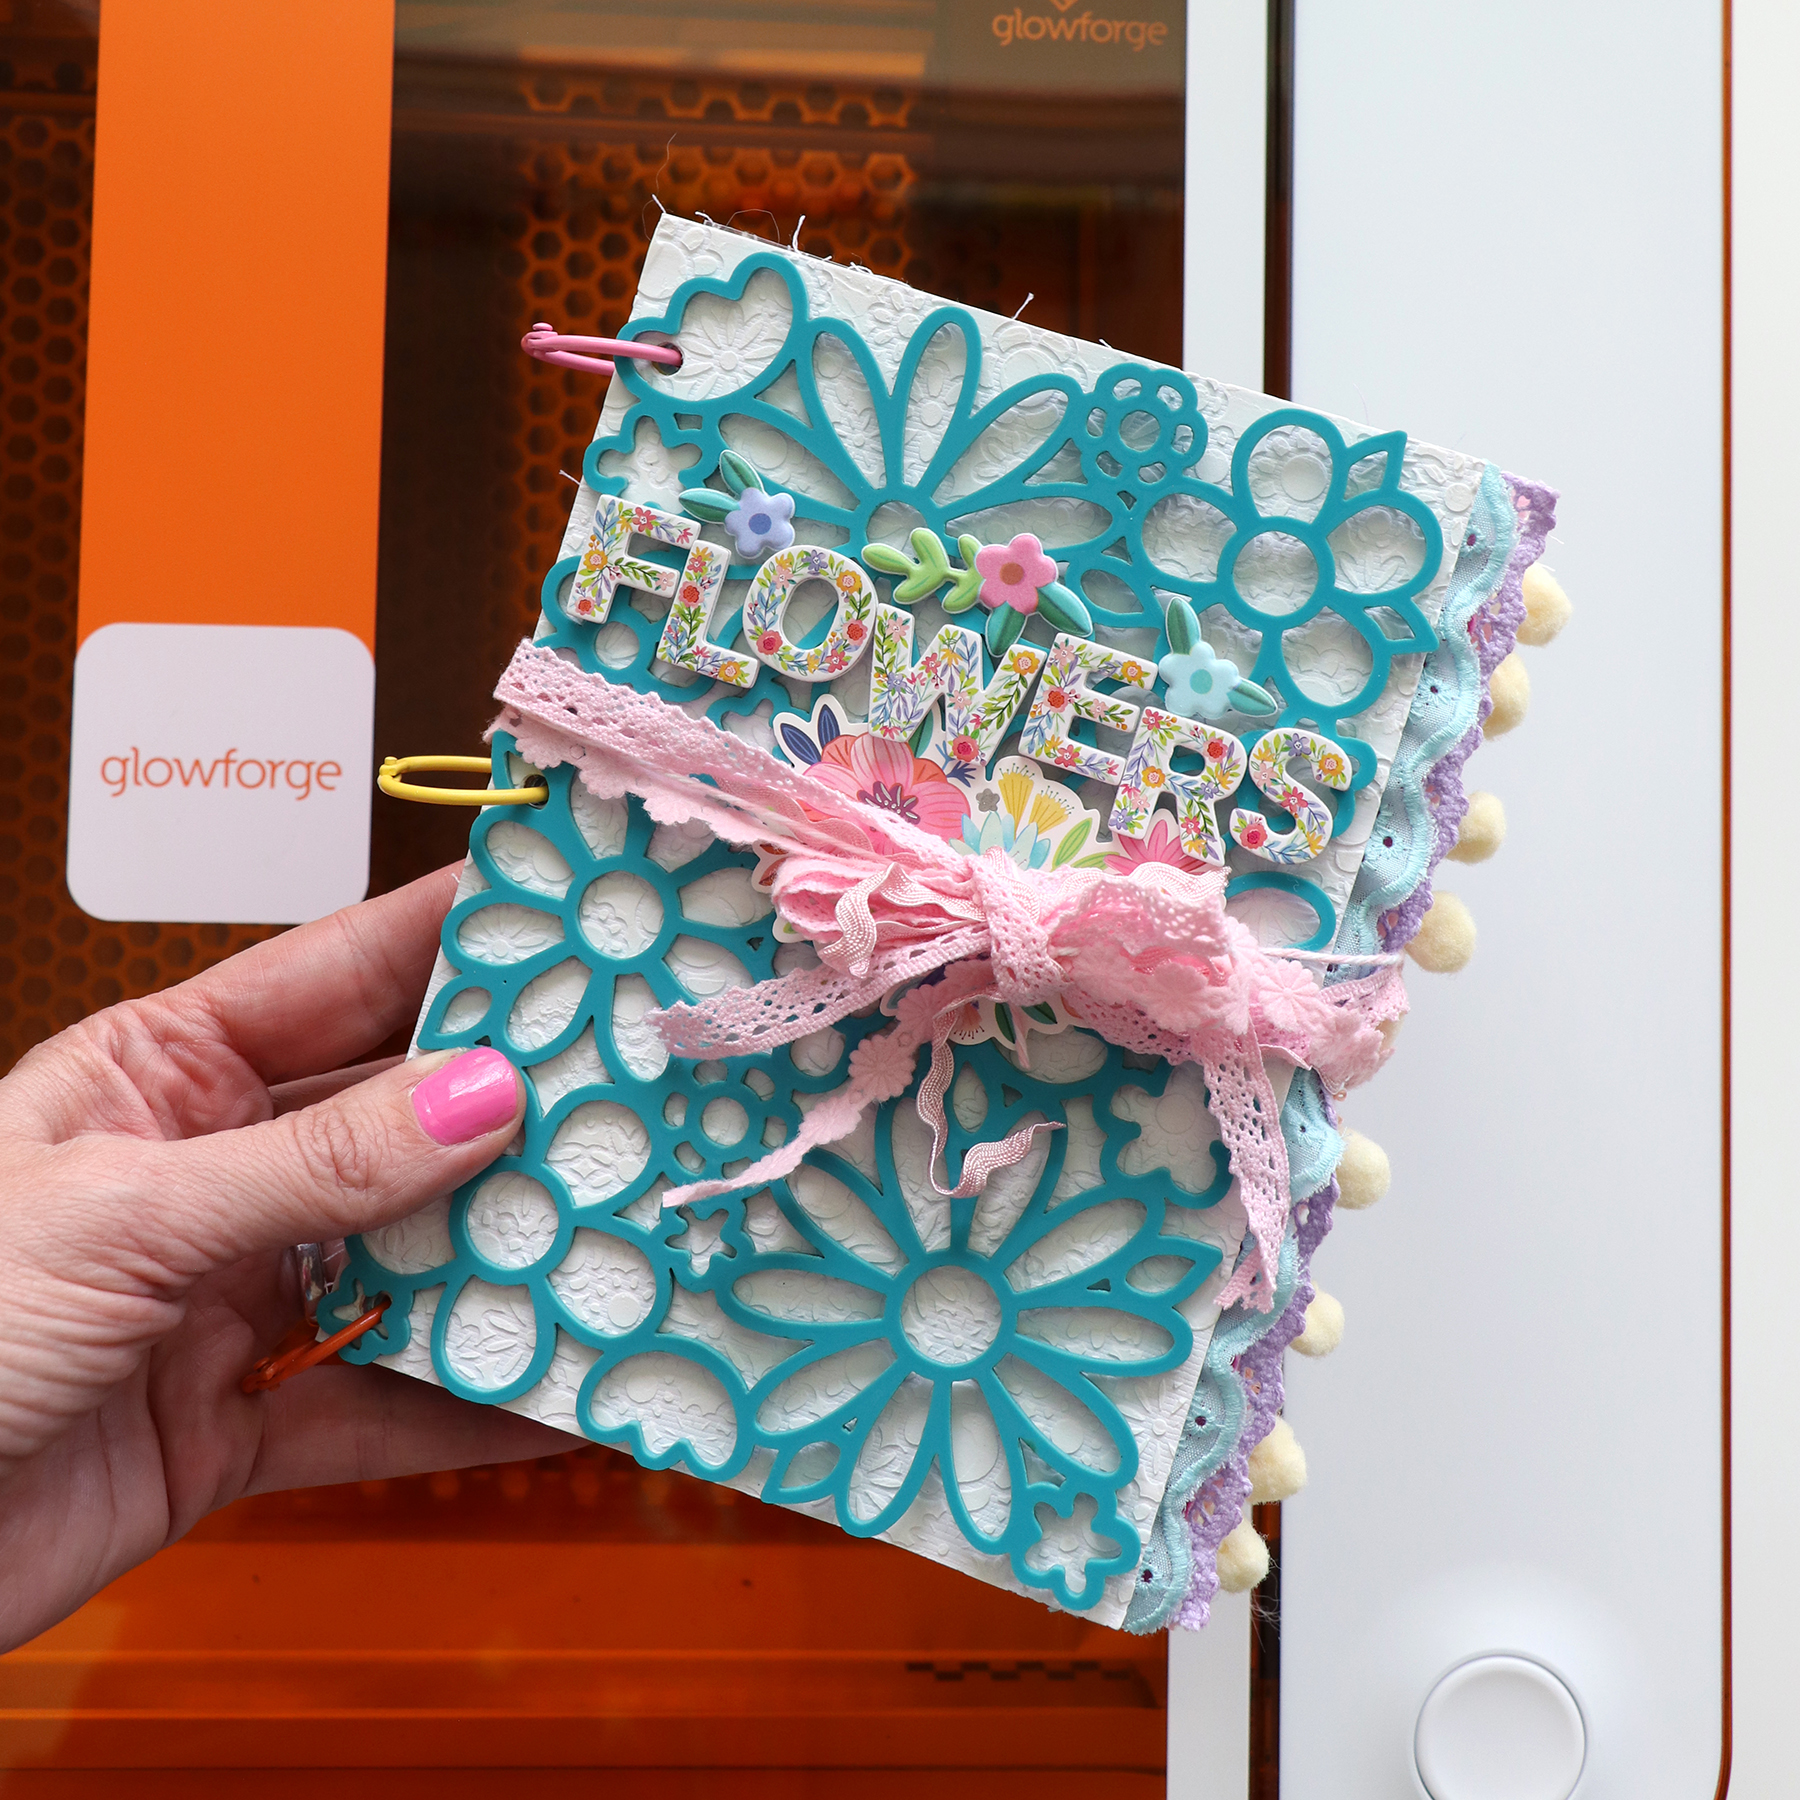
Here is a new 5x7" mini album all about FLOWERS made with Blooming Wild that I created for a campaign with the new Glowforge Aura!
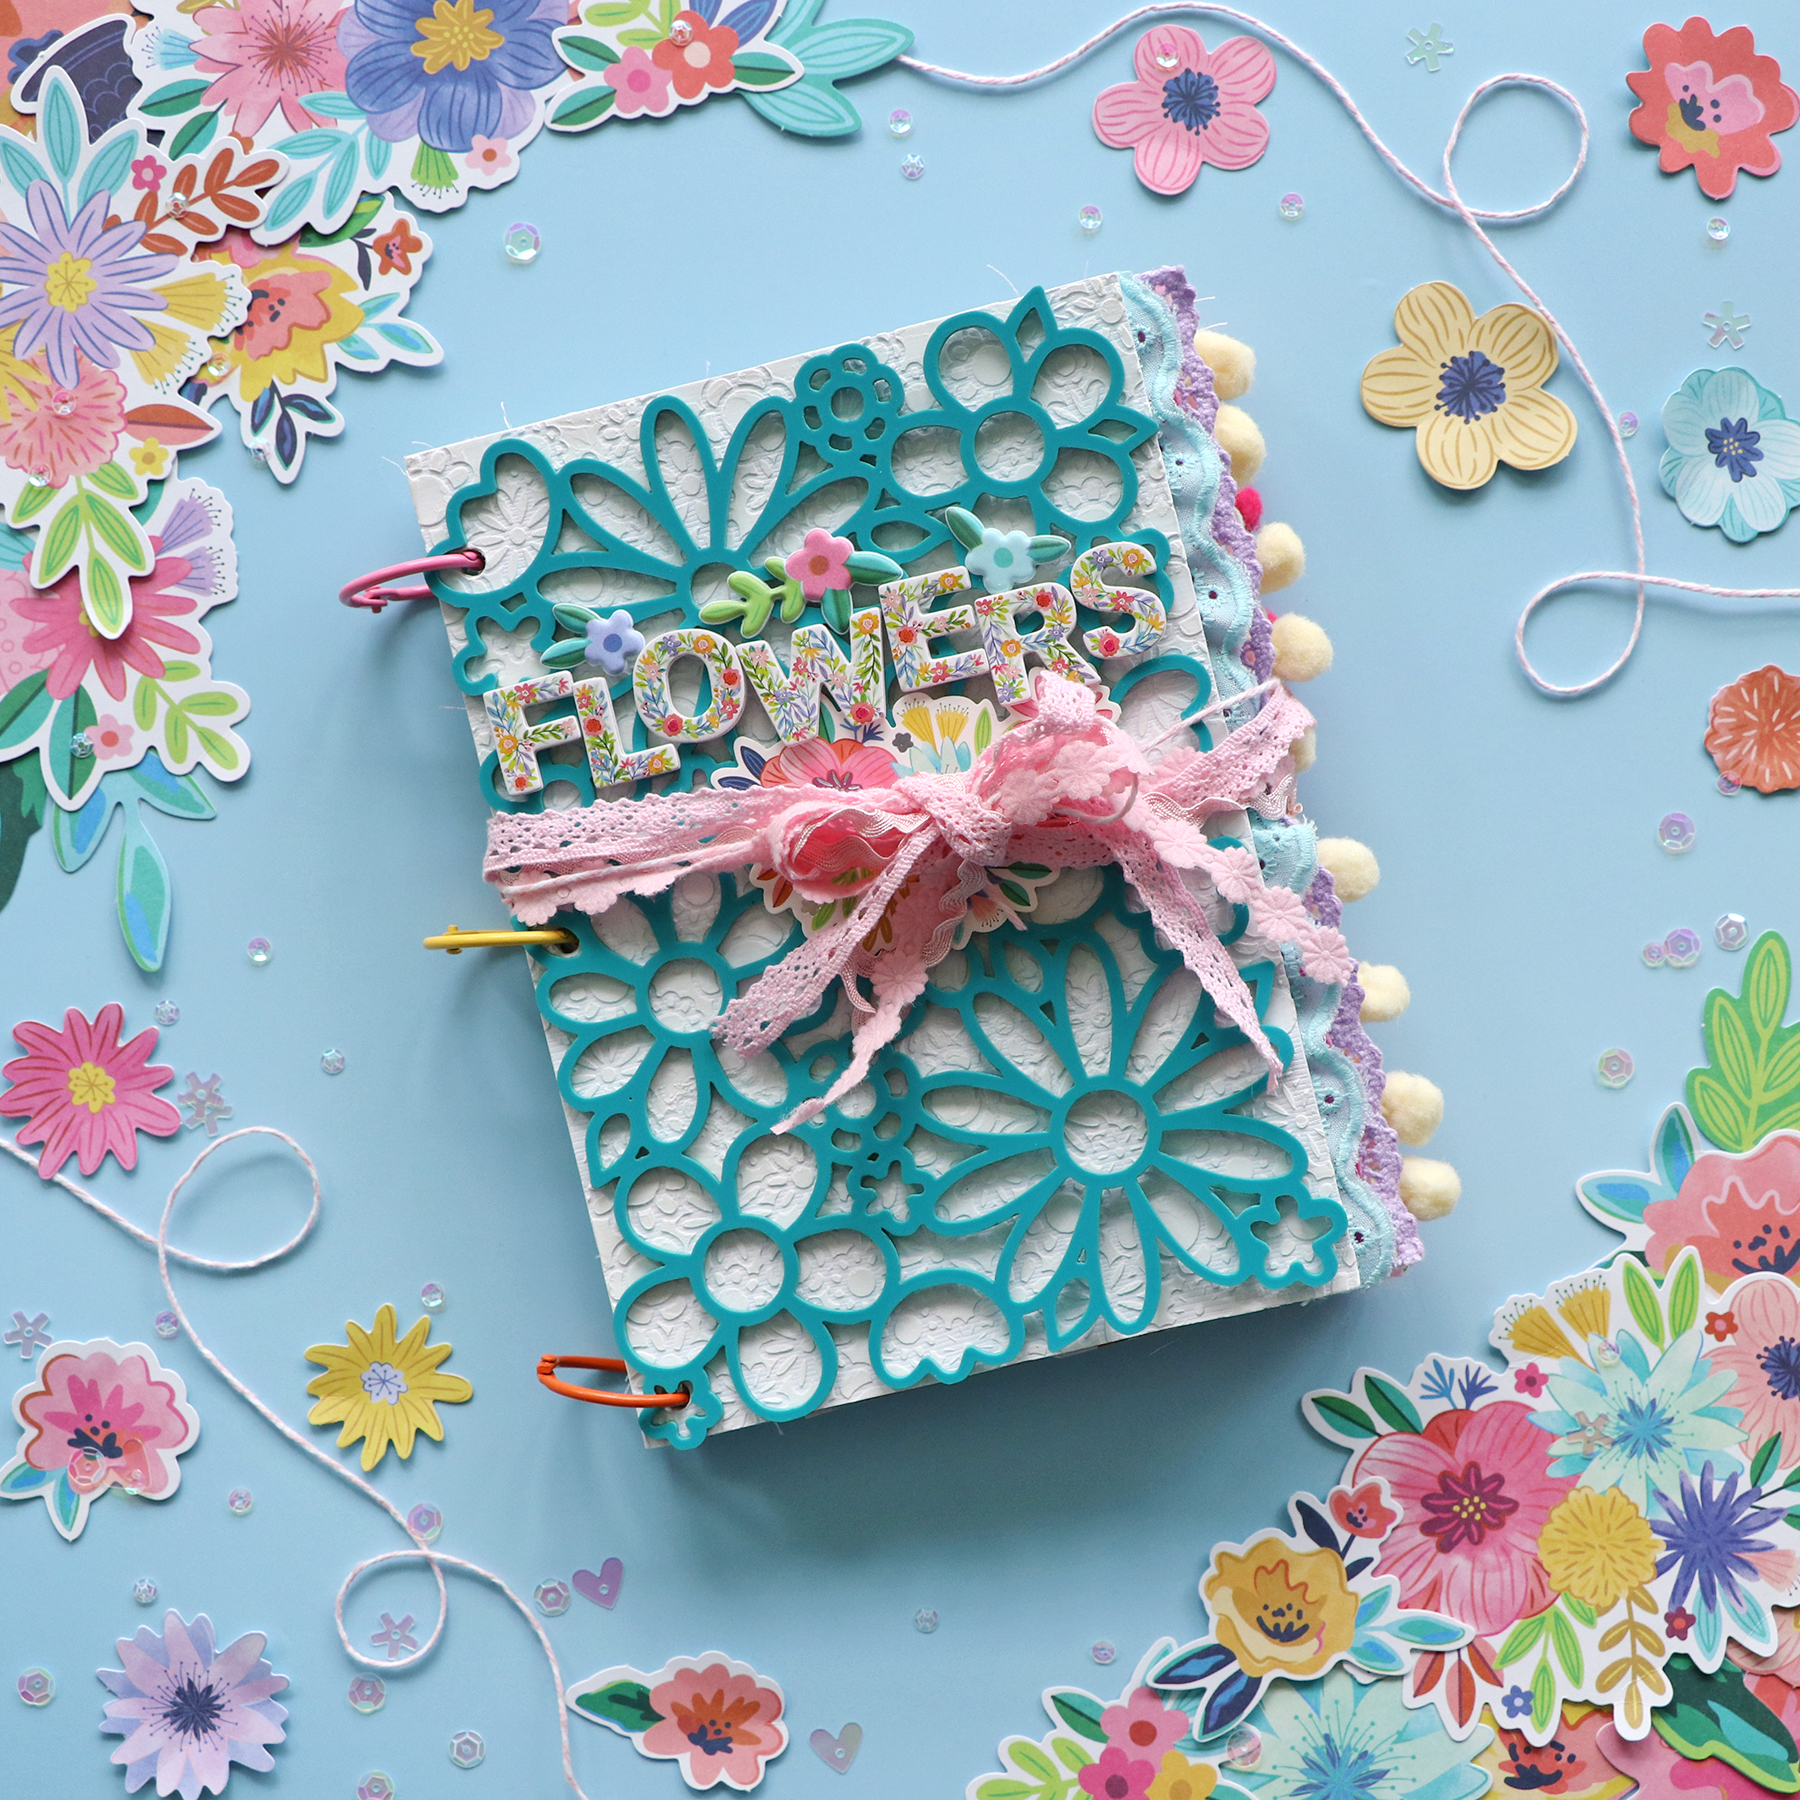
I cut the covers from teal acrylic and it took the machine about 4 hours to make them, they're so dainty and delicate and pretty! :) I decorated the cover with flowers from the Puffy Phrase Stickers, a floral cluster from the Cardstock Stickers, and used the floral Thickers from Bloom Street to spell FLOWERS.
For the first page I used my past Flower Garden Stencil (use the cut file as an alternative!) and scraped white modeling paste through it onto white cardstock. I edged the right side with blue eyelet ribbon from my stash.

I covered the left page with a full 5x7" photo. For the right page, I cut a piece of the Floral Transparency to 5x7", stitched pink crushed velvet ribbon onto the right edge, then embellished with a "sweet" and heart from the Cardstock Stickers.

I didn't add anything extra to the back of the left page because it's see-through, but you totally could! I cut a 5x7" piece of the blue floral B-side of Paper 8 and stitched purple lace ribbon onto the right edge. Then I grabbed the Chipboard Alphabet Outlines and backed them with patterned papers before layering them onto the page. I added an "I LOVE" Cardstock Sticker inside the "O" and placed a Mini Flower Puffy Sticker on the bottom right corner.

On the left page I added a 4x6" photo and placed a flower from the Puffy Phrase Stickers on each corner. I embellished with a "love" word from the Puffy Phrase Stickers and tucked a round floral sentiment Cardstock Sticker below. For the right page, I cut a 5x7" piece of smooth white cardstock and arranged flowers from the Floral Die Cuts and Ephemera Die Cuts around the edges in a frame. In the middle I added a "BLOSSOM" Puffy Phrase Sticker with a Mini Flower Puffy Sticker between. On the right edge I stitched pink flower ribbon.

A 4x6" photo adorns the left page and I embellished with bits from the Sticker Book and a scalloped border sticker from the Project Pad. For the right page, I trimmed a 6x8 page protector to 5x7" then stitched down the right edge to seal it. I poured sequins from my stash into the bottom, stitched a line about 2.5" above, poured in more sequins, stitched another line about 2.5" above, poured in more sequins, then stitched across the top. I also stitched yellow pom pom ribbon on the right edge. I topped the three sections with a Puffy Phrase Sticker and transparency flowers from the Sticker Book.

I didn't add anything else to the back of the sequins page, I like being able to see them :) For the right page, I cut a piece of pastel striped Paper 3 to 5x7" and then chain stitched with a matching colored thread through all the stripes. The stitching took about 4 hours. I topped the middle with a Flower Die Cut and stitched salmon scalloped trim to the right edge.

A 4x6" photo hides a lot of the messy back of the stitching page and then I embellished with three butterflies from the Cardstock Stickers and Chipboard Stickers. For the right page, I cut a piece of blue floral Paper 2 to 5x7" then cut the same section from another piece of it. I fussy cut the flowers and adhered them on top of the full piece with foam squares for a fun and dimensional page. In the middle I placed a "Love" Chipboard Sticker then adhered teal scalloped ribbon to the right edge.

After adding a 4x6" photo to the left page I made photo corners from the mini floral Paper 11 and called it good! For the right page, I cut a 5x7" piece of the watercolor Paper 18. I designed a 5x7" Flower Frame Cut File, cut it from white cardstock, and then backed it with Blooming Wild patterned papers. Inside the frame I added a little sentiment from the Chipboard Frame Stickers, added a piece of floral Washi Tape below, then wrote journaling in the rest of the space with a blue pen. To finish the page I stitched white/pink lace ribbon to the right edge.

I adhered a 4x6" photo to the left page and embellished the top left corner with a round floral sentiment from the Ephemera Die Cuts and two floral pieces from the Chipboard Frame Stickers. For the right page, I cut a 5x7" piece of white cardstock. Then I trimmed pastel stripes from Paper 23, distressed the edges, and machine stitched them diagonally across the page. I topped the page with an oval floral "LOVE" Ephemera Die Cut then stitched green satin picot ribbon to the right edge.

I tucked a 4x6" photo under the ribbon then in the white space at the top created a title with Thickers & mini alphas and a sentiment from the Sticker Book. The floral cluster at the bottom is from the Cardstock Stickers. On the right page, I cut a piece of blue paper from the Project Pad to 5x7" then made folded heart flowers and stems with leaves from Blooming Wild papers. I topped each flower with a Mini Flower Puffy Sticker then stitched pink pom pom trim to the right edge.

I added a 4x6" photo to the left page and embellished with a "HAPPY" Chipboard Sticker and a bunch of little flowers from the Cardstock Stickers. On the right page, I covered a 5x7" piece of white cardstock with fringed paper strips made from the rainbow striped Paper 10. Before stitching the pink lace ribbon on the right edge, I did more stenciling on the back of the page.

The back page is a repeat of the front page: I used my past Flower Garden Stencil (use the cut file as an alternative!) and scraped white modeling paste through it.

To connect the album together, I punched three holes through the left side of each page and then slid them onto a pink, yellow, and orange 1" loose leaf binder ring.

I tied a few varieties of pink ribbon around the middle to keep the album closed and look cute :)

I hope you are inspired to pick up my Blooming Wild collection and document your love of flowers!
SUPPLIES: Patterned papers, stickers, Thickers, die cuts, washi tape, embellishments: BLOOMING WILD; Acrylic flower covers made with the Glowforge Aura; modeling paste; white cardstock; 6x8 page protector


I would totally purchase the turquoise flower, mini book cover if you sold them. Lol. Glow forge is not in my wheelhouse. My husband would kill me.Roxie Texas
ReplyDeleteSo beautiful inspiration Paige!! thank you so much, I love your mails!
ReplyDelete