Skiing in the Alps


Tuesday, February 14, 2017

Chris fulfilled a lifelong dream last weekend and went skiing in the Alps with some buddies! They drove down to the little town of Sautens, Austria Friday after work and woke up early Saturday to catch the first lift at Sölden ski resort.
On the first gondola of the day!
Wow! They lucked out and had beautiful weather all weekend.
Skiing in the Alps is a lot different from skiing back in the States because most of the skiable terrain is above the tree line.
That just clears the way for these amazing views!
My hubby practically on top of the world!
I had no idea that they were going to this place! Many scenes from the last James Bond movie "Spectre" were filmed in Sölden. Now I wish I had gone!
The resort definitely was proud of their starring role in the film.

Perfect lunch while skiing in the Alps: bratwurst and pommes with Red Bull (an Austrian company!).
The hills are alive!
Chris and some of his dental clinic colleagues.
They had some fun stuff set up around the mountain including this slalom course where you could scan your ticket and it would film you. Chris says it was suuuuuper icy.
Our friend Jordan in Sölden.
On Saturday night they went into the town of Oetz for some delicious Tyrolean cuisine.
Chris tried the Tyrolean classic Gröstl: fried potatoes, eggs, bacon, and other deliciousness.
There was a cantilevered lookout at the top of one of the lifts. Would you go out on this?!
Panorama from the end of the viewpoint. Austria in all its splendor!
Maybe the boys will let their wives come next time? *hint hint*

Love Layout by Flóra Farkas


Monday, February 13, 2017

It's true that I often love to spend hours making a single layout - especially when hand stitching, sometimes it takes up to 8 or 9 hours! But scrapbooking is my "happy" and creative outlet and therapy and stress reliever and if putting that amount of time into a layout is what it takes and I love the results then that's ok with me! But I also LOVE when layouts come together in a jiffy - not all layouts need to take hours to make to be beautiful! Which is why I absolutely love the layout I'm sharing with you today made by Design Team Member Flóra Farkas.
Hi there! Happy day before Valentine’s Day!  It’s Flóra back with a love-themed layout. This time I felt like creating a layout of my parents, not about us. They don’t have a lot of photos together, but I always push them to send me selfies as we have a long distance relationship.
 photo love_layout_ffm.jpg
There isn't a ton to say about this layout because this was my fastest layout ever!! Believe me, it’s super easy to work with the Oh My Heart collection. When you touch the elements your inner Paige Evans just puts together a page in seconds ;)
 photo love_layout_ffm1.jpg
Actually I used a Silhouette cut file (#172105) for the background and cut it from Paper 13 with a Silhouette Cameo. Then I backed it with Paper 21 which gave the colorful, mind blowing background. I placed a photo of my parents and started to embellish it. I used some flowers from the Ephemera Die Cuts and Chipboard Stickers. I am so grateful that the pack contains lots of flowers, not just one or two because you need many, right? 
 photo love_layout_ffm3.jpg
I also placed some Puffy Stickers on my project. You can find some on the right bottom corner of the photo and others are scattered on the background to add extra texture. I could not resist to add at least one Heart Charm as well. They are too cute not to use them. To finish I wrote my journaling and oh boy! Have you seen that the Acrylic Stamp Set includes lines?! Finally I don’t have to draw them on my own!
 photo love_layout_ffm2.jpg
I also made a video tutorial just to prove how fast you can put together a page with the gorgeous Oh My Heart collection. If you have few free minutes check it out!
Thanks for stopping by today and have a lovely day!
SUPPLIES: OH MY HEARTPaper 13Paper 21Ephemera Die CutsPuffy StickersAcrylic Stamp SetCharms
 photo Floral Farkas.jpg
Blog: pinkandpapergift.blogspot.com Instagram: @floramfarkas Pinterest: @floramfarkas
Facebook: pinkandpapergift YouTube: Flora Monika Farkas
Pages that come together in a heartbeat can't be beat! :)

Super Star Layout


Saturday, February 11, 2017

Last Sunday Fox looked up at the wall where I tape all of my layouts before they eventually go onto a shelf where they sit until they eventually go into scrapbooks and said, "How come they're all of Jane?!" Uh oh. Busted. I didn't think he'd really notice but he did and man-oh-man I've felt so guilty ever since! I just love using #alltheflowers on my pages and typically photos of Jane go better with that style. I'm definitely not afraid to use pink on my pages of Fox, I just like scrapping with really girly things! Also, not trying to start a debate here or push my thoughts or beliefs, I've been burned before. I'm pretty much Switzerland when it comes to anything, I can see from both points of view. ANYWAY!!! This past week I've been scrapping like a mad woman with a purpose in mind: pages of FOX! Here is one for today and I'll share more soon:
 photo Super Star by Paige Evans.jpg
SUPER STAR by Paige Evans
DESCRIPTION: I'm going back through my first two Pink Paislee collections and using those supplies first - I've made three pages with Fancy Free and three with Take Me Away. Oh My Heart is coming next!
JOURNALING SAYS: Fox has loved going to pre-school and all his teachers and making new friends and of course playing! Now onto the big leagues: kindergarten!
HOW TO: First I created a "super star" cut file - I cut it from white textured cardstock and then used the inner pieces as templates to trace and cut from grey/blue/greenish papers from Take Me Away. I sprayed the back of the die cut with adhesive and then quickly placed the papers. Then I spent some time making a mixed media background on a green/aqua ombre paper using gesso, watercolors, and acrylic paint. Once that dried I adhered the die cut with foam adhesive so it's slightly raised off the background. Next came the embellishing with chipboard stickers, three white foam heart stickers, die cuts a black & white photo matted on a black tag, wood veneer, and more. I journaled next to the photo inside the "A" slash "star". To finish I stamped a few stitching lines with the roller stamp - everything is from Take Me Away!
SUPPLIES: Patterned paper, stickers (chipboard, foam), wood veneer, die cuts, roller stamp: Take Me Away by Paige Evans / Pink Paislee; Cardstock, pen, adhesive: American Crafts; Super Star cut file: Paige Evans; Die cut machine: Silhouette Cameo; Watercolors: Loew Cornell; Paint: FolkArt; Ink: StazOn
 photo Super Star Detail 3 by Paige Evans.jpg
 photo Super Star Detail 1 by Paige Evans.jpg
 photo Super Star Detail 4 by Paige Evans.jpg

You Are My Bright Side Layout by Missy Whidden


Friday, February 10, 2017

Fussy cutting is the name of the game in today's lovely layout by Missy Whidden! In fact, on our way home from Milan over New Years, I cut out the exact same hearts from Paper 02 - I cut out every.single.one. And then what did I do with them? NOTHING! I couldn't figure out what to do! So they're sitting in a little ziplock baggie just waiting patiently. And now I know exactly how to use them thanks to this layout Missy is sharing today!!
Hello friends! I’m back with another fun and colorful layout using the gorgeous Oh My Heart collection. Love is the theme this week and I knew right away that I had to use Paper 02 for my layout. All those hearts were just begging to be fussy cut! So I spent some time doing just that. I wanted to create the look of confetti hearts coming out from behind my photo, which is of me and my husband on our trip to Aruba last year. I used the beautiful gradient Paper 04 as my background. I love those blue shades and the hearts just pop against that darker color. I cut a big heart on my Cameo and then backed it with white cardstock. I used some watercolors with the plastic packaging technique on the background and then gave it a coat of gesso to lighten it up. I love how the hearts just jump off the page! To make the heart pop off the page I machine stitched around it twice with pink and orange thread.
 photo You Are My Bright Side.jpg
Aren’t all those little hearts just lovely? I’m a huge rainbow fan so it was fun creating this. I added the soft watercolor behind them so the white background wouldn’t be so bright. Plus I love adding mixed media to my pages! I added some tissue paper and a few die cuts from the Ephemera Die Cuts Pack. I just can’t get enough of those flower die cuts!
 photo You Are My Bright Side1.jpg
I can’t stop staring at these colors! I combined a few of the Chipboard Stickers here, which are fabulous for even more pops of color. I fussy cut a few of the scalloped borders from Paper 17 to add right under my photo. I also added a colorful Puffy Sticker under those: that cute little scalloped border sticker. Tangled thread is another item I love to add to my pages for extra pops of color and texture.
 photo You Are My Bright Side2.jpg
Since there was a lot of open white space in the upper left part of the heart, I decided to create a cluster of flowers. I used more of the floral die cuts and chipboard flowers. I used one of the die cut pieces for my title and combined it with some of the XOXO puffy stickers. There are more chipboard pieces under that. I love the contrast of the blue and the bright pink!
 photo You Are My Bright Side4.jpg
Check out the process video to see how this layout came together:

I had such a blast putting this together. I hope it inspires you to fussy cut some hearts or something else from patterned paper. You can get some really awesome and fun looks by taking the time to cut out fun shapes!
 photo Missy Whidden.jpg
Blog: littlenuggetcreations.blogspot.com  Instagram: @missywhidden  Pinterest: @missywhidden
Facebook: missy.whidden  YouTube: Missy Whidden
Have a super wonderful day! Be back soon!

US Layout


Monday, February 6, 2017

I was scrolling through Pinterest and saw a free butterfly background cut file offered from Juliana Michaels at 17turtles.com! Yes please! Here is the layout I made with it using my Oh My Heart collection:
 photo Us by Paige Evans.jpg
US by Paige Evans
DESCRIPTION: This is a tried-and-true technique for me: backing die cut shapes with patterned paper :) I also tried the messy string bunches like Missy Whidden does - so fun!
JOURNALING SAYS: How crazy and amazing is it that we're coming up on our 10 year anniversary?! So happy that you sat in the same seat for so many weeks just to meet me :)
HOW TO: Die cut the butterfly background cut file from white cardstock then back each butterfly with a different patterned paper. Adhere the die cut onto Paper 04 using foam squares for dimension. Trim away two of the butterflies on the right side (save them for a different project!) then layer a photo over heart foiled paper (it's found in the 12x12 paper pad). Place chipboard stickers and Thickers color-on-color around the butterflies, trying to space them evenly. Bunch pieces of white thread and tuck them under the butterflies that have an embellishment. Type, print, and trim journaling then adhere it over the photo.
SUPPLIES: Patterned paper, stickers (chipboard, puffy), Thickers: Oh My Heart by Paige Evans / Pink Paislee; Cardstock, adhesive: American Crafts; Thread: Coats & Clark; Butterflies cut file: Juliana Michaels at 17turtles.com; Die cut machine: Silhouette Cameo 3
PROCESS VIDEO: Watch my latest YouTube video to see how this layout was made (and be sure to subscribe!)
 photo Us Detail 1 by Paige Evans.jpg
 photo Us Detail 2 by Paige Evans.jpg
I can't stop won't stop die cutting and backing :) :) :) 

Movin' to Seattle


It's official! We're moving to Seattle this summer!
Here's the story: technically we could get out of the Army this summer because our four years are up: 4 years of dental school for 4 years of dental service in the Army. But we've seen dentists before us try and find jobs in the states from Germany, and it's hard. So we thought, if we can CHOOSE where we go, why not just extend one more year and make transitioning to real life as easy as possible? So we toyed around with the idea of places to live where there are Army bases. We considered New York or DC or Hawaii (cuz why not?!). I'll live almost anywhere for a year! But then we thought about where we ultimately want to end up. Which is kind of a scary thought! All my life has been planned out and "looking to the next thing": 6 years in Provo going to college at BYU and working at American Crafts while waiting for Chris to finish up; 4 years of dental school at USC in Los Angeles; 4 years in Germany; 1 year in Seattle. THEN WHAT??? Well, I think we want to end up in the Pacific Northwest. Why? To be close to family and we love rain, trees, mountains, lakes, and nature. My mom and dad are still in Redmond. My brother and his family live near by. It's a short plane ride to Utah and Nevada and Colorado where all of our other family members live. We're totally west coast people.
So rewind a few months back, we emailed a guy and asked, "If we can choose where we go can we stay in the Army one more year?" He said yes(!!!) and asked us for a list of our top choices. So far so good! We gave him our top choices which I think were Seattle, Colorado, and New York. I think we nixed Hawaii because while it would be awesome, we just really want to be close to family after being apart for so long. Shortly thereafter he said Seattle was available and we would receive official orders in January of 2017. Fast forward to today (not quite January but still, February 6th is pretty dang good for the Army!) and it's legit! We are moving to Washington where Chris will work at Joint Base Lewis McChord for one year and then... who knows! Totally scary but at least we'll be close to family for support and hopefully good opportunities!
My dream was to transfer to the Air Force and live in London for a few years :) But this is a close second! If you know of any dentists retiring or selling their practice in the Seattle area, give me a holler :)
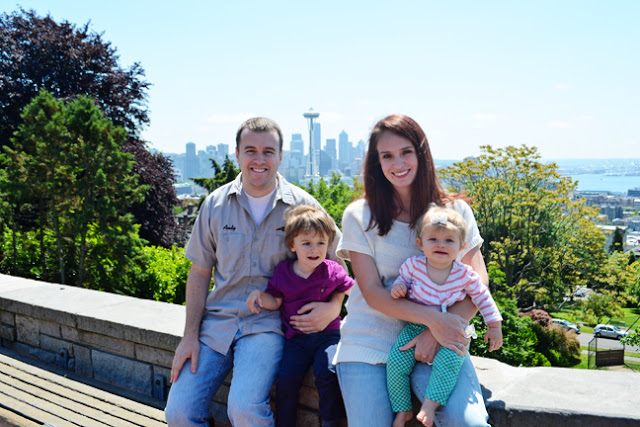
This picture was taken at Kerry Park in Seattle just a few days before we moved to Germany:
4 years has absolutely flown by. We are going to miss living in Germany soooo much, I can't even put it into words. I already miss living here, if that makes sense. Not being able to hop in the car and drive to whatever European city we want to? Shoot. Ahhh the simple ways of life and having everything closed on Sundays. Driving 100mph! I will definitely do a recap post before we move of my reflections of living in Germany.
Anyway! Lots of changes and a big new chapter in our lives coming soon!

Cozy Layout


Saturday, February 4, 2017

We're introducing the 2017 Pink Paislee Design Team over on the blog and today it's my turn! Here is the layout I made:
 photo Cozy by Paige Evans.jpg
COZY by Paige Evans
DESCRIPTION: I got rid of a TON of border punches a few years back, thinking they'd never come back in style. Then I was wanting a fun way to feature a lot of different patterns (although they're ALL from the same single piece of paper, Paper 12!) and dug through my punches box and found these! So glad I saved a few! What goes around comes around!
JOURNALING SAYS: You sure do know how to make yourself comfy cozy and in between all of the pillows!
HOW TO: Trim Paper 12 into all of the individual patterns. Punch the paper strips with different border punches and then group them by color. On a kraft cardstock background and starting at the bottom, start layering the paper strips. Lightly adhere the papers in place then use a sewing machine and matching colored thread to sew the papers. Ruffle up the edges and leave the threads long. Layer a photo on the top left and embellish with color-on-color pieces. Type, print, and trim a line of journaling and adhere it near the photo. Drop white paint in three places to finish.
SUPPLIES: Patterned paper, stickers (chipboard, mini alphabet, puffy), flower die cut: Oh My Heart by Paige Evans / Pink Paislee; Cardstock, adhesive: American Crafts; Sewing machine: Brother; Thread: Coats & Clark; Border punches: American Crafts, EK Success, Fiskars, Martha Stewart Crafts
PROCESS VIDEO: I made a start-to-finish video so you can see the entire process!
 photo Cozy Detail 6 by Paige Evans.jpg
 photo Cozy Detail 5 by Paige Evans.jpg
 photo Cozy Detail 4 by Paige Evans.jpg
 photo Cozy Detail 2 by Paige Evans.jpg
 photo Cozy Detail 1 by Paige Evans.jpg
What goes around comes around! Now I need more border punches ;)

Memo Board by Steffi Ried


Friday, February 3, 2017

Steffi Ried also made a super cute and functional memo board to keep track of lists, house small embellishments, and is simply adorable to look at!
The Oh My Heart collection fits perfectly with my memo board. I created a board with pockets. Tickets, vouchers, recipes, pens, etc can be attached here. Also the cute notepad from the current collection finds a place in the board. A great decoration for your kitchen, craft space, or as a gift for family & friends. I'll show you how I created the board with some photos! photo SteffiRied_Memoboard_.jpg
 photo SteffiRied_Memoboard_Detail1.jpg
 photo SteffiRied_Memoboard_Detail2.jpg
The Epoxy Paper Clips from the Take Me Away collection also fit perfectly on the board.
 photo SteffiRied_Memoboard_Detail3.jpg
First I gathered the supplies. This included a photo frame (I used 7x9.5"), papers, stickers, embellishments, paperclips, scissors, and double-sided glue tape.
 photo SteffiRied_Memoboard_Tutorial_1.jpg
Then I dismantled the frame. The back serves as a template for my papers. There are three pockets so first I cut the paper for the back wall and then the three papers somewhat smaller.
 photo SteffiRied_Memoboard_Tutorial_2.jpg
For the edge of the pocket to be more stable, I folded over a 1.5" edge on the upper side of the pocket.
 photo SteffiRied_Memoboard_Tutorial_3.jpg 
You can now glue or sew the edge, whichever you prefer.
 photo SteffiRied_Memoboard_Tutorial_4.jpg
Then the papers were glued with double-sided adhesive tape. I glued the middle bag with dimensional adhesive so in this pocket is more space for larger things such as pens, brushes, etc.
 photo SteffiRied_Memoboard_Tutorial_5.jpg
Now the back wall with the papers is fixed again in the photo frame. Finally, the frame is decorated with stickers, embellishments, paperclips, brushes.
 photo SteffiRied_Memoboard_9x9_Insta.jpg
I hope you like my project and want to create a memo board too! Thanks for stopping by!
 photo Stefanie Ried.jpg
Blog: steffiried.blogspot.com Instagram: @steffiried Pinterest: @steffiried Facebook: stefanie.ried.96
I would love to hang something like this in my crafty space wouldn't you?!

2nd Oh My Heart Coptic Book


Wednesday, February 1, 2017

I will be teaching two bookbinding classes in the near future (scroll to the bottom for for information!) and made the example book using my Pink Paislee Oh My Heart collection!
 photo IMG_2040.jpg
This cute li'l mini book is 4x6" - perfect for photos of the same size, journaling, scrapbooking, gift-giving, and much more!
 photo book.jpg
I painted the wood covers periwinkle to match the purpley-blue in my collection. I will have lots of paint options at the classes so participants can pick and choose and even mix their own colors!
 photo IMG_2048.jpg
Look carefully and you'll notice I used three colors of thread to tie the book together (I will have a HUGE bag of colors to pick from at the classes!). Since there are 9 signatures (groups of paper) I made the first three with pink, the middle three with yellow, and the last three with green. Cuz why not?! :)
 photo Oh My Heart Class Book.jpg
The kits will come with 18 pre-cut Oh My Heart papers as well as 45 trimmed pieces of regular white paper (I encourage people to bring their own papers if they wish!).
 photo IMG_2019.jpg
And then in the spine I tied in the Oh My Heart charms as well as two jewels, two gold sequins, and three small pearls - all will be included in the class kit.
 photo IMG_2020.jpg
The book opens and lays flat so it's great for working in small spaces like airplanes and office spaces.
 photo Oh My Heart Class Book1.jpg
On the cover I embellished with a few die cuts and chipboard stickers - both entire packages will be in the class kits so there will be tons of options for decorating!
 photo IMG_2035.jpg
Class information:
On Saturday February 25th 2017 I will be teaching a bookbinding workshop in Berlin. The class is from 10am-4pm and includes a coptic bookbinding kit, lunch, snacks, a pop-up shop, and drinks - all for €89. For more information and to register, visit: http://www.cathleenkick.de/BB-Crop/minibook-workshop-mit-paige-evans-25-2-2017.html Hope to see you there!
The other class will be locally at a scrappy friend's house on Saturday April 29th. If you are interested please send me an email :)
Thanks for visiting today!
Paige Taylor Evans © // Quinn Creatives DESIGN