Cross Stitch Cards by Elsie Robinson


Tuesday, December 24, 2019

Merry Christmas Eve everyone! It’s Elsie Robinson here and today I have some cross stitch inspired cards to share with you using three of Paige’s cut files. Since I love stitching, these cards are so fun to create. However, if stitching isn’t your thing, I also have an alternative cross stitch card that gives you the cross stitched look in a hurry! Let me talk you through each card...
This first card is the simplest and I used the Cross Stitch Snowflake cut file to create it. Instead of having my Silhouette Cameo cut the file, I used the pen holder tool with a pencil in it to draw the design instead. Once the design was sketched, I used a paper-piercer to punch a small hole into the paper, where each point of the cross met another. I used white embroidery thread to stitch each ‘x’; I love the white against the kraft background. For the title I used the Truly Grateful Thickers to spell out ‘JOY’.

For this next card I followed the same method as the previous card. However, this time I used the Cross Stitch Reindeer cut file and used different colours of thread. I used a light brown and dark brown thread for the head and antlers and some bright red thread to create a little red nose. For the title, I used the alphas from the Puffy Phrase Stickers to spell out ‘HAPPY HOLIDAYS’.

And finally, if stitching isn’t your thing, you can still the cross-stitched look by cutting the cut files instead of sketching and stitching them, and backing them with patterned paper. For this card I used the Nordic Background cut file. This cut file is intricate so I cropped the top and bottom sections from the design so I could size the card to be 5x7 inches. I backed each section with different patterned papers from the Truly Grateful collection. The foiled cardstocks from the 6x8 Paper Pad add a nice subtle glimmer to the design. For my title I used the navy Mini Thickers from Pick-Me-Up.

I hope you’re inspired to do some festive cross stitching with Paige’s cut files! And I hope you all have a lovely Christmas!

SUPPLIES: Patterned papers, stickers, Thickers, embellishments: TRULY GRATEFUL; Mini Thickers: PICK-ME-UP; white cardstock; Die cut machine: Silhouette Cameo 3; Cut files: Cross Stitch Snowflake, Cross Stitch Reindeer, and Nordic Background by Paige Evans
Location: England / Blog: Hey Elsie / Instagram: @heyelsie_ / Facebook: Elsie Robinson / YouTube: Elsieeee / Pinterest: heyelsie

Oh Christmas Tree Layout by Brianna Lepper


Monday, December 23, 2019

Hi friends! Brianna Lepper here with another fun Christmas layout! For this page, I used a few bits and pieces from Paige's Whimsical, Horizon, and Truly Grateful collections. To start, I cut Paige's Snow Globe cut file from white cardstock on my Silhouette Cameo 3 and started backing the entire thing. It was actually quite therapeutic backing each of the pieces.
This cut file has a lot of smaller somewhat circular pieces so I grabbed my 3/4 inch circle punch and a regular hole punch to help make the backing process a tad bit easier. For a lot of the pieces I used the 2x2 Paper Pads in the three collections that I pulled out. I also used the 6x6 Paper Pad from Whimsical and the 6x8 Paper Pad from Horizon.

For the base of the snow globe, I pulled out one of my favorite patterned papers from Paige's Oh My Heart collection, Paper 09. I adhered my photo to the right of the globe and layered up a few pieces from the Floral Die Cuts underneath it.

For my title, I used the Truly Grateful Thickers and the Mini Thickers from Pick-Me-Up. I scattered around dots from the Epoxy Stickers and backed the glass portion of the snow globe with vellum. I didn't adhere the entire cut file to the vellum so that some of the pieces would be naturally raised up to create dimension. I love how it looks! I ran the whole page through my sewing machine and stitched with shiny gold thread to create a little halo effect around the snow globe. White acrylic paint splatters around the page finished the layout off.

I love how this page turned out! It was so much fun mixing Paige's collections together. Thank you for stopping by and I hope I've inspired you in some way today and I hope you're enjoying this wonderful holiday season! See you again in my next post!

SUPPLIES: Patterned papers, stickers, die cuts, Thickers, embellishments: TRULY GRATEFUL; PICK-ME-UP: Mini Thickers; white cardstock; white acrylic paint; Die cut machine: Silhouette Cameo 3; Cut file: Snow Globe by Paige Evans
Location: Louisiana, USA / Blog: I Love Paper Blog / Instagram: @briannalepper / Facebook: Brianna Nichole
YouTube: Brianna Lepper / Pinterest: Brianna Lepper

Christmas Cut Files Bundles


Sunday, December 22, 2019

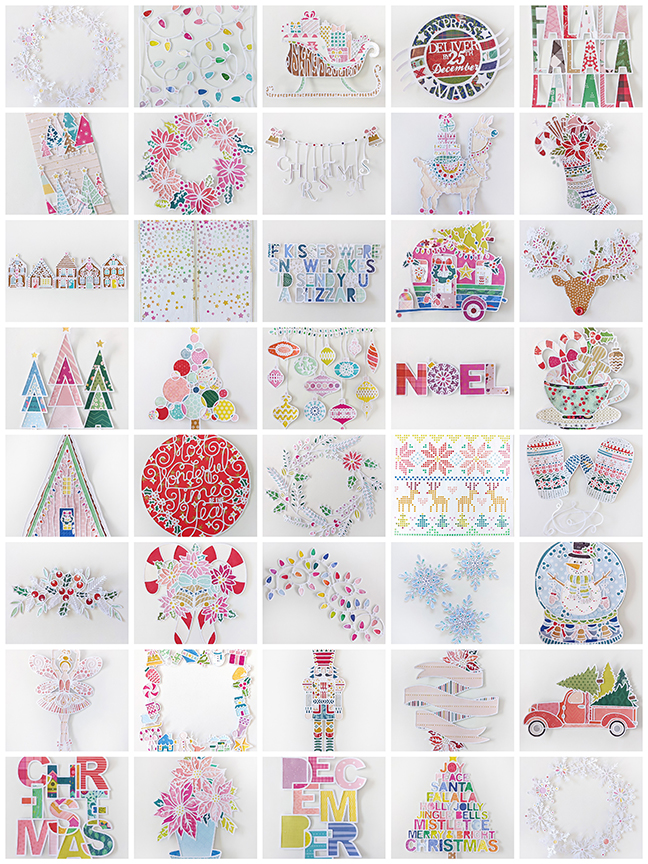
Grab my 25 Days of Christmas Cut Files and get to adding them inside your December Daily!
I also have a Bundle of 38 Christmas Cut Files WITH the backing pieces! This is all 25 Christmas Cut Files + 13 more that you can find individually in Etsy & Silhouette, all in a single & easy and convenient place. Having this bundle makes backing these cut files so much easier than tracing and fussy cutting every single individual piece!
I have a good start on my December Daily 2019 using all of these backed cut files:
There are lots of different ways to go about backing a cut file and I have two process videos showing how I do it! For these intricate 38 Christmas Cut Files I have had the Silhouette Cameo cut out the backing pieces, saving loads of time instead of cutting out each individual piece one by one. Here is that process video. The other option is to trace and cut out all the pieces by hand and here is that process video. Hope these tutorials help! Let me know if you have any questions!
Can't wait to show you my finished album soon! 
Merry Christmas & Happy Holidays!

Christmas Card Trio by Anita Bownds


Saturday, December 21, 2019

Hi crafty friends, Anita Bownds here with you today sharing some fun Christmas cards using Paige's cut files as the main focal points. I always love giving family handmade cards for Christmas especially when I can’t be with them for the holidays.
For all the cards I decided on the colors I was going to use and I went through the papers in the Truly Grateful collection. For my first card I’m using the Candy Cane then I chose Paper 03 and trimmed it down to fit my card. Then using an embossing folder I embossed the paper with tiny Christmas trees and sanded it before applying it to my card. I used paper from the 6x8 and 12x12 Paper Pads and Paper 20 to back the cut file. To finish off the card I added glitter, a Wood Button, and a few scattered enamel hearts from the Mixed Embellishments.
For the second card I used pink cardstock as my card base, polka dot paper from the 6x8 Paper Pad trimmed down to fit my card base, then I cut out Christmas Tree cut file using a paper from the 12x12 Paper Pad. I cut out the Holiday Bow and backed it with Paper 24, added it in the center of the tree, and adhered it to the card adding some glitter around the edges of the branches and a Wood Button in the middle of the bow. To finish it off I placed a few enamel hearts from the Mixed Embellishments.
For my last card I decided on this cute little Slug Bug Christmas Tree cut file. I used pink cardstock again for my card base and a dark blue stars paper from the 6x8 Paper Pad on the front. I backed the cut file with papers from the 6x8 Paper Pad, 12x12 Paper Pad, Paper 20, and 2x2 Paper Pads, and adhered it to the card. To finish it off I added glitter to the Christmas tree, added Wood Buttons to the wheels, a sentiment from the Puffy Phrase Stickers, and a few scattered enamel hearts from the Mixed Embellishments.
I hope I’ve given you some last minute Christmas card inspiration!

SUPPLIES: Patterned papers, stickers, enamel hearts, embellishments, wood buttons: TRULY GRATEFUL; white cardstock; Die cut machine: Silhouette Cameo; Cut files: Candy Cane, Christmas Tree, and Slug Bug Christmas Tree by Paige Evans
Location: Australia / Blog: Neat-N-Crafty / Instagram: @anitabownds / Facebook: Anita Bownds
YouTube: Anita B / Pinterest: Anita Bownds

Make It Merry Layout by Missy Whidden


Friday, December 20, 2019

Hey, friends! Missy Whidden here with a fun and festive Christmas layout featuring Paige’s Truly Grateful collection and Lightstrand Border cut file. As soon as I saw that cut file I knew I had to use it for a holiday page. I cut the lights from textured white cardstock using a Silhouette Cameo 3 and backed them using several papers from Truly Grateful. I love that this cut file gives you the opportunity to create a rainbow color scheme! I wanted to create a mixed media background on smooth white cardstock, so I used several shades of green Shimmerz sprays to give the illusion of a tree.
I coated most of the background with clear gesso first and then added the sprays. The bright lights just pop right off the page against the greens. To create dimension I added adhesive foam behind all the lights. I used a few birds from the Cardstock Stickers and Ephemera Die Cuts in a few places. They just give such a great Christmas vibe!

I added lots of leaves and flowers from the Floral Die Cuts to create a little cluster on the right side of the page. I also fussy cut a few flowers from the 6x8 Paper Pad and Paper 02. I mixed and matched my title using Thickers and the Pick-Me-Up Mini Thickers. I love how colorful the title turned out.

I couldn’t resist using this “Be a Light” piece from the Ephemera Die Cuts. This page is all about the lights, so it was perfect. I tucked in a few more flowers here under the photo for a few more pops of color and detail. Lastly, I tucked in coordinating colors of tangled thread and sprinkled Heidi Swapp Gold Color Shine around the page.

I love how this layout came together! It’s so fun to use non-holiday products to create a holiday project. It’s an exciting challenge to take on and I hope this inspires you to do just that. Thanks so much for stopping by!

SUPPLIES: Patterned papers, stickers, die cuts, Thickers, embellishments: TRULY GRATEFUL; PICK-ME-UP: Mini Thickers; gesso; inks; white cardstock; Die cut machine: Silhouette Cameo 3; Cut file: Lightstrand Border by Paige Evans
Blog: littlenuggetcreations.blogspot.com // Instagram: @missywhidden // Pinterest: @missywhidden
Facebook: missy.whidden // YouTube: Missy Whidden

Christmas House by Nidia Rubio


Thursday, December 19, 2019

Hi friends! It's Nidia Rubio from Scrapamundi and I'm here today totally swept up in the magic of Christmas. Christmas is my favorite time of year to scrapbook and being a part of Paige's Cut File Design Team is a dream for me. So you can imagine how special this post is to me :)
 
I bought this wooden house last Christmas, but I didn't decorate it. I needed an amazing idea and at last this idea came! I wanted to create a wonderful magical house, simple but lovely. I used some of Paige's cut files and her Truly Grateful collection.

One of my favorites is the tiny Poinsettia Wreath on the top of the house. Backing it with patterned papers was a real challenge for me, but it was worth it, don't you think?

And what about Christmas trees?! Every tree was made with the Geometric Christmas Tree cut file and backed with Paper 05.

My favorite element is the Signage Post. It was backed with different colored papers and I wrote 7 must-haves of Christmas: illusion, happiness, kindness, love, home, chocolate (obviously!), and magic. What are your must-haves of Christmas? :)

The final touch is this Slug Bug Christmas Tree. I loved it at first sight. I put it at the back of the house, maybe waiting to unload the tree.

Wishing you the best Christmas full of joy and magic. Thank you for stopping by!

SUPPLIES: Patterned papers: TRULY GRATEFUL; white cardstock; Die cut machine: Silhouette Cameo 3; Cut files: Poinsettia Wreath, Geometric Christmas Tree, Signage Post, and Slug Bug Christmas Tree by Paige Evans
Location: Spain/ Blog: Scrapamundi / Instagram: @scrapamundi / Facebook: Scrapamundi
YouTube: Scrapamundi / Pinterest: Scrapamundi

Shaker Planner Dashboard by Mik Godinho


Wednesday, December 18, 2019

Hi friends! It’s Mik here from Papermiks here with you today! Have you ever made a shaker dashboard? Today I’ll show you how to make a beautiful dashboard using the wonderful Horizon collection and Paige's Geometric Christmas Tree cut file.
I started by die cutting the Geometric Christmas Tree cut file from one white cardstock and a paper from the 6x8 Paper Pad. Then, I backed a transparent sheet behind. To make my shaker background I glued the Christmas tree on Paper 03, poured in some sequins, and glued it shut.

I love to decorate my dashboards with some words to make a motivational dashboard. So I used words from the Epoxy Stickers to finish my motivational shaker dashboard. That’s it!

I hope you've been inspired! Do you have any questions or simply want to talk some more about planner dashboards? Leave me a comment below the post or check out my IG account.

SUPPLIES: Patterned papers, stickers: HORIZON; Thickers: WHIMSICAL; white cardstock; Die cut machine: Silhouette Cameo 3; Cut file: Geometric Christmas Tree by Paige Evans
Location: Bolivia / Instagram: @papermiks / Facebook: mik.godinho.papermiks 

Laugh Love Together Layout by Maija Männistö


Tuesday, December 17, 2019

Hi lovelies and happy Christmas time! Maija Männistö here to share a fun and colorful Christmas layout with the Truly Grateful collection and Paige's Christmas Frame cut file! Even though the collection is fall-themed, it really fits Christmas time too with all the bright colors.
I love all the elements in the Christmas Frame cut file and the fact that I could add lots of patterned paper to back it. I used several different papers to fit the theme and the size of the cut file. The 2x2 Paper Pads worked perfectly for some. To add a little bit of that Christmas twinkle I used papers from the 6x8 Paper Pad with the foiled details. And for the rest I went with the 12x12 Paper Pad as it had the perfect shades of green and red in it. I also pulled brown and gold cardstock from my stash to get the bright and shiny star as well as the perfect gingerbread figures.

For the background I wanted to add a tiny bit of color so I used the Prima - Pastel Dreams watercolors to create a splashed background for the frame. This helps the white cut file pop from the page. For the title I cut the word "together" from the phrase paper in the 12x12 Paper Pad. I love that you can cut it into a banner shape. For embellishing I wanted to go the simple way as the frame itself is quite busy already. I used the stars from the Cardstock Stickers and added few words from the Puffy Phrase Stickers. I really love how this turned out - a fun and colorful layout to match the silly photos of my kids from last year.

Thank you so much for stopping by today and have a lovely Christmas!

SUPPLIES: Patterned papers, stickers: TRULY GRATEFUL; white cardstock; Watercolors: Prima - Pastel Dreams; Die cut machine: Silhouette Cameo 3; Cut file: Christmas Frame by Paige Evans
Location: Finland / Blog: Mai Makings / Instagram: @maimakings / YouTube: Mai Makings / Pinterest: Mai Loves

Guest Designer | Maryám Pérez


Monday, December 16, 2019

Hello friends! My name is Maryám Pérez and I’m from Chile. You can find me on my blog at maryamperez.blogspot.com, on Instagram @maryampdesign, or my YouTube channel. I am beyond thrilled to be guest designing for Paige this month using her wonderful cut files. Since I saw Paige stitching the Sketch & Stitch Heart Circles cut file back in January at Creativation, I knew I wanted to give it a try as well.
To create my layout, I slightly modified the cut file and deleted the two center rounds of hearts because I wanted to put my photos in there. Next up, I gathered lots of different colors of embroidery thread that coordinated with the colors from the Whimsical collection and then I took a needle and spent some days hand stitching all 70 hearts.
Once I finished, I wanted the hearts to be the main focus of the layout and because these kinds of projects take awhile to create, I only added a few embellishments from the Whimsical collection here and there.

For my next layout, I used another one of my favorite cut files, Butterfly Background. I started by backing the cut file with different patterned papers from Whimsical and once I finished, with the help of some foam dots, I adhered it to the page.
For the background of my layout, I decided to go out of my comfort zone and used Paper 08 from the Turn the Page collection that has polka dots on a pink background.
To embellish my layout, I used bits and pieces from the Whimsical collection as well as iridescent sequins. I added the title and included the journaling in which I tell a little bit about the day I met Paige :)

For my last layout, I used the Layered Flower cut file and created five 3D flowers from different patterned papers from the Whimsical and Turn the Page collections.
I also chose some embellishments from the die cut pack and sticker book from Whimsical that helped me to tell the story from my journaling a little bit better.
And that is it! Thank you so much for stopping by today! 
It was an honor for me to be here as a guest designer and I have to say that I had so much fun creating these projects. I hope you enjoyed these ideas and felt inspired to create something new using the awesome cut files from Paige! Have a great day!

SUPPLIES: Cut files: Sketch & Stitch Heart Circles, Butterfly Background, and Layered Flower by Paige Evans; Die cut machine: Silhouette Cameo 3; Scrapbook collections: WHIMSICAL and TURN THE PAGE

Christmas Trees Flip Book by Lilly Sanchez


Sunday, December 15, 2019

Hey guys, Lilly Sanchez here, welcome back to the blog! Today I am sharing a super cute and very simple little project I created using Paige's Christmas Tree Mini Album cut file.
With the busy season upon us, I haven’t really had time to create super big projects. But you guys know I still have to craft one way or another. So when I saw this Christmas Tree Mini Album cut file I knew just how I wanted to use it: to decorate the trees and add a cute little ring to give it that flip book look for Christmas gifts or happy mail. And you guys, in just minutes you can whip up a bunch of them and make your gifts look extra fab!

I did resize the file to make it smaller as I wasn’t adding pictures to it. You can also use these as individual tags for gifts. That would be super cute. You get 7 trees in the actual file but I only used 6 because I dislike odd numbers lol. I then attached the layers popping them up with foam squares. The papers are from the Truly Grateful collection. I used Paper 15 for the background of all my trees. Then every other tree has Paper 06, Paper 12, Paper 21, Paper 23, and the 12x12 Specialty Paper. With a few beads, gems, pompoms, ribbon, and wooden stars from my stash, I finished up this project! I love me a cute and easy project that still allows you to have crafty fun but also time for others things we have to get done.

Hope you guys enjoyed, see you next time!

SUPPLIES: Patterned papers: TRULY GRATEFUL; Embellishments: Lilly's stash; Die cut machine: Silhouette Cameo 3; Cut file: Christmas Tree Mini Album by Paige Evans
Location: New Jersey, USA / Instagram: @craftingwithliller / Facebook: Crafting with Liller
YouTube: Crafting with Liller / Pinterest: Crafting with Liller
Paige Taylor Evans © // Quinn Creatives DESIGN