
I've been emailing back-and-forth with reps from BasicGrey and then when they asked me to create a layout for their blog and I said, "Yes, please!" Here's what I came up with using an assortment of Hey You and Hipster products:
 OUR ANNUAL CHRISTMAS CARD PHOTOSHOOT | PASADENA CITY HALL

Journaling says: Every year I like to hire a new photographer to take our family photo and use the best picture for our Christmas card. This year Megan Papworth took our pics. I was barely pregnant with Jane!
How to: From browsing through Pinterest I found this image as inspiration:

Then it was a matter of trimming the curved shapes from the Hey You patterned paper pad and sewing them onto a sheet of cream background cardstock. I added a pair of photos with foam dots to the empty space on the bottom left corner. I'd been holding onto these photos since December 2011 and was soooo glad to finally scrap them using papers that match to a "T"! I love when that happens! To further embellish, I added two rows of buttons/brads, placed a letter sticker title between strips, journaled between strips, and tucked chipboard and sticker sentiments into the strips. Chipboard photocorners finish it off!
Supplies: Patterned paper, buttons, fabric brads, wooden brackets, chipboard photo corners, stickers (letters, scalloped fabric border, sentiments), paper banner, die cuts (date label, sentiments): BasicGrey; Cardstock, pen, adhesive: American Crafts; Sewing machine: Bernina; Thread: Coats & Clark

************************************************************
Just for kicks and giggles, here's another layout I made with BasicGrey supplies:
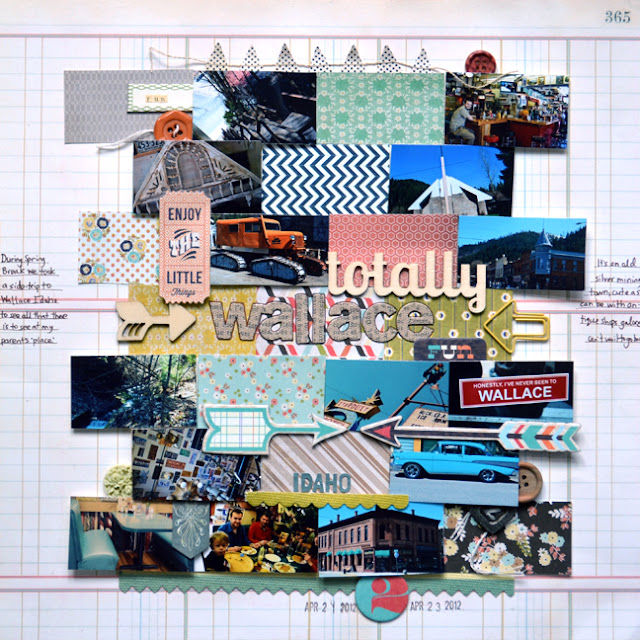 TOTALLY WALLACE IDAHO
Journaling says: During Spring Break we took a side trip to Wallace Idaho to see all that there is to see at my parent's "place." It's an old silver mining town, cute as can be, with antique shops galore. Can't wait to go back!
How to: Trim photos and patterned paper into mini blocks then arrange them like bricks across the front of a ledger paper background. Write journaling on the sides. Stamp the dates below with a chipboard number between. Make the title over the paper/pictures using a wooden veneer word, fabric letter stickers outlined with a brown pen to help them stand out, and mini letter stickers. Embellish the layout with buttons, chipboard, fabric border stickers, a paper banner, wooden veneer arrow, decorative brad, and more as shown.
Supplies: Patterned paper, decorative brad, stickers (fabric borders, filigree tab, letters, sentiment ticket), paper banner, chipboard (arrows, "fun" tab, number, tag), wooden veneer shapes (arrow, "totally"): BasicGrey; Buttons: American Crafts (wooden), BasicGrey; Arrow paper clip: Freckled Fawn; Date stamp, pen, ink: American Crafts
 Always a pleasure to do guest work for awesome scrappy companies!
Just for kicks and giggles, here's another layout I made with BasicGrey supplies:

Journaling says: During Spring Break we took a side trip to Wallace Idaho to see all that there is to see at my parent's "place." It's an old silver mining town, cute as can be, with antique shops galore. Can't wait to go back!
How to: Trim photos and patterned paper into mini blocks then arrange them like bricks across the front of a ledger paper background. Write journaling on the sides. Stamp the dates below with a chipboard number between. Make the title over the paper/pictures using a wooden veneer word, fabric letter stickers outlined with a brown pen to help them stand out, and mini letter stickers. Embellish the layout with buttons, chipboard, fabric border stickers, a paper banner, wooden veneer arrow, decorative brad, and more as shown.
Supplies: Patterned paper, decorative brad, stickers (fabric borders, filigree tab, letters, sentiment ticket), paper banner, chipboard (arrows, "fun" tab, number, tag), wooden veneer shapes (arrow, "totally"): BasicGrey; Buttons: American Crafts (wooden), BasicGrey; Arrow paper clip: Freckled Fawn; Date stamp, pen, ink: American Crafts


Wow! These are amazing! You create the most AWESOME backgrounds!!
ReplyDeleteThese are great!
ReplyDeleteThis is gorgeous :) x
ReplyDeletethese are seriously AWESOME! the rainbow layout just makes me smile--thanks for the GENIUS ideas!
ReplyDeleteAmazing! Just love your creativity!!
ReplyDeleteThis is so fun! Love the one with all the "travely" things:) great work I'm sure that took so much time! Your incredible!
ReplyDeleteGREAT LAYOUTS. Love them both!
ReplyDeletestunning pages!!! LOVE LOVE the circle layers on the top page
ReplyDeleteYour layouts always amaze me. Love your constructed pieces of paper to make something so beautiful!
ReplyDeleteI love that curved shape layout Paige, I am feeling totally inspired now.
ReplyDelete