The One with Vesuvius - CHECK!


Friday, January 16, 2015

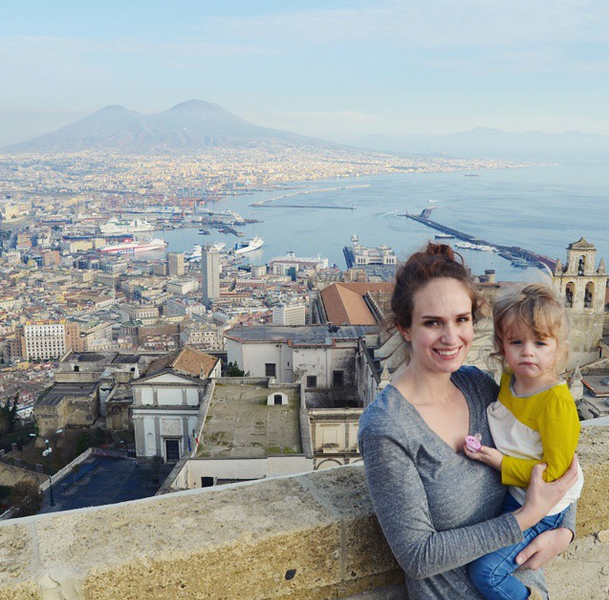
True story: I've always had a weird obsession with volcanoes (and have watched Dante's Peak more times than I care to admit...) Therefore, it's been a big ticket item on my bucketlist to see Vesuvius - the volcano that erupted and destroyed Pompeii in 79 AD. I even blogged about wanting to see Pompeii in July 2011: http://www.paigeandchris.com/2011/07/one-with-pompeii.html.
My heart skipped a beat when we saw it yesterday real life.
Agenda for today: the ruins of Pompeii and Herculaneum. I'm super stoked!

The One with Scrapbook Expo Spotlights!


Thursday, January 15, 2015

Some more fun scrappy news to share: every week I will be posting a scrapbooker spotlight over on the newly revamped and beautified Scrapbook Expo blog called The Weekly Scrapper! I'm spotlighting myself first to introduce the article and all that good stuff :) I made a layout just for the spotlight (as will every scrapper I feature!) and am sharing it here today:
 photo CuteStoryRecordedbyPaigeEvans.jpg
CUTE STORY RECORDED by Paige Evans

Description: I was scrolling through my Silhouette library and saw this lovely set of ampersands (and ampersand set by Lori Whitlock design ID #24970):
The swirly twirly pink ampersand in the center caught my eye and NEEDED to be BIG on a layout, cut with my Silhouette CAMEO of course :)

Journaling says: Playing on the ground with only a few toys because our stuff hadn't arrived yet.

How to: Die cut an ampersand from the and ampersand set by Lori Whitlock design ID #24970 from scratch cardstock using a Silhouette CAMEO then lightly adhere it over a white cardstock background. Watercolor over the ampersand then remove it and let the paint dry (or hurry up the process with a hairdryer). Poke holes about 1/4" apart all the way around the ampersand then backstitch through the holes changing the color of thread where the watercolor changes color. Yes, a long process, took about two hours, but it's so therapeutic for me. Trim a couple of photos to fit the curves of the ampersand and adhere them in place. Cluster embellishments such as die cuts, stickers, chipboard, brads, and more, around the layout. Trim a bit of doily and add a piece of chipboard on the top left corner. Journal on a die cut with a black pen and stamp the date in black ink on the bottom right corner. 

Supplies: Cardstock, pen, roller date stamp, adhesive: American Crafts; Die cuts, stickers, chipboard, brads, doily: Open Book by Maggie Holmes for Crate Paper; Ink: StazOn; Watercolors: Studio Calico; Floss: DMC; Ampersand cut file: and ampersand set by Lori Whitlock design ID #24970; Die cut machine: Silhouette CAMEO
 photo CuteStoryRecordedDetailbyPaigeEvansforblog.jpg
If you want a chance to be featured in a weekly Scrapbook Expo Spotlight, shoot me an email with a link to your gallery!

The One with the Ali Edwards LOVE THIS Layout


Wednesday, January 14, 2015

Show-and-telling my latest Ali Edwards Digital Creative Team layout!
 photo LoveThisbyPaigeEvansforBlog.jpg

LOVE THIS by Paige Evans

Description: I signed up lightning fast to showcase the Ali Edwards Memory Hearts digital brushes - I love hearts and lots of them! Win win!
Journaling says: You two are so stinkin' adorable I can't even handle it! Jane's pouty face and Fox's cute smile!

How to: Turn the hearts from the Memory Hearts digital brushes into cut files then die cut them using a Silhouette CAMEO from the Kiss Kiss collection by Crate Paper. Back the solid hearts with colored cardstock, back a few of the heart outlines with white cardstock, and back another heart with a photo. Adhere the hearts to a light pink cardstock background using dimensional adhesive. Embellish with chipboard, die cut, rub on, and sticker hearts. Apply a "love this" rub on title above the photo. Drop dark brown spray mist over three places to create a visual triangle. Zigzag stitch over the outlined hearts for some texture. Journal with a black pen on a tag and stamp the date in black ink below.

Supplies: Hearts digital brushes: Ali Edwards; Cardstock, adhesivepenroller date stamp: American Crafts; Patterned paper, chipboard, stickers, die cuts, rub ons: Crate Paper; Spray mist: Studio Calico;  Ink: StazOn; Sewing machine Brother; Thread: Coats & Clark; Die cut machine: Silhouette CAMEO
 photo LoveThisDetailbyPaigeEvansforBlog.jpg
Lots of scrappy things lately and lots more to come! Along with a bit of travel recaps soon :)

The One with Classes & Upcoming Events!


Tuesday, January 13, 2015

I've added a new "page" and sidebar icons to my blog called "CLASSES & UPCOMING EVENTS"! This is where I will provide up-to-date details about, well, classes I'm participating in, workshops I'll be teaching, and scrappy events I'll be attending! Here's what I've got in store for the next few months:


I will be working at the American Crafts booth at the PAPERWORLD show in Frankfurt, Germany January 31st - February 3rd. I would love it if you would stop by and say hi! 


I will be teaching how to make two layouts at the Crop Am Rhein (CAR) 2015 near Dusseldorf, Germany on Saturday March 1st 2015. Find more information here: http://scrap-impulse.typepad.com/scrapimpulse/car/


I will be teaching how to make a mini album and layout at Shop Violeta Scrap in Madrid, Spain on March 7th 2015. More information can be found here: http://www.elscrapdevioleta.com/2014/11/taller-de-scrapbooking-con-paige-evans.html and on my blog post about it: http://www.paigeandchris.com/2014/12/the-one-with-teaching-at-shop-violeta.html


And lots more things in the works I'm excited to share soon!

The One with the American Crafts 10+ PATTERED PAPERS Layout


Monday, January 12, 2015

It's 10+ PATTERNED PAPERS week on the American Crafts blog!
 photo BestEverbyPaigeEvans.jpg
YOU'RE CUTE by Paige Evans

DESCRIPTION: Goodness knows I scheduled this week just for myself cuz I LOVE PATTERNED PAPER! And I know I've shown this same style of layout with a big doily backed with patterned papers for the third time, but why change a good thing :)

JOURNALING SAYS: I love when we dress matchy matchy!

HOW TO: Die cut the Flower Rosette by Jamie Koay (Design ID #10909) from white cardstock using a Silhouette CAMEO die cut machine, then back each and every section with patterned paper using dimensional adhesive. That whole process took about three hours but I just love doing this technique - I don't mind it, in fact, it helps me relax! Place a trio of photos across the center and embellish with puffy & paper stickers, a heart and a butterfly die cut, "ever" watercolorable word die cut placed below and "best" letter stickers above, journaling spot, tags, and more. Place color-on-color enamel dots around the doily. Drop blue spray mist across the layout. Stamp the date in black ink and journal with a black pen on the ends of the photos.

SUPPLIES: Cardstock, patterned paper, die cuts, paper & puffy stickers, enamel dotsroller date stamppenadhesive: American Crafts; Spray mist: Mr. Huey's by Studio Calico; Ink: StazOn; Die cut machine: Silhouette CAMEO; Doily cut file: Flower Rosette by Jamie Koay (Design ID #10909)
 photo BestEverDetailbyPaigeEvansforblog.jpg

The One with "Paige"


Sunday, January 11, 2015


True story: when I was a kid I HATED my name with a complete and total passion. Children would tease me and taunt me screaming, "Turn the page Paige!" all up in my face over and over and over again. Yeah. Not so much fun. And then pagers came out. Oh boy. "Why don't ya page me Paige!" That got old REAL fast...

Fast forward to this morning when I had an epiphany. How fitting is the name Paige for this hobby that I have grown to love and appreciate so much? (Scrapbooking, just in case ya didn't know ;) Layouts are also called pages. I make pages. Paige's pages! 

So. Long story short. 29 years later, I can finally say thanks mom and dad for naming me Paige. It's the perfect fit!

The One with the 2015 Calendar on PS I Adore You!


Thursday, January 8, 2015

My 2015 DIY printable desk calendar is available for only 24 more hours on PS I Adore You for 50% off so it's only $2! It comes in two sizes - 4x6" or 5x7". 
 Simply print your 5x7" or 4x6" calendar onto cardstock or photo paper and then display it in an empty CD case, picture frame stand, or clip the pages onto a piece of string and dangle it as a banner so you can see the entire calendar all at once. Enhance your workspace or desktop all year long!
 Proceeds from PS I Adore You go to help cute kids with cancer - such a worthy cause!

The One with the Ali Edwards YOU & ME Layout


Wednesday, January 7, 2015

Here is my latest Ali Edwards Digital Creative Team layout:
 photo YouampMebyPaigeEvansforBlog.jpg
YOU & ME by Paige Evans

Description: I do love a big, round background element :) I had so many ideas rolling around in my head when I selected the Ali Edwards Firsts digital brushes - spraying and stitching and layering... but repeating the sunburst stood out the most to me!


Journaling says: Just a little pre-church self w/ my pretty girl.

How to: Turn the sunburst from the Firsts digital brushes into a cut file then die cut it using a Silhouette CAMEO 9 times in concentric sizes from the Open Book by Maggie Holmes for Crate Paper collection. Adhere the sunbursts to a pink ombre paper background using dimensional adhesive. Layer and embellish a photo in the center. Drop black India ink over the top left and bottom right sides of the photo. Apply a sentiment title rub on to a tag and tuck it under the photo. Journal with a black pen above and below the picture.  

Supplies: Sunburst digital brush: Ali Edwards; Adhesivepen: American Crafts; Patterned paper, wood veneer, chipboard, brad, die cuts, stickers, tags: Crate Paper; India ink: ProArt; Die cut machine: Silhouette CAMEO
 photo YouampMeDetailbyPaigeEvansforBlog.jpg
Until next time!

The One with Elvis in Grafenwöhr


Tuesday, January 6, 2015

I may have mentioned it once or twice before, but it's a fun piece of trivia: Elvis Presley was stationed here in Germany in 1958 and he sung in a bar that is now our church building.


Here is little Miss Jane dancing in front of the bar-turned-church.
Wouldn't it be awesome to travel back in time a couple decades to see Elvis perform in the town we now live in?!

The One with docrafts Layouts


Sunday, January 4, 2015

I've had the fun opportunity to create a couple layouts for docrafts recently and thought I'd share them here today as well!
 photo 2014TravelsbyPaigeEvans.jpg
2014 TRAVELS by Paige Evans

Description: I was asked to create a "year in review" page and since our 2014 highlights were traveling all over Europe, I thought it'd be fun to feature our favorite destinations from the year on a single layout. I was trying to figure out how to make everything fit on one page when I came across this circles paper in the Capsule collection - the circles are the perfect size and place for featuring lots of tiny photos! And then I pulled products and papers from the Capsule, All Aboard, and Christmas in the Country collections, along with a few other embellishments like wooden buttons, ribbon bows, and regular buttons.

Journaling says: There isn't really any journaling, just written destinations: Ingolstadt, Barcelona, Disneyland Paris, Nymphenburg Palace, Mostar, Dubrovnik, Herrencheimsee, Salzburg, Switzerland, Paris, Versailles, Karlovy Vary, Krakow, Berlin, Potsdam, Lisbon, Vatican, and Rome.

How to: Punch 2" circles from patterned papers and traveling-themed die cut cards and place them over all of the white circles on the base paper. Stitch over a few of the circles to add some texture. Print photos at 1.5 x 1" then adhere them over the whole or mostly whole circles using dimensional adhesive. Layer and tuck embellishments like buttons, ribbon bows, and stickers on and around all of the circles. Print the months (I used the Traveling Typewriter font since my manual typewriter is out of ribbon but this font has the same look) onto a subtle patterned paper, trim the months out, and adhere them over the circles. Use a pencil to write the destinations/places. Die cut the word "travels" from patterned paper using a Silhouette CAMEO and curve it around the bottom of a circle. Hand cut "2014" from a dark patterned paper and curve it around the top of the circle to complete the title.

Supplies: Patterned paper, tags, stickers, ribbon bows, buttons: docrafts; Sewing machine: Brother; Thread: Coats & Clark; Pencil, adhesive: American Crafts; Circle punch: EK Success; Die cut machine: Silhouette CAMEO
 photo 2014TravelsDetailbyPaigeEvans.jpg

*********************************************************************************

 photo CatampFoxHappybyPaigeEvans.jpg
CAT & FOX = HAPPY by Paige Evans

Description: It was a fun challenge to try and use as many of these chalkboard/kraft/wood veneer/cork/all neutral supplies together as possible on one page!

Journaling says: The journaling is written on a tag tucked into a pocket! It says: When we were in Korcula, Croatia Fox found a whole bunch of cats across the street and had so much fun chasing them around and petting them. Like mother like son I suppose! It may be my greatest achievement to pass along a deep love for animals :) Hopefully we can have lots of pets again one day soon.

How to: Arrange photos, tags, wood veneer arrows, envelopes, cork, and more, like a puzzle onto the top portion of a white cardstock base and adhere everything in place. Stamp the date in black ink on one of the kraft stickers. Apply white and black rub on details to a few more areas. I let Fox write his name with chalk on a chalkboard tag - I love how this will be saved forever! Write on a journaling tag with a black pen and tuck it into a pocket. Doodle on some of the chalkboard pieces with a white pen. Drop white paint around the layout. Place a kraft stringed banner below all of the embellishments. Apply a rub on title to the bottom left corner.

Supplies: Envelopes, wood veneer, cork, buttons, tags, stickers, chalkboard labels, kraft stringed banner, rub ons, chalk: docrafts; Cardstock, roller date stamp, adhesive: American Crafts; Pens: American Crafts (black), Uni-Ball Signo (white); Paint: Americana; Ink: StazOn
 photo CatampFoxHappyDetailbyPaigeEvansforblog.jpg
docrafts is sponsoring a lot of the supplies for my two layouts I'm teaching at Crop Am Rhein 2015 happening February 28 - March 1st! I'll post more information about CAR 2015 soon, meanwhile you can check out Barbara's blog - Scrap Impulse and see a PDF with information at http://scrap-impulse.typepad.com/files/anmeldungcar2015.neu.pdf

Tschuss/Bye!

The One with the Elle's Studio Blog Contributor!


Saturday, January 3, 2015

 
I've got a fun announcement today: This year I'm going to be a blog contributor for Elle's Studio! Elle's Studio and I go way back - I was on their first design team in 2010 and I'm so excited to be back four years later!
Jenni Hufford 
Waleska Neris
***Paige Evans*** 

What exactly does this mean? Lemme tell ya! Once a month I will have a step-by-step or video tutorial on the Elle's Studio blog. Fun right?! I can't wait to get started!

Also, the 2015 Elle's Studio Design Team was just announced and it looks like an incredibly talented team - so excited to see all of their creations this year! Bonus: be sure to visit every member's blog for a chance to win some awesome goodies.

The One with Happy New Year 2015!


Thursday, January 1, 2015

HAPPY

That is all :) 
I'm up to my elbows in new, fun, can't wait to share projects! 
Here's to a wonderful year!
Paige Taylor Evans © // Quinn Creatives DESIGN