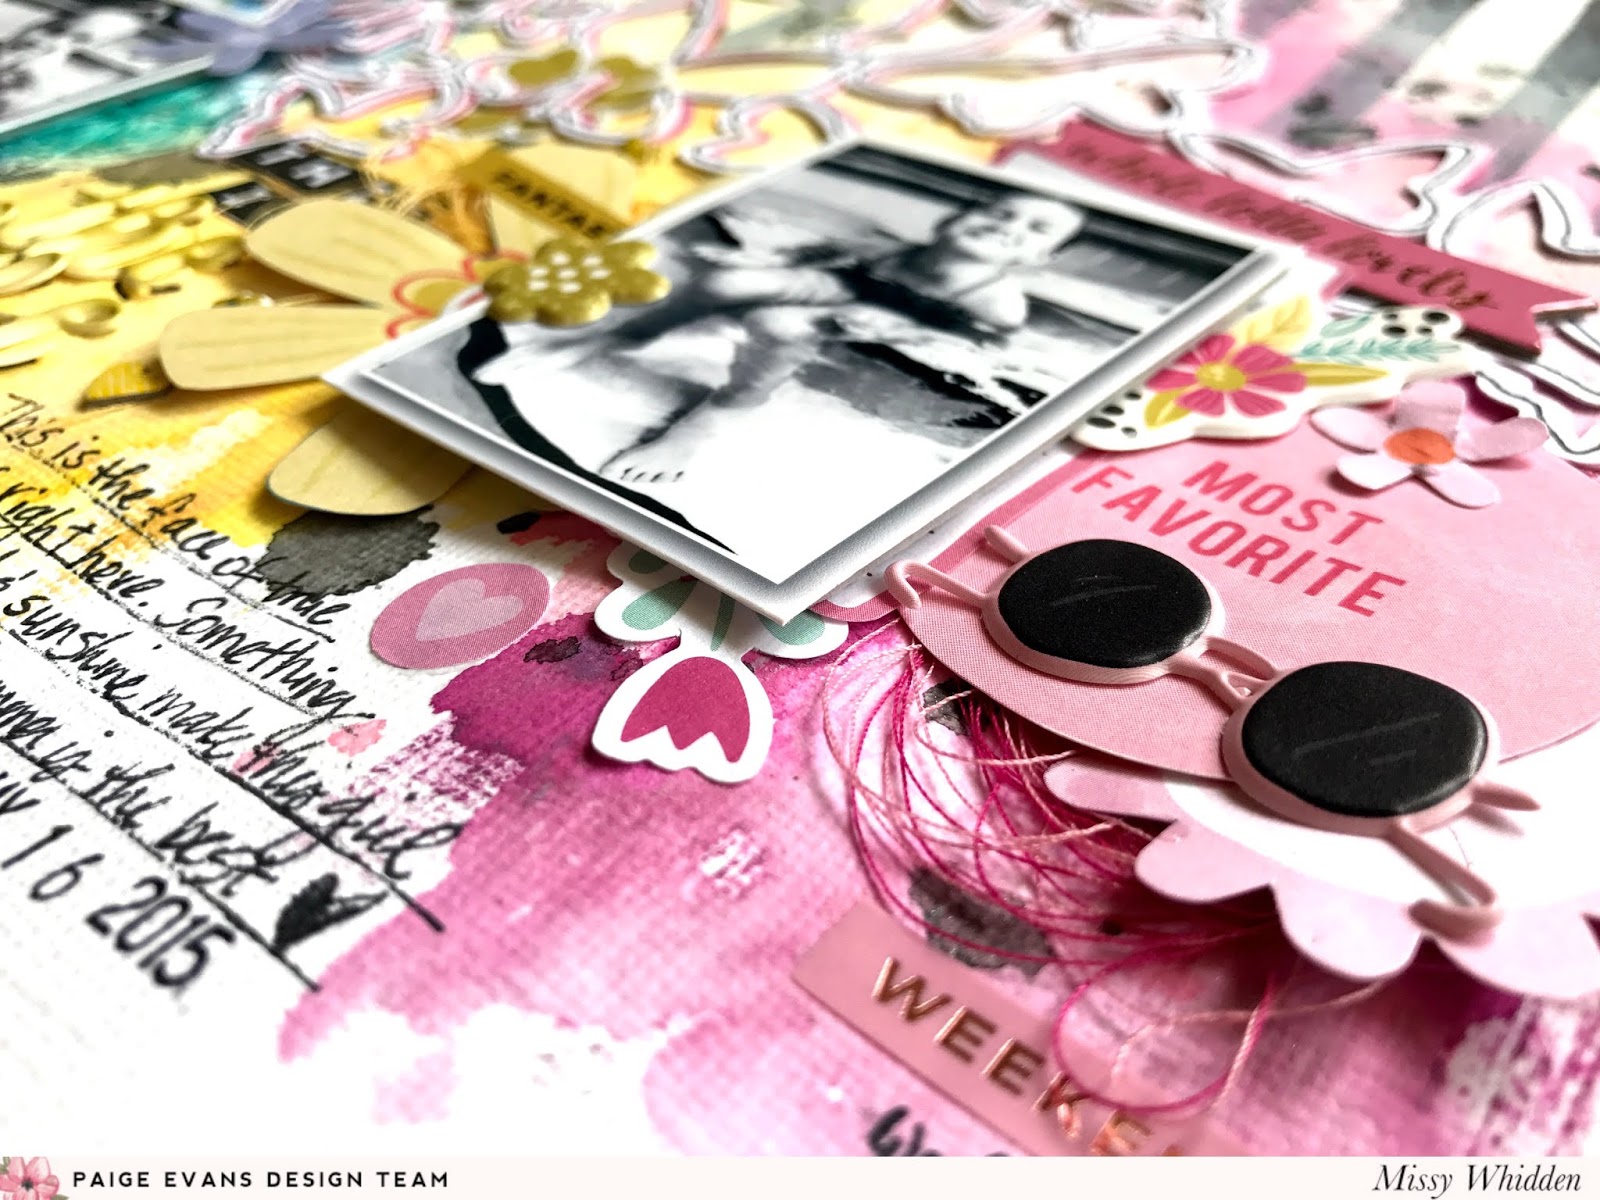
This is the Life Layout by Missy Whidden


Tuesday, September 4, 2018

Hey, friends Missy here! I’ve been wanting to use Paige’s Butterfly Border cut file for some time now, and I finally did for this page. I wanted to create a shadow effect with it, so I first cut it on white cardstock and then on Oh My Heart Paper 14 which is a beautiful pink ombre. I offset the pink paper under the white to give it a pretty pink shadow. I wanted to incorporate lots of black and white so I used Oh My Heart Paper 07 for the top half of the layout. I traced and cut around the top edge of the cut file to fit the shapes. I smudged a lot of white gesso down on the black and white paper to soften the lines and then used my three favorite colors of Distress Oxides to create lots of messy color.
I scraped the ink pads right onto the paper and then spritzed with some water. I used a brush to spread some of the color around below the butterflies and behind them. I decided later on in the process to add color above the butterflies as well. I sorted through lots of embellishments in coordinating colors and used several stickers from the 30-page Paige Evans #StickerBook and some fussy cut flowers from the Oh My Heart 12x12 Paper Pad.

I found lots of matching goodies to use here including Oh My Heart Puffy Stickers, Pick-Me-Up Puffy Stickers, and even some fun circles from Fancy Free Paper 03. I always find pieces to use from Paige’s 30-page #StickerBook. There are a few bits of Oh My Heart Chipboard Stickers and Pick-Me-Up Chipboard Stickers. And for fun I added in some matching colors of tangled thread.

I combined some #StickerBook alphas with some Oh My Heart Puffy Stickers to create my title. Since the letters were yellow on top of yellow ink, I traced around them with a black pen to make them stand out. I also added some black splatters and stamped some cute lined hearts using the Turn the Page Layerable Stamp Set.

I always have so much fun mixing and matching Paige’s collections! I hope this inspires you to do the same on your next page. Thanks for stopping by!
SUPPLIES: PICK-ME-UP: Chipboard Stickers, Puffy Stickers; TURN THE PAGE: Layerable Stamp Set; OH MY HEART: Paper 07, Paper 14, 12x12 Paper Pad, Puffy Stickers, Chipboard Stickers; TAKE ME AWAY: Roller Stamp; FANCY FREE: Paper 03; 30-page Paige Evans #StickerBook; Die cut machine: Silhouette Cameo; Cut file: Butterfly Border by Paige Evans; white cardstock; gesso; Distress Oxides
Blog: littlenuggetcreations.blogspot.com  Instagram: @missywhidden  Pinterest: @missywhidden
Facebook: missy.whidden  YouTube: Missy Whidden

Fun with Dinosaurs Layout by Jana Maiwald-McCarthy


Monday, September 3, 2018

Hi everyone, Jana back again, I have a fun new layout to share. As soon as I saw the new Dinosaur Border cut file I knew that I wanted to use it.
 We went to a dinosaur theme park back in 2016 and I never scrapped the photos, so finally I have one of them on a paper. I started with cutting the file two times, running to the left and running to the right, I used the mirror tool in the Silhouette Software.

I grabbed three different 6x6 paper pads (Oh My Heart, Pink Paislee “Moonstruck,” and Crate Paper “Flourish”) and looked for different green tones to back the little dinosaurs with. Before I glued them to the background I added a lot of watercolors in green and brown tones for a realistic feel.

The picture shows my little one and one of his best friends next to a giiiiant T-Rex; that was so cool
and very impressive. To get the nature feel on the paper I also decided to cut another file from Paige,
the Leaf Wreath. I cut the leaves apart and placed them around the photo.

I used the Pick-Me-Up Alphabet Stamps to create a part from my title and to finish this page I added
some enamel dots and more tiny stamps. I really love how this layout turned out and had a lot of fun with these cut files!

SUPPLIES: PICK-ME-UP: Alphabet Stamps; OH MY HEART: 6x6 Paper Pad; Cut files: Dinosaur Border, Leaf Wreath; Die cut machine: Silhouette Cameo; white cardstock

Blog: Scissors Glue & Paper / Instagram: @janammcc / YouTube: Jana ScissorsGluePaper / Facebook: Jana Maiwald-McCarthy

Stadium High School Layout for Paige's Pages 16


Sunday, September 2, 2018

Here is the second layout from Paige's Pages 16 at Big Picture Classes!
There are a lot of different techniques on this layout that combine together to create something unique & fun: modeling paste with stencils, heat embossing with gold glitter powder, splashing watercolors and acrylic paint, fussy-cutting, tone-on-tone, border punches, and more!
There is a paper in my Turn the Page collection that is filled with colorful hexagons (Paper 17). Even though the collection has been out for over a year, I still haven’t used this paper and I was excited to give it a whirl! Once I fussy-cut one hexagon from every color I thought about how I could jazz them up. Enter gold glitter embossing! I have a few colors of powder that I’ve kept throughout my frequent purges but I still don’t use them as often as I should – I need to emboss more!
I like to include smaller photos on my layouts to let the background work and paper piecing enhance the story. On this layout I toyed with one larger photo first but since all my other layouts in Paige’s Pages 16 use a single photo I switched to several small photos to show how to include multiple pictures on one layout.


There were a few detail photos from this event that I wanted to highlight but didn’t want to make an entire mini album like I usually do when I have a lot of photos from a single adventure, so printing them small let me show more photos while also having fun creating the background.

Find the start-to-finish process video and more tips & tricks over in Lesson 2 of Paige's Pages 16 at Big Picture Classes! :)

SUPPLIES: TURN THE PAGE: Paper 07, Paper 10, Paper 17, Sticker Book, Journaling Spots, Puffy Stickers; modeling paste; watercolors; enamel dots; precision pen; Sewing machine: Brother; Thread: Coats & Clark; gold glitter embossing powder; watermark ink; spiral notebook border punch

Color Pour


Saturday, September 1, 2018

Have you seen the new Color Pour line by American Crafts available at JoAnn?! I got my hands on some of the products and went to town creating a one-of-a-kind canvas to add to a wall in my happy scrappy place!
I couldn't pick just one or two colors, I had to go with eight :)
I poured my selected paints into eight little plastic cups and then squirted a few drops of Cell Magic into each cup.
There are popsicle sticks included in one of the Color Pour kits which I used to stir around the Cell Magic in each cup.
Then I poured the paints into two larger cups.
I put the four warmer colors in one cup and the four cooler colors in the other.

Then I poured the warm colored paints on the left side of a long canvas and...
...poured the cool colors on the right side.
Next I wiggled the canvas around and let the paint droop over the sides. I love the marble effect!
Oooooh!
Ahhhh!
It does get a bit messy so be sure to put down a drop cloth - this plastic one was also included in a kit.
When there is an option to add gold, always add gold!
I love the bits of sparkle & shine the gold flakes add!
Then I let the canvas sit out to dry for the rest of the day and overnight. When I woke up this morning it was ready to go!
Just a note that the darker pink turned red when it dried so I would have picked a different pink if I could do this over again. And there definitely will be a next time!
Ready to hang!
I put my Color Pour canvas in a corner of my happy scrappy place to stare at and admire all the colors.

August 2018 Highlights


August was all about unpacking and making our house a home.
Our belongings were supposed to be delivered later in the month so we spent the first few weeks as homeowners painting. First room: my scrap room of course! I painted it Summer House by Behr. It's a beautiful mint.
Next, I painted Jane's room two shades of pink. The chair rail was already that raspberry pink.
And last but not least I painted Fox's room two shades of blue. 
We spent a lot of time swimming in Nana's hot tub.

Unpacking took ages. The movers dumped everything out of all my neatly organized bins and boxes and threw them into bigger boxes and packed my then empty bins and boxes separately. It was really frustrating and maddening to me why anyone would unorganize everything that was so perfectly organized, but what's done is done and even though it took five times longer than it has from our previous moves to unpack, I got 'er done! Phew!
The kids had a super short summer break - they got out mid-June and went back August 10th. Jane started 1st grade and Fox started 2nd grade.
Cutest unicorn I ever did see!
I finally got my scrap room all set up! So happy to be back to crafting again!
Snuggle time is the best time.

Sweet Friendship Layout by Julie Taylor


Hi there scrappy friends, Julie back with you today sharing a layout using the gorgeous feather cut files (Feather 1 and Feather 2).
I cut out lots of feathers in various sizes and inked them in shades of blues and purples then backed some of them with papers from the Pick-Me-Up 6x6 Paper Pad. I added them falling down the page over a background of mixed media using the packaging technique.


I die cut the word ‘sweet’ and backed it with the B-side of Pick-Me-Up Paper 14 and added it, using pop dots, above all the feathers. My photos went above that along with a Rub-On. The "friendship" Chipboard Sticker and a few sentiment Stickers finished the page.


I hope you have enjoyed seeing how I’ve used these feathers and thanks for looking!

SUPPLIES: PICK-ME-UP: Paper 14, 6x6 Paper Pad, Stickers, Chipboard Stickers; Cut files: Feather 1 and Feather 2 by Paige Evans; Die cut machine: Silhouette Cameo; white cardstock

Instagram: @julie9699 / Facebook: Julie Taylor
Paige Taylor Evans © // Quinn Creatives DESIGN