Blue Lagoon Mini Album


Thursday, May 25, 2017

My obsession with making mini albums continues! I purchased a whole bunch of 4x4 mini albums when they were on sale a couple YEARS ago... and they've been sittin' pretty on my shelf ever since! Just waiting to be used and loved.
After finishing up the Keukenhof Pocket Mini Album a couple days ago, I needed a new project and photos to scrap. I decided to make a mini album based around our pics from the Blue Lagoon in Iceland!
Then I wondered which collection to use. The photos aren't very colorful, in fact, they are mostly mint, black, and white. So I decided to try something I've never done before and make an entire monochromatic mini album, not using a specific collection, instead I went through box by box of my scrap stash and pulled out all the mint-colored things from papers and ribbon to washi tape and buttons to sequins and ink colors, and much more!
After trimming the photos down I placed them into pockets in pretty much chronological order and the album already felt like it was lookin' good! Just putting photos into pockets is "scrapbooking"! Then I worked on the cover. I love this really old set of Thickers with different shades of mint. The plan was to use my sewing machine to stitch them on but after scratching up the cover and the needle broke and literally flew into my eye... I tossed that idea and instead did some hand stitching. On the spine I used my We R Memory Keepers Typecast and typed "Blue Lagoon Iceland" onto ledger paper, trimmed it down, and inserted it into the bookplate. Once the album was completely finished I wrapped ribbon, baker's twine, and yarn around the spine and tied on two mint tassels.

On the inside cover I adhered a chipboard wave from the brand new Summer Lights collection by Pink Paislee between the stitched lines.
What's a project without stitching?! Ha! I trimmed a piece of transparency to the same size as the page protectors, punched holes in the sides, then hand stitched the country of Iceland in aqua thread. I placed a small heart sticker where the Blue Lagoon is. Next came a sequin & glitter pocket: I poured a few blue sequins and glitter into the bottom, stitched 1/3 of the way across, added more sequins & glitter, stitched 2/3 of the way across, added even more sequins & glitter, then sewed the top shut. Being the glitter phobe that I am, I'm proud of this little pocket page haha.
I also really love backing die cuts with patterned paper! Since I spent a long time searching through all of my 6x6 patterned paper pads pulling mint papers, I figured I'd better use them! I die cut the self made "Blue Lagoon" outline three times from white textured cardstock, used spray adhesive to attach them all together, backed the open letters with patterned paper, then die cut a solid "Blue Lagoon" from white cardstock to back the entire piece so it has a clean back side.
Then we get to the photos! On all of the 4x4 photo pockets I wrapped washi tape around the right edge - I love the color this adds, though I don't know if "color" is the right word since I only used tints, tones, and shades of a single color ;) I copied text from the blog post recap, printed it out, and trimmed it into strips before adhering it directly onto the "white space" of the photo.
The next photo page is a picture of the rain-soaked window and a phrase we kept repeating throughout our time in Iceland haha. In the 4 pocket page I added two photos and the other two are filled with buttons - to help them stay in the pocket I machine stitched along the top edges.
The buttons are visible on the front and back and I added two more photos to the other pockets. On the right spread, another 4 pocket page, I trimmed four pieces of cardstock, sprayed them with adhesive, then layered bits of textured ribbon across them. A fun filler page!
The backsides of the ribbon-covered cardstock are seen on the left side and then I topped them with stickers. On the right page, another 4 pocket page, I typed and printed journaling onto vellum - the vellum reminds me of the fog/steam at the surface of the water. And I added another pair of small photos.
On the left side I backed the photos with pieces of baker's twine and yarn then stitched down the sides so they'll stay in place forever. On the right spread I used a 4" square photo (which means more washi tape on the right edge!), then added a wave die cut and a jumble of messy string with a mini clothespin.
The left side is a big picture of me in the water along with "most favorite" puffy stickers from my Fancy Free collection. Look carefully and you'll see I dotted the "i" with a sequin. The right 4 pocket page is 4 small photos, done and done, clean and simple.
I trimmed a piece of white cardstock to 4" square, stamped the flower from the Oh My Heart acrylic stamp set all over it using 5 different colors of aqua/blue ink, then trimmed it into 2" squares to fit the pockets. Also clean and simple! The right pocket holds a 4" square photo and then on top of the sleeve I added a puffy frame sticker with typed and printed journaling on vellum trimmed into strips.
On the left side I made another filler page by stitching mint embellishments down the center and mirrored that down the right edge of the right photo page. Directly on the photo I stamped journaling lines and hand wrote journaling all about that smoothie.
I added glitter chipboard dots to the top of the large photo mimicing rain. On the right 4 pocket page I saved our receipt and trimmed two 2" squares from it for two of the pockets then added photos to the other pockets. I stitched "love" to the center.
The left side is a couple more photos, a bit more journaling, and a puffy butterfly sticker with "antennae" made from pins from my stash. On the right photo I made "rain" with modeling paste and a stencil across the top edge and slid on a flag paper clip to the bottom right side.
The last page is a family photo and a few sentiment stickers on the bottom left, the date stamped below, and another flower stamped on the top right corner with a sequin in the middle of the flower.
All-in-all this album only took a single afternoon to complete! This format of mini album with pockets lends itself to quick scrapping - you just need to embellish which you can keep to a minimum or take it to the next level, whatever suits your style!
Also, gathering the supplies beforehand and limiting myself to only using a single color helped streamline the process and made it come together quickly!
As I type this my photo order of Cinque Terre pics is about to arrive so I'm gonna go prep the pages for that mini! 
Can't stop, won't stop making minis!

Ebern Scrappt Recap


Wednesday, May 24, 2017

My fifth and final (or maybe not? you never know!) time teaching at Ebern was so fun!

From 10am-4pm we made four layouts and ate yummy food and shopped!
 Dad - can you make me one of these wooden glue holders?! So cool!
 Scrapping away!

A super cute visitor! She loves pink almost as much as me :)
I brought my new Stitch Happy sewing machine by We R Memory Keepers so everyone could try it out!
 Taking turns using the Stitch Happy - worth the wait!
It was also interNational Scrapbook Day and there's nowhere else I'd rather be and nothing else I'd rather be doing than teaching scrapbooking on this fun annual holiday!
I have loved getting to know these girls and seeing their beautiful faces over the years!

We made 4 layouts that I've taught in previous workshops which you can find on my page about past events: http://www.paigetaylorevans.com/p/past-workshops.html
I really really hope to back some day! A huge thank you to Lena for inviting me to teach often and organizing these crops!

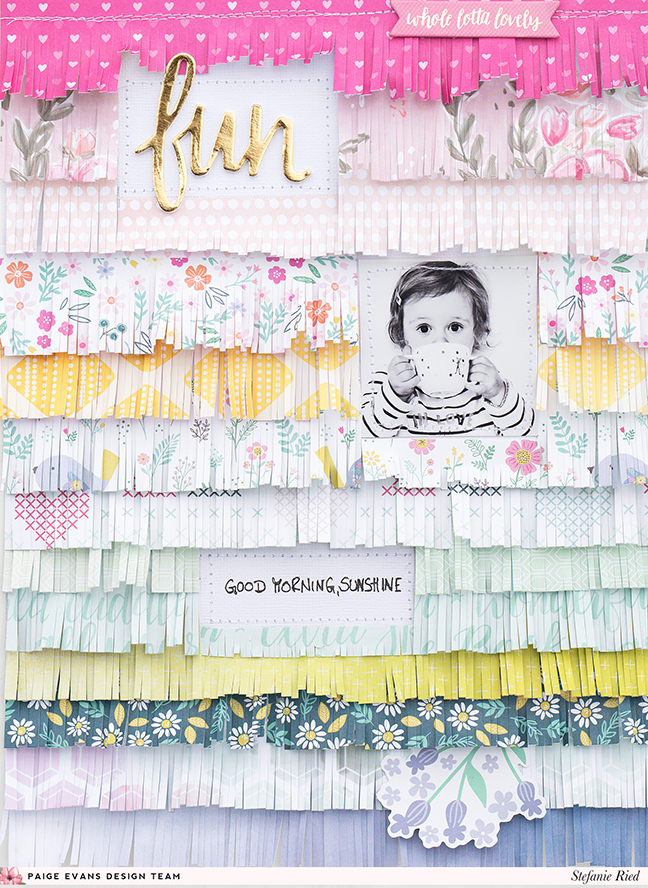
Good Morning Sunshine Layout by Steffi Ried


Tuesday, May 23, 2017

It's all about FRINGE these days! So funny how some trends come and go - I remember when fringe was all the rage a decade or so ago, then I got rid of my fringe scissors and all my other decorative scissors, and now, it's back! What goes around comes around! Design team member Steffi Ried created a beautiful fringe layout that's easy to replicate!
Hello and welcome! For my layout I designed the background with fringed papers. I wanted to use only a few papers first, however, it became more and more, I couldn't stop! No wonder, with so many beautiful patterns and colors. After I finished the layout, I though, this looks like Paige's style :)
After I had selected all the papers, I cut the fringes with regular scissors. That was my "occupation" in the evening. It was very easy and with a few breaks in between, the fringes were cut quickly. 
Within the background I wanted to add three windows: one for the photo, the title, and the journaling.
I hope you like my colorful layout and would like to create a layout with fringe! Thanks for stopping by!

Here is a process video showing how this layout came together:
Blog: steffiried.blogspot.com / Instagram: @steffiried / Pinterest: @steffiried / Facebook: stefanie.ried.96 YouTube: Steffi Ried
Whether you have special fringe scissors or regular scissors, making fringed paper strips is easy peasy and when they're layered down the background of a layout it creates a beautiful and colorful textured design! Go on then, give it a try!

Reykjavík, Iceland


Monday, May 22, 2017

Reykjavík, the capital of Iceland, is the world's northernmost capital city. It's a fun, quirky town with colorful buildings, funky modern architecture, and serves as the gateway to the rest of the country.
Our first stop in exploring Reykjavik was the Hallgrimskirkja church, which was literally out the front door of our airbnb.

This immense concrete Lutheran church was built beginning in 1946 and completely dominates the skyline of the city.
Being a Lutheran church, the inside is very reserved with limited decoration.
For a few bucks you can ride an elevator up and then climb the last few floors to the observation deck at the top of the nearly 250 foot tall tower.
Views! You can see our airbnb building with the white roof in the center-right of this picture. Great location!
Quintessential Reykjavik views. I LOVE the colors!
THE view of the city looking down Skolavordustigur street towards the old harbor. Google "Reykjavík" and this is what you'll see.
Across the bay.
Out front, a statue of the Viking explorer Leifur Eiriksson, the first European discoverer of North America, stands proudly. The statue was a gift from the US to commemorate the 1000th anniversary of Eiriksson's voyages.
Then we walked into the heart of town.
Colors everywhere! It looks like a Mondrian painting.

Strolling down one of the main shopping drags, Skolavordustigur.
Snippets from our walk.
Jane. This girl is somethin'!
Town details.
Down in the center of the old town is the Tjornin lake. The area is a magnet for birds with more than 40 species visiting at different times of the year including swans, geese, terns, and of course, ducks. Ducks trump all.
Nearby is the Domkirkja, Iceland's main cathedral. It's a modest little church but it played a vital role in the country's conversion to Lutheranism.
The inside has a lovely wooden interior with hints of gold.
Hotel on the Austurvollur green with a restaurant by Jamie Oliver inside.
Main square.
Unsurprisingly, we've never seen an Iceland plate on a car as we've driven around continental Europe. Iceland plate - check!
Jane started feeling a little sick, but she's a trooper.

The Harpa is an example of some of the cutting edge, modern architecture that is springing up in Reykjavik. The building is a concert hall and cultural center located right on the water's edge.
In the afternoon we booked a puffin tour so we walked down the gangway in the Old Harbor to hop on our boat.
From the boat looking back towards the Old Harbor.
From the harbor you have tons of options for tours, many of which are whale watching since the waters around Iceland are rich with marine life, including the humongous Blue Whales.
Our kids didn't last long on the tour before the hum of the engine, the rocking of the water, and the coziness of the life jackets put them to sleep.
Our tour was a success! We saw puffins!
On coastal cliffs and islets all around the country, puffins return year after year to nest and hatch their young. The puffin season was just starting so we were lucky to get some glimpses of these cute (and fast!) birds.
Thankfully, the weather held and the only reason we got wet was from the spray of the ocean as we sped around.
Back on dry land we walked up Laugavegur street, another popular shopping area.
This shop advertised itself as the cutest shop in Iceland. I agree!
Fox loved the robot mural.
Hello aqua house!
We don't travel lightly.
The next morning we woke up at 3:00am (we tried to stay on Germany time though so it "only" felt like 5:00am) to make our way to the airport. Reading material states: "Earthquakes, fires, volcanoes, floods, neglect, and pestilence." All things Icelanders have had to overcome.
Flying back into Germany, we passed over the bright yellow rapeseed fields that dot the country every spring/summer/fall.
On the drive home we spotted this bright pink Fiat. GIMME!!
Little clips of walking around Reykjavík and the puffin boat tour:
Our family in Reykjavík, Iceland on Wednesday May 3rd 2017.

And that concludes our trip to Iceland! Next trip: Oslo, Norway!
Paige Taylor Evans © // Quinn Creatives DESIGN