FIND ME HERE


Saturday, August 19, 2023


***CHECK BACK OFTEN FOR MORE IN-PERSON CLASSES, ONLINE EVENTS, AND RELEASES!*** 
 
NOW
Visit MY SHOP for all classes, kits, pre-orders, supplies, and more!


2024
August 31st & September 1st - Scrap & Learn Virtual Camp: register HERE

October 5th - Sweet & Spooky Virtual Event with Scrapbook & Cards Today

November 9th & 10th - Tricks & Treats Weekend in Thornton, CO: register HERE - SOLD OUT - join the waitlist by sending me an email: paigetaylorevans@gmail.com

2025
March 7th-9th - Scrapbook Event at Scrapbook Haven in Omaha, Nebraska! Registration opens soon!

July 5th & 6th - 4th of July Scrapbook Event in Wallace, Idaho: register HERE

October - Scrapbook Event in Texas! More info coming soon!

Sketch Challenge #2 with Paige Evans


I'm so excited to share my second sketch and accompanying challenge!
SKETCH CHALLENGE #2
1) Create a new layout based on this sketch!
2) Upload your layout to your social media by Saturday September 16th 2023 and tag me @paigetaylorevans so I can see. You can use whatever products/collections you have.
3) After you post your finished layout, send me a DM or email (paigetaylorevans@gmail.com) and I will give you a code for $15 off your purchase of digital items/virtual classes in my shop! Open worldwide!
4) Have so much fun!! Can't wait to see what you make for this sketch challenge!!
Here is my layout made in 2020 that the sketch is based on created with Bloom Street. I have a full blog post about it HERE. And HERE is a link to my Concentric Circles Cut File if you want to have a machine draw out the background.
Can't wait to see what you make!!

Presents Layout by Yui Oku


Friday, August 18, 2023

Hi everyone! Yui Oku here today with a new layout using Paige's Presents from the 25 Christmas Cut Files 2021 along with her new Sugarplum Wishes collection!
Sugarplum Wishes has special colors in addition to the traditional christmas colors!! Pink, purple, yellow, green, and more! So I wanted to use a lot of patterned papers. First, I backed the Presents Cut File. I ignored the ribbon part and pasted the paper in the shape of the box. Then put Washi Tape on the ribbon part. I made a ribbon bow by sticking Washi Tape on both sides and formed them into bows that stick in place with glue dots. I thought it would be cute to have a lot of bows, so I put them on the photo too. I love the super cute Paper Clips. I removed the clip and used only the charms. For the background, I used Paper 3 and Paper 5This is my first layout using Sugarplum Wishes so I wanted to use many things! In addition to Ephemera Die Cuts, I added snowflakes and holly leaves Sequins.

I hope this layout inspires you to use Paige's Presents from the 25 Christmas Cut Files 2021 along with her new Christmas-themed Sugarplum Wishes collection!

SUPPLIES: Patterned papers, stickers, Thickers, die cuts, washi tape, sequins, paper clips, embellishments: SUGARPLUM WISHES; white cardstock; Cut file: Presents from the 25 Christmas Cut Files 2021 by Paige Evans

Blog // Instagram // YouTube // Facebook

The Fam Jam Layout by Valerie Bisson


Thursday, August 17, 2023

Hi friends! Valerie Bisson here with a new layout featuring the Christmas Trees from the 25 Christmas Cut Files 2020 and Sugarplum Wishes collection by Paige Evans.
Starting with the beautiful snowflake Paper 9 for my background, I sprinkled it with a bit of white and green paint. Then I cut the Christmas Trees from white cardstock and backed them with papers from the 6x8 Paper Pad. I chose four of the Washi Tapes to border the top and bottom of my layout. This also made a good spot for my trees to sit at the bottom of the page. To make the Washi Tape pop a little more I placed it onto white cardstock first then adhered it to my page. Next I added my family photo doubled up as I like to do sometimes for emphasis, to the top third of the page. Below I added my title with the Thickers. Embellishments sprinkled throughout the page came from the Foam Stickers, Cardstock Stickers, Ephemera Die Cuts, Floral & Snowflake Die Cuts, Mini Puffy Stickers, Sticker Book, and Enamel Dots.
Thanks so much for stopping by I hope you’re inspired to create with Christmas Cut Files and Sugarplum Wishes.
SUPPLIES: Patterned papers, stickers, Thickers, enamel dots, die cuts, embellishments: SUGARPLUM WISHESwhite cardstock; Cut file: Christmas Trees from the 25 Christmas Cut Files 2020 by Paige Evans

Ornaments Layout By Phil Donahue


Wednesday, August 16, 2023

Hello scrappy friends! Happy Christmas in August! Phil Donahue here with my first layout using Paige's fun and festive Sugarplum Wishes collection along with her Ornaments Cut File! For this layout, I wanted to combine a few techniques I've used on past layouts to showcase a photo of my niece Zelda's first Christmas!
For the first technique, I used a method from a layout I shared last year which layered multiple cutouts of the same cut file to create a dimensional element on the page. Using my Cricut, I cut the file eight times and adhered all but one on top of each other. I reserved the best quality white cardstock for the top layer. I adhered papers in various patterns from the 6x8 Paper Pad on all but three bulbs of the dimensional cut file. The remaining three ornaments are where another technique from a previous layout was featured! After adhering acetate, I flipped the dimensional cut file and poured sequins from the Acrylic Sweaters & Sequins pack into each of the acetate fronted bulbs then backed each with vellum. I flipped it back and adhered the final layer of the cut file over top to clean all the lines and complete the dimensional shaker cut file! Afterward, I used the pink stripe side from Paper 11 as my main background along with 1.5" strips of the floral side of Paper 1 to create a border on the top and bottom of the page. I nestled and adhered the shaker cut file in between the borders and added my photos in a spot between the three shaker elements. The final technique was from the same shaker layout which featured the same photo twice! This method emphasizes the photos' importance and makes it even more prominent and the focus of the layout. I made embellishment clusters using items from the Foam Stickers, Sticker Book, and Floral & Snowflake Die Cuts then added Enamel Dots and more Sequins around the page to complete the layout!
I hope you found some inspiration from this layout and pick up the Ornaments Cut File along with Sugarplum Wishes for all your holiday crafting! Happy scrapping!
SUPPLIES: Patterned papers, stickers, die cuts, enamel dots, sequins, embellishments: SUGARPLUM WISHESwhite cardstockvellum; Cut file: Ornaments by Paige Evans

Merry & Bright Layout by Noelle Culp


Tuesday, August 15, 2023

Hi crafty friends! Noelle Culp here today with a new layout featuring using Paige's Poinsettia Frame Cut File and Sugarplum Wishes collection!
I couldn't wait to start creating with Sugarplum Wishes! New collections are so fun to play with! For this layout, I started with Paige's Poinsettia Frame Cut File. I wanted to stick with pinks, so I backed the flowers with Paper 6 and the pink card from the Boxed Cards. I backed the leaves with Paper 8. For my background, I used a holly leaves stencil and Distress Oxides in Rustic Wilderness. I also added a few splashes of green. I added my photo behind the cut file then glued the whole thing on my background. I added a few torn paper strips with Paper 8 to the top and bottom of my layout. Next, I made some flowers using Paige's Layered Flower Cut File that I cut out of pink paper and then added a few holly leaves from the Floral Die Cuts. I cut out a sentiment from Paper 4 and added a title using the Mini Thickers.
I love how this page turned out and I hope it inspires you to try Paige's Poinsettia Frame Cut File and Sugarplum Wishes collection!
SUPPLIES: Patterned papers, die cuts, stickers, Thickers, embellishments: SUGARPLUM WISHESwhite cardstock; Cut files: Poinsettia Frame and Layered Flower by Paige Evans

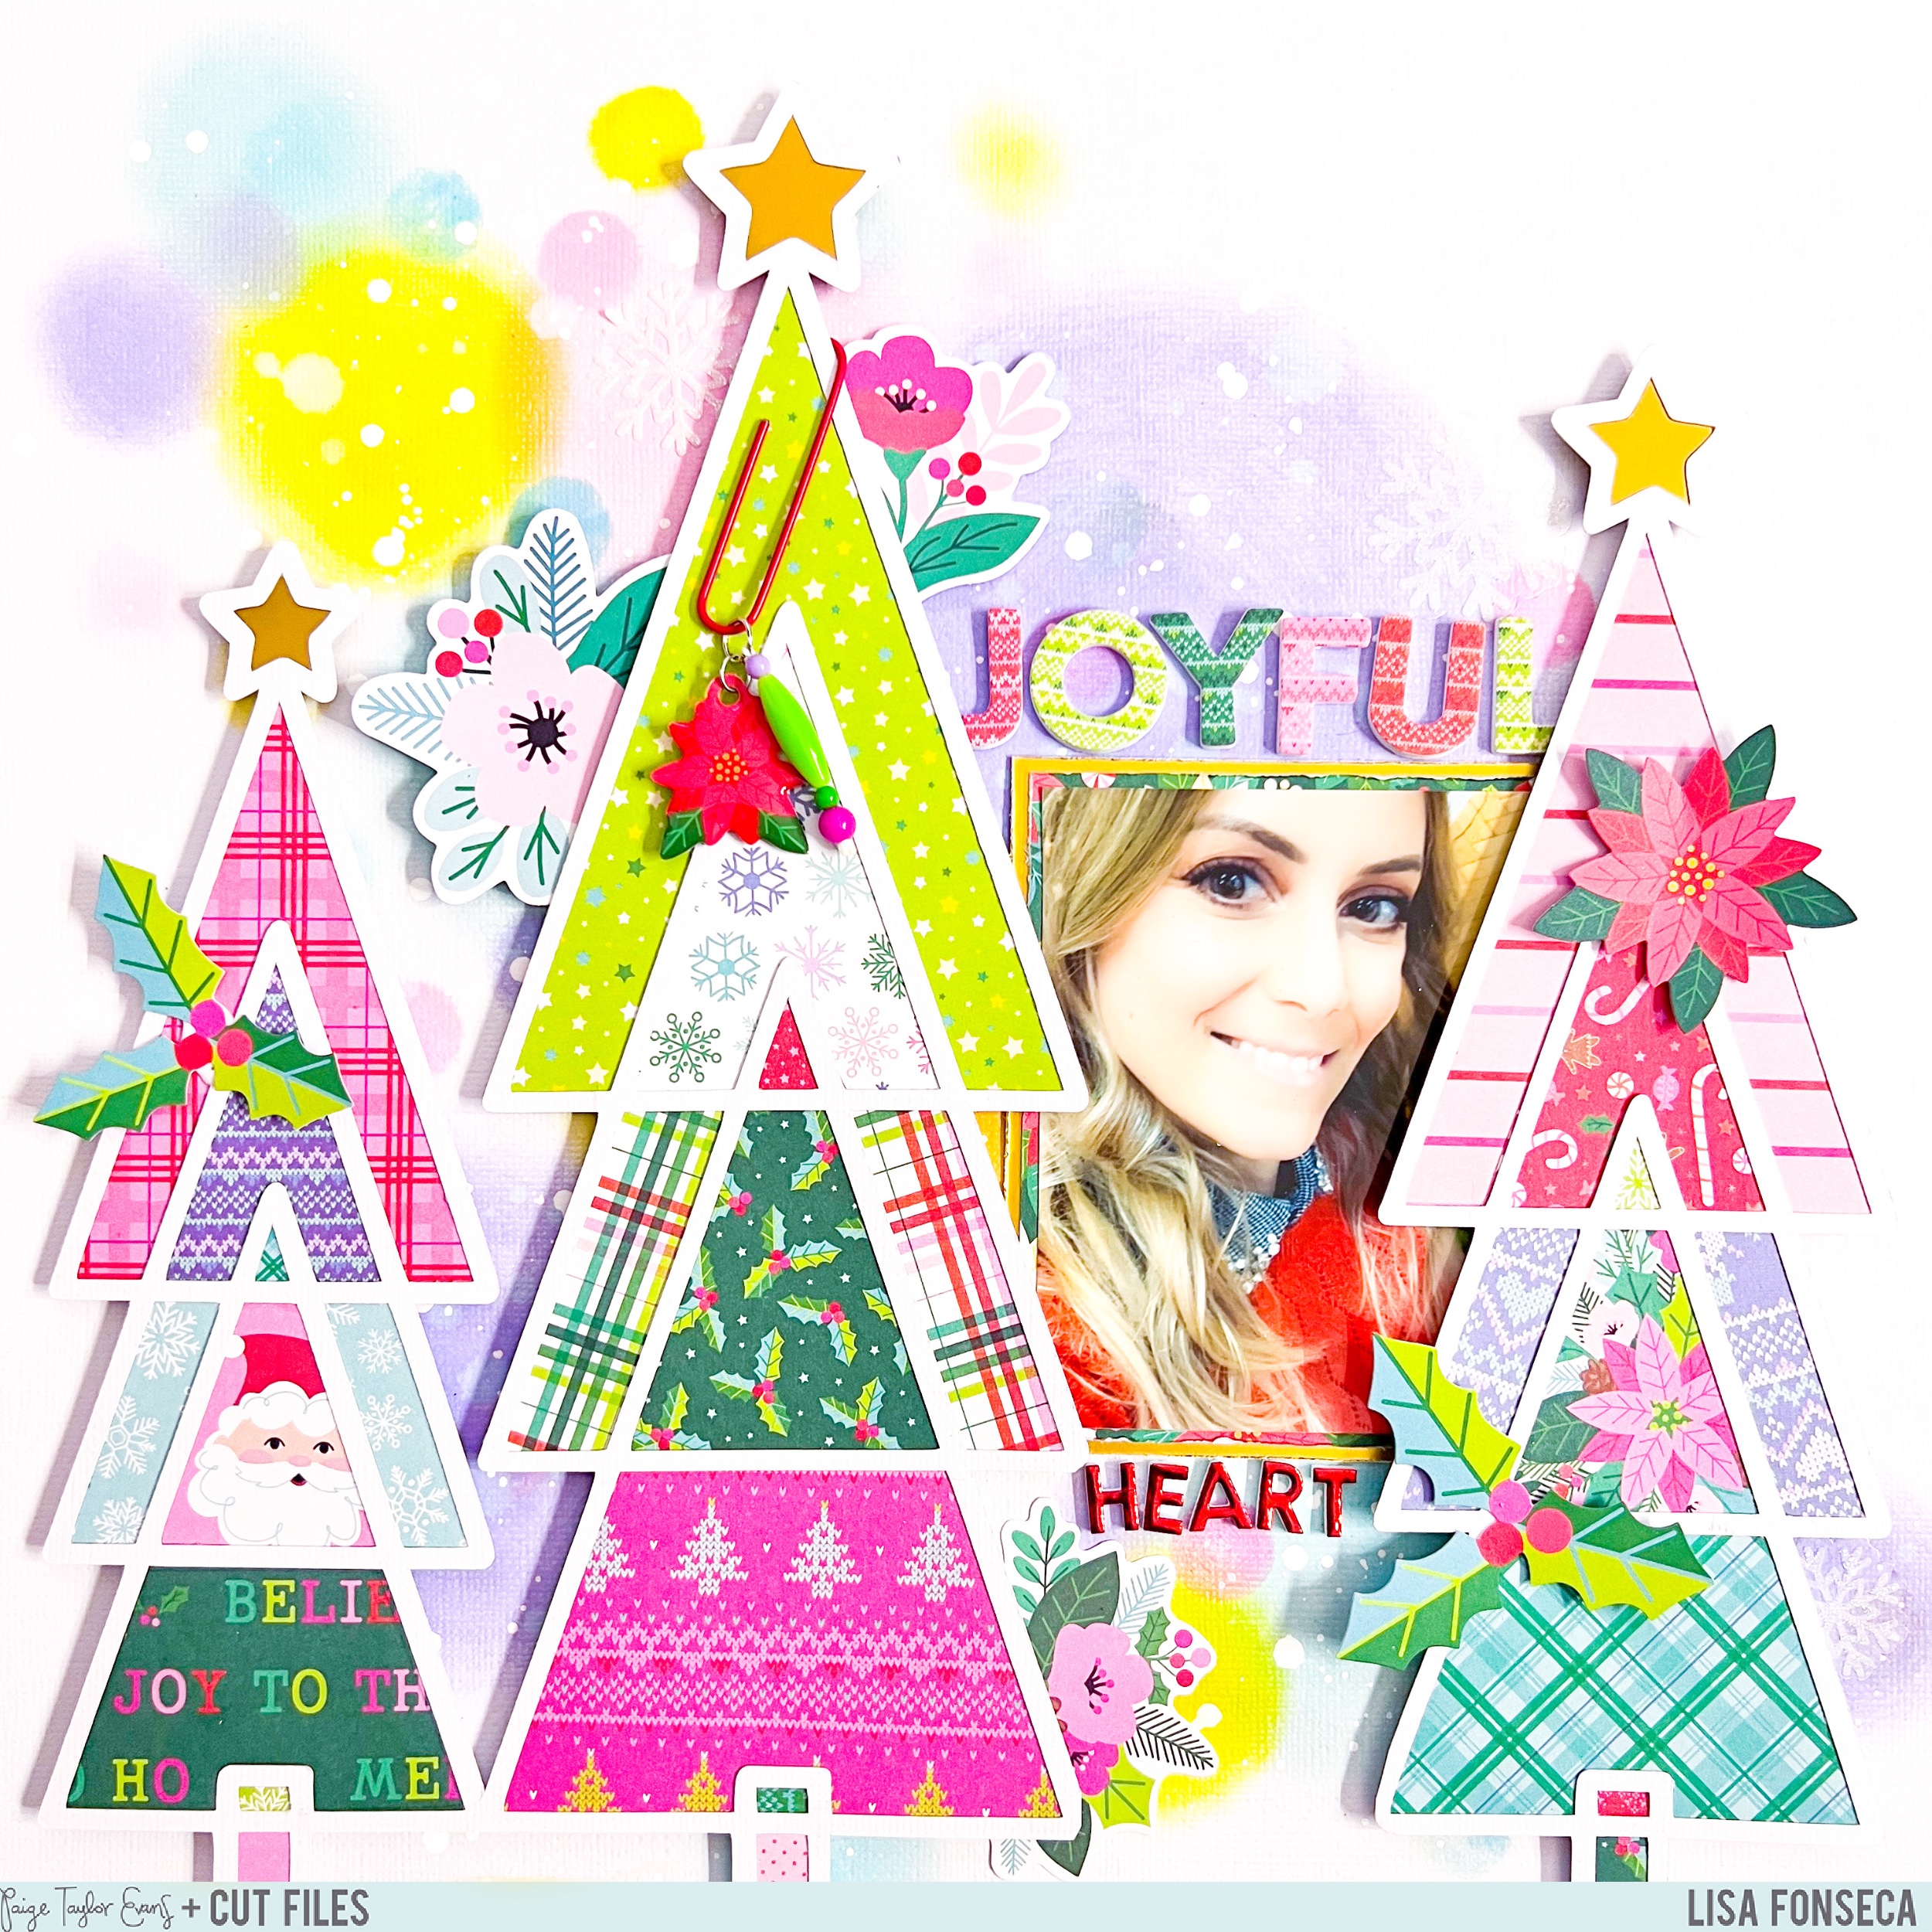
Joyful Heart Layout by Lisa Fonseca


Monday, August 14, 2023

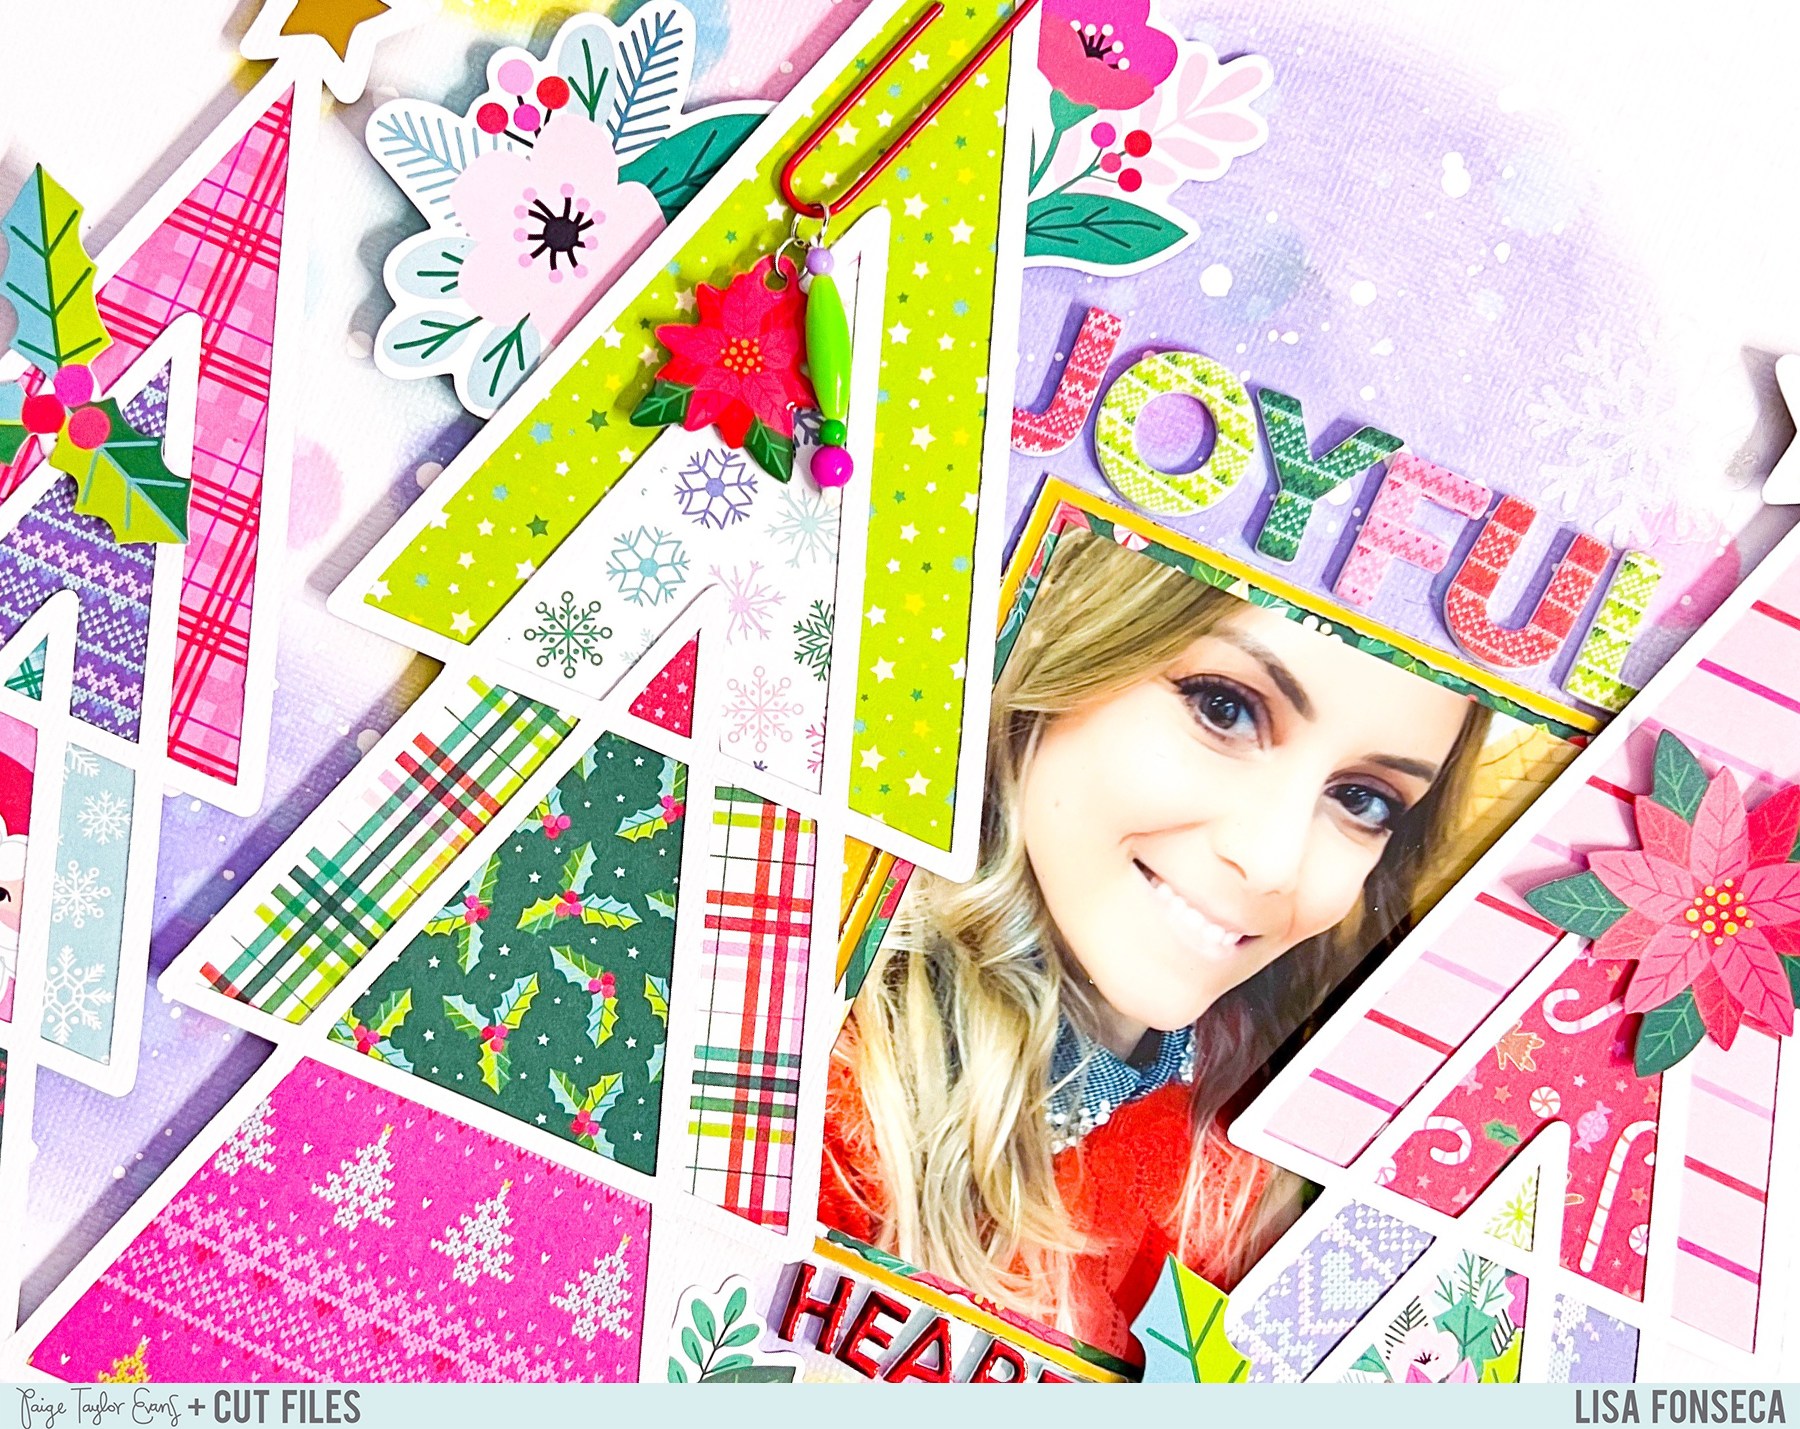
Hey scrappy friends! Who's excited for some Christmas in July... ehhh August projects? :) Lisa Fonseca here with a festive layout using Paige's Sugarplum Wishes collection and Christmas Tree Trio from the 25 Christmas Cut Files 2019!

I'm not a big fan of Christmas in July... I love summer so much that I don't even want to think about something cold during the summer months!! But I have to say that Paige's new collection, Sugarplum Wishes, is soooooo pretty, that I really couldn't wait to start using it! I backed the Christmas Tree Trio from the 25 Christmas Cut Files 2019 with almost all the patterned papers from the collection. I did some mixed media on the background using Distress Oxides and white acrylic paint and added some Floral Die Cuts, a Paper Clips, and both the Thickers and Mini Thickers to create my title!
Get your Christmas photos out and go crazy with this wonderful new Sugarplum Wishes collection along with the Christmas Tree Trio from the 25 Christmas Cut Files 2019!
SUPPLIES: Patterned papers, stickers, Thickers, die cuts, paper clip, embellishments: SUGARPLUM WISHES; Cut file: Christmas Tree Trio from the 25 Christmas Cut Files 2019 by Paige Evans

My Deepest Sympathies Card by Paige Evans


Sunday, August 13, 2023

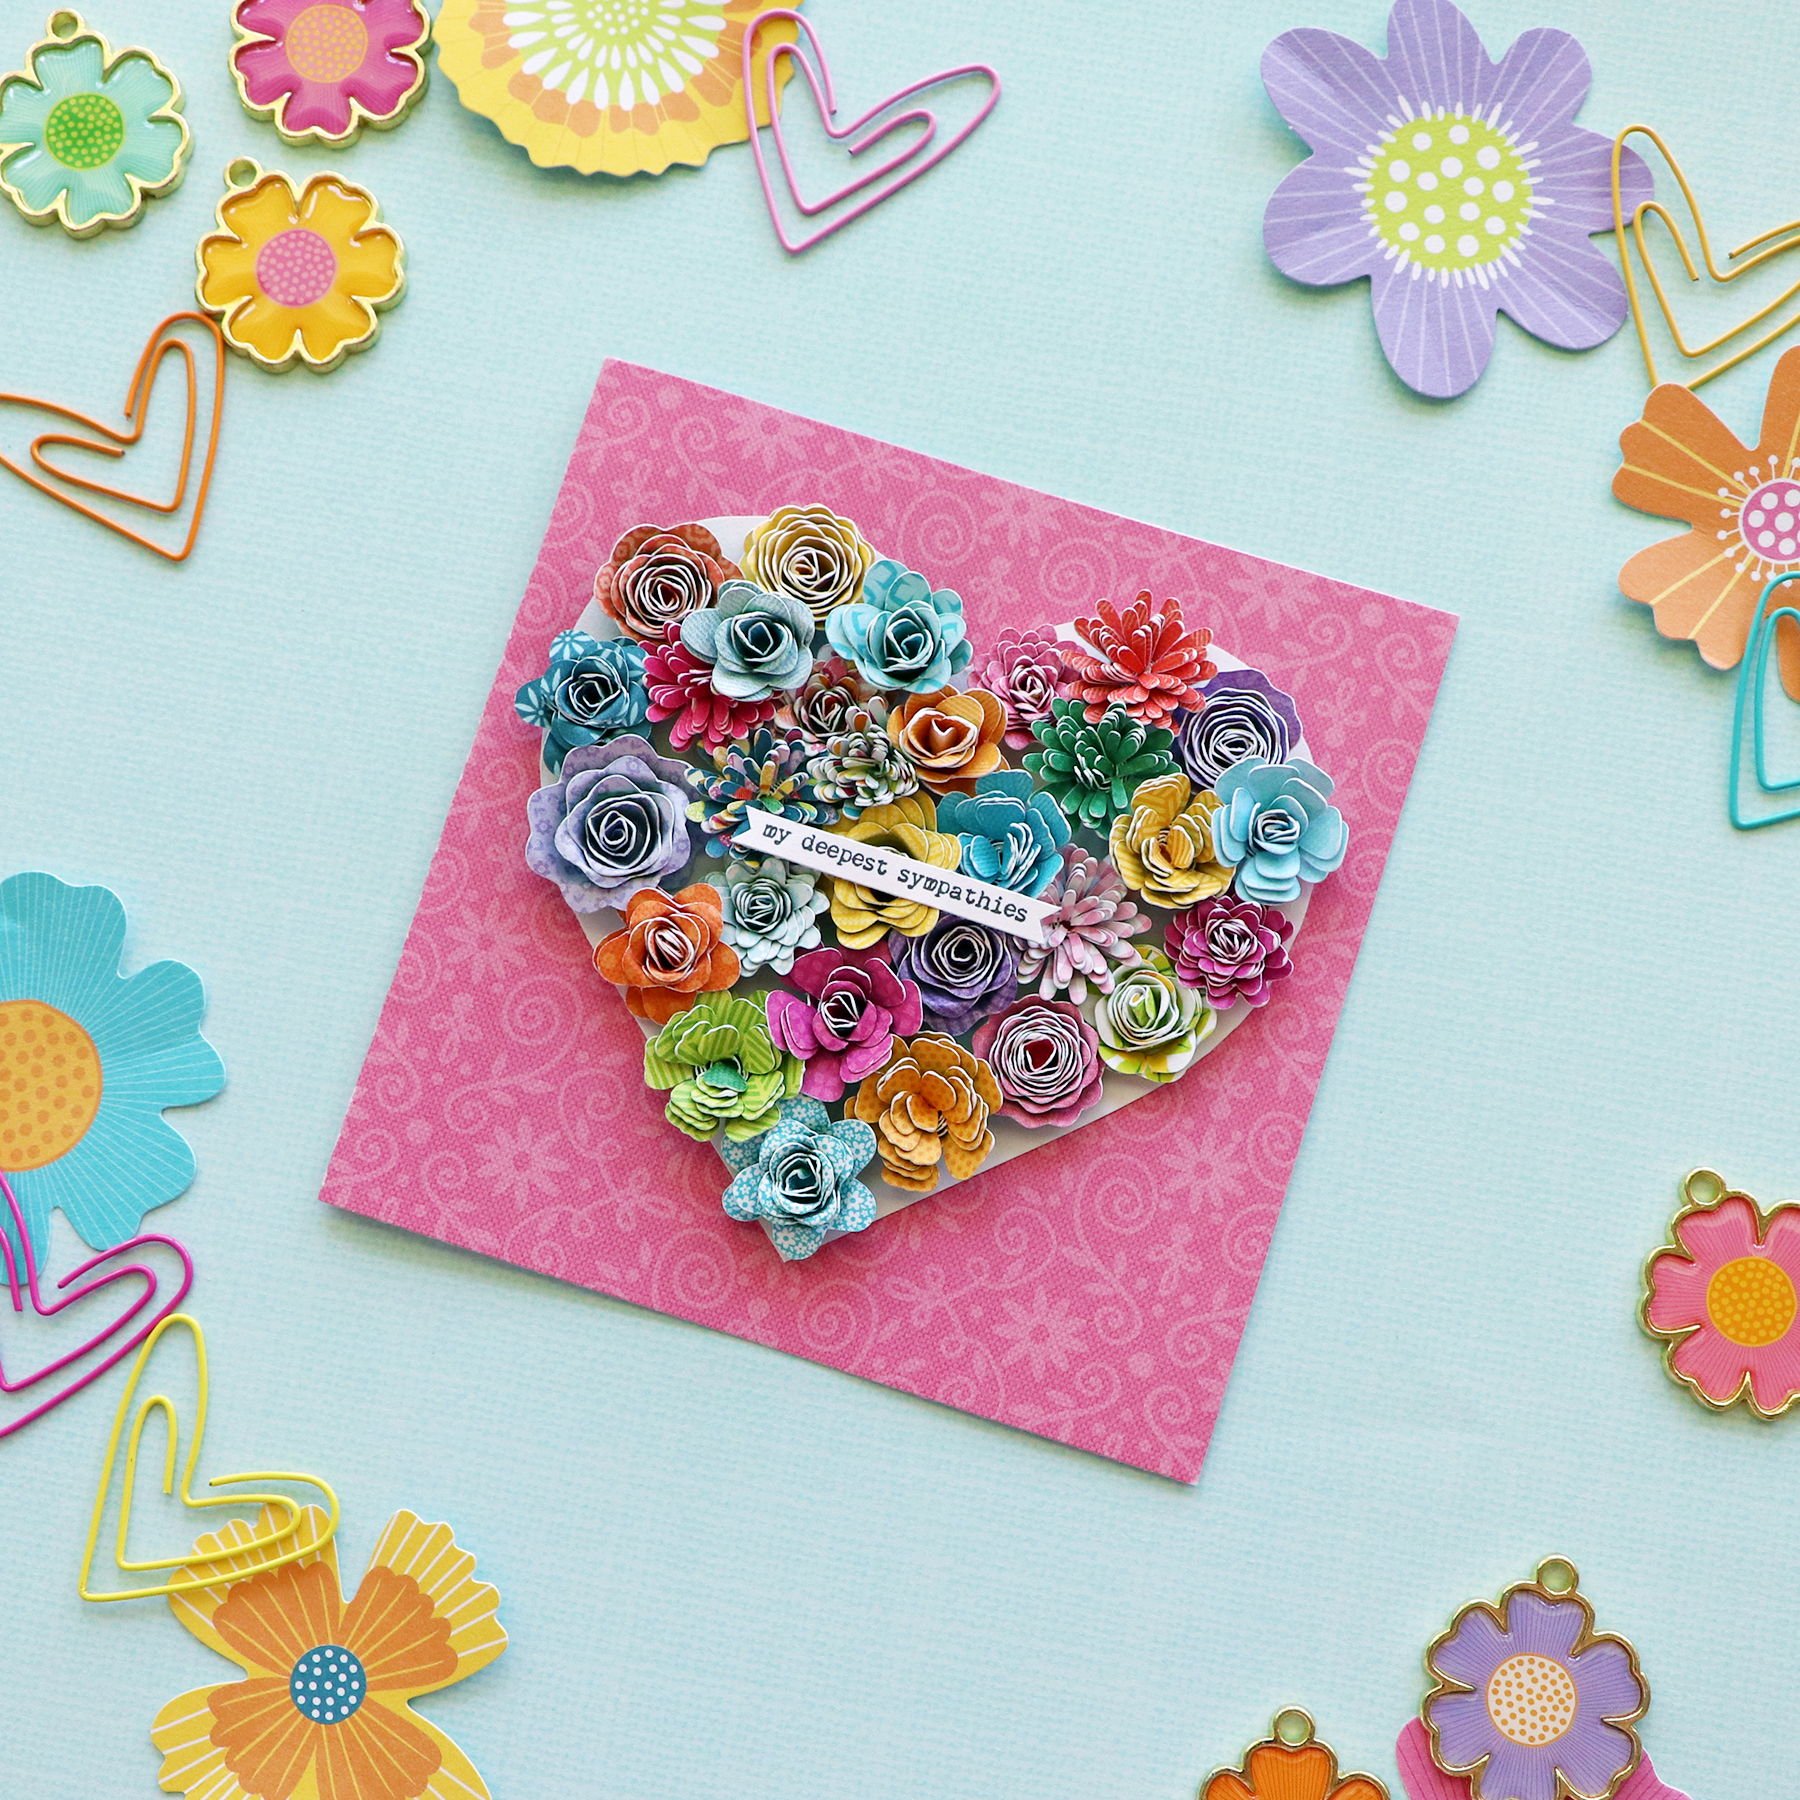
Here is one of the cards from my Make Your Memory book with Better Day Books!
In the chapter about CARDS you'll find the step-by-step photo tutorial for creating these rolled paper flowers. I used my Splendid collection to create a bunch of them, placed them in a heart shape, added them to the pink floral card front, and topped it with a sentiment. This card is very dimensional so it's best delivered in person or in a box :)
 I hope you are inspired to purchase my Make Your Memory book and try the tutorial to make your own card featuring rolled paper flowers!

SUPPLIES: Patterned papers, stickers, die cuts: SPLENDID

August Virtual Classes & Upcoming In-Person Events


Saturday, August 12, 2023

Join me on Wednesday August 23rd for a day of virtual crafting using the Round Trip collection by Maggie Holmes!
First, in this 2 hour virtual class taking place at 11am-1pm Eastern Time on Wednesday August 23rd 2023 on YouTube (the class is recorded for re-watching), I will teach you how to create an adorable paper purse with a coordinating folding squares mini album to go inside! Techniques include photo flips, custom tags complete with matching ribbons, adding a magnetic closure, and tips for making the most of the folded squares style of album! All while preserving and featuring your precious memories!
***********
After an hour break for lunch, come back for a 12x12 Scrapbook Layouts Class! In this 2 hour virtual class taking place at 2-4pm Eastern Time on Wednesday August 23rd 2023 on YouTube, I will teach you how to create two 12x12 scrapbook layouts featuring a paper pieced bookshelf (might be my favorite layout EVER!) and more folding squares made with a variety of patterned papers!
Upon purchase of either class a PDF will be emailed with the link to the YouTube video where the class takes place on the first page, a list of supplies to buy or gather from your stash, photo sizes, instructions, any homework needed to be completed before the class, and templates to download/print/cut. The class is recorded for watching at your convenience in case you can't attend the live. Let me know if you have any questions and hope to see you soon in my Purse with Folding Squares Mini Album Class and then my Bookshelf & Folded Squares Layouts Class!
***********
I have more Acrylic Globe Stands! This is the stand to go along with my 3D Globe Mini Album Virtual Class!
*********************
Grab a signed copy of my Make Your Memory book!
*********************
Only 5 spots left at this Clue-themed scrapbooking event hosted by Every Memory's Important taking place in August 2024 in Alpharetta Georgia! Click HERE to go to the Facebook page with all the info for this fun event!
*********************
The day before my Caribbean Cruise & Crop sets sail from Port Canaveral, Florida on Saturday June 2nd 2024, you can join me for to exclusive classes creating layouts & a mini album at an Orlando Crop on Saturday June 1st 2024! These will be different from the classes taught on the cruise so come to both for a whole bunch of Paige projects :) We'll use my collection releasing in early 2024 which is in the works right now! Find all the details and registration form HERE.
*********************
Only 3 spots left on my Caribbean Cruise & Crop from June 2nd-9th 2024! We'll set sail on the new Wonder of the Seas ship to visit amazing destinations then spend the days at sea with me scrapbooking learning how to create layouts, mini albums, and more! Click HERE for all of the info and registration form.
*********************
Hope to see you at ALL of these things! ;)

136 Days to Christmas Layout by Kelly Daye


Friday, August 11, 2023

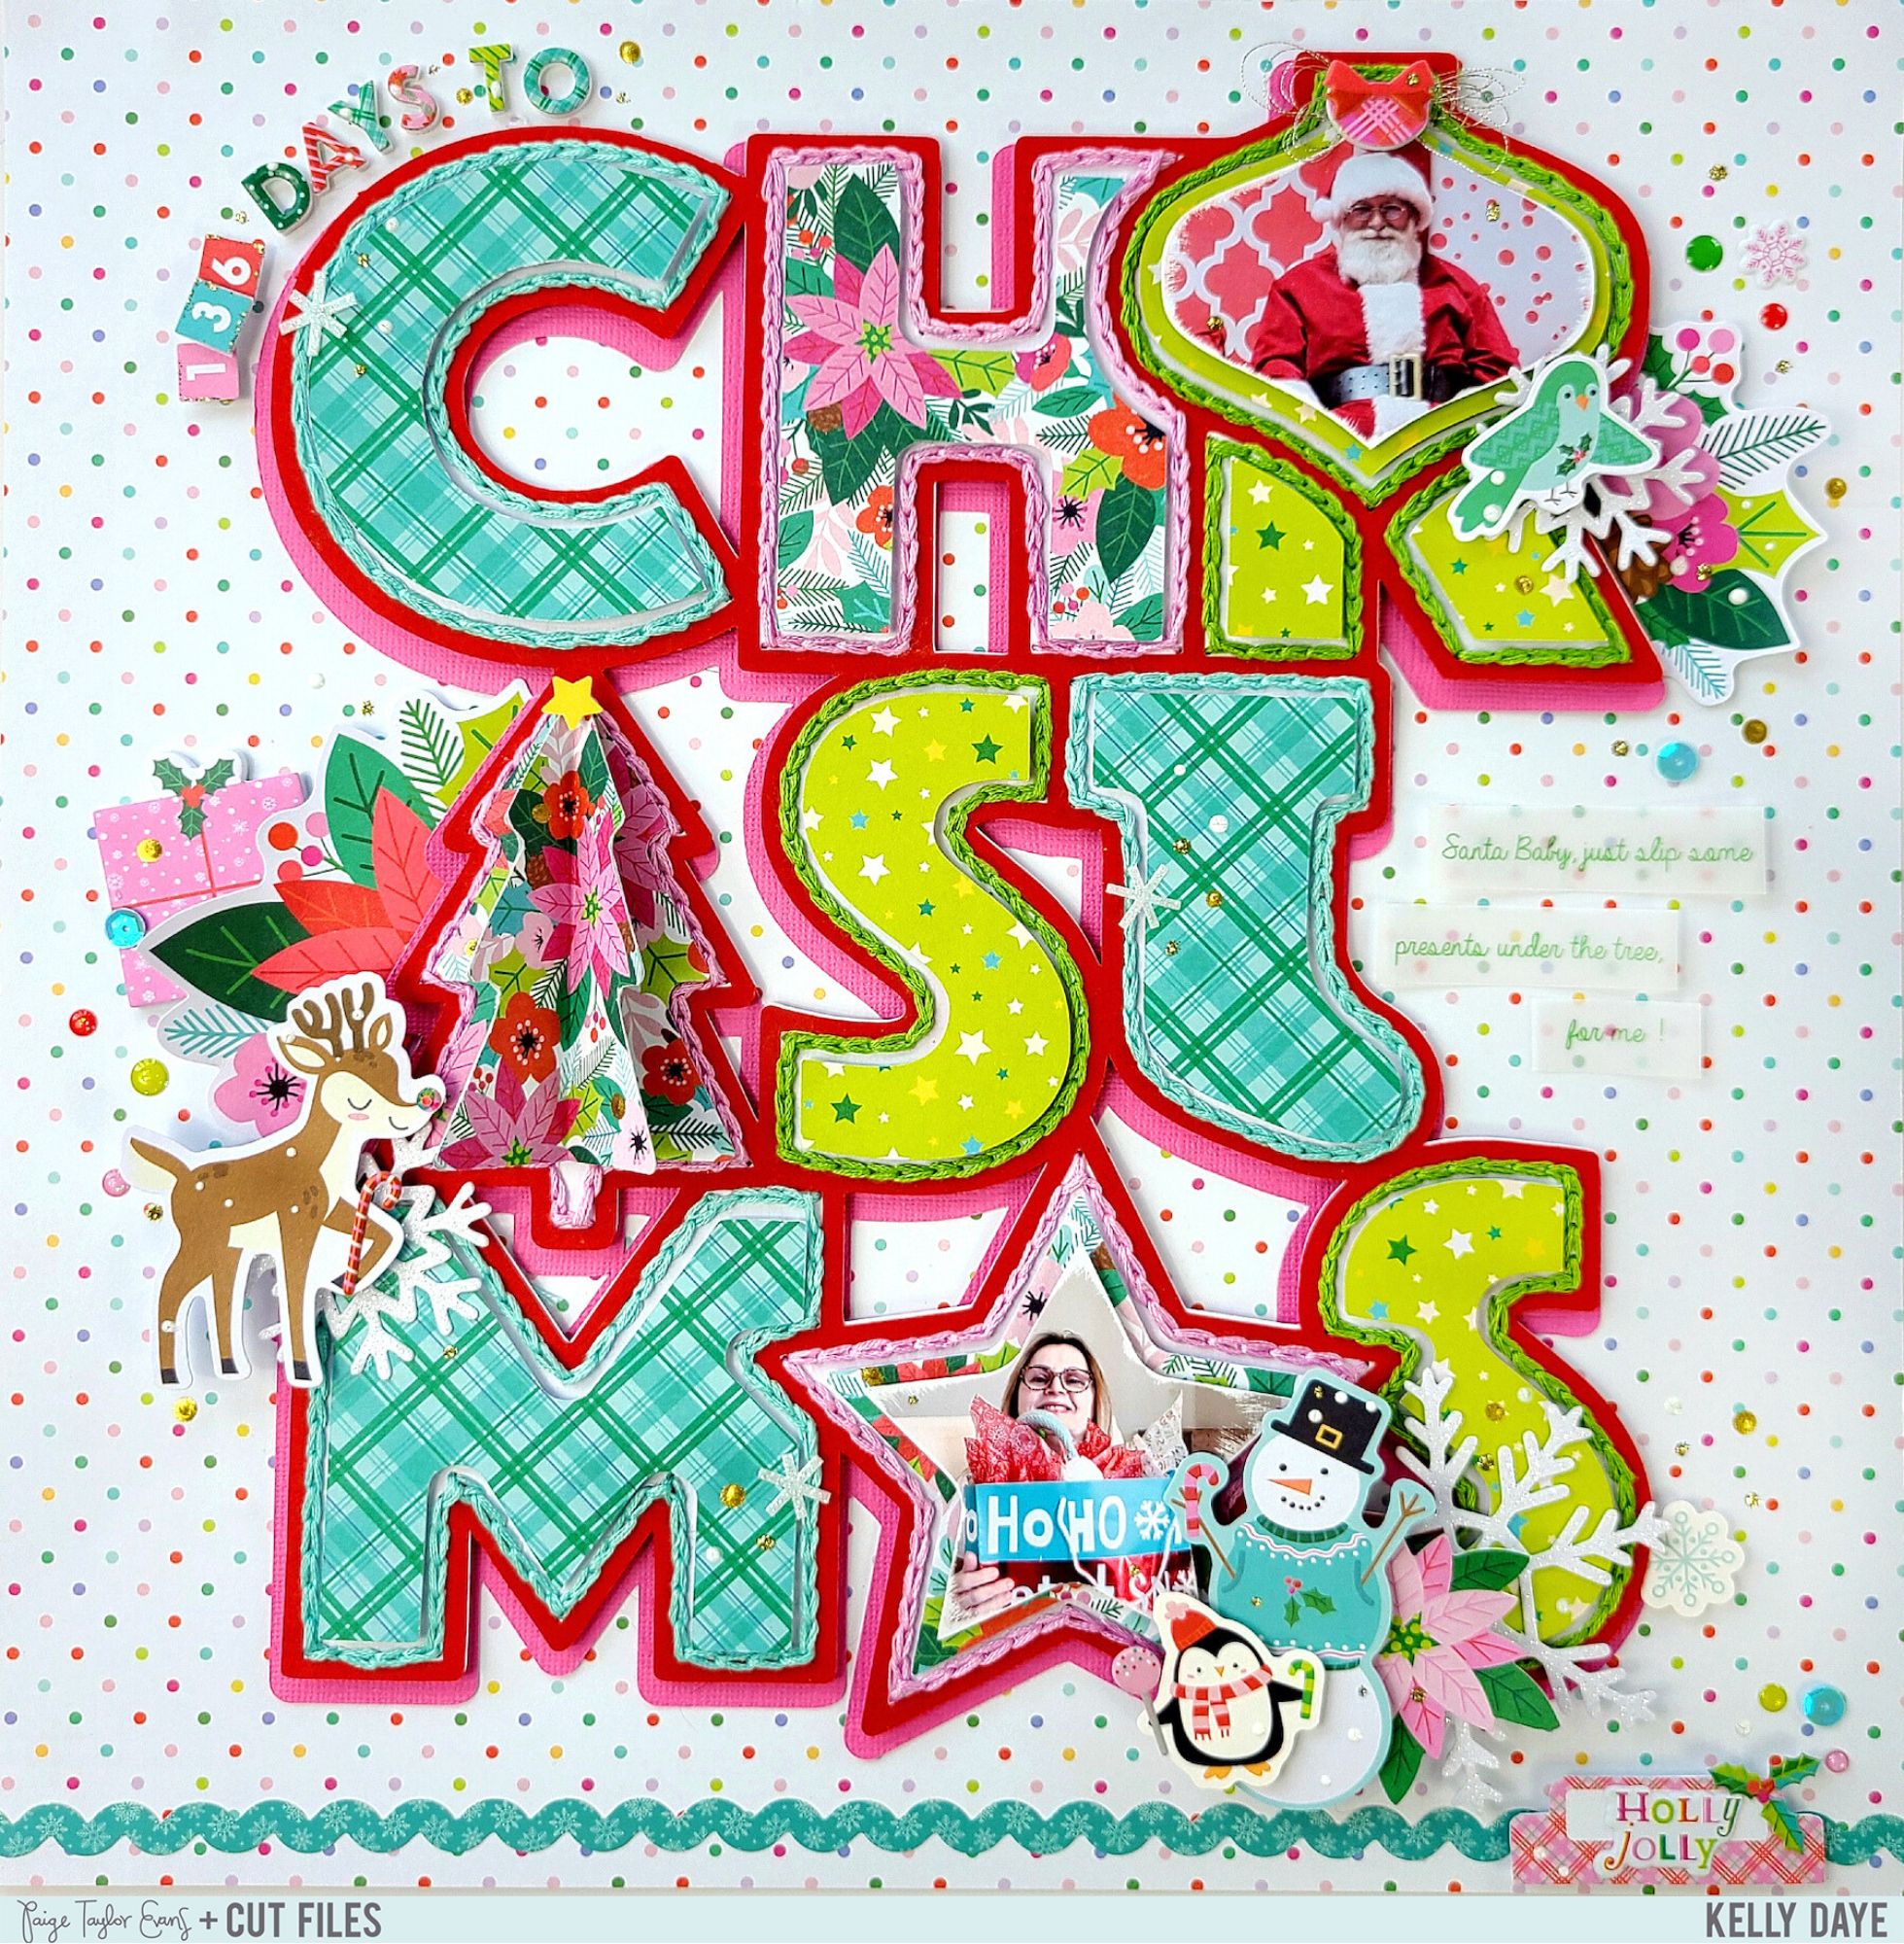
Hello crafty friends, Kelly Daye here and I’m so excited to share my very first layout using Paige’s fun and fabulous Sugarplum Wishes collection! Was it possibly designed JUST for me? Well no, but it sure feels like it. I’m completely smitten with the hip and modern mix of colors and all the cute icons and images.
I chose jolly polka dotted Paper 5 as my background. It’s a sweet option to plain white paper. The ‘Christmas’ title cut file is from Paige’s 25 Christmas Cut Files 2021. I cut it out of red cardstock and glued it on to a background cut from white cardstock. Then I chain stitched with all 6 strands of DMC Floss tone-on-tone to complement each letter. I cut them from the 6x8 Paper Pad. An off-set of the cut file was cut from bright pink cardstock for a pretty shadow beneath. It’s taped to the polka dot background with the stitched cut file popped up over top. I cut all the letters as an inset of the cut file to be able to pop them up and show off the stitching. I love raising the layers with 3D foam tape, it adds so much dimension.
With my foundation in place, I turned my joyful attention to all the fabulous and cute Sugarplum Wishes embellishments! Working in an invisible triangle, I made three collages that include Foam StickersFloral & Snowflake Die CutsCardstock StickersMini Puffy Stickers, and Ephemera Die Cuts. The oh-so-cute mini alphas and colorful numbers from the Sticker Book helped complete the title. It was hard to stop, so I didn’t, LOL! The cute aqua ric rac trim on the bottom is from the Cardstock Stickers. Since it’s not 12” long, I’ve snipped off an inch and placed it on the other side of an index tab from the Sticker Book. Et voilà, only you and I will know, ha! I decorated the index tab with more Mini Puffy Stickers. They’re so darn cute and little, they’ll fit anywhere and everywhere and I LOVE them! Did you notice the 3D tree? Instead of a flat tree, I cut out 3 trees and glued them back to back to create some interesting dimension. Finally, I’ve sprinkled around some colorful Enamel Dots and Sequins.
I hope you’re inspired, and will join us in the spirit of Christmas this summer! I can’t wait to see what you make! Be sure to share your own pretty projects at Paige’s Happy Scrappy Place so we can cheer you on!
SUPPLIES: Patterned papers, stickers, die cuts, enamel dots, sequins, embellishments: SUGARPLUM WISHESwhite cardstock; Cut file: Christmas Title from the 25 Christmas Cut Files 2021 by Paige Evans

Oh Christmas Tree Layout by Kat Flores


Thursday, August 10, 2023

Hi scrappy friends! Kat Flores here and I’m happy to be back on Paige's blog with my first Christmas themed project using Sugarplum Wishes! Today I'm sharing this cheerful and colorful layout using the Stamps from the 25 Christmas Cut Files 2020!
I started by cutting the Stamps from white cardstock in different sizes and I backed them with papers from the 6x8 Paper Pad. I added adhesive foam on the cut file and placed them near the paper edges. I kept some stamps for adding my photos and journaling. My idea was to keep my background simple to let this gorgeous collection shine. Once I glue down all the stamps, I filled the empty spaces with all kinds of embellishments like Foam Stickers, some floral pieces from Floral & Snowflake Die Cuts, elements from the Sticker Book, Cardstock Stickers, and details using the Acrylic Stamps. Finally, I added my title using the Mini Thickers and some tiny elements like Enamel Dots, Mini Puffy Stickers and sequins from Acrylic Sweaters & Sequins.
I had so much fun creating this layout and I hope it inspires you to get ready for Christmas using Paige’s Sugarplum Wishes collection and the Stamps from the 25 Christmas Cut Files 2020. Have a wonderful day and happy scrapping!
SUPPLIES: Patterned papers, stickers, Thickers, die cuts, stamps, enamel dots, sequins, embellishments: SUGARPLUM WISHESwhite cardstock; Cut file: Stamps from the 25 Christmas Cut Files 2020 by Paige Evans

Flowers Mini Album by Paige Evans


Wednesday, August 9, 2023

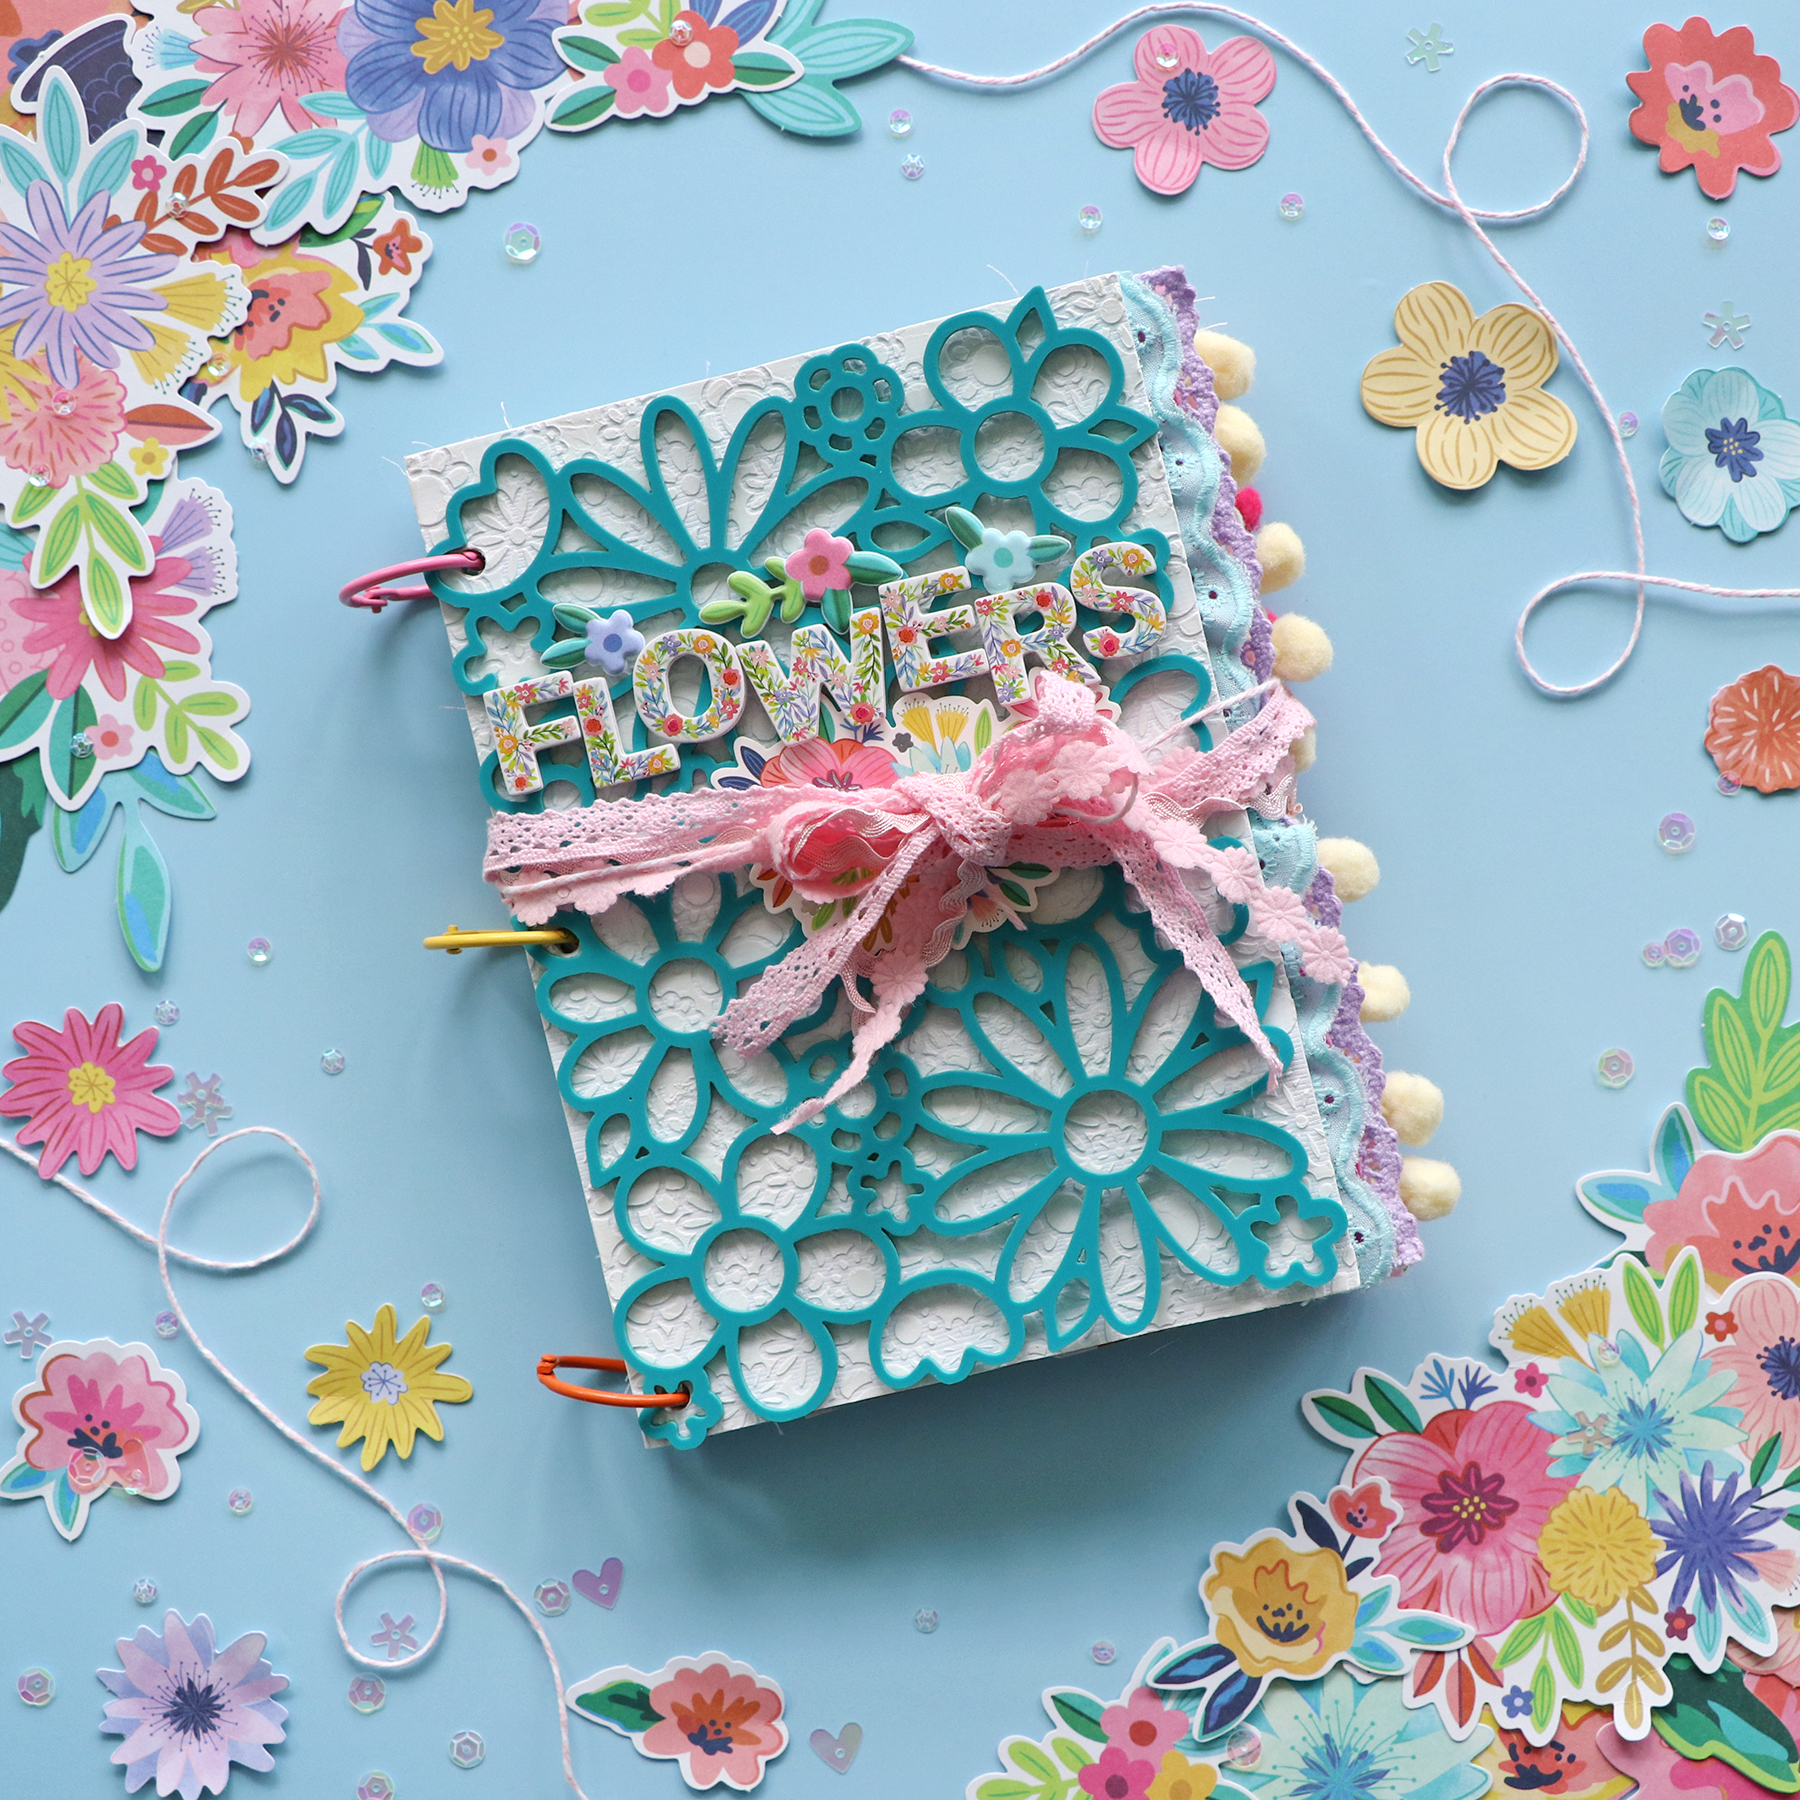
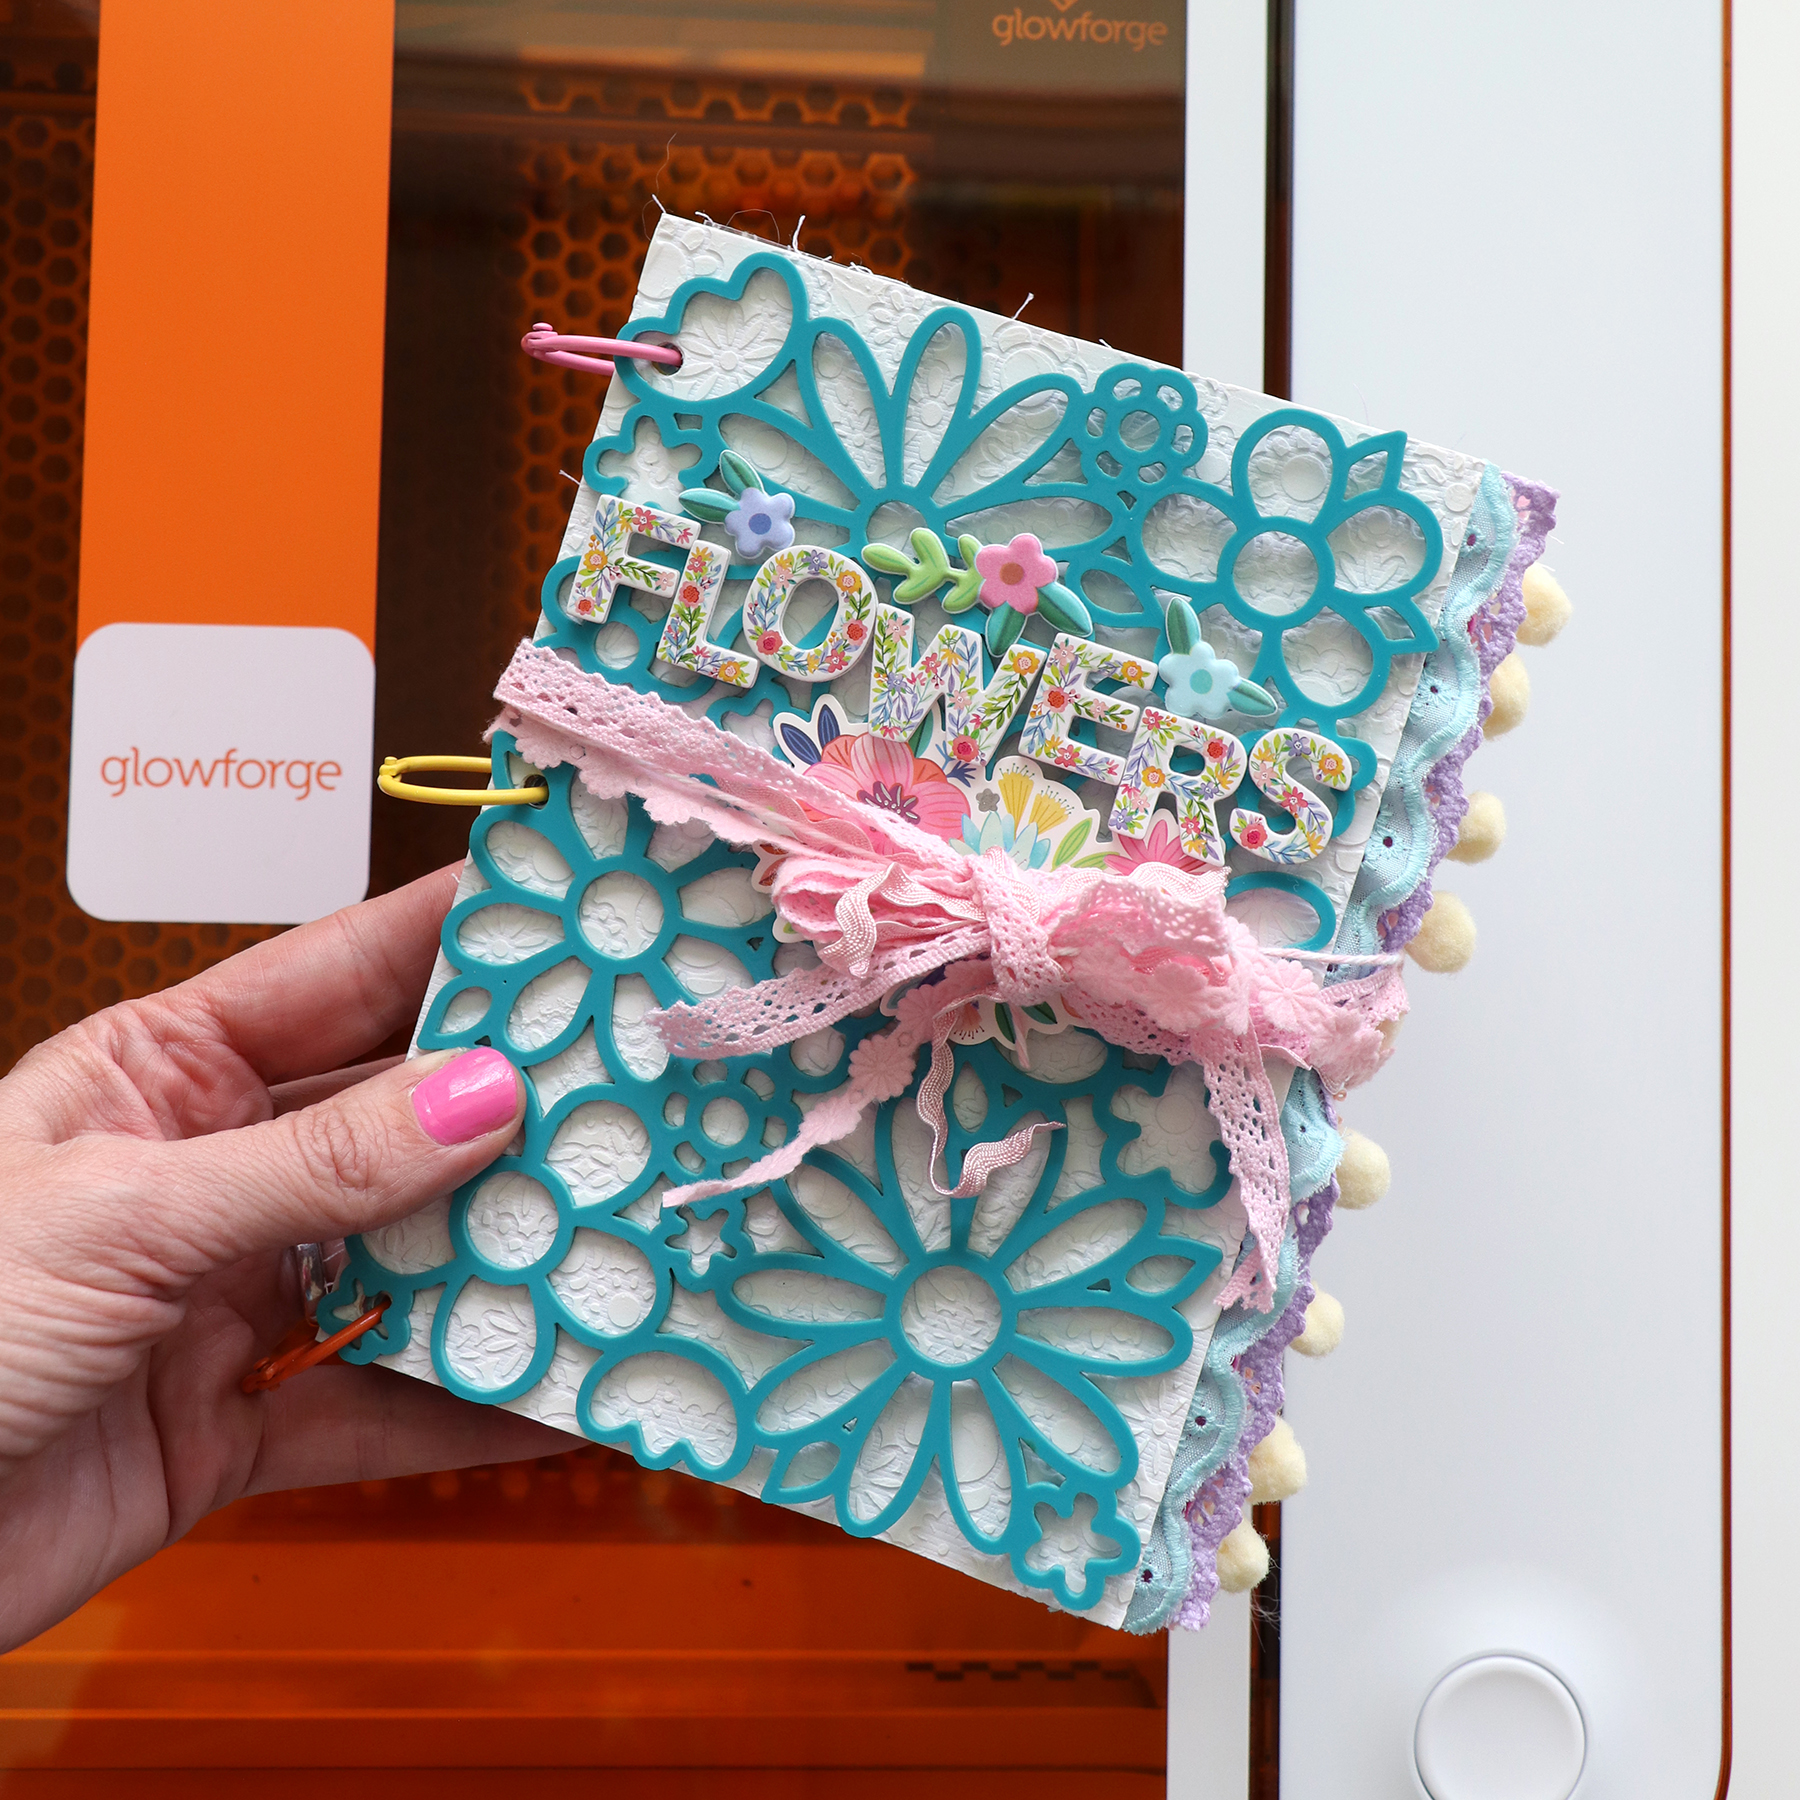
Here is a new 5x7" mini album all about FLOWERS made with Blooming Wild that I created for a campaign with the new Glowforge Aura!
I cut the covers from teal acrylic and it took the machine about 4 hours to make them, they're so dainty and delicate and pretty! :) I decorated the cover with flowers from the Puffy Phrase Stickers, a floral cluster from the Cardstock Stickers, and used the floral Thickers from Bloom Street to spell FLOWERS.
For the first page I used my past Flower Garden Stencil (use the cut file as an alternative!) and scraped white modeling paste through it onto white cardstock. I edged the right side with blue eyelet ribbon from my stash.
I covered the left page with a full 5x7" photo. For the right page, I cut a piece of the Floral Transparency to 5x7", stitched pink crushed velvet ribbon onto the right edge, then embellished with a "sweet" and heart from the Cardstock Stickers.
I didn't add anything extra to the back of the left page because it's see-through, but you totally could! I cut a 5x7" piece of the blue floral B-side of Paper 8 and stitched purple lace ribbon onto the right edge. Then I grabbed the Chipboard Alphabet Outlines and backed them with patterned papers before layering them onto the page. I added an "I LOVE" Cardstock Sticker inside the "O" and placed a Mini Flower Puffy Sticker on the bottom right corner.
On the left page I added a 4x6" photo and placed a flower from the Puffy Phrase Stickers on each corner. I embellished with a "love" word from the Puffy Phrase Stickers and tucked a round floral sentiment Cardstock Sticker below. For the right page, I cut a 5x7" piece of smooth white cardstock and arranged flowers from the Floral Die Cuts and Ephemera Die Cuts around the edges in a frame. In the middle I added a "BLOSSOM" Puffy Phrase Sticker with a Mini Flower Puffy Sticker between. On the right edge I stitched pink flower ribbon.
A 4x6" photo adorns the left page and I embellished with bits from the Sticker Book and a scalloped border sticker from the Project Pad. For the right page, I trimmed a 6x8 page protector to 5x7" then stitched down the right edge to seal it. I poured sequins from my stash into the bottom, stitched a line about 2.5" above, poured in more sequins, stitched another line about 2.5" above, poured in more sequins, then stitched across the top. I also stitched yellow pom pom ribbon on the right edge. I topped the three sections with a Puffy Phrase Sticker and transparency flowers from the Sticker Book.
I didn't add anything else to the back of the sequins page, I like being able to see them :) For the right page, I cut a piece of pastel striped Paper 3 to 5x7" and then chain stitched with a matching colored thread through all the stripes. The stitching took about 4 hours. I topped the middle with a Flower Die Cut and stitched salmon scalloped trim to the right edge.
A 4x6" photo hides a lot of the messy back of the stitching page and then I embellished with three butterflies from the Cardstock Stickers and Chipboard Stickers. For the right page, I cut a piece of blue floral Paper 2 to 5x7" then cut the same section from another piece of it. I fussy cut the flowers and adhered them on top of the full piece with foam squares for a fun and dimensional page. In the middle I placed a "Love" Chipboard Sticker then adhered teal scalloped ribbon to the right edge.
After adding a 4x6" photo to the left page I made photo corners from the mini floral Paper 11 and called it good! For the right page, I cut a 5x7" piece of the watercolor Paper 18. I designed a 5x7" Flower Frame Cut File, cut it from white cardstock, and then backed it with Blooming Wild patterned papers. Inside the frame I added a little sentiment from the Chipboard Frame Stickers, added a piece of floral Washi Tape below, then wrote journaling in the rest of the space with a blue pen. To finish the page I stitched white/pink lace ribbon to the right edge.
I adhered a 4x6" photo to the left page and embellished the top left corner with a round floral sentiment from the Ephemera Die Cuts and two floral pieces from the Chipboard Frame Stickers. For the right page, I cut a 5x7" piece of white cardstock. Then I trimmed pastel stripes from Paper 23, distressed the edges, and machine stitched them diagonally across the page. I topped the page with an oval floral "LOVE" Ephemera Die Cut then stitched green satin picot ribbon to the right edge.
I tucked a 4x6" photo under the ribbon then in the white space at the top created a title with Thickers & mini alphas and a sentiment from the Sticker Book. The floral cluster at the bottom is from the Cardstock Stickers. On the right page, I cut a piece of blue paper from the Project Pad to 5x7" then made folded heart flowers and stems with leaves from Blooming Wild papers. I topped each flower with a Mini Flower Puffy Sticker then stitched pink pom pom trim to the right edge.
I added a 4x6" photo to the left page and embellished with a "HAPPY" Chipboard Sticker and a bunch of little flowers from the Cardstock Stickers. On the right page, I covered a 5x7" piece of white cardstock with fringed paper strips made from the rainbow striped Paper 10. Before stitching the pink lace ribbon on the right edge, I did more stenciling on the back of the page.
The back page is a repeat of the front page: I used my past Flower Garden Stencil (use the cut file as an alternative!) and scraped white modeling paste through it.
To connect the album together, I punched three holes through the left side of each page and then slid them onto a pink, yellow, and orange 1" loose leaf binder ring.
I tied a few varieties of pink ribbon around the middle to keep the album closed and look cute :)
I hope you are inspired to pick up my Blooming Wild collection and document your love of flowers!

SUPPLIES: Patterned papers, stickers, Thickers, die cuts, washi tape, embellishments: BLOOMING WILD; Acrylic flower covers made with the Glowforge Auramodeling pastewhite cardstock6x8 page protector
Paige Taylor Evans © // Quinn Creatives DESIGN