
I'm back with another just-for-fun layout using my Pie Circles Background cut file and Truly Grateful collection!

Here is a process video so you can see how this layout came together:
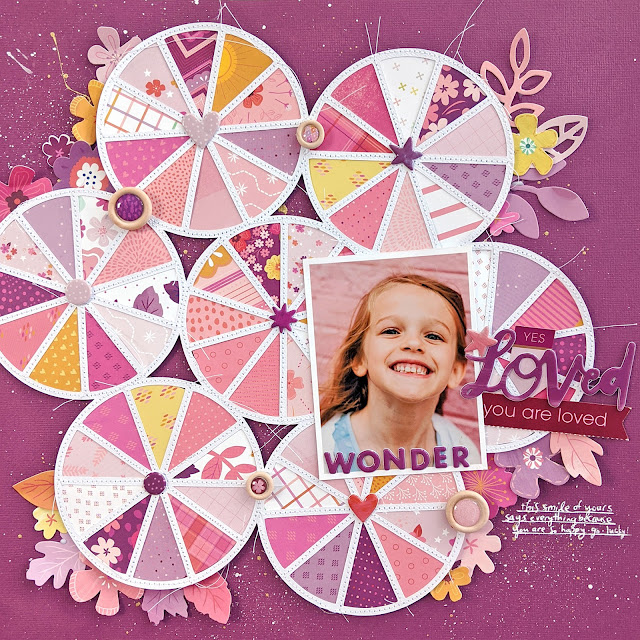
I started by cutting my Pie Circles Background cut file from white cardstock using a Silhouette Cameo 3. Then I went through Truly Grateful and pulled out all of the papers with pink, purple, and a few yellow/oranges for a little pop of brightness. I traced one of the inner wedges of one of the pie circles and used it as a template to hand cut 70 slices.

I quickly placed all of the wedges on top of the cut file to see how I wanted to arrange them then carefully took them all off in the same order. I used spray adhesive across the back of the cut file and then placed the backing pieces in the same arrangement. Turning the complete cut file over is such a fun WOW moment!

Next, I spent some time machine stitching through the cut file for lots of interest and texture. I used a Brother sewing machine and white Coats & Clark thread with a basic running stitch. It took about 2.5 minutes to stitch each pie circle, so about 20 minutes to stitch the entire design. Totally worth it! Slow and steady wins the race :)

I had a heated debate with myself about which color of cardstock to use for the background and ultimately I turned to instagram stories for input. My gut wanted to use a light purple background, but the majority of votes were for this darker purple background so I decided to please the people and give 'em what they want lol. I actually really like how it turned out so I'm glad I pushed myself to use this darker color of purple to help the backed cut file colors POP.

To jazz up the background a bit I splashed liquid gold paint across it along with Pastel Dreams & Tropicals watercolors in colors matching Truly Grateful, topped with a smattering of watered down white acrylic paint splashed with a paint brush as well as a toothbrush for a fine mist.

Once the background dried I adhered the cut file on top with dimensional adhesive and added the photo. I adhered the cut file slightly off-center and trimmed off the little piece of excess on the left edge. Time for embellishing! I placed "WONDER" purple Puffy Phrase Stickers across the bottom of the photo and a "Loved" Epoxy Sticker on the right side with a "you are loved" tag from a Journaling Spot below. I tucked a "YES" tab also from the Journaling Spots into the title arrangement.

On the center of each circle I added an Epoxy Sticker, keeping with the monochromatic pink/purple color scheme. Between a few of the circles I added a Wooden Button. I opened up a fresh pack of Floral Die Cuts, grabbed all the pink, purple, yellow, and orange flowers and leaves then tucked them underneath the cut file in a few clusters. I glued them in place and then bent up the petals and leaves for dimension. To finish I wrote journaling with a white pen under the title.

I hope this layout inspires you to use my Pie Circles Background cut file with Truly Grateful! See you again soon!
SUPPLIES: Patterned papers, stickers, wooden buttons, die cuts, embellishments: TRULY GRATEFUL; Sewing machine: Brother; Thread: Coats & Clark; Printer: Canon Pro-100; white acrylic paint; liquid gold paint; Watercolors: Pastel Dreams & Tropicals by Prima; white cardstock; Die cut machine: Silhouette Cameo 3; Cut file: Pie Circles Background by Paige Evans


Absolutely STUNNING!!! LOVING those circles and that adorable photo!!! Happy Thanksgiving!
ReplyDeleteand there it is !! Your, 'which background layout' turned out spectacular Paige! Bravo for being adventurous and 'giving the people what they want', LOL! Too funny. I'm in awe of your sewing, it's perfectly centred down the middle of the strips. The old 'slow and steady wins the race' holds water :D xK
ReplyDelete