December Daily 2022 by Paige Evans


Sunday, January 15, 2023

I finished up my December Daily for 2022 and am excited to show it with you!
Here is a 25 minute YouTube video of me talking about and flipping through the album:
 
I also did a 25 minute live show and tell on Instagram talking about the pages before I added photos if you want to see and learn about them, watch HERE.
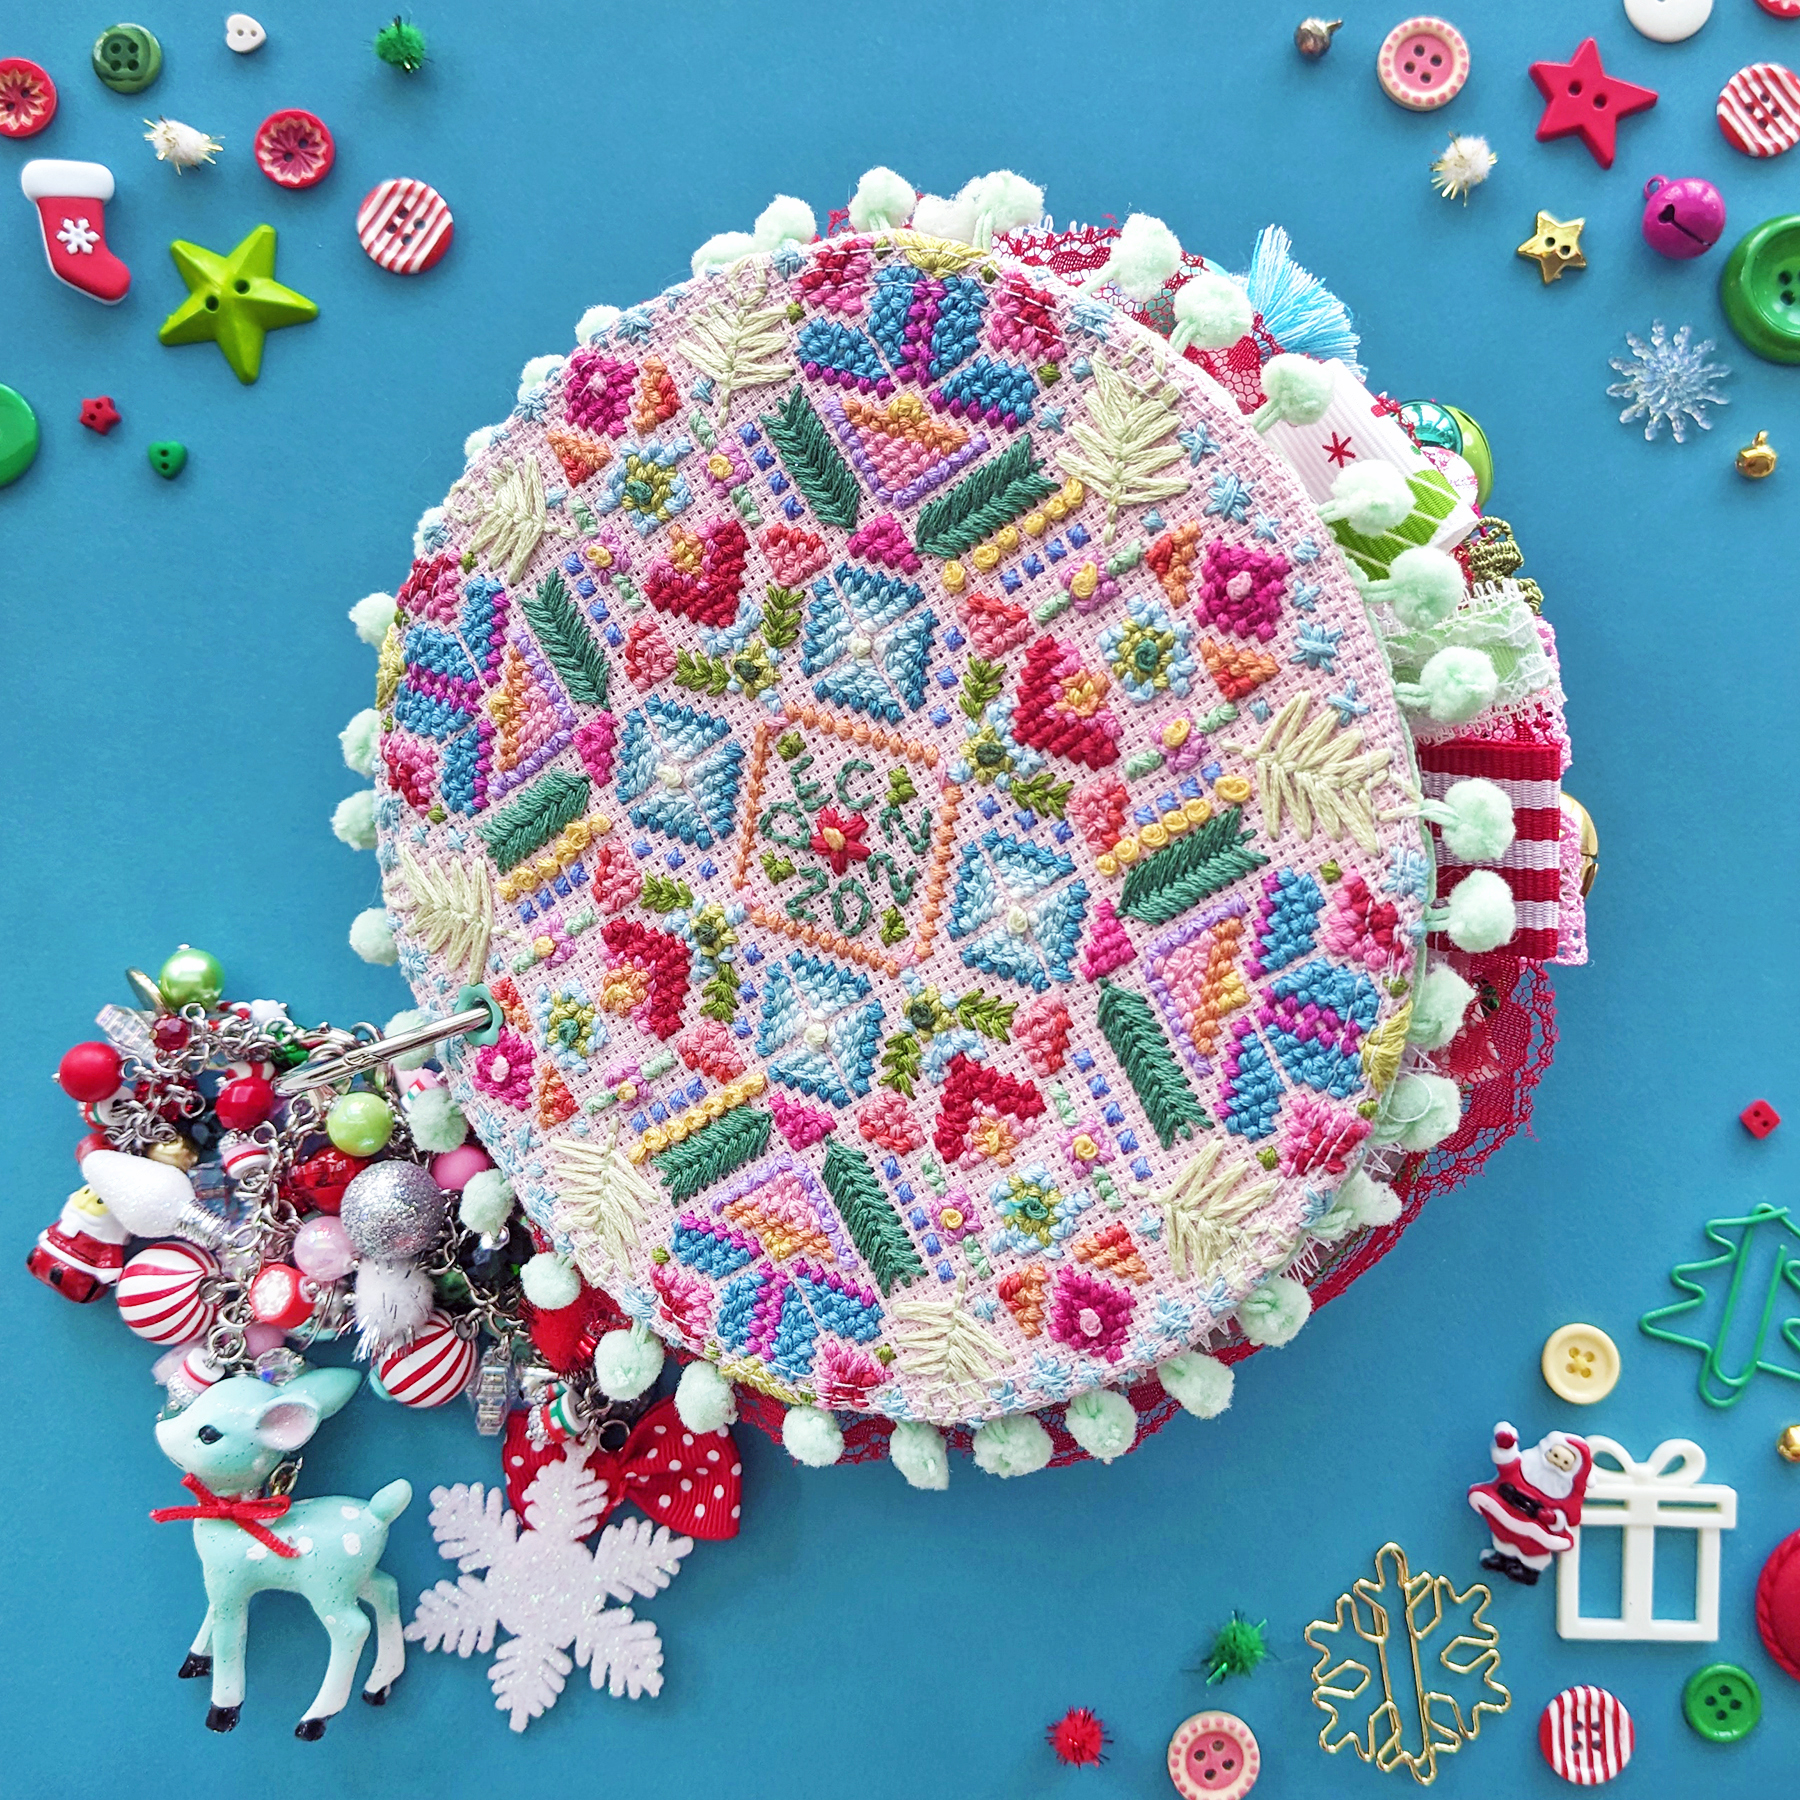
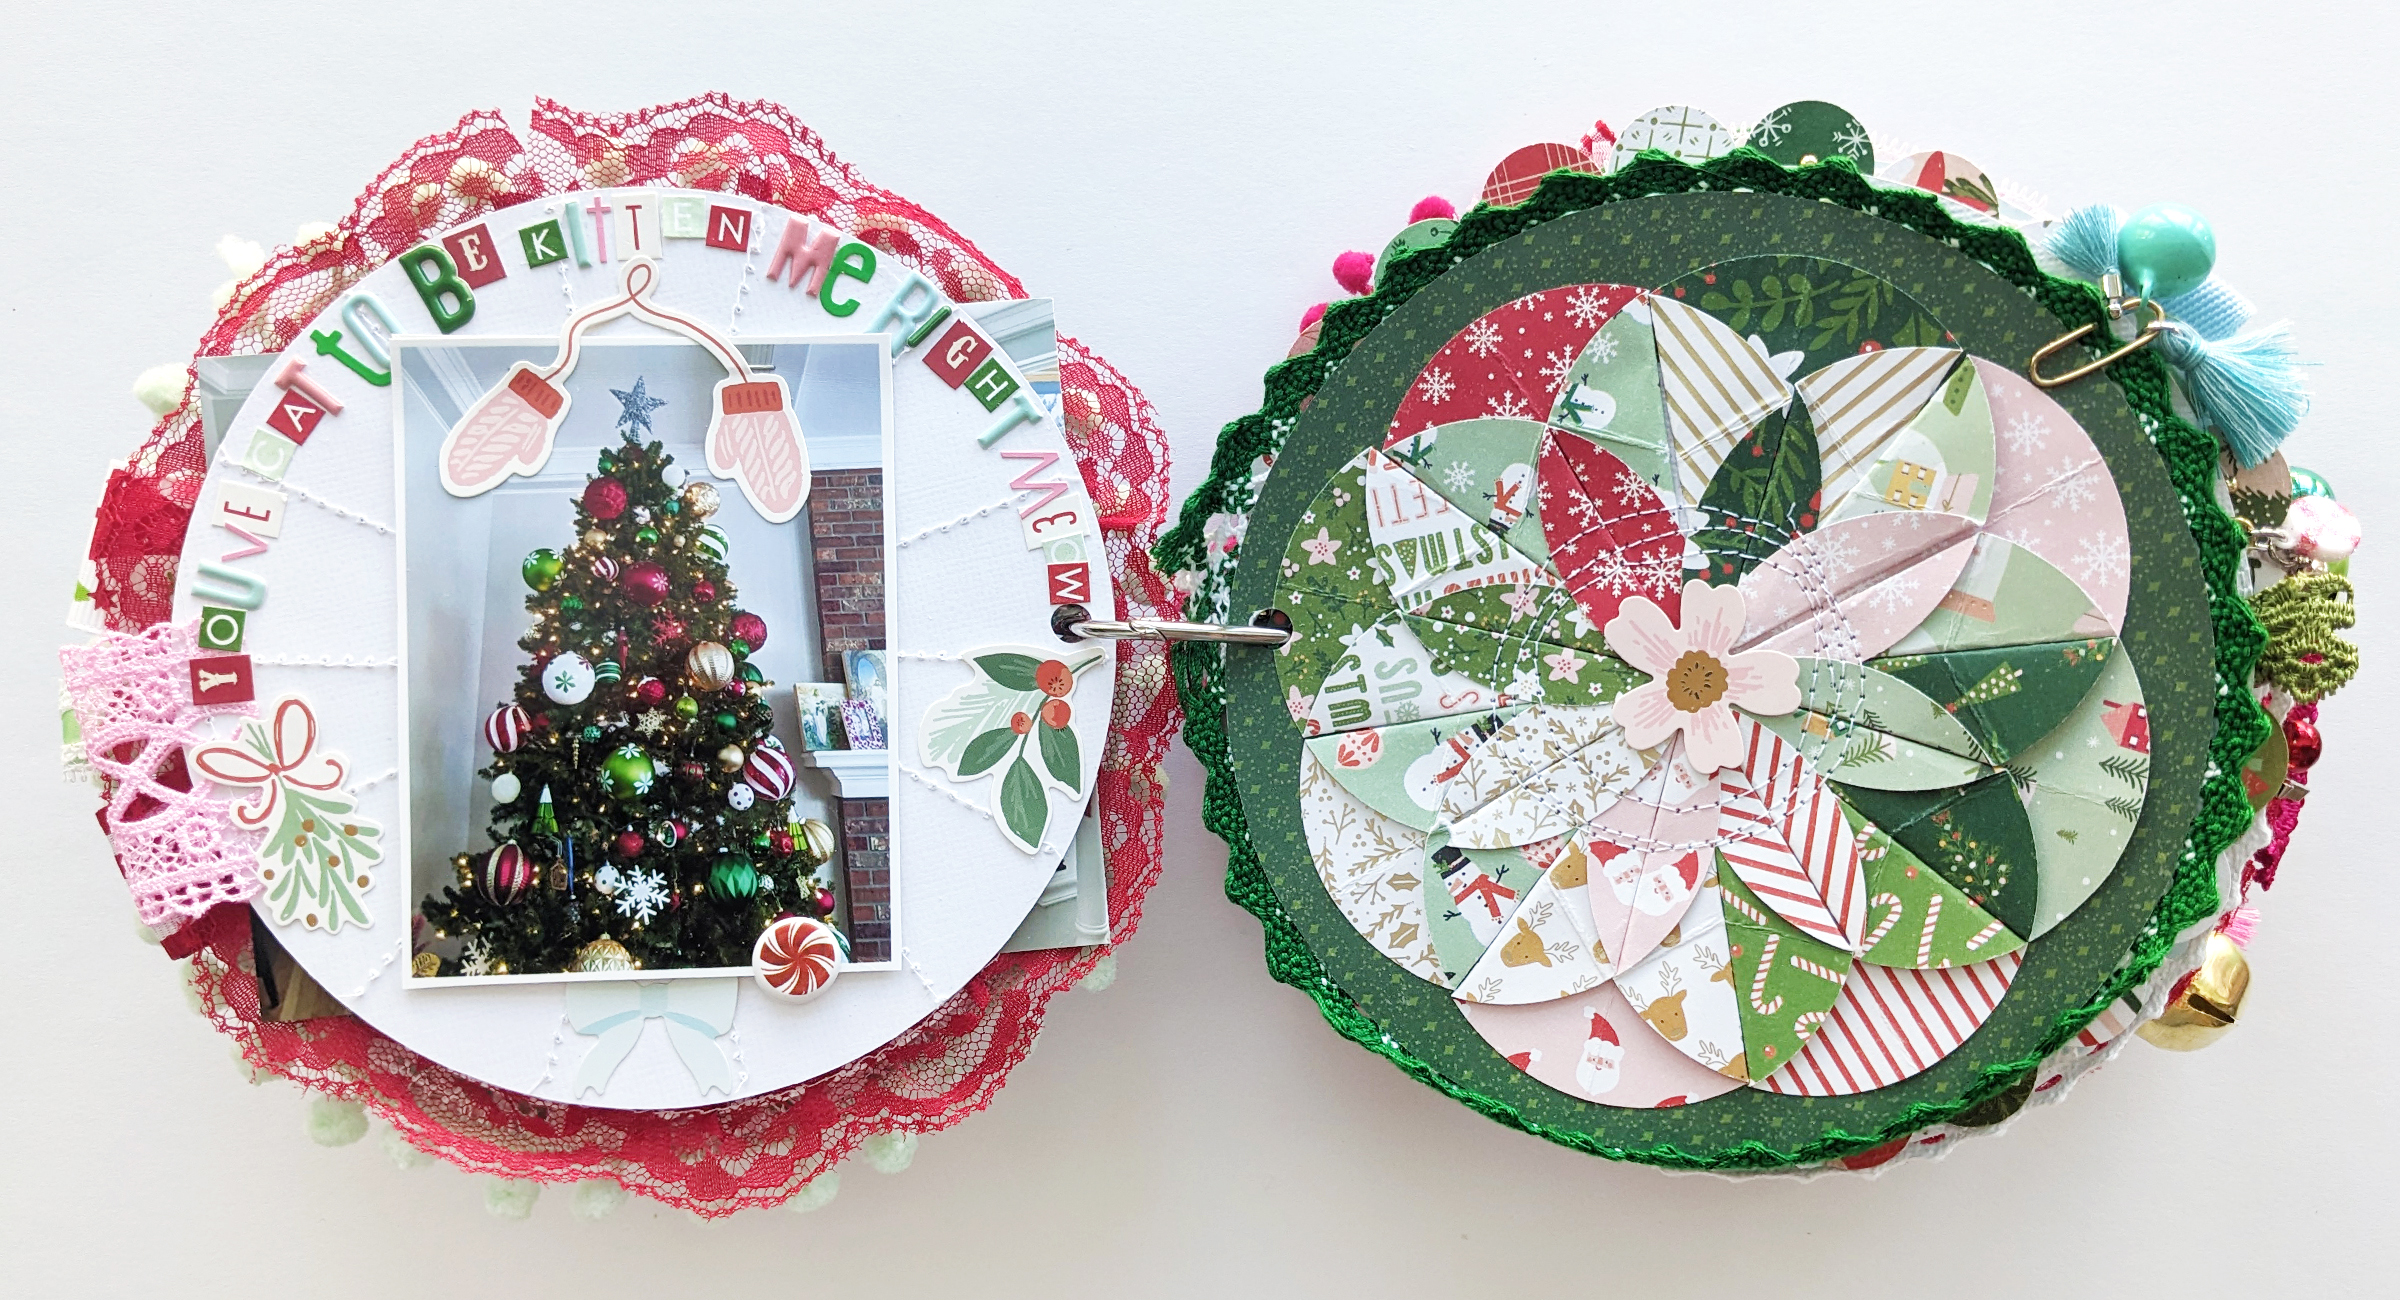
Throughout the album I added and texture in the form ribbon stitched to almost every page, totally amazing and festive charms by Emily Inspired Designs, cut files, and lots of bits sticking out everywhere.
Many of the supplies I used throughout the album are from the Mittens and Mistletoe Collection by Crate Paper, all of this year's holiday DCWV Paper PadsAlphabet Soup Stickers by Doodlebug Design, the digital Pink Christmas collection by Kelly Bangs Creative, and some new cut files I designed just for this album.
The little embellishments, charms, paper clips, and ribbons are from my stash - check Etsy and Ebay for cute bits!
This is my 10th year of doing a December Daily and every year the size and format has been slightly different:
2012: 6x6" Chipboard
2014: 5x7" Wooden Covers
2015: MemoryDex Tray
2016: Traditional 6x8" Binder Album
2017: 4x6" Coptic Book
2018: 6 x 7 1/2" Christmas Tree Shaped
2019: 4x8" Traveler's Notebook
2020: 6x6" Chipboard with Embroidered Covers
2021: 6x8" with Embroidered Covers
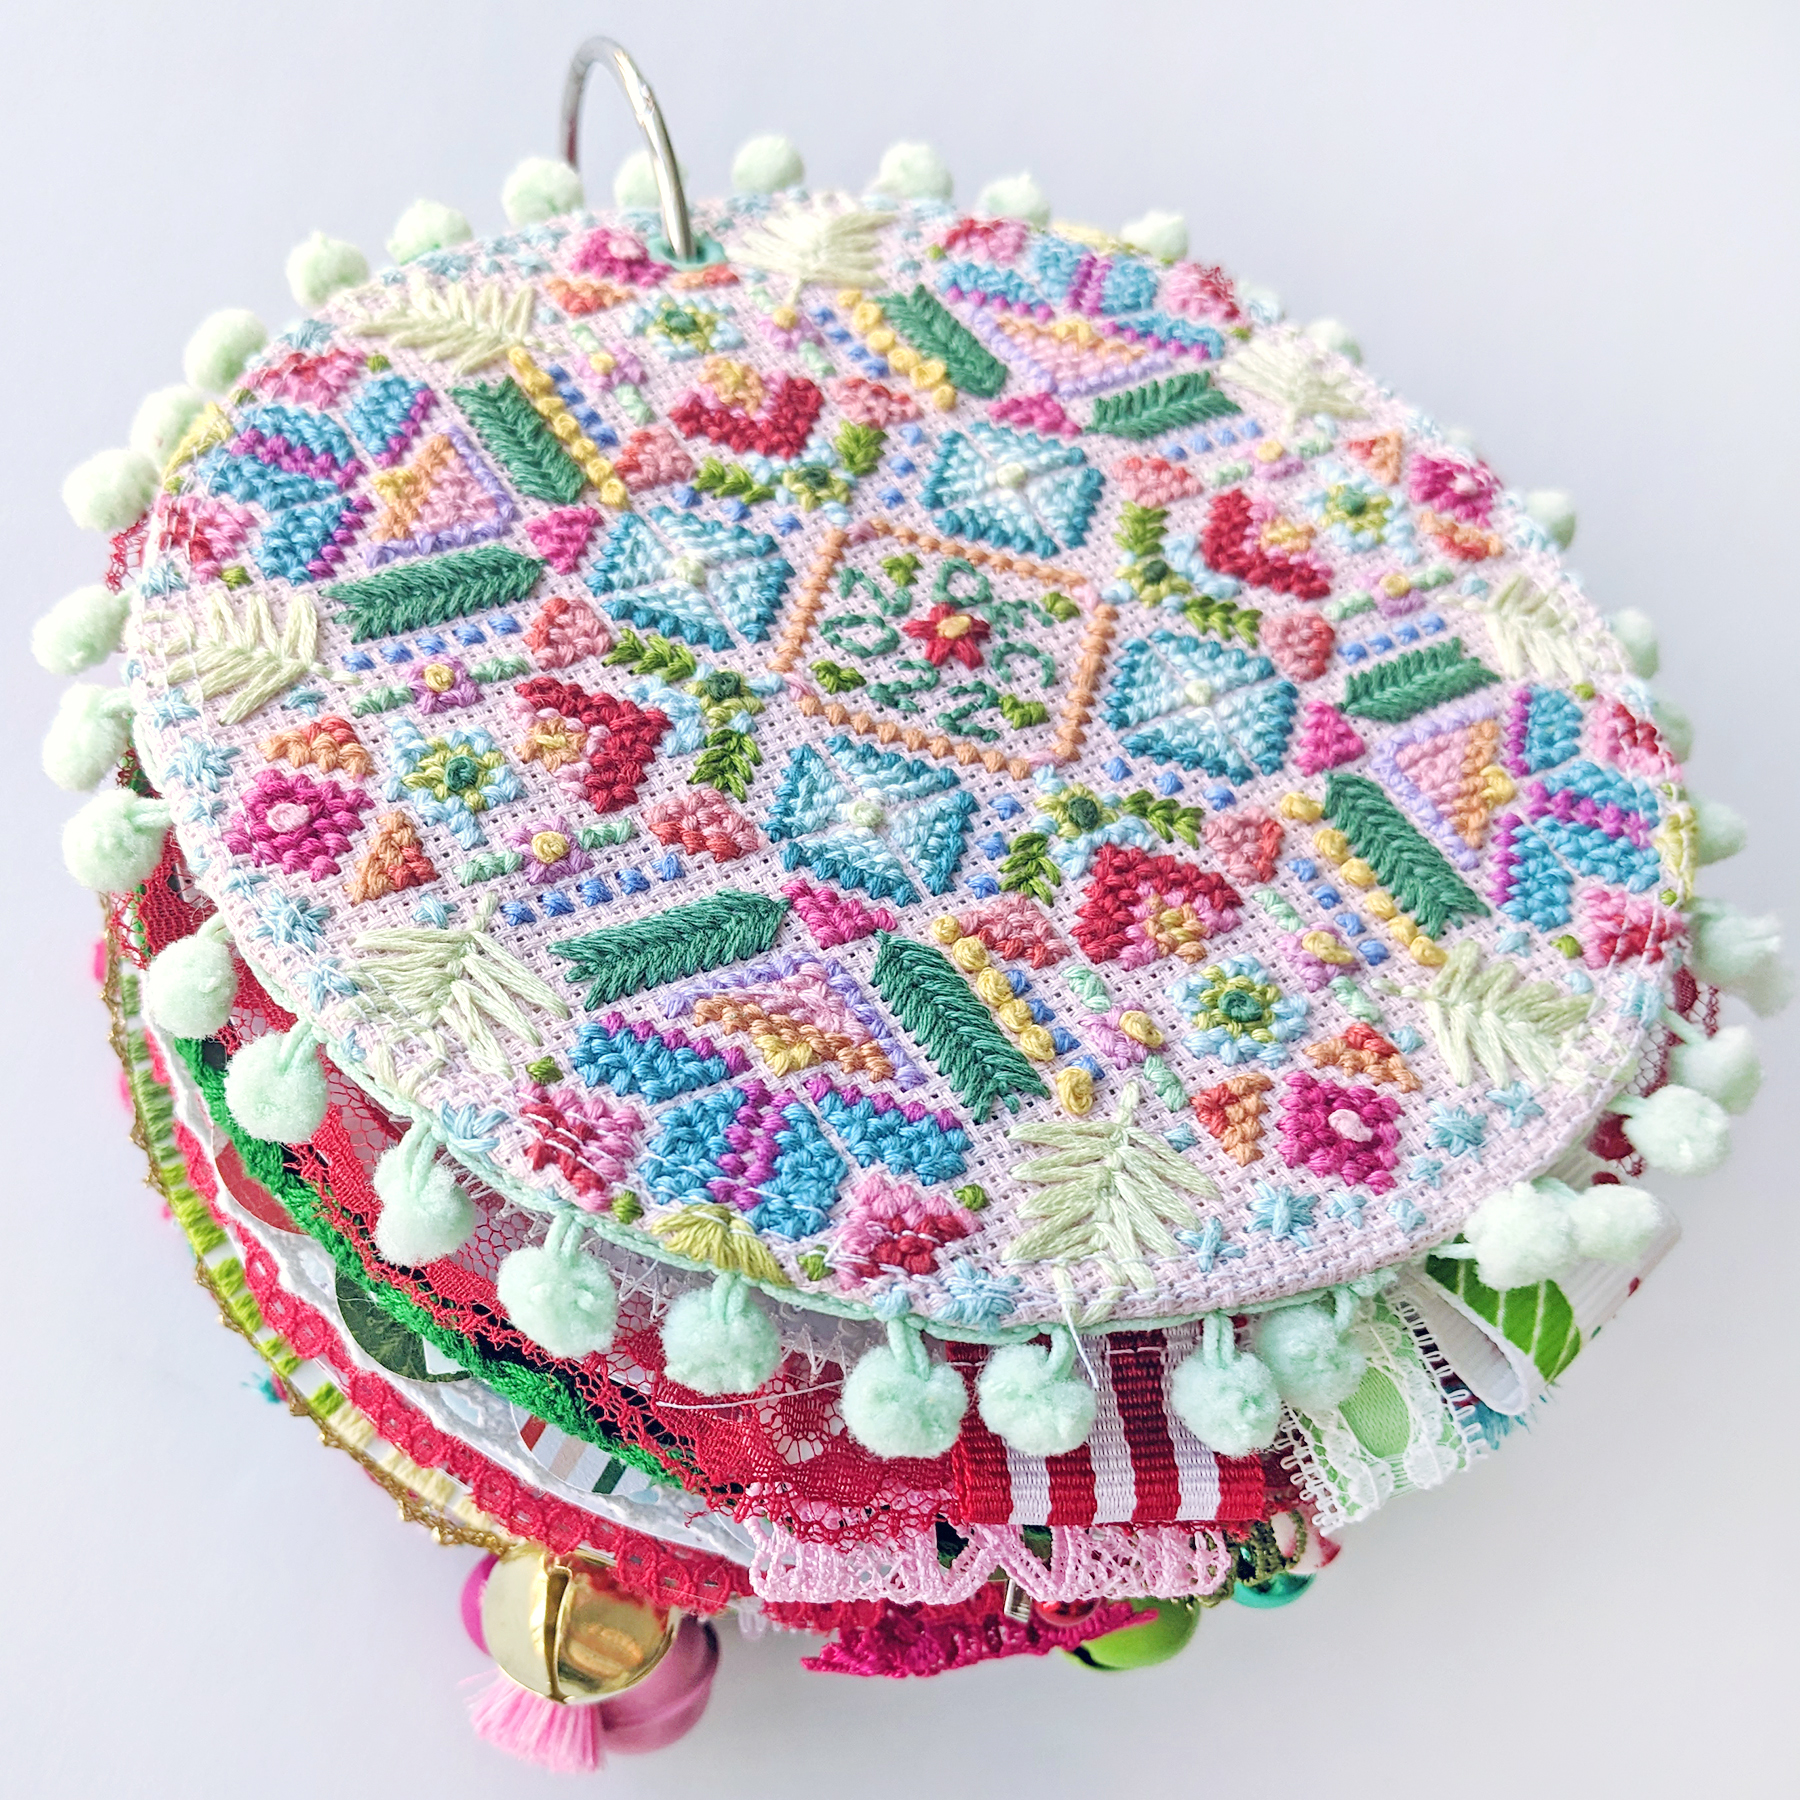
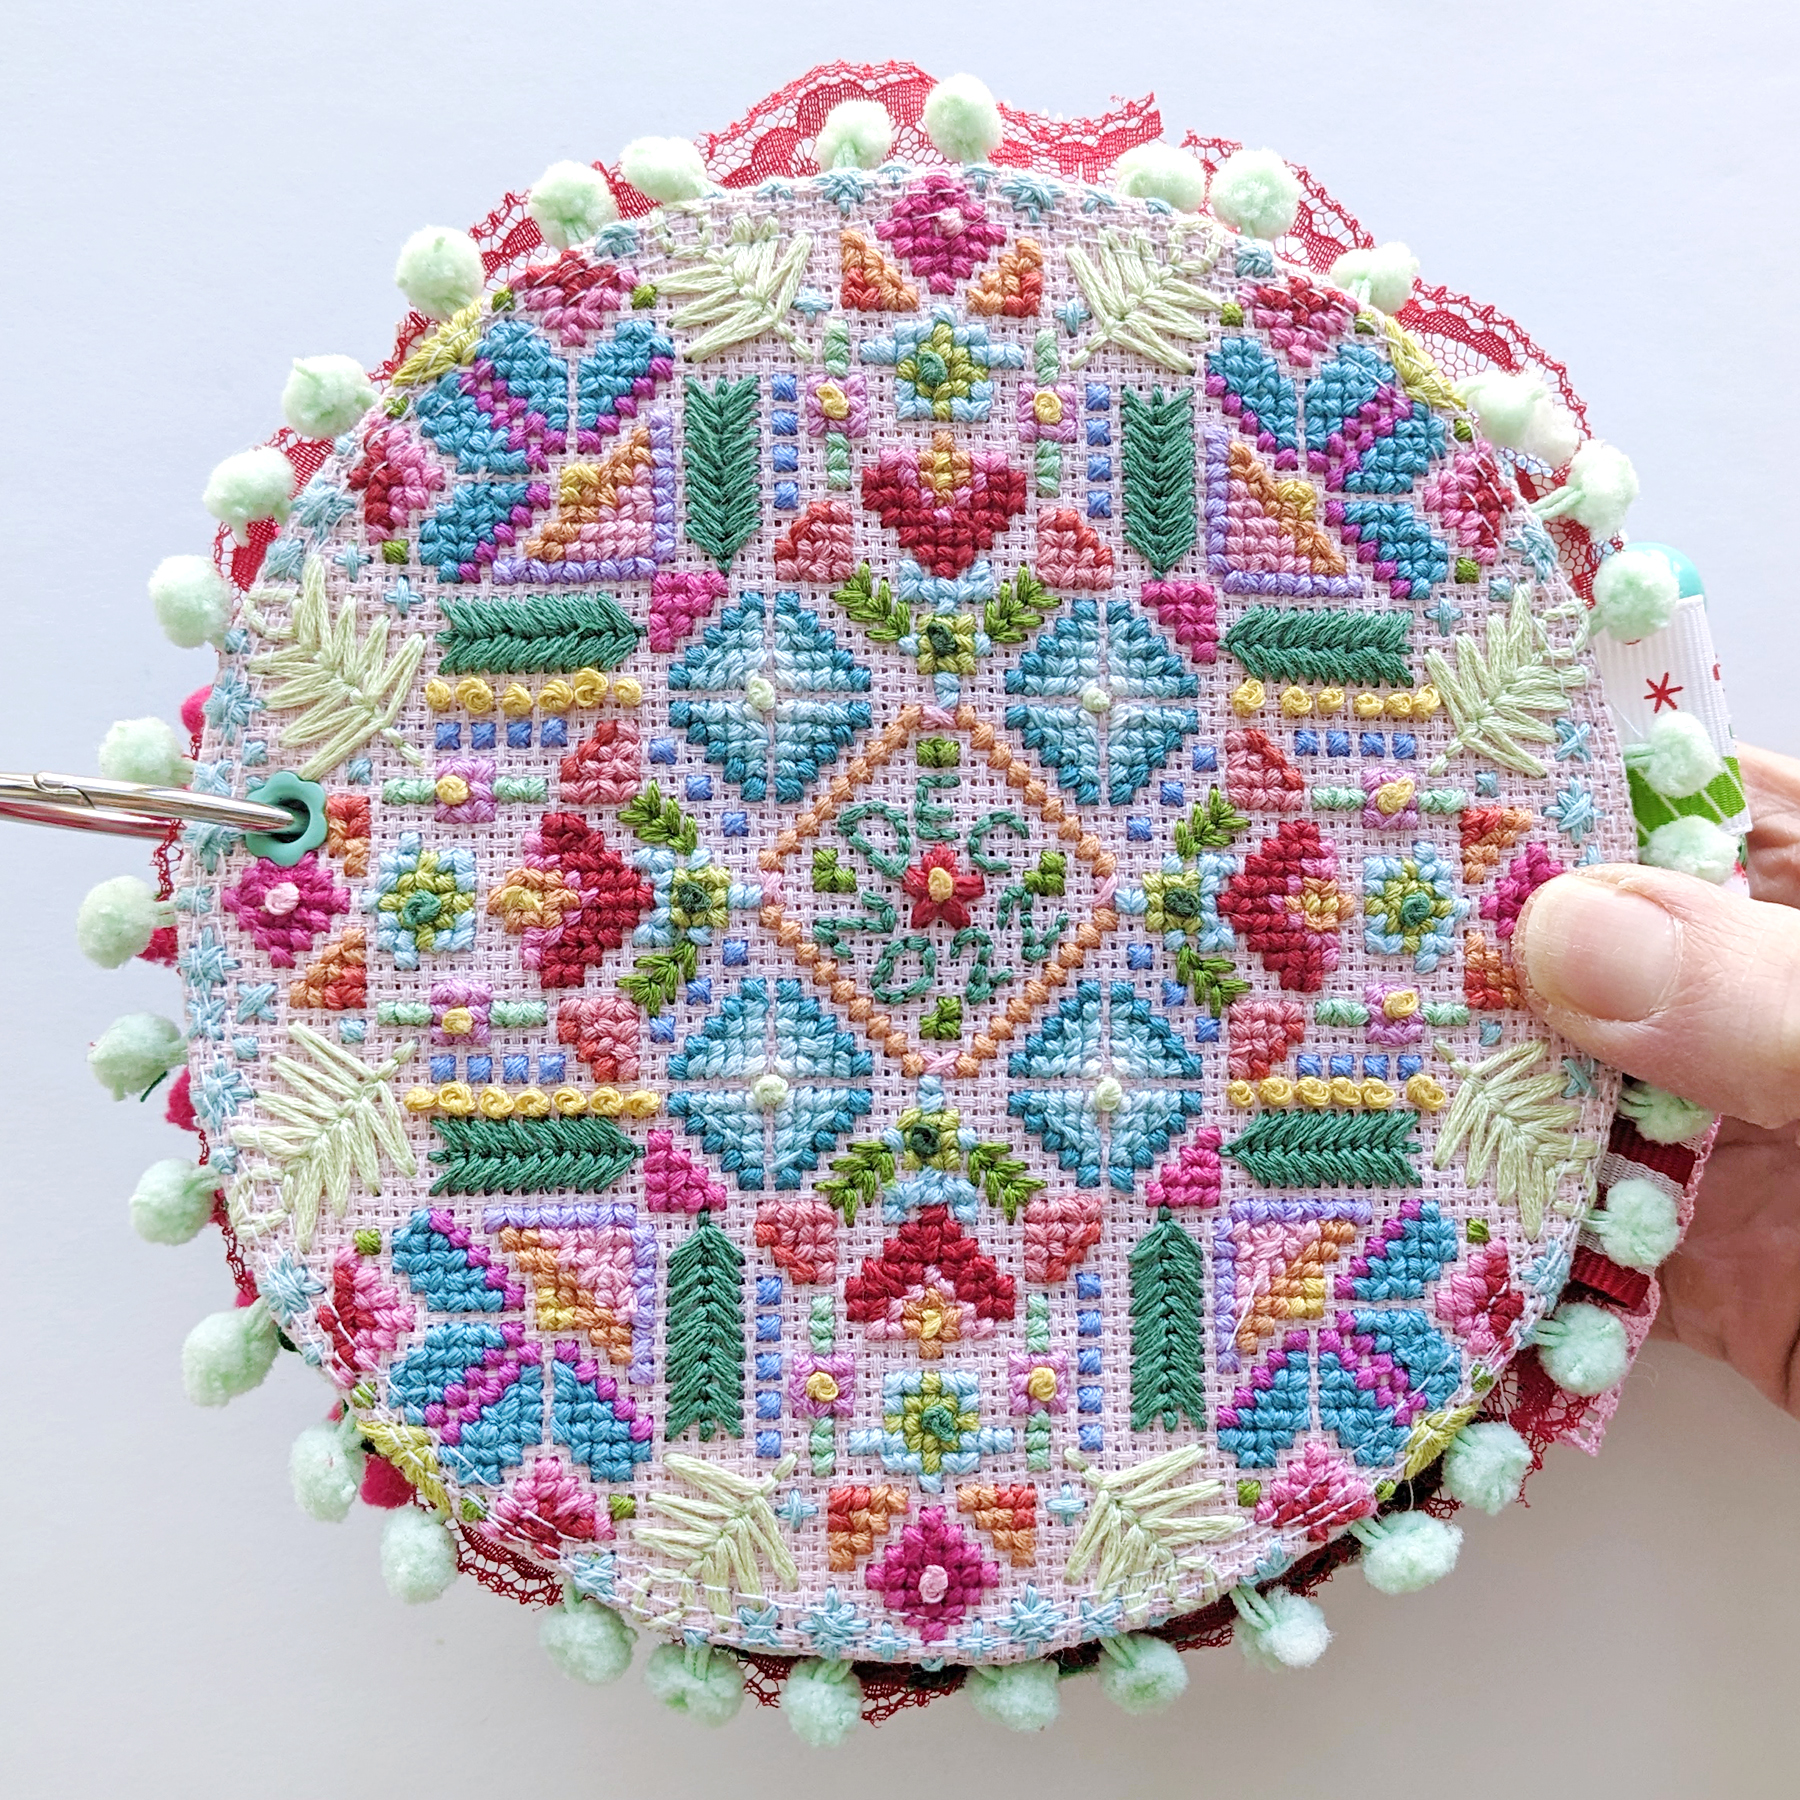
2022: 6" Round with Embroidered Covers
I have flip throughs of all of these on my YouTube - December Daily Playlist.
The hardest part for me is choosing the size & style of album I want to make since I do like it to be different every year. One night it came to me: round like an ornament! Yes! Let's do that!
I loooove having a custom embroidered cover so to begin I purchased this bundle of cross stitch fabric on Amazon. The colors are so perfectly Christmas! Of course I chose the pink for the front cover :) Then I used the forest green for the back.
All the DMC embroidery threads I used:
I spent about 24 hours over the course of a week back in November stitching and I based my design on two patterns from Diana Watters Handmade Etsy ShopScandinavian Meadow & Midnight Marigolds.
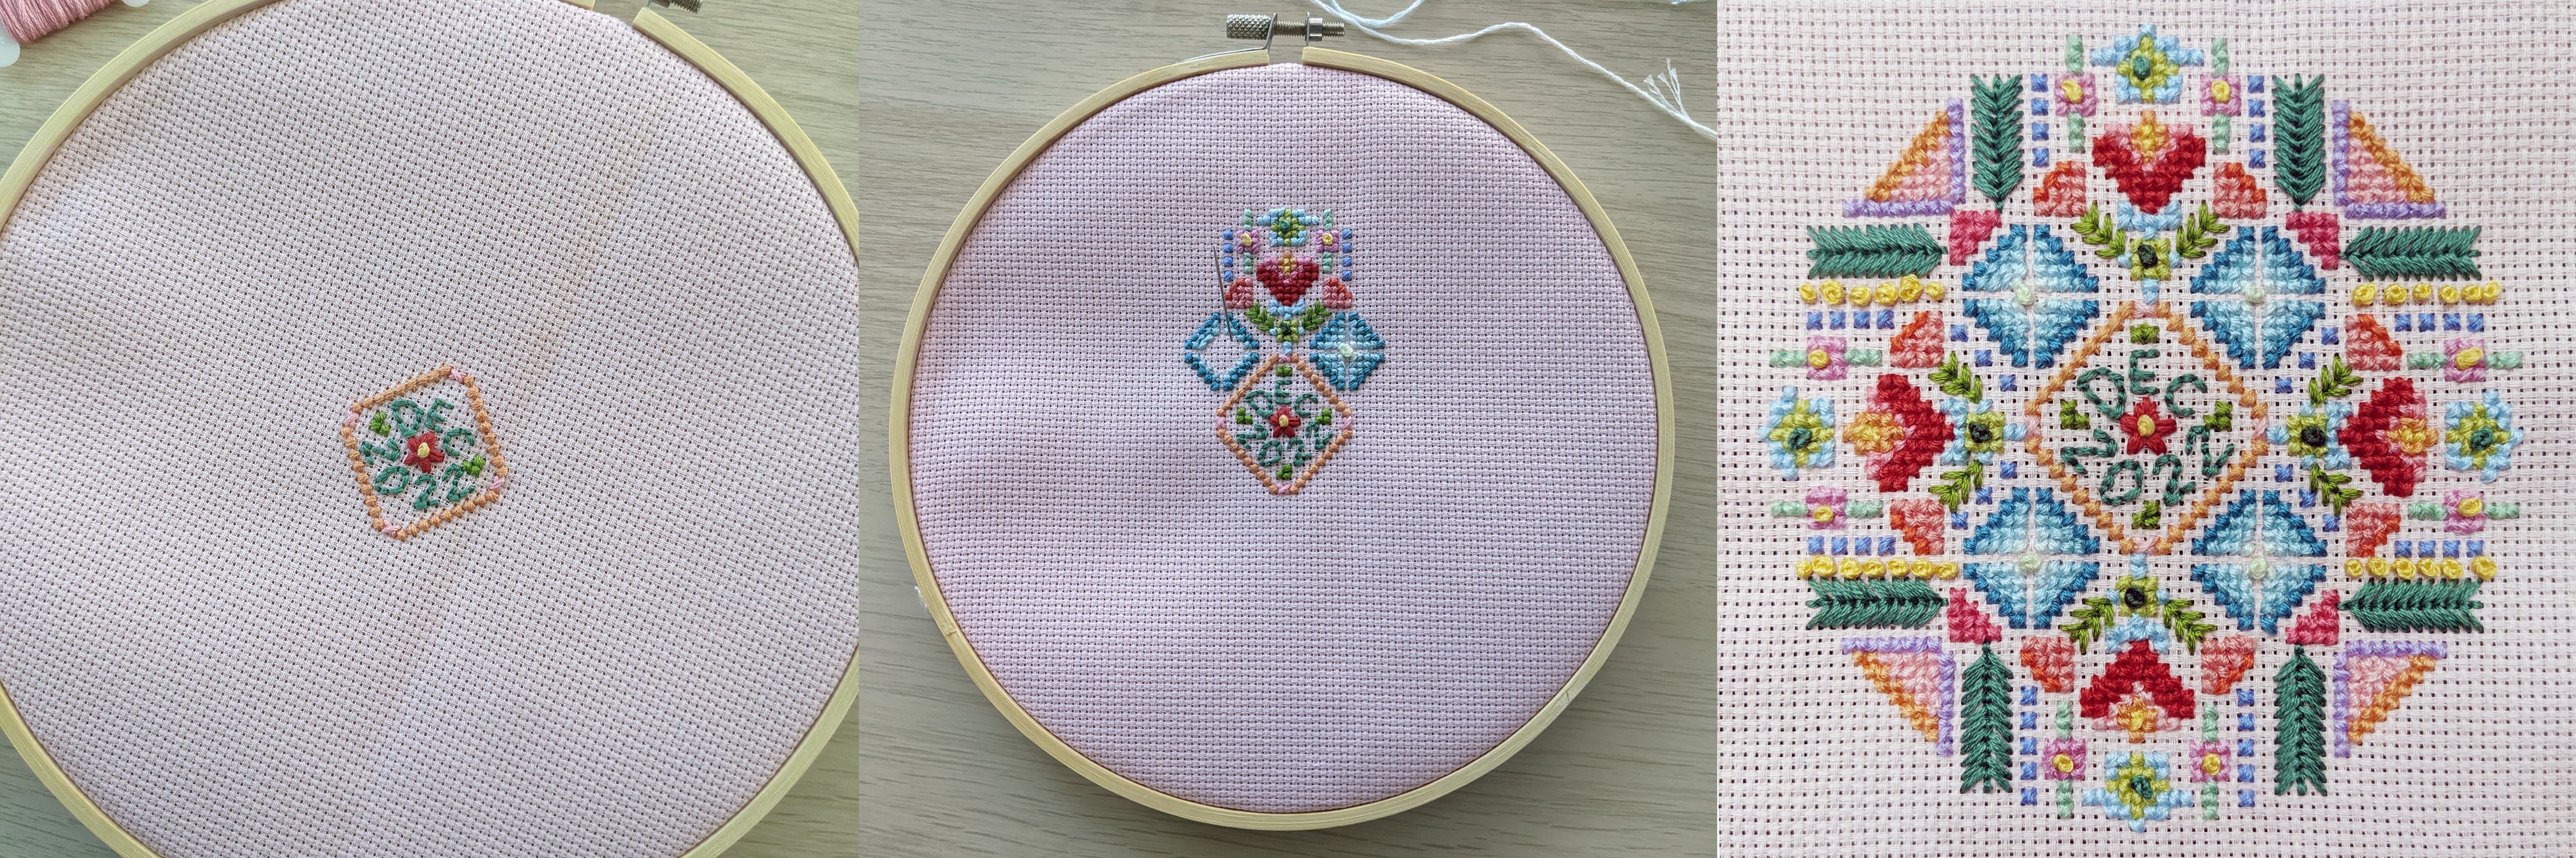
All done stitching! Ready to be trimmed and wrapped around chipboard.
Here's a look at the cover in its finished state.
I hoped that by having the size/shape/style and covers of my album done way before December, I'd have a good head start! However, after I finished creating my projects and kits for PaigePals4, I spent the rest of December, well, resting! Finally a few days into January 2023 I got my mojo back and created my album in about 10 days.
Before I got my mojo back, I had all my Christmas supplies out on my craft table and my photos printed, cut, and ready to go. And there everything sat for weeks. When I'm in a rut, I try and just make something, anything. I knew my album was round, so rather than start with my photos, I decided to just start making round pages using different scrapbooking techniques. Before I knew it, I had 25 foundation pages!
Instead of covering up the artwork with photos, I opted to add photos onto the backsides and let all the fun scrapbook techniques and patterned papers shine :)
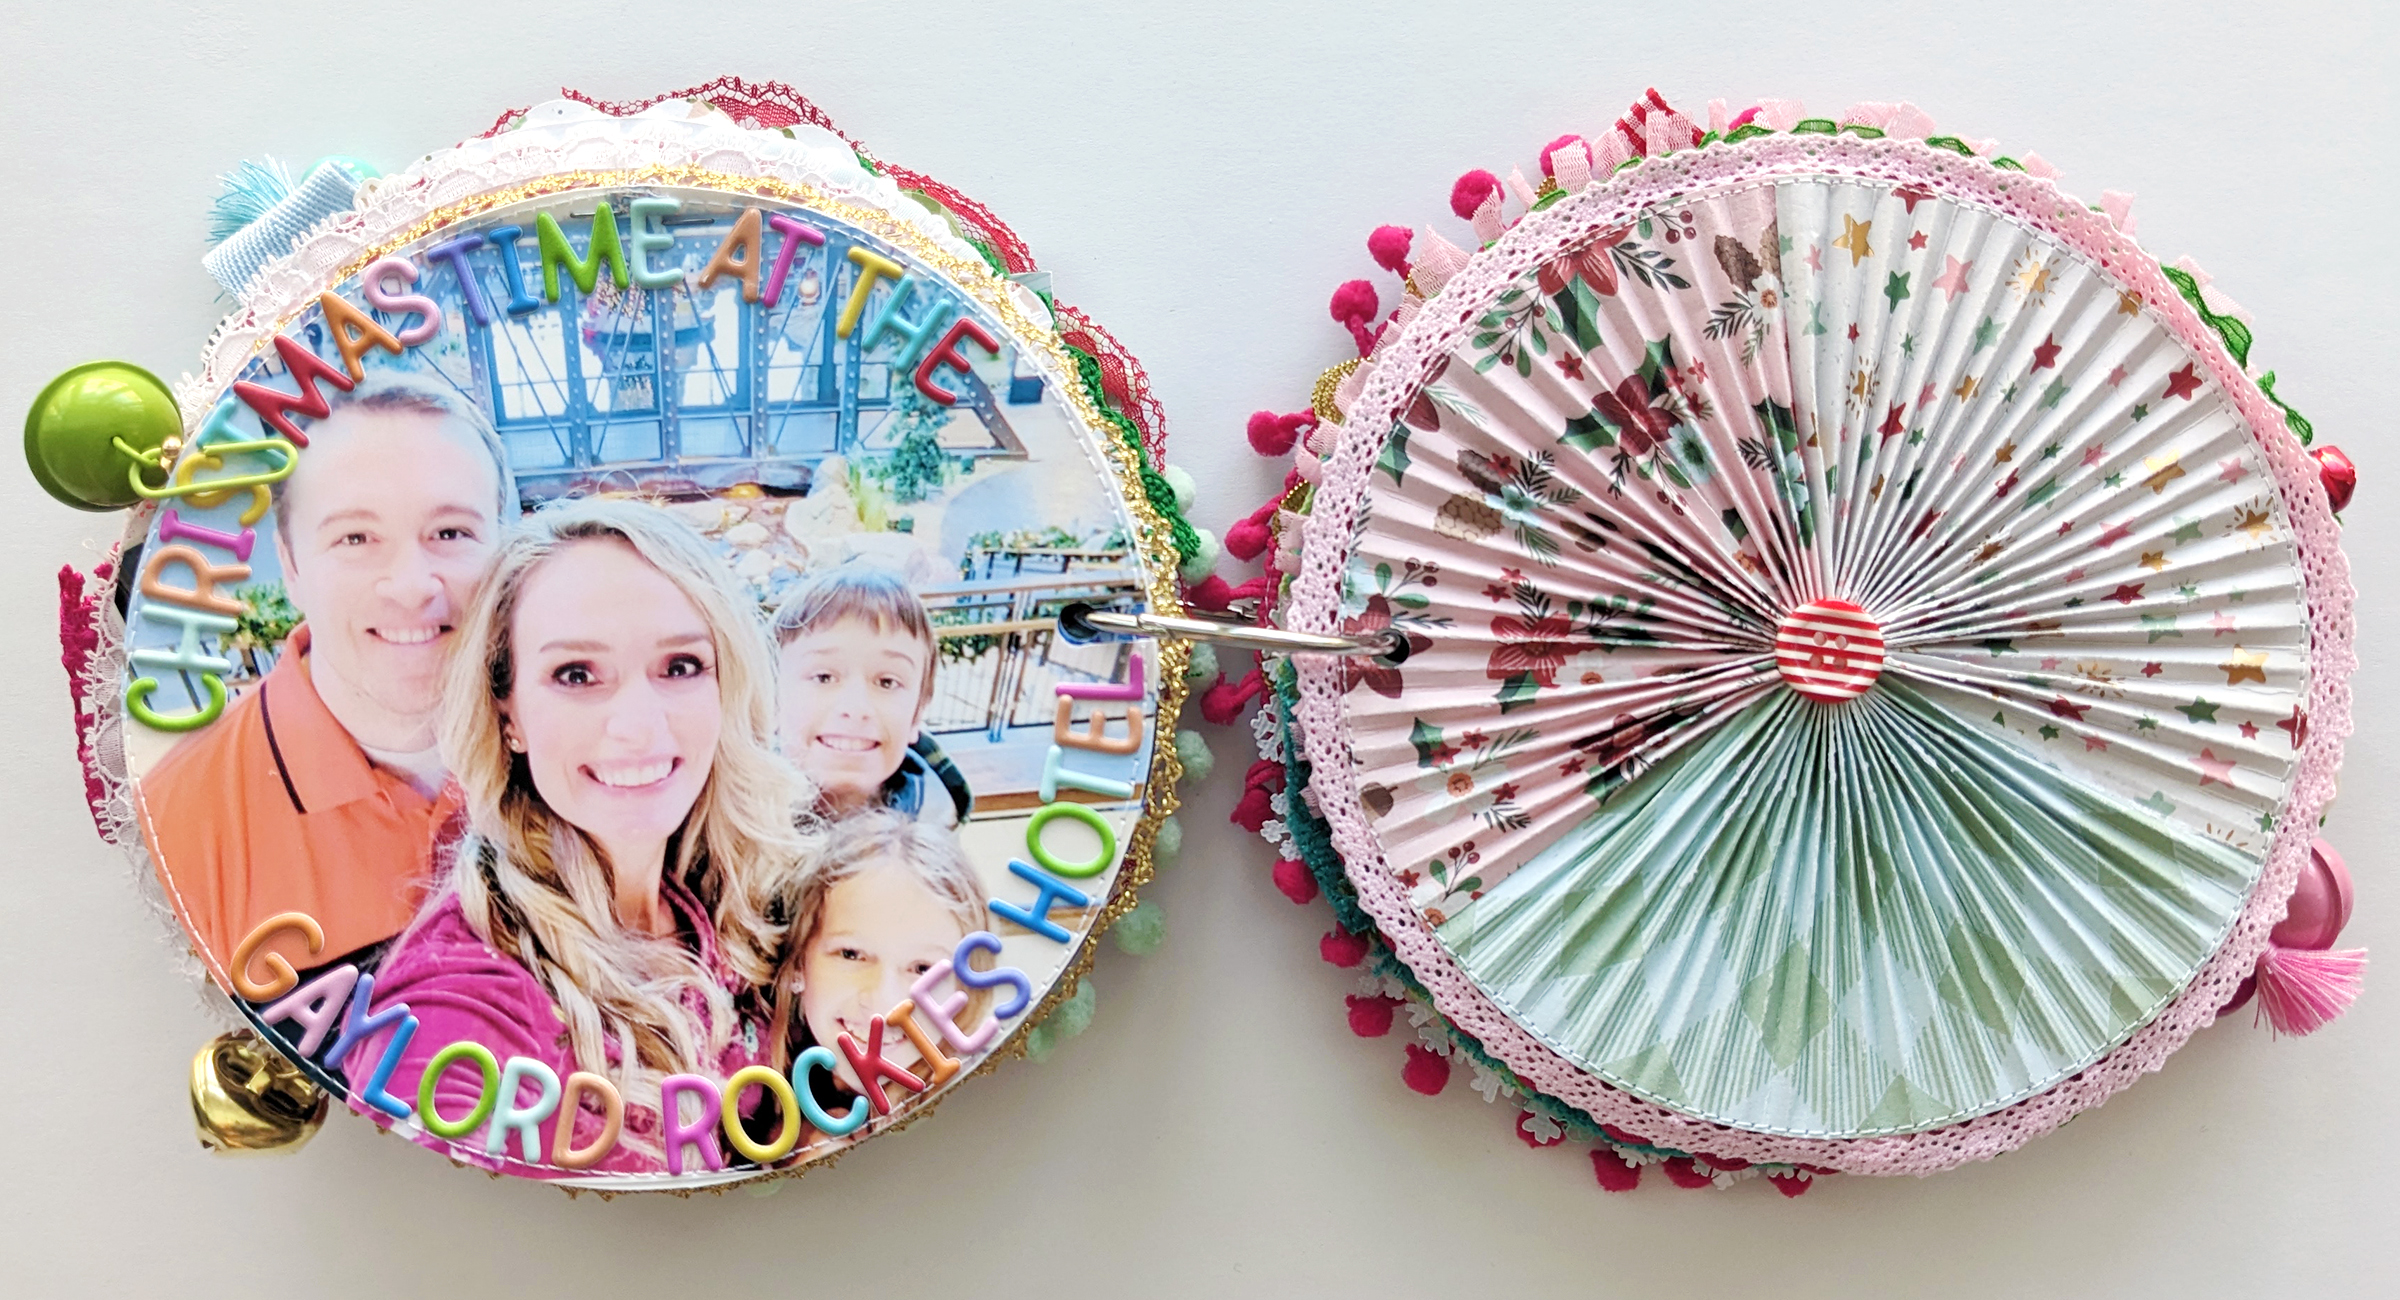
To attach the book together, I punched a hole through the left side of every page and looped them onto a 2" binder ring. On the front and back covers I set an eyelet through for stability using a Crop-A-Dile.
Both covers are lined with a poinsettia floral paper. I added a journaling spot on the inside cover to introduce the album. The right page is a shaker pocket made from a page protector and I poured a bunch of sequins in it, stitched, poured more, stitched, poured more, etc, then stitched it closed. I made the year with Alphabet Soup Stickers by Doodlebug Design topped on layered Mittens and Mistletoe stickers in the center. On the right I stitched three folded pieces of ribbon as page turners.
I didn't add anything additional on the back side of the shaker pocket. On the right page, I scraped white modeling paste through a nordic sweater stencil onto a white cardstock page and let it dry. I stitched red lace around the edge after I embellished the back. In the center I added a journaling spot from Mittens and Mistletoe and wrote journaling with a black pen.
After adding a full 6x4" photo, I embellished with a poinsettia and a holly sticker from Mittens and Mistletoe and a sentiment sticker from an old Pinkfresh Studio collection I believe. On the right side, I used the 6x6 Down the Chimney Paper Pad to create wedges and distressed the edges before machine stitching them onto a white cardstock page. In the center I added a 2" square photo and tucked banner pieces under the edges. I stitched folded pink lace ribbon to the edge for a page turner. 
On the left side I used an assortment of small alphabet stickers to spell "you've cat to be kitten me right meow" around the top curve and made a photo flip in the center with silly pics of Amy in the tree. I finished the page with a few stickers from Mittens and Mistletoe. On the right page I used the 6x6 Merry Merry Paper Pad to create a folded flower (you can learn how to do this technique in my February Layouts Class!) and attached it onto a green paper page. I stitched green ribbon trim around the edge. In the middle I placed a small pink flower and slid on a paper clip with a tassel and jingle bell.
Here's a peek at the photo flip. Amy is hilarious. Anybody else's cat climb the Christmas tree?
In the center of the left page I added a 4" square photo and embellished with stickers from Mittens and Mistletoe. For the right page, I designed a Cut File with Holes for Stitching: once I brought the needle and thread up through one hole, I slid on a bunch of sequins from my stash, and pierced the needle through the next hole. Repeat for all 9 sets of holes. Such a fun effect! I attached a green lace ribbon tab and paper clip with charms on the right edge.
I covered the back side with a candy cane paper from a DCWV Paper Pad and placed a 4" round photo in the center. The stickers are from Mittens and Mistletoe. For the right page, I used a 5/8" circle punch to make a bunch of circles from a DCWV 6x6 Paper Pad from last year and edged them around a green paper page (learn how to use this technique on a layout in my virtual class HERE!). I stitched around and around, topped each circle with a gold pearl, and placed a 4" round photo in the center. I wrote journaling around the photo and placed a banner sticker at the bottom.
I covered the left page with white embossed stars paper from the 6x6 Down the Chimney Paper Pad and placed a 4x6" photo on top - I trimmed the excess photo edges. The journaling spot sticker is from Mittens and Mistletoe and I wrote journaling. That's all for this page, clean and simple, because the following page is busy and bright! I machine stitched lines down a light blue polka dot paper and then fussy cut a bunch of ornaments from the Pink Christmas collection. I attached the ornaments with foam squares for a bit of dimension. To finish I stitched white lace trim around the edge.
I covered the back side with a green patterned paper and then scattered photos all across the back. In empty spaces I added little star stickers and a banner from Mittens and Mistletoe. The right page is one of my favorites! I covered the top of a white cardstock circle with blue polka dot paper like falling snow. Then I cut white glitter cardstock into wavy sections and layered them across the bottom as snowy hills. All along the tops of the hills I added tiny puffy stickers from a few Crate Paper collections and fussy cut images from the 6x6 Down the Chimney Paper Pad and the 6x6 Holiday Delight Paper Pad to make a little snowy scene! To finish I stitched a ribbon tab on the edge as a page turner and also added a paper clip charm.
Across the middle of the left page I placed a 6x4" photo and rounded the edges. The die cuts and stickers are from Mittens and Mistletoe and I wrote a little journaling around the bottom curve. On the right page, I trimmed 3/4 x 3" paper strips from the 6x6 Holiday Delight Paper Pad, placed them in a quilt design, then took some time to machine stitch around every paper piece. I didn't add anything else, I didn't want to cover any of it up :) I stitched light blue scalloped velvet ribbon around the edge.
I covered the left page with light strand paper from the 6x6 Holiday Delight Paper Pad and added 7 mini photos on top along with a little label sticker and a caption. Done and done! For the right page, I designed a Stitching Cut File and used a few different colors of thread to stitch it using a basic backstitch. Around the edge I stitched red lace.
The left page is covered with a blue plaid paper from the Pink Christmas collection and I made a photo flip with 3x4" photos - more kitty pics of course! The stickers and die cuts are from Mittens and Mistletoe. For the right page, I fussy cut a bunch of flowers from the Pink Christmas collection and placed them in a wreath around a white page. I added a 2" square photo of Sandy in the middle and wrote journaling with a blue pen below then slid a pink paper clip with a tiny jingle bell slid on the right edge.
Here's a look at the photo flip. Cute kitties! Oh my heart.
I covered the left page with a star paper from the 6x6 Down the Chimney Paper Pad, added a 4" round photo, and placed gnome, flower, and berry stickers from the older Photoplay Christmas Party collection. The right page is another fun technique! I used my Folded Circles Cut File to have my machine cut about (40) 1" circles from DCWV Paper Pads, folded them, attached them to a white cardstock page, trimmed off the excess, then stitched around the edge. I stitched a bright pink lace ribbon tab to the right edge for a page turner and placed a small sentiment sticker from Mittens and Mistletoe in the center.
I made an accordion photo in the middle of the left page and curved gold alpha stickers above and below for a title. Stickers used as embellishments are from various Christmas collections. On the right page, I designed a Swirls Stitching Cut File, used mint thread, and did a chain link stitch. Then I fussy cut tiny ornaments as light bulbs from the 12x12 Merry Merry Paper Pad and attached the light bulbs with foam squares for a bit of dimension. White lace was stitched around the edge and a jingle bell attached to a paper clip slid on the right edge to finish.
Here is the accordion photos open. Love this tradition of seeing the Gingerbread House!
And the back side of the accordion photos embellished with stickers.
I covered the back with a light pink snowflake paper from the 6x6 Merry Merry Paper Pad and topped it with photos and embellishments from Mittens and Mistletoe. For the right page, I die cut a circle ring from Vicki Boutin White Foundations Media Paper and then wrapped a rainbow of threads around it! So simple, so effective! I backed the opening with a photo.
I trimmed a slightly smaller circle of paper from the Pink Christmas collection to mat on the backside and added a fussy cut sentiment also from the Pink Christmas collection to the middle. On the right page, I designed a round Christmas Cut File, cut it from white cardstock, and backed it with printed digital papers from the Pink Christmas collection. I placed the die cut over a round piece of vellum and a light blue plaid paper then started stitching around the edge. Before stitching it closed I poured in sequins to make a shaker, then finished stitching. Then I stitched gold trim around the edge. Lots of layers for this page!
The left page is a full photo flip-up. I used almost allll the colors of Alphabet Soup Stickers by Doodlebug Design to make the title around the top and bottom. On the left side I added a paper clip with a green jingle bell. The right page is a paper rosette made with three pieces of paper from Mittens and Mistletoe scored at every 1/8". It was a bit fiddly to put together but I love the results! I stitched pink trim around the edge and topped the center with a candy cane striped button.
Here is the photo flip-up of our staycation at the Gaylord Rockies Hotel. I made collages in Picasa and printed the pics at home.
The left page was covered with a red patterned paper then I added two 2x3" photos. The stickers and embellishments are from 3 different older collections. For the right page, I trimmed a round piece of mint cardstock for the page base. Then I used a 5/8" star punch to make a bunch of paper stars from a past Crate Paper collection that I then glued in a wreath design. I machine stitched around and around the page over the stars then came in with almost an entire package of enamel shapes from Mittens and Mistletoe. In the center I added a photo and topped it with a bird sticker and banner sticker. I stitched red ric rac around the edge then to finish I added a paper clip and jingle bell on the right side.
I made another photo collage in Picasa to cover the backside of this page then embellished with an ornament border sticker from the Photoplay Christmas Party collection along with a strip of journaling. For the right page, I used a pink patterned paper as the page base then used three sizes of heart punches to make paper hearts - 5 for each flower - from a past DCWV paper pad. The hearts were folded in half to make "petals" and I filled the entire page with them! I topped the flowers with white enamel dots then stitched green lace around the edge.
On the left page I added two photos on a blue snowflake paper from the 6x6 Down the Chimney Paper Pad and embellished with a bunch of snowflake stickers and a bow sticker from older collections. On the right page, I made the base from light blue cardstock then made the names of all the reindeer using various Christmasy alphabet stickers. To help them stay in place I machine stitched across all the names. I embellished with a reindeer sticker and a peppermint sticker (I think I got them from Target a few years ago lol) and the pink reindeer die cut is printed and fussy cut from the Pink Christmas collection. I stitched pink scalloped ribbon around the edge to finish,
For the left page I covered it with tree paper from Mittens and Mistletoe, added three photos, and placed a banner sticker also from Mittens and Mistletoe in the center. I added a few more stickers from past collections here and there. For the right page, I designed a Christmas Tree Cut File and cut it from gold snowflakes paper. I trimmed lots of paper strips from the Mittens and Mistletoe collection, fringed them, layered them on a white cardstock page, and adhered the die cut tree page on top. I stitched pink ric rac around the edge and attached a paper clip with pink baubles on the right edge.
I always have so many photos from Christmas Eve! I layered them over a green striped paper and added a few stickers to embellish along with journaling. On the right page, I used the beautiful Christmas Floral Set by A Pocket Full of Happiness to create a pretty wreath using pink/red/green/mint cardstocks. In the center I added a colorful sentiment then stitched funky pink trim around the edge.
After covering the left page with blue snowflake paper, I punched five photos into 1 1/2" circles as well as a lined journaling spot. I placed the photos around the page and embellished between with puffy stickers and light pink enamel dots. On the right page I made a shaker pocket: first I trimmed white cardstock to a 5" circle then I used a tiny snowflake punch and made paper snowflakes from two papers in my Go the Scenic Route collection. I glued a few of them to the white cardstock and saved the rest for a bit later. I trimmed clear transparency paper to a 5" circle, placed it over the white cardstock circle, and began machine stitching around it onto the center of a full page bright pink paper circle from the Photoplay Christmas Party collection. Before I finished stitching all the way around, I poured in the rest of the punched paper snowflakes and shimmery flakes that look really like snow, then finished stitching. I stitched teal trim around the edge and topped the center with stickers also from the Photoplay Christmas Party collection.
I backed the left page with a yellow paper from my Bungalow Lane collection and added a 4" square and 2" square photo on top. I embellished with die cuts and stickers from Mittens and Mistletoe. On the right page, I punched 1" squares from the older Snow & Cocoa collection by Crate Paper and used them to cover a white circle page. Once covered, I trimmed the excess, then zig zag stitched down and across every seam to create a quilted look. On each square I placed a tiny alphabet sticker to make the title "CHRISTMAS ADAM TRADITION". I stitched lime green trim around the edge and slid on a paper clip with a tiny jingle bell to finish.
The left page is covered with a green floral paper from the 6x6 Holiday Delight Paper Pad and I added three 2" square photos across the middle then embellished minimally with Mittens and Mistletoe stickers and a die cut. For the right page, I started with a pink snowflake page base then die cut my Snowflake Wreath Cut File from white cardstock. After gluing the snowflake wreath in place I topped it with a whole bunch of puffy stickers from Mittens and Mistletoe. Inside the wreath I added a 2x3" photo of Jane on Christmas morning with her stocking and both kitties, lucky duck!
I added a full 6x4" photo across the middle of the left page, trimmed the excess, and added gold Thickers across the top and bottom curves. The right page is supposed to resemble a present - I placed red gingham ribbon down and across the middle then topped it with a bow. In each quadrant I added a 2" square photo and covered three of them with patterned paper blocks and present stickers, held in place with washi tape so they lift up to reveal favorite Christmas presents underneath :) I stitched gold ric rac around the edge.
Nothing too fancy on these last pages, I added a chipboard journaling spot sticker from Mittens and Mistletoe to the back page and left the back cover plain to let the pretty paper be the star!
After it took me 24+ hours to stitch the cover, I really wanted to stitch a fancy back cover too, but I didn't have it in me lol. Instead, I stitched a simple holly berry cluster and added pink pom pom trim around the edge.
And that, my friends, is my December Daily 2022 in a nutshell! It is a CHONKSTER, almost 3" tall!
Guess what?!?! My very own Christmas collection is almost done! It should release sometime this summer! And then I'm planning to do kits and a December Album Foundation Pages Class! My collection will have a coordinating 6x8 album with pocket page protectors which is awesome, but I can't be confined by just pocket pages haha, so we'll definitely learn some out-of-pocket techniques featured here! I can't wait!!
I hope you have enjoyed looking through my December Daily 2022! Let me know if you have any questions!

2 comments

Paige Taylor Evans © // Quinn Creatives DESIGN