The One with Living in Germany


Monday, December 30, 2013

We've lived in Germany working for the Army for almost 6 months! Time flies when you're having fun!
People here say that's how long it takes to "adjust". I'd like to think we've loved it from the second we got here, but it's true that some things take getting used to. Here are some differences that I've noticed living abroad:

Lights take forever-and-a-day to turn on. We've found a brand of lightbulb that's a bit faster and brighter, but most of the lights in our house still take about 5 minutes before they're at their full potential. Random, I know, but it's something to get used to!
You HAVE to recycle or you're fined.
Garbage only comes every other week.
Recycling comes once a month.
You have to pick up your mail at the post office, it's not delivered.
Mail only comes M-F, not Saturday like in the states.
You have a fill out a customs form for every.single.thing you send in the mail from here to anywhere. Paperclips included... Ask me about that if you're really curious, it's a whopper of a story...
No speed limit on the autobahn! That's something to get used to - freedom to drive as fast as you want!
Along with driving - all of the roadsigns are different, and in German! I had to pass a driving course to get my international license.
And again with driving, the roads are skinny as all get out! Narrow narrow narrow! They definitely weren't made for large American SUVs! And parking spots are teeny weeny. We see about 50 Smart Cars for every 1 SUV.
There is one American grocery store on base that sells food from home. 
You can't bag and take your own groceries at the American grocery store, you have to pay the person to do it.
You have to bring your own bags to German stores or pay for their plastic ones.
The biggest size of milk is a 1/2 gallon carton - no more two gallon jugs from Costco!
No Costco, no Target, no Anthropologie, or pretty much ANY American store you can think of. Wait - I thought of some - IKEA and H&M :)
Let's just say every toilet everywhere has a wand right beside it to 'scrape' with.
There is only one movie theater that oftentimes only shows a movie one time and it's always a couple weeks later than when it's released in the states. As a previous movie buff, this is definitely one of the harder changes!
No cable TV. I miss HGTV!!!
There's only one American radio station hosted by the Army.
We pay our fast and tithing online through Wells Fargo bill pay, not checks to the bishop.
The PX (the everyday convenience store on base) is expensive, so we do a lot of our shopping online at Amazon.com and get free shipping with Prime.
No Hulu or Netflix - we've found our way around that with a service called "Hide My A$$" which changes our VPN to a stateside address.
The language barrier... Sometimes I feel like I can't read because everything I see is in a different language. It's all jibberish! I've officially decided to try to learn German. How cool would that be to be able to speak another language?
It's a completely different system for measuring things. Kilometers per hour instead of miles per hour. Centimeters instead of inches. So on and so forth. 
When it comes to numbers and money, they use periods instead of commas and commas instead of periods. For example, in the states $1,345.67 would be 1.345,67. Well, after the exchange rate it'd be different!
Which is another thing - it's a different currency here. Euros instead of dollars. And the dollar only gets about 71 Euro cents.
The VAT tax - everything here is taxed 19%. Yeah. That's a lot. But some big stores like IKEA and H&M take VAT forms so we can get that 19% back because we're from the US.
The plugs and voltages are different. I shorted out our white noise machine because it was 110 volts instead of the European 220 volts. Oopsies.
The weather.... wah wah... After living in perpetually sunny weather in SoCal for 4 years the weather is one of the biggest changes to get used to. It's dark, cold, foggy, snowy, and FREEZING in the winters, which is now. It gets me down. But then we travel south to Italy where it's warm and sunny and all is right with the world :)
The time difference. It's hard sometimes being 9 hours ahead of my family. I can only chat with my mom from 4-10pm and 6-7am my time. I used to be able to chat anytime! But we make do and I'm thankful for G-chat and email.
Everything here looks like a painting! I'll never get over it!
It only takes 6 hours to drive instead of 15 hours to fly to Italy! And 2 hours to drive to Prague, an hour to Nuremberg, 5 hours to Paris, 7 hours to Amsterdam, and a bajillion other amazing places that we've never dreamed of going to but feasibly could!

Basically, even though this sounds like a lot to get used to, we are loving our time abroad and all the changes that come with it. It'll be a fun 3 or 4 year jaunt and then we'll return to the states ready to take on our next adventure!

The One with the Happy New Year (New Year Challenge) Card


Sunday, December 29, 2013

After a long hiatus (I pulled the new baby, hubby graduating, and moving to Germany cards) I've resumed hosting the CARDS challenges on the Create blog! The first theme is NEW YEAR cards and here is what I made:
 photo HNYbyPaigeEvans-2.jpg
HAPPY NEW YEAR by Paige Evans

Card is 4" square
How to: Trim white cardstock to make a 4" square card base. Place adhesive in a circle on the center then sprinkle it with gold star sequins. Sew circles over the sequins using white thread. Place gold glittered "HNY" Thickers on the middle for a title then write "happy new year" using a gold pen below.

Supplies: Cardstock, gold glitter foam letter stickers, adhesive: American Crafts; Sequins: Studio Calico; Gold pen: Uniball Signo; Sewing machine: Brother; Thread: Coats & Clark

The One with From Venice to Venice


Saturday, December 28, 2013

We went to Venice California in May and we went to Venice Italy today! 
2013 has been an incredible year and I'm excited to do a round up post on the last day of 2013 to see and relive all of our exciting adventures. Can 2013 be topped? Only time will tell!


Also, congrats to the winner of the 2Peas Gardeners' Digest December 2013 Blog Hop: Iara!
Congrats Iara - email me at paigetaylorevans at gmail dot com to claim your cardstock pack!

The One with Studio Calico COPPER MOUNTAIN Layouts


Friday, December 27, 2013

I didn't think I was going to be able to participate this month, my very first month on the Studio Calico Creative Team, but by divine intervention my box came with two days to spare and I busted out my four layouts in an evening and morning - and I could have kept going, there are SO MANY AMAZING products in the Copper Mountain Kits! I HIGHLY, HIGHLY recommend them :)
 photo MyGuybyPaigeEvans.jpg
MY GUY by Paige Evans

Journaling says: What a handsome little boy you are Fox! Especially when you let me style your hair!

How to: Die cut three stars from white cardstock then back each section with patterned paper using pop dots for dimension. Adhere the stars on a gray cardstock layout background. Place a black&white photo on the main star. Embellish the stars with chipboard circles and puffy heart stickers. On the bottom right corner adhere a label die cut topped with black vellum letter stickers for a title, a blue puffy heart sticker, and three arrows stamped with black ink. Journal with a black pen on the top left corner. Drop white spray mist across the layout.

Supplies: Scrapbook kit: Copper Mountain by Studio Calico (main kit only); Cardstock, pen, adhesive: American Crafts; Patterned paper: 7 Gypsies, Bella Blvd, October Afternoon, Studio Calico, We R Memory Keepers; Badge, chipboard circles, label die cut, letter stickers, arrow stamp, spray mist, star cut file: Studio Calico; Puffy heart stickers: Twine & Ink; Ink: StazOn; Die cut machine: Silhouette Cameo by QuicKutz
 photo MyGuyDetailbyPaigeEvans.jpg
****************************************************
 photo HelloHellobyPaigeEvans.jpg
HELLO HELLO by Paige Evans

Journaling says: How super handsome are you in this BabyGAP fedora? I ALMOST bought it for you but I knew you'd only wear it for a few minutes. Still, I'm glad I got pictures of you in it!

How to: Die cut lots of "hello" words from patterned paper then adhere them across the top and bottom of a dark blue cardstock layout base. Use the negative image of one "hello" and paint it with white paint on the bottom right corner. Straight stitch across a few of the words and staple others in place. Embellish some of the words with chipboard circles and puffy heart stickers. Add a trio of photos to the middle of the layout. Tuck airmail ribbon under the top edge of the photos. Tuck die cut labels under the left and right edges and under the middle photo. Journal on the label die cuts under the middle photo with a black pen. Stamp arrows using white paint on the outer photos. Drop white spray mist across the layout as shown.

Supplies: Scrapbook kit: Copper Mountain by Studio Calico (main kit only); Cardstock: Bazzill Basics; Pen, adhesive: American Crafts; Patterned paper: 7 Gypsies, Bella Blvd, October Afternoon, Studio Calico, We R Memory Keepers; Chipboard circles, arrow stamps, spray mist, "hello" cut file: Studio Calico; Label die cuts: Life Love Paper; Air mail ribbon: Maya Road; Puffy heart stickers: Twine & Ink; Ink: StazOn; Paint: FolkArt; Die cut machine: Silhouette Cameo by QuicKutz; Sewing machine: Brother; Thread: Coats & Clark; Staples: Tiny Attacher by Tim Holtz
 photo HelloHelloDetailbyPaigeEvans.jpg
****************************************************
 photo JanesBangsbyPaigeEvans.jpg
JANE'S BANGS by Paige Evans

Journaling says: One afternoon when Jane's hair was particularly out of control I decided to give her a hair cut! She looks so darn cute!

How to: Die cut a heart background from cream cardstock. On a scrap block of cardstock, trace the hearts a little bigger onto the scrap cardstock then cover those hearts with patterned paper. Add two photos to the hearts and journal in an empty one with a gold pen; outline the heart with a gold marker. Sew around three of the hearts before adhering the die cut page on top. Embellish the die cut hearts with sequins, a seam binding ribbon bow, and wooden veneer circles as shown. Add gold foil chipboard letters across two hearts for a title. Trim the left and right edges of the layout and back them with gray striped paper. Cut wide washi tape into smaller pieces and place the strips on the top left and bottom right edges. Embellish the washi tape with badges and blue epoxy dots.

Supplies: Scrapbook kit: Copper Mountain by Studio Calico; Cardstock, adhesive: American Crafts; Patterned paper: BasicGrey, Chic Tags, Farmhouse Paper Company, October Afternoon, SEI, Studio Calico, We R Memory Keepers; Badges: Hello Forever (pie char), Life Love Paper (star); Chipboard: Studio Calico (circles), We R Memory Keepers (letters); Wooden veneer circles, sequins, seam binding ribbon, hearts cut file: Studio Calico; Epoxy dots: Doodlebug Design; Washi tape: PinkFresh Studio; Gold marker: Sharpie; Gold pen: Uniball Signo; Die cut machine: Silhouette Cameo by QuicKutz; Sewing machine: Brother; Thread: Coats & Clark
 photo JanesBangsDetailbyPaigeEvans.jpg
****************************************************
 photo JaneyGirlinaBoxbyPaigeEvans.jpg
JANEY GIRL IN A BOX by Paige Evans

Journaling says: You loved sitting in this box so much I don't think you've smiled so big as you did in this simple box. It's the little things that get you to smile the most!

How to: Punch large hexagons from patterned papers and photos and slightly smaller hexagons from a few of the same patterned papers. Adhere the large hexagons from the bottom left to the top right corner of a dark kraft cardstock layout background, leaving spaces for the photos. Sew diagonally across the hexagons to keep them in place. Add the photos with pop dots and adhere the smaller hexagons on top of their matching ones. Place canvas letter stickers underneath the hexagons to make a title then journal on a label die cut below. Place a row of chipboard pieces above the hexagons. Stamp three arrows by the chipboard pieces and next to the journaling using brown ink. Embellish the hexagons with cork asterisks, chipboard pieces, and a badge as shown.

Supplies: Scrapbook kit: Copper Mountain by Studio Calico; Cardstock, pen, adhesive: American Crafts; Patterned paper: BasicGrey, Chic Tags, Farmhouse Paper Company, October Afternoon, SEI, Studio Calico, We R Memory Keepers; Badge, label die cut: Life Love Paper; Cork asterisks, arrow stamp: Studio Calico; Canvas letter stickers: Prima; Chipboard (arrows, "@", camera, hearts, house, sentiments, stars): Simple Stories; Hexagon punches: Creative Memories; Ink: StazOn; Sewing machine: Brother; Thread: Coats & Clark
 photo JaneyGirlinaBoxDetailbyPaigeEvans.jpg
Until next month, Auf Wiedersehen! 

The One with Studio Calico COPPER MOUNTAIN Sneaks!


Thursday, December 26, 2013

In just 12 hours the Copper Mountain Kits go live on Studio Calico!!!
And that's when I get to share them here too, so check back at 12 noon Eastern Time!
Here are my VERY FIRST sneak peeks!
 photo Desktop.jpg
I know it's only my first kit, but I love the colors and elements of Copper Mountain so much, it's going to be hard to top it next month :)

The One with Scrap Your Stash #13


My 13th and final Scrap Your Stash layout and how-to video is live at twopeasinabucket.com!
I know Christmas is over, but I wanted to squeeze one more holiday layout from my supplies - so the theme is "scrap your Christmas embellishments!"
 photo AllisCalmbyPaigeEvans.jpg
ALL IS CALM, ALL IS BRIGHT by Paige Evans

Description: I have never made so many Christmas layouts as I have this past holiday season! The Christmas lines and embellishments by American Crafts (Peppermint Express), Studio Calico (Magical), Crate Paper (Bundled Up), and Elle's Studio (Noel) are A.M.A.Z.I.N.G., so much fun to work with, and go so well together! And I love the exclusive 2Peas cut files - I used a couple sentiments as the final finishing touches. I followed the same format as the holiday mini album I made for the November 1st debut - backing shapes with seasonal embellishments such as sequins, ribbon, plastic die cuts, wood veneer shapes, buttons, stamps, badges, and more.

Journaling says: As soon as we set up the Christmas tree I make sure to get pics of the kids in front of it to see how they've grown!

How to: The video shows how to create the layout from start to finish. Here it is written: Die cut three columns of Christmas trees from the middle of a full sheet of white cardstock. On a block of 6x12" white cardstock, place the die cut page on top and trace inside the trees. Figure out what each tree will be filled with: foam asterisk stickers, wood buttons, stamping, wood veneer starbursts, patterned paper, star sequins, badges, ribbon, plastic star die cuts, snowflake stickers, and more. Leave one blank for journaling. Fill the trees with the embellishments then adhere the die cut page over the trees. Write journaling in the empty tree and outline that tree with a black pen. Add a gold bow to the top of the journaling tree. Place a photo on the top right and bottom left corners. Die cut sentiments from white cardstock - I used the exclusive 2Peas cut files that say "all is calm" and "all is bright". Staple the die cuts over the photos. Drop black spray mist over the top right and bottom left corners then sprinkle on some sequins. Outline the layout with white glitter glue. Stamp the date on the bottom left corner to finish.

Supplies: Cardstock, patterned paper, foam asterisks, snowflake stickers, ribbon, pen, adhesive: American Crafts; Badges: Crate Paper, Studio Calico; Wood buttons: American Crafts, Crate Paper; Star sequins, wood veneer starbursts, spray mist: Studio Calico; Stamps: American Crafts (roller date), Elle's Studio (sentiments); Ink: StazOn; Staples: Office supply; Die cut machine: Silhouette Cameo by QuicKutz; Sentiment cut files: twopeasinabucket.com
 photo AllisCalmDetailbyPaigeEvans.jpg
 photo AllisCalmDetail2byPaigeEvans.jpg
Here is the accompanying video so you can see how this layout was made from start to finish:

Challenge: Use up your Christmas embellishments! Every month a winner from all the SCRAP YOUR STASH entries will be drawn and rewarded with a $10 gift certificate. Winner will be announced on the 2Peas blog!

The One with Christmas 2013


Wednesday, December 25, 2013


That means Merry Christmas in German ;)

First, congrats to the winner of my 1700th blog post giveaway, my friend AmandaF! Check your email AmandaF!
Thank you to everyone for your love, support, and readership. It means the WORLD to me!


MERRY CHRISTMAS 2013!
What a merry season it has been!
 Every night since December 1st after dinner we have sat down as a family and read a Christmas story followed by opening up an advent calendar chocolate. The kids really looked forward to it and seemed to "get it". I bet next year will be even better!


We had our Christmas program at church on Sunday. The Christmas program is always my favorite. I loved seeing the Primary children sing. Next year Fox will be up there!

I tried to get a cute pic of us to post on Instagram a couple weeks ago, but I chickened out from posting it.


My Christmas present came on Tuesday - my first Studio Calico Creative Team box!! I was soooo worried it wouldn't get here until after Christmas and I wouldn't be able to participate. But someone upstairs took pity on me and it arrived in the nick of time! Full reveal of my layouts on Friday, woohoo!

We've had fun video chatting with my family a lot these past few weeks because we miss them so. I'd prefer to spend the holidays with our fams, but that just didn't work out this year. Thank goodness for modern technology! Fox loves looking at himself in the little image on the computer that shows us in the camera.

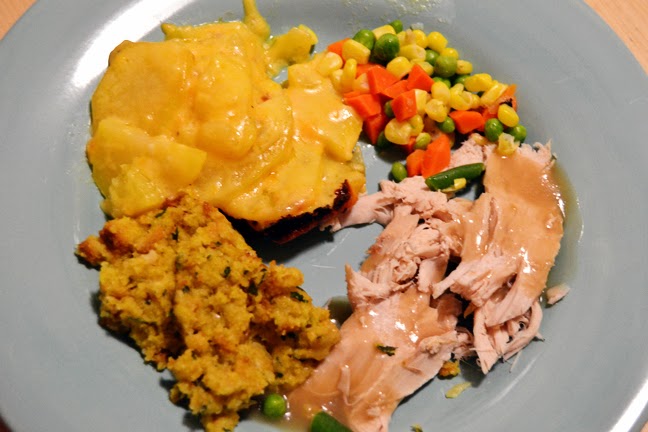
I sure married a great catch. Not only is he an amazing father and husband, he's also a supreme chef! He cooked a full on Christmas Eve dinner complete with turkey, from scratch scalloped potatoes, stuffing, and veggies. I ate two entire ginormous-sized portions of everything! When in Rome Netzaberg right?
And then this morning he made yummy egg casserole and divine cinnamon roles. He's a keeper!

This morning was the big day!

Fox and Jane slept in til 7 - best Christmas present ever! Because seriously 99% of the time they wake up at 6am or earlier. So 7am was a welcome treat!
Signature bokeh Christmas tree pics :)
Fox and Jane opening prezzies.
MERRY CHRISTMAS ONE AND ALL!

The One with Christmas Layouts for American Crafts


Tuesday, December 24, 2013

I had a pair of layouts go up on the American Crafts blog yesterday! Here they are:
 photo Joy.jpg
JOY by Paige Evans

Journaling says: Taking a stroll through Redmond Town Center during Christmas. Dec 26 2012.

How to: Punch a triangle from the Peppermint Express by American Crafts, Bundled Up by Crate Paper, and Magical by Studio Calico 6x6 paper pads. Adhere the triangles in star shapes across the upper half of a white cardstock layout base. Sew spirals over the stars using white thread. Add an embellishment like a star sequin or plastic snowflake die cut or wood veneer starburst to the center of each star. Add a "JOY" wood veneer piece to the top left edge. Place three photos across the bottom and add tags, stickers, and journaling around the photos to embellish. Drop black spray mist over the top left and bottom right corners.

Supplies: Cardstock, tags, stamps (date, stars), baker's twine, ink, pen, adhesive, triangle punch: American Crafts; Patterned paper: American Crafts, Crate Paper, Studio Calico; Wood veneer ("JOY", starbursts), plastic snowflakes, star sequins, spray mist: Studio Calico; Stickers: American Crafts (label, snowflake, ticket sentiment), Studio Calico (dimensional sentiment banner); Sewing machine: Brother; Thread: Coats & Clark
 photo JoyDetail.jpg
***********************************************************
 photo MerryChristmas.jpg
MERRY CHRISTMAS by Paige Evans

Journaling says: We spent Christmas 2012 with my family in WA. It was perfect and oh so much fun to watch Fox "get it" and enjoy opening presents. Jane was cute as can be watching Fox as always. Dec 25 2012.

How to: Roll kraft cardstock into a tube the tie various kinds of ribbon, tulle, crocheted trim, tinsel trim, ric rac, and more around it, starting with longer pieces at the bottom and working up to shorter pieces at the top to make a Christmas tree. Adhere the tree on the center of a kraft card base. Top the tree with a red glitter star sticker and embellish it with button stickers and wood veneer starbursts as ornaments. Paint over two doily masks on the top left and bottom right corners using white paint, remove the masks, and let them dry. Add a photo over the painted doilies and embellish around the photos using wood buttons, candy cane stickers, star sequins, and plastic snowflakes. Write journaling on the bottom left corner, stamp the date below, and frame the journaling with word and sentiment stickers. Drop black spray mist across the top left and middle right edges.

Supplies: Cardstock, stickers (buttons, candy cane, glitter star, sentiment, words), ribbon, tulle, crocheted trim, tinsel trim, ric rac, date stamp, ink, pen, adhesive: American Crafts; Wood buttons: Crate Paper; Wood veneer starbursts, vellum label die cut, plastic snowflakes, star sequins, spray mist: Studio Calico; Paint: FolkArt; Doily masks: Prima
 photo MerryChristmasDetail.jpg
Merry Christmas Eve!

The One with Bamberg


Monday, December 23, 2013

If you're looking for the 2Peas blog hop click here!
If you're looking for my 1700th blog post giveaway click here!

Chris had last Friday off so we took a day trip to the city of Bamberg, Germany.
The rising sun looked like a sunset over the city of Creußen. That was the last we'd see of the sun that day, ha.
It's been raining a lot on our adventures so we wised up and got a raincover for our stroller. It worked wonders and kept the kids dry during the first couple hours of our trip when it rained. 
We found a parking garage under the tourist information building, parked, and made our way up and out to civilzation. A beautiful city awaited us!
Bamberg extends over seven hills, each crowned by a beautiful church. This has led to Bamberg being called the "Franconian Rome" - although a running joke among Bamberg's tour guides is to refer to Rome instead as the "Italian Bamberg". It's a town in Bavaria, Germany, located in Upper Franconia on the Regnitz river, close to its confluence with the river Main (pronounced "mine"). Its historic city center is a listed UNESCO world heritage site. The town, first mentioned in 902, grew up by the castle (Babenberch) which gave its name to the Babenberg family. On their extinction it passed to the Saxon house. The area was Christianized chiefly by the monks of the Benedictine Fulda Abbey and the land was under the spiritual authority of the Diocese of Würzburg.
There's also an Army base in Bamberg that is slowly closing and many folks are coming down to Graf from there.
Bamberg is one of the cities not mentioned in the Rick Steves Germany book, but Chris took over and played tour guide. We stopped at the TI and bought a super cute umbrella and the employees were so nice and gave both Fox and Jane a ginormous sucker which kept them occupied for a good 20 minutes!
We headed out to see all that we could see!
Berries / Kinda creepy sculpture
'Tis the season! The town was decked out with Santas and all things Christmas.
Festive storefront / Pink tipsy topsy building
If you google images of Bamberg, most of the pictures you'll see are of the Rathaus/Town Hall. 
A bridge led over the Regnitz river at this point as early as the 11th century. The town hall was built in the middle of the 14th century and rebuilt by Bamberg citizens after a fire disaster in 1440. 
We walked under, around, and through the Town Hall and felt sufficiently satisfied with our experience there. Super cool building.

Photo op! Käthe Wohlfahrt stores are the crème de la crème of Christmas trinkets.  
Bamberg is just oh so cute and exactly what I picture in my mind's eye when I think of Bavaria.
Down the river from the Town Hall is Little Venice. 
The former fishermen's houses are lovingly named Klien Venedig. Small medieval half-timbered buildings with balconies and tiny gardens in front line the banks.
Statue along the bridge. 
This is my new favorite building in the whole wide world! 
Details of the town.
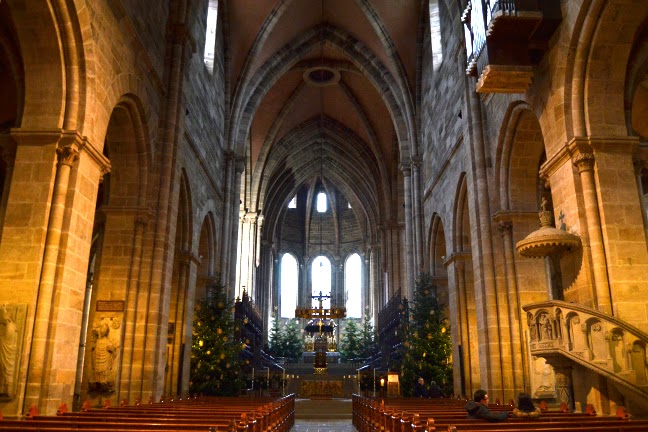
We walked up the hill to the Bamberg Cathedral.

We got a better view of the entire cathedral later in the day, but here it is now so it's all together:

The cathedral is a late Romanesque building with four imposing towers.

It was founded in 1002 by the emperor Henry II, finished in 1012, and consecrated on May 6, 1012. It was later partially destroyed by fire in 1081. 
The new cathedral, built by St. Otto of Bamberg, was consecrated in 1111 and in the 13th century received its present late-Romanesque form. 
Top left: A Nativity altar in the south transept made of limewood by the famous artist Veit Stoss. He made it when he was about 80 years old. Top right: One of the most magnificent sculptures in the cathedral is the marble tomb of Emperor Henry II, the founder of the cathedral, and his wife, Empress Cunigunde. It took the famous sculptor Tilman Riemenschneider 14 years to carve: between 1499 and 1513. The tomb is slightly higher than floor level because below there is a crypt. The carvings around the sides tell of various episodes in the lives of the imperial couple. Bottom left: Janey being a painey :) Bottom right: A nativity scene set up for Christmas.
Another treasure of the cathedral is an equestrian statue (below, left) called the Bamberg Horseman. People have tried to guess for years who this knight on horseback really is. During the cathedral’s history people have often made up stories about who he is. The Romantics thought he was a German emperor from the Hohenstaufen family. The Nazis thought he was a knight who symbolized German perfection, looking towards the east for new lands to conquer. This was Nazi propaganda. The knight on the statue does not, in fact, look east at all. It is now thought that he was probably the 11th century Hungarian king Stephen I. Modern technology has made it possible for us to know what the original colors were, and this has helped scientists to identify him. The sculptor carved only his mask into the sculpture, leaving his identity a mystery. 
Vine covered walls outside the cathedral. Textural and lovely.
Next to the cathedral is the Old Court. 
The Old Court is the former imperial and bishop's palace and was once directly connected with the cathedral. We walked through the schöne pforte (beautiful gate) to enter the inner courtyard which is surrounded by half-timbered buildings.
Inside the inner court, looking back at the cathedral / A wooden door
Half timbered buildings galore.
Strike a pose! With my new artsy Bamberg umbrella!
Across from the Old Court is the New Residence - undergoing construction, darn scaffolding ruining my pics!
The four-winged complex was built in two stages. The Baroque wings facing the cathedral were built under Prince Bishop Lothar Franz von Shöborn by Leonhard Dientzenhofer between 1697 and 1703.
Our Castles Pass includes a tour of the Palace so we hopped aboard. Here's Chris, Fox, and Jane checking out some art before the tour started. 
The tour began and we entered the magnificent Receiving Hall. 
Woooooow.
Amazing!
We only lasted a few minutes and only in this one room due to some children being particularly unruly...

So we headed outside to the rose garden which is probably lovely in the spring and summer! Even now I find the twisty, leafless trees beautiful. 
The views from the Rose Garden up to St. Michael's can't be beat!
Fox having the time of his life, unleashed and free to run to his heart's content.
Me'n'Fox
Looking down below to Bamberg.
We walked back down into the city to find some lunch.
We found a little bakery and we got some pretzels and sandwiches.
Then we walked back to the car to drive to a couple more sights.
First we drove up to the tallest of the seven hills to see the Altenburg Castle. 
The first mention of the Altenburg was in 1109, although it is likely that it was built on the spot of an earlier palisade castle.

It first served as what is known is German as a "Fliehburg".

This is a castle that was not regularly inhabited but served mainly for city defense as a place where local residents could flee to in times of danger. In 1251 the sovereign bishops of Bamberg acquired the castle. From 1305 to 1553 it was the residence of the bishops.

In 1553, during the Second Margrave War, the army of Albert Alcibiades, Margrave of Brandenburg-Kulmbach, burned the castle down. Afterward the castle was used as a prison for awhile.

In 1801, the Bamberg physician Adalbert Friedrich Marcus acquired the decaying castle and restored it from the ground up. The author E. T. A. Hoffmann, who was friends with Marcus, felt so drawn to the castle that he frequently stayed for a long time in one of the wall towers during the years 1808 to 1813. 
Supposedly there are panoramic views of the entire city of Bamberg below, but we couldn't see them cuz it was "froggy". 
Trying to see something, anything.
We found popcorn popping!
The kids call canons "booms".
The castle has a restaurant inside - we saw some waiters carrying out big dishes of cooked potatoes that smelled delicious!
Pretty nifty lookin'!
After a quick stop at Altenburg Castle we drove to St. Michael's Monastery.
St. Michael's is a former Benedictine monastery and was founded as early as 1015 at the suggestion of Emperor Heinrich II. After its dissolution in 1803 the buildings were used for a hospital and now it's an old people's home.
The steps to go inside were blocked off so we took a turn around the buildings.
View from the back.
It wasn't nearly as foggy down here so we got some beautiful views of Bamberg.
Then it was back to the car and a short drive home while the kids napped.
Overall, Bamberg is a beautiful city and I highly recommend visiting there if one gets the chance. 
Paige Taylor Evans © // Quinn Creatives DESIGN