The One with the American Crafts FLOWERS Layout


Monday, May 25, 2015

It's FLOWERS Week on the American Crafts blog and here's what I made for this lovely topic:
 photo Fine amp Dandy by Paige Evans for blog.jpg
FINE & DANDY by Paige Evans

Description: I love a lot of things. Flowers are definitely one of them - in all their varieties! 

Journaling says: These photos of you on the porch are some of my very favorite ever! You're just so darn cute!

How to: I got a little tricky and technical with this layout - read on! I LOVE (there I go again!) the flower metal dies by Maggie Holmes in the Confetti collection by Crate Paper:
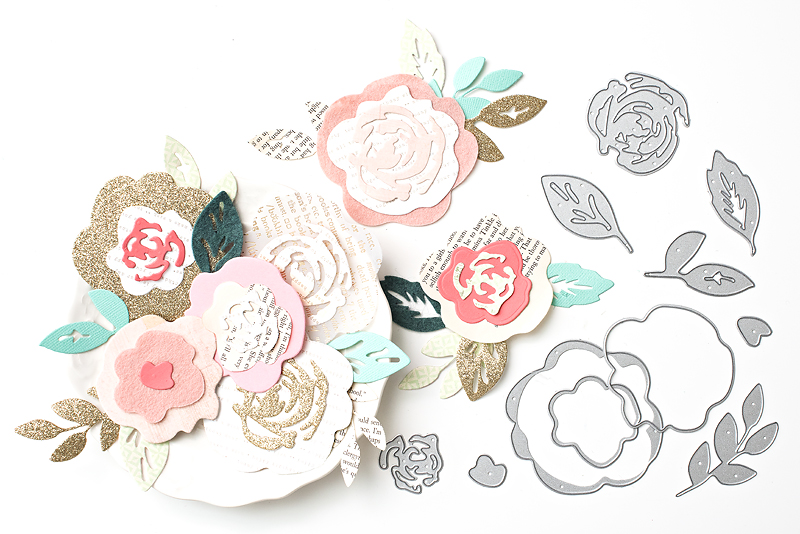
But cranking out each and every single piece by hand with a manual die cut machine and then carefully peeling/poking each and every piece out of the metal dies takes forever and a day. Lesson learned from making my Minc layout a few weeks ago. And I wanted to make a whopping 24 flowers. So guess what I did? I put the metal dies on my scanner, scanned them, imported the scan into Adobe Illustrator, traced the flowers and leaves with the pencil tool, and then turned them into cut files using the trace function in Silhouette Studio! Now I can create these exact flowers in multiples and at different sizes with the click of the button, thanks to a Silhouette Cameo (yup, here it comes, a plug for my SILHOUETTE SAVVY class!). So. Die cut 24 of each flower and leaf piece from the Dear Lizzy Fine & Dandy collection then assemble the flowers. I used hot glue to stick everything together and then bent up the edges for dimension. And then I instagrammed the picture of them all assembled of course :)
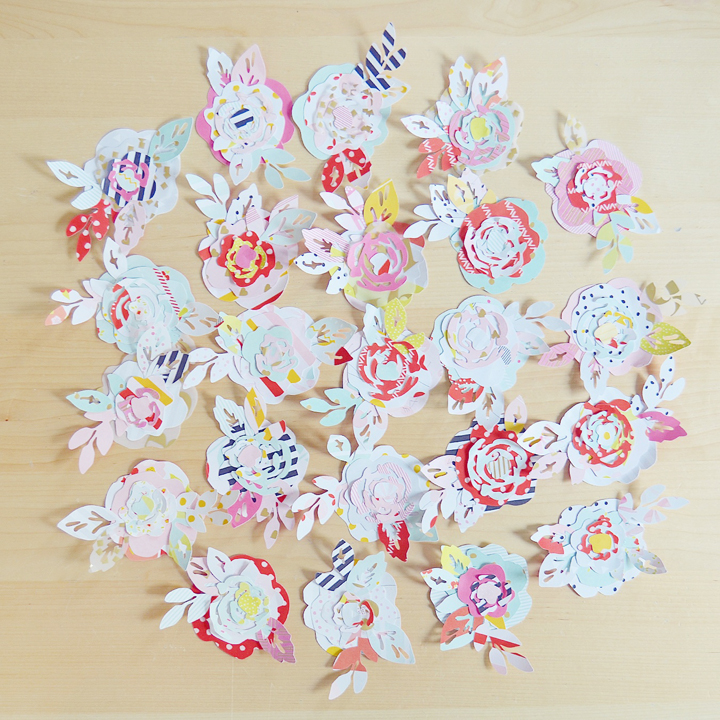
Then on a white cardstock background, find the center of the layout and place a photo in the middle. Use watercolors to make eight big painted circles around the photo then adhere the flowers on top. Yes, I made way too many flowers for this layout - that just means I have extras for future projects! Write journaling with a black pen on a black/white striped round tag then tuck it under the bottom right side of the photo. Place a "Fine & Dandy" banner die cut under the top edge of the photo for the title then embellish with a number paper clip and chipboard heart sticker. Done and done!

Supplies: Cardstock, patterned paper, chipboard, paper clip, die cut, round tagpenadhesive: American Crafts; Watercolors: Loew Cornell; Flower metal dies: Crate Paper; Die cut machine: Silhouette Cameo
 photo Fine amp Dandy Detail by Paige Evans for blog.jpg
Thanks for stopping by and if you love your Silhouette Cameo as much as I do be sure to check out my class all about this wonderful tool: SILHOUETTE SAVVY!

The One with Other Craftsy Classes


Saturday, May 23, 2015

Have you checked out Craftsy yet? Cuz it's awesome. They're not home-made videos, they're professionally filmed and edited, in a studio, with title graphics and logos, HD videos, quality sound, make-up and hair done-up by artists, the whole enchilada. It's an amazing platform with excellent student/teacher interaction, there are always sales (like this weekend for Memorial Day many of these classes mentioned below, including mine!, are on sale!), and the instructors are top notch, just sayin' :) Here are just a few of the incredible paper crafts classes put on by Craftsy, starting with the two I created:

SILHOUETTE SAVVY with Paige Evans

PATTERNED PAPER PLAY with Paige Evans

TRAVEL SCRAPBOOKING with Amy Tan


FRESH TECHNIQUES FOR ARTFUL LAYOUTS with Wilna Furstenberg


CARDS WITH DIMENSION by Danielle Flanders


Moral of the story: CHECK OUT CRAFTSY! You won't regret it!

The One with the Ali Edwards ARCOS DE LA FRONTERA Layout


Thursday, May 21, 2015

It's been awhile since I shared an Ali Edwards Digital Creative Team layout! I was invited to be a guest designer for her CLICK Kit so I couldn't publicly share those and then we've had some breaks because of traveling, etc. But anyway, long story short, here's my latest AE layout using the LITTLE THINGS kit:
 photo Arcos by Paige Evans.jpg

ARCOS DE LA FRONTERA by Paige Evans

Description: I played with the LITTLE THINGS kit by Ali Edwards and fell in love with the colors and patterns found on the cards:
Journaling says: Walking up the hill to the top of the city was my favorite part of the day. The views were breathtaking all around!

How to: Print the journaling/Project Life cards and some of the other elements from the LITTLE THINGS kit onto white cardstock. Use a triangle punch to make a few dozen patterned paper triangles (want dozens more ideas for creative ways to use patterned paper? Check out my PATTERNED PAPER PLAY class!). On a pink patterned paper layout base, start spiraling the triangles starting in the center and working out. Use a sewing machine to sew over the triangles. Print a round sentiment, punch a photo into a circle, and adhere the pieces inside the spiral. Set a trio of buttons below the photo and print/cut out the blue alphas to make the title above the photo. Journal on the bottom right corner with a black pen and stamp the date in black ink below.

Supplies: Digital elements: LITTLE THINGS kit by Ali Edwards; Cardstockadhesivepen, roller date stamp, ink: American Crafts; Patterned paper: Pink Paislee; Buttons: Studio Calico; Sewing machine: Brother; Thread: Coats & Clark
 photo Arcos Detail by Paige Evans.jpg
Thanks as always for stopping by - means the world to me!

The One with the eScrap Layout


Wednesday, May 20, 2015

Back in March when I flew to Madrid to teach a scrapbooking workshop, I was given a couple of awesome collections from the Spanish company eScrap: Pirueta and Sinergias!

And today I'm sharing a li'l how-to over on the eScrap blog using those lines! Here is the finished layout:
 photo Budapest by Paige Evans for eScrap.jpg
BUDAPEST by Paige Evans

Description: Jessy Christopher so kindly sent me a few background cut files last year and I was happy to finally get a chance to use one! I used the Diamond Heart background:

Journaling says: Budapest was our very first big adventure and oh my goodness it is still one of our most favorite destinations - it's amazing!

How to: Visit the eScrap blog for the full how-to including a few step-by-step photos!

Supplies: Patterned paper, stickers, die cuts: eScrap; Die cut machine: Silhouette CAMEO; Pen, adhesive: American Crafts
 photo Budapest Detail 2 by Paige Evans for eScrap.jpg
Thanks eScrap for the lovely supplies!

The One with SILHOUETTE SAVVY!


Monday, May 18, 2015

My second class at Craftsy called SILHOUETTE SAVVY just launched!!

Is your Silhouette still sitting in the box? Or are you looking for some new techniques and ways to use your beloved Cameo? Join me in SILHOUETTE SAVVY and learn virtually everything there is to know about your Silhouette!


From beginning functions to sophisticated techniques, I'll be there every step of the way showing you exactly how to create amazing layouts in 7 HD lessons, over 20 minutes each!


If you want to check out a minute and a half promo video, click on this link: http://www.craftsy.com/video/course?courseId=5048


The Silhouette Cameo is my most favorite scrapbooking tool in the whole wide world! I use it on SO MANY of my layouts to create eye-catching designs, backgrounds, titles, shapes, and more. Which is why I'm over-the-moon-elated to share the HOW and WHY behind my ideas!


A little behind-the-scenes shot of filming SILHOUETTE SAVVY - I'm deep in discussion with my Producer, Amana.


 Craftsy videos and lessons are unique from anything I've done before because the camera is on the whole me, not just my hands! And when I'm creating the layout, there are two cameras filming from different angles so you get to see more than normal. It's quite awesome.


SILHOUETTE SAVVY includes a lesson showing how to make my most favorite layout ever using the Silhouette Sketch Pens. Here's the sneak I've shared before:


There are seven cut files I designed that come with the class, including these three backgrounds:


Hope you'll join me in SILHOUETTE SAVVY and make the ultimate cutting machine your favorite tool! The class is $29.99. Email me for a $5 off code :)

The One with the Ebern Scrappt Recap


Saturday, May 16, 2015


Today I drove an hour and a half north to a cute little town called Ebern to teach a double layout workshop! Side note: I graduated from Brigham Young University with a Bachelor of Arts in Art Education - it's really really (REALLY!) fun for me to actually use my college degree, albeit in a slightly different way than I thought I would: I thought I'd be teaching art in high school. But this is a pretty gosh dern fun alternative!

Couldn't get lost with these cute signs taped up all around the building.

Here is the first layout I taught how to make:
COOL GUY by Paige Evans

HOW TO: Punch (100) 1” circles then cut each circle in half. Glue the half circles around the edge of a blue cardstock layout in five rows: there should be 12 half circles on each edge in the first layer, then 11, 10, 9, and 8. Trim a piece of patterned vellum, tear off the bottom edge, and glue it to the center. Cut a kraft doily in half and tuck it under the edges of a photo in the middle. Add a string of hearts and a black button to the left side of the photo and journal on one of the hearts with a black pen. Apply white letter rub ons under the photo for a title and place black mini alphabet stickers below to complete the title. Place a tab sticker and add a teal resin bird on the bottom right corner of the photo. Glue four wooden buttons around the layout and trim sentiment die cuts to tuck under each button. Drop black watercolor paint around the buttons to finish.

SUPPLIES: Cardstock, patterned paper: American Crafts; Patterned vellum, die cuts: Elle's Studio; Resin bird, acrylic button, alpha stickers, label sticker: Crate Paper; Kraft doily, alpha rub ons, wood buttons: Maya Road; Circle punch, heart strand: docrafts; Watercolors: Loew Cornell

The first step was to punch 100 (yes, 100!) 1" circles. 
I LOVED the punching sounds.

The layout took about two hours to make then we went outside for a big group photo. This beautiful church was right outside the workplace.
All towns in Germany are top-notch cute. Just sayin'. 
Such a wonderful group of scrappy ladies! Thanks for having me!
"Downtown" Ebern.
Me in front of a particularly cute building. 
Whelp. You know I love these kinds of photos :)
The Stadtmitte, May Pole, lamp post, and a cute sign, all in one.
Trio of half-timbers.
After lunch I taught how to make this layout:

LOVE YOU TO THE MOOD AND BACK by Paige Evans

HOW TO: Hand cut letters to make a title from a variety of patterned papers. Figure out the placement of the words on a white cardstock background and take a picture to remember where they go. Watercolor a rainbow of stripes down the center, one row for each row of words. Glue the letters over the paint once it’s dry. Place a couple of heart stickers on the letters. Add a photo to the bottom right corner. Embellish the top left and bottom right corners using ribbon, stickers, resin frames, dimensional bows, and more. Journal on a die cut tag and place it on the top left corner cluster to finish.

SUPPLIES: Cardstock: American Crafts; Patterned paper, die cut: Elle's Studio; Resin frames, bows, lace: docrafts; Stickers: Crate Paper; Watercolors: Loew Cornell

So fun to see which papers people chose.
Workin' away! It's always a little awkward when it's so quiet you can hear a pin drop! Hopefully that just means they're concentrating. That, and I don't understand what anyone is saying when they're chit chatting... But it's all good!
I was so proud of people's creations - hand cutting is tricky business!
My favorite attendee :) 10 year old Lina.
The drive to and from Ebern was breathtaking. The views all around simply can't be beat! I never want to leave!
Hoping to be back in September to teach another workshop in Ebern, so if you're interested in coming, you know where to find me!
Paige Taylor Evans © // Quinn Creatives DESIGN