Let's Face It Layout by Audrey Yeager


Monday, April 30, 2018

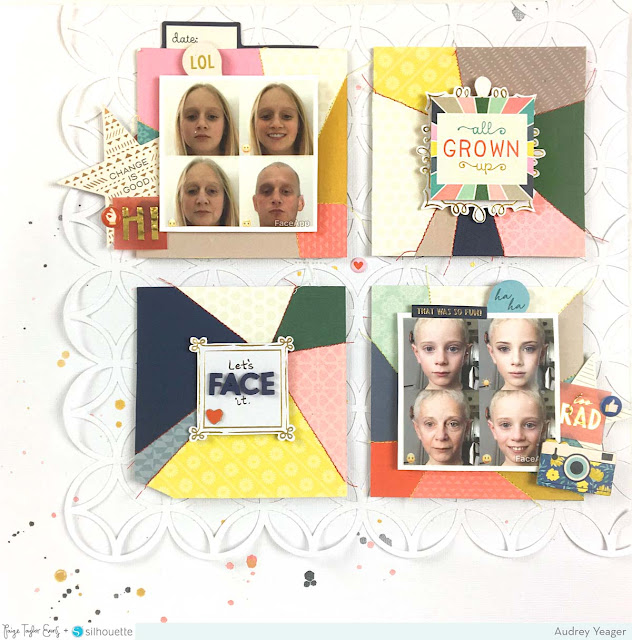
Cut files die cut from white cardstock then added onto a white background create such a lovely texture! Here is Audrey Yeager's newest design team layout using that technique along with pops of bright colors!
Hi everyone! When I first saw Paper 20 from the Turn the Page collection it reminded me of a quilt pattern. I cut out some squares from the paper and stitched along the lines.
Because my photos were a grid I put the papers in a grid as well. I wanted to add something to the background to make it pop a bit so I took the Circles Petals Background 8.5x11 cut file and cut it from white cardstock using a Silhouette Cameo to add some interest and texture behind my grid of papers.

I cut some frames out from the gold foiled frame paper in the Pick-Me-Up 12x12 Paper Pad and embellished with papers from the 2x2 Paper Pads and some Mini Thickers.

Finally, I added just a few embellishments around my photos and tucked a journaling card behind my top photo. I hope you like it! Thanks for stopping by!

SUPPLIES: PICK-ME-UP12x12 Paper PadEphemera Die CutsMini ThickersPuffy StickersTURN THE PAGEPaper 202x2 Paper PadsEphemera Die CutsJournaling Spotswhite cardstock; Cut file: Circles Petals Background 8.5x11 by Paige Evans; Silhouette Cameo
Blog: audreysreflection.blogspot.com / Instagram: @audreykit1 / Pinterest: @audreykit /
Facebook: Audrey L. Yeager  / YouTube: Audrey Yeager

Mom Life Layout


Sunday, April 29, 2018

Have you seen the beautiful new Spring 2018 issue of Scrapbook & Cards Today Magazine? I have a couple pages inside including this one with a Mom-theme.
This was one of the very first layouts I made with Pick-Me-Up way back in January - we work a few months in advance to hit magazine deadlines! I was so anxious to fussy cut the flowers from Paper 02. I used them ALL. Every.Last.One :)
After fussy cutting all of the flowers I layered them under a 4" square photo on the pretty blue ombre B-side of Paper 04. To frame the layout I used the scalloped stitch on my sewing machine with white thread. For more texture and interest I splashed white acrylic paint around the edges.
When it came time to embellish, I wanted the flowers to be the main focus so I kept things minimal and used bits and pieces from the Chipboard StickersPuffy Stickers, and Stickers. I made the title with "MOM" letters from the Chipboard Thickers and scattered a few more sentiments around for sweetness :)
To finish I wrote the journaling with a white Sharpie paint pen and then underlined it with a .03 black precision pen. Love having this precious memory documented forevermore!
SUPPLIES: PICK-ME-UPPaper 02Paper 04Chipboard StickersPuffy StickersStickersChipboard Thickers; Sewing machine: Brother; Thread: Coats & Clark; Pens: precision pen, white Sharpie paint pen; white acrylic paint

Daffodil Layout by Lorilei Murphy


Saturday, April 28, 2018

Simple and sweet moments are brought to life in new ways like on this layout by Lorilei Murphy!
Paige recently added the Daffodil cut file to her store and right away I knew I had the perfect photo and story for the cut file.
Even though my daughter is now a teenager I still surprise her with little treats on the holidays. This year we added another bunny to her collection of Jelly Cat bunnies and she ended up naming her Daffodil! I wasn’t sure if I would back the cut file or add paint so I cut the daffodils from white cardstock using my Silhouette Cameo 3. I started looking through all my Paige Evans & Pink Paislee collections and found some pretty papers so off I went. I also decided a bit of mixed media would make the yellow daffodils pop, so I added blue sprays with the packaging technique to the background.

Turn the Page had the perfect colors to embellish the layout with. I tucked in the super sweet Chipboard Sticker birdie and flowers below the "moments" Ephemera Die Cut and ended up with a cute little cluster above the multi Thickers title. I’ve said it before but I love how all the collections go so beautifully together!

I wasn’t sure about the blue background to start with, but it adds so much punch to the layout, I love it. Cut files are a great way to customize one of your stories!

Blog: roseyposeystudio.com / Instagram: @roseyposey_studio / Pinterest: @roseyposeygirl /
Facebook: 
Rosey Posey Studio / YouTube: Lorilei Murphy

Hello 2018 Layout by Steffi Ried


Friday, April 27, 2018

Design team member Stefanie Ried has a new and of course STUNNING layout to share today!
Hello and welcome to a new layout of mine. I used the beautiful cut file by Paige called Frames 8.5x11 Background. How cool is this!? Perfect for decorating with stickers, photos, papers, and more.
At the moment I like my layouts to be very bright with a few colored accents, so I cut the cut file out of white cardstock with the Silhouette Cameo.

I adhered the cut file on a white cardstock background. White on white :) This is not so easy when taking pictures as I later discovered haha, but I really like the result. I then put all kinds of StickersEphemera Die CutsMini ThickersRub-Ons, and more from Pick-Me-Up on the table and decorated the frames with them.

I wrapped two frames with embroidery thread and sewing thread. Another frame is filled with a shaker pocket. The Sequins are from the Turn the Page collection.

I hope you like it and thanks for stopping by!

Blog: steffiried.blogspot.com / Instagram: @steffiried / Pinterest: @steffiried / Facebook: stefanie.ried.96 YouTube: Steffi Ried

Love to Read Layout


Thursday, April 26, 2018

It's been a couple weeks since I shared a process video - I have some that I've made but can't reveal for a few more weeks sooooo I made a layout just for fun!
Check out the process video to see how this layout came together:
I started by designing a flower frame cut file which you can download for free by CLICKING HERE. I would LOVE to see what you make with it so please tag me, email me, leave a comment, anything, so I can see :) I die cut the flower frame from white cardstock using my Silhouette Cameo 3. I only used one patterned paper to back the entire design and that's Paper 21 from my Pick-Me-Up collection.
It took about 2.5 hours to back the entire frame - not too bad! I'm watching/listening to Desiree's season of The Bachelorette in the background otherwise it's too quiet. Why do Fox & Jane have to be so big and off in school already!? I miss when they were home with me all day every day.

 Once I finished backing the cut file I chose a light blue cardstock background - I debated between lots of other colors and patterned papers but liked this one best. I lightly traced the inside corners of the frame with a pencil for placement before continuing on.
 Next I applied an entire page of Rub-Ons to the middle of the layout. I used the included popsicle stick to apply them and as I was slowly removing the top protective layer I would scrape over any parts of the rub-on that weren't all the way applied. I put the frame back in place, added a photo to the bottom left corner (trimming the edges so they're flush with the frame) and then machine stitched around the inside of the frame.
 For more color and added detail I used a scalloped border punch to make strips from the rainbow striped paper that comes in the Mini Thickers. I treat that packaging material as its own patterned paper, I love it so much! I also machined stitched those scalloped paper strips in place and trimmed the thread ends for a cleaner look - lots of times I leave the thread ends long. I wrote journaling with a .03 black precision pen along the bottom right edge. To finish I added some Puffy Stickers mixed into the Rub-Ons. I love how this layout turned out and it was so fun to make a layout just because!
SUPPLIES: PICK-ME-UPPaper 21Mini ThickersStickersPuffy StickersRub-Ons; Blue cardstock, white cardstockprecision pen: American Crafts; Sewing machine: Brother; Thread: Coats & Clark; Scalloped border punch: Fiskars; Cut file: Flower Frame by Paige Evans; Die cut machine: Silhouette Cameo 3

Pick-Me-Up Card Trio by Zsoka Marko


Wednesday, April 25, 2018

Feast your eyes on this beautiful set of cards by design team member Zsoka Marko featuring Pick-Me-Up and my cut files!

Hello lovelies, I'm back today with a card trio I've made for the Paige Evans + Silhouette Design Team. First I picked out my color scheme - it's very hard to stay away from those berry tones in the gorgeous Pick-Me-Up collection, but I challenged myself and chose blues and yellows for my main colors. All three cards are 5.5x5.5" top folding cards.
  On the first one I've used the Geometric Flower cut file. I used a sketch pen to draw the design with my Silhouette Cameo then hand stitched it with different shades of yellow/green/blue embroidery floss.
I adhered a 5.5" square blue patterned paper to my card base then added a slightly smaller yellow patterned paper. Finally I attached my 5x5" hand stitched panel on top using foam adhesive. I fussy cut a few butterflies from one of the patterned papers and scattered them around the hand stitched area. My sentiment consists of a die cut from the ephemera pack and a chipboard piece. To finish off my card, I added a few drops of Nuvo Crystal Glaze here and there.
I wanted to add hand stitched flowers on the second card but then my laziness got the best of me haha! You'll see in the close-ups that I sketched out the design with my Silhouette Cameo - I used the Simple Flower Background cut file first. Then I decided to cut the little flowers from a few different patterned papers and create a dimensional, gradient look instead. The sketch lines were still helpful, this way at least it was very fast to line up those flowers!
I glued a 5.5" square blue patterned paper onto my card base, then added a slightly smaller piece of green, and last my yellow card front. I added foam dots to the flowers and adhered them to the card front. The sentiment I picked comes from the 2x2 Paper Pad. I glued this onto the flowers then added a frame from the Ephemera Die Cuts. To create more dimension I used foam adhesive. I didn't want to cover up more of the background so I only added a flower die cut, a puffy sticker, and a bow die cut to the frame.
On my final card I've used the Flower in Wreath cut file, which I cut from yellow patterned paper. I backed each flower center with some navy patterned paper then decided to die cut the wreath again from a lighter yellow patterned paper, this time only the outlines. I added a 5.5" square piece of navy floral patterned paper to my card base, then I adhered the flower outline die cut onto it using some foam adhesive. I also kept the inside piece and glued it down in the middle with my ATG. I like the different layers.
I then added some pop dots to my flower centers and glued the wreath on top of the other, but actually turned it a bit, so that the bottom layer doesn't back the flowers on top. I punched a yellow circle for the middle then added foam adhesive and my circle sentiment on top. To finish off this card I placed a butterfly and a bow on it.
That's it for today! I hope you like how these turned out and can use one of the techniques I showcased today!


Blog: apocketfullofscrap.blogspot.com / Instagram: @zsokamarko / Facebook: Zsoka Marko / YouTube: Zsoka Marko

Amboise, France Mini Album


Tuesday, April 24, 2018

It's Auburn Lane week on the Pink Paislee blog and I made a mini album about our day in Amboise, France - the colors went together perfectly and even the houses throughout this collection matched this city to a "T"! Definitely a French vibe in Auburn Lane and it's beautiful.
A quick flip through of the mini album:
How did this mini album come to be? A couple weeks ago we went with my parents to their house in Wallace, Idaho for General Conference and I brought this collection with me. I wasn't planning to make a mini album but after I cut apart Paper 01 and Paper 11 into the individual cards and sentiments, I thought about what I could do with all of them and a vision of a mini album popped into my head. The idea was born! Using only the limited supplies I brought with me, including embroidery threads and my sewing machine (YES, I brought my sewing machine on vacation, lol), I created most of the foundation pages.
Here are the finished front sides:
And the finished back sides:
For the cover I trimmed a piece of Paper 10 to 3x4", rounded the bottom corners, and then backed one of the Wood Veneer Frames with vellum. Since the space was small and my title was quite long, I created a "ransom note" style title by cutting out letters from lots of different pieces from leftovers of Paper 01 and Paper 11. The year and heart stickers are from the Sticker Book.
On the top page I applied a gold frame Rub-On to white cardstock, fussy cut it out, and adhered it with foam squares over a tangle of thread. For the journaling strips throughout this mini album I copied and pasted my blog post into a new word document, changed the font to Remington Noiseless, printed it out, and then trimmed it into strips. I used liquid glue to adhere the tiny strips in place. For the bottom page I fussy cut one of the flowers from the Specialty Floral Vellum and adhered a "thankful" Ephemera Die Cut on top along with an "October" sticker from the Sticker Book underneath.
This card is made from a piece of Paper 12 with a frame and floral Ephemera Die Cuts glued on top then I stamped the date on the handy dandy space on the bottom right corner. I tucked a photo behind the flower and adhered a caption below.
Left photo top: I stapled a paper flower over a Puffy Sticker flower and overlapped them on a photo. I glued journaling pieces down the right side. Left photo bottom: On a small piece of Paper 02 I added a journaling spot Sticker and journaled on top. I tied pink embroidery thread to a paperclip from the Mixed Embellishments and slipped it onto the left edge. Right photo top: I adhered a photo onto the back of a stitched sentiment card, rounded the corners, and then place a heart and sentiment sticker from the Sticker Book on the top left corner. Right photo bottom: I stamped journaling lines and hearts onto a card from Paper 01 then rounded the corners.

I fussy cut all of the adorable houses from Paper 05 and tucked one behind a photo of Leonardo da Vinci's house. Then I made a sequin pocket using packaging and sequins from the Mixed Embellishments. I placed a floral Puffy Sticker on top for added interest.
Here is a full-page photo and I added a piece of a Floral Die Cut at the bottom then machine stitched around the edges.
Left photo top: I applied a gold floral Rub-On at the top of a full-page photo. Left photo bottom: I hand stitched on a sweet card from Paper 01. Middle photo top: I applied a floral Rub-On at the top of a full-page square photo with rounded corners. Middle photo bottom: I hand stitched around the bouquet on this card from Paper 01, placed a "beautiful" Ephemera Die Cut at the bottom, and added a caption below. Right photo top: This card is made from Paper 08 and at the top I added a journaling spot Sticker with journaling over it and then a photo of a pie we ate so the little utensil and teacup Stickers matched well. Right photo bottom: This is a flower fussy cut from Paper 06 with another Floral Die Cut layered on top.

At the bottom right corner of the full-page photo I created a cluster of little embellishments. The bottom page is a card from Paper 01 with hand stitched frames and only at the very end of making this album did I realize the "A" could also be for "Amboise" instead of "Autumn!" (That's what's printed underneath the handmade "for Amboise" banner".) How serendipitous! I topped the printed "A" with a Chipboard Thickers "A".
A detail shot of some layered fussy-cut and die cut flowers.
After tucking a photo under an Ephemera Die Cut frame I glued sequins on the right side and then glued journaling strips below. The bottom page is a floral card from Paper 11 with a matching "beautiful" Puffy Sticker on top - after adhering a photo to the back I machine stitched around the edges.
I layered all kinds of flowers down this piece of Paper 09, machine stitched down the center a few times, and then placed a "wander" Sticker on top.
On the top card I added two photos of half-timber houses and then embellished with stickers and die cuts. The bottom page is a card from Paper 01 with hand stitching details, a tiny fussy cut flower, and typed journaling strips.
Left photo is flowers, flowers everywhere :) The right photo is a Wood Veneer Frame on a page made from Paper 08 and a photo tucked into the corner.
On the back of a fussy cut flower I layered a round floral frame and stapled a photo with gold Washi Tape. The bottom page is another card from Paper 01 and I hand stitched through the "love more" sentiment then carefully trimmed around and bent up the leaves and flowers. See detail shot below.
Underneath the photo of the church interior is journaling written with a white pen. | You can see the dimension on this card made by cutting around leaves and flowers then bending them up.

I backed this card with white cardstock that I stitched pieces of Washi Tape onto. I tucked a photo behind a floral die cut and added a caption. The "wander" tag is from Paper 11.
I spent some time hand stitching through the "gathered" word on this Ephemera Die Cut tag and then edged the bottom with gold Washi Tape and a flower sticker.
On the back of the tag I covered the hand stitching with flowers and leaves topped with a photo and heart puffy sticker. The bottom page is a full photo with a Wood Veneer Frame and Puffy Sticker decorations.
Details.
On the top right corner of this full page photo I placed three stickers from the Sticker Book then machine stitched around the edges. The bottom is another card from Paper 01 with hand stitching through the word "gather".
One final card from Paper 01 with hand stitching.
The last page is a family photo and embellishment/journaling cluster at the top.
I wasn't even planning on making this mini album but I'm so glad I did because we have more wonderful memories documented! Plus, I love playing with paper, scissors, glue, and all the embellishments :)
I hope you get your hands on the new Auburn Lane collection - once you start sifting through all of the pretty things you'll be so inspired you'll want to run to your crafty space to get to makin'!
Paige Taylor Evans © // Quinn Creatives DESIGN