
I have been working on this project for over a month and I'm so thrilled to finally be able to share my finished Pink Paislee MemoryDex!

Here is a video flip through to get an overall explanation of this project and what it's about:
I created 3 cards with each of my Pink Paislee collections: FANCY FREE, TAKE ME AWAY, OH MY HEART, TURN THE PAGE, PICK-ME-UP, WHIMSICAL, HORIZON, TRULY GRATEFUL, and BLOOM STREET.

I worked on the cards here and there a little bit every day over the past month. Originally I was only going to create one card per collection, but I wanted to showcase "all the things" from each collection which I couldn't do on just one card! Three is more reasonable :) Also, I had intended to go back through when finished and add photos from a travel adventure to turn it into a mini album, but I also want to keep adding more cards with each collection so I was stuck. I decided to go a different route and make this what it is - a collection of Pink Paislee collections! The date they were released, photos of me at the time, what each collection is about, etc. Now I'll easily be able to add to it and with purpose.

The MemoryDex concept was made by the one and only Heidi Swapp and has been revived by a crafty movement, #bringbackmemorydex. You spoke, she listened! Yay! This cute black & white tray can be found in a set at JoAnn stores. Onto the cards!

Here are the three cards made with my very first collection with Pink Paislee called FANCY FREE.
 You can read the cards to see what this scrapbook line is all about :)
I used three of my envelope cut files to create the card bases. For every card I used the MemoryDex Hole Punch to add the holes that make them fit in the coordinating tray. I added machine stitching on almost every card for texture & interest.

Envelopes and pockets are the perfect place for storing tags, journaling spots, and die cuts. Somewhere on one of the tags in each set I stamped the date the collection was released. I also added the logo from each collection somewhere on the cards for documenting. It's a little time capsule of memories! I printed my 2" square photos at home by creating collages in Picasa, importing the finished collage into Photoshop, then printing on my Canon Pro-100 printer.

With every collection I do a giveaway on instagram so I take a picture of the entire line to promote and share it. I printed each of those photos out for this project.

Here are the three cards I made using TAKE ME AWAY.


This globe card was fun to make! I used my Globe cut file and added stitching and layers upon layers of embellishments. To make it sturdy I super glued a wooden skewer stick to the back.

All of the info about this line including the date it was released (almost three years ago to the day!) along with a couple photos can be found on these tags and journaling spots. Take Me Away is the only one of my collections to include a roller stamp so I used it in a few spots and then tucked all these cards into the top left corner under all the embellies. I loved making those paper rosettes and have a few left over for another rainy day project.

Onto my third collection - OH MY HEART! Here are the three cards I made:


The flowers in Oh My Heart are just so pretty, colorful, and versatile. I used my Envelope Flowers cut file and backed it with a pink paper before layering fussy cut flowers all over the top. A photo of the Creativation booth where Oh My Heart debuted is tucked into the flowers.

All of the info about this collection is tucked into another envelope.

January 5th 2017 is when this line was released and I still love it as much today as I did back then! Like the tag says, "Every new collection brings a huge burst of inspiration, I want to scrap all day!" Parts of my 8th collection landed on my doorstep this past week and I can't tell you how many times I've sifted through the 24 patterned papers. I can't wait to play with it and show you new things!

This set of cards was made with my 4th collection called TURN THE PAGE.


Fringe! I picked my favorite pastel papers, trimmed them into strips, fringed those strips, then adhered them down a card. I had a lot of butterflies leftover from a previous layout so I used a few of them to embellish tone-on-tone. I turned the card into a pocket and tucked cards and die cuts inside.

Here are the tags and journaling spots, etc with the pictures and details about this collection. It released just a few days after we moved back to the US after living in Germany for four years, on July 17th 2017. It was a big change! Which is how this collection came to be - thinking of all the changes we go through in life and embracing them.

I've never made a sequin pocket before! So this was fun! I poured the sequins from Turn the Page into a transparency pocket and then machine stitched it closed with gold thread. I layered all kinds of goodies on the top right corner, all of which can be found in the Turn the Page collection.

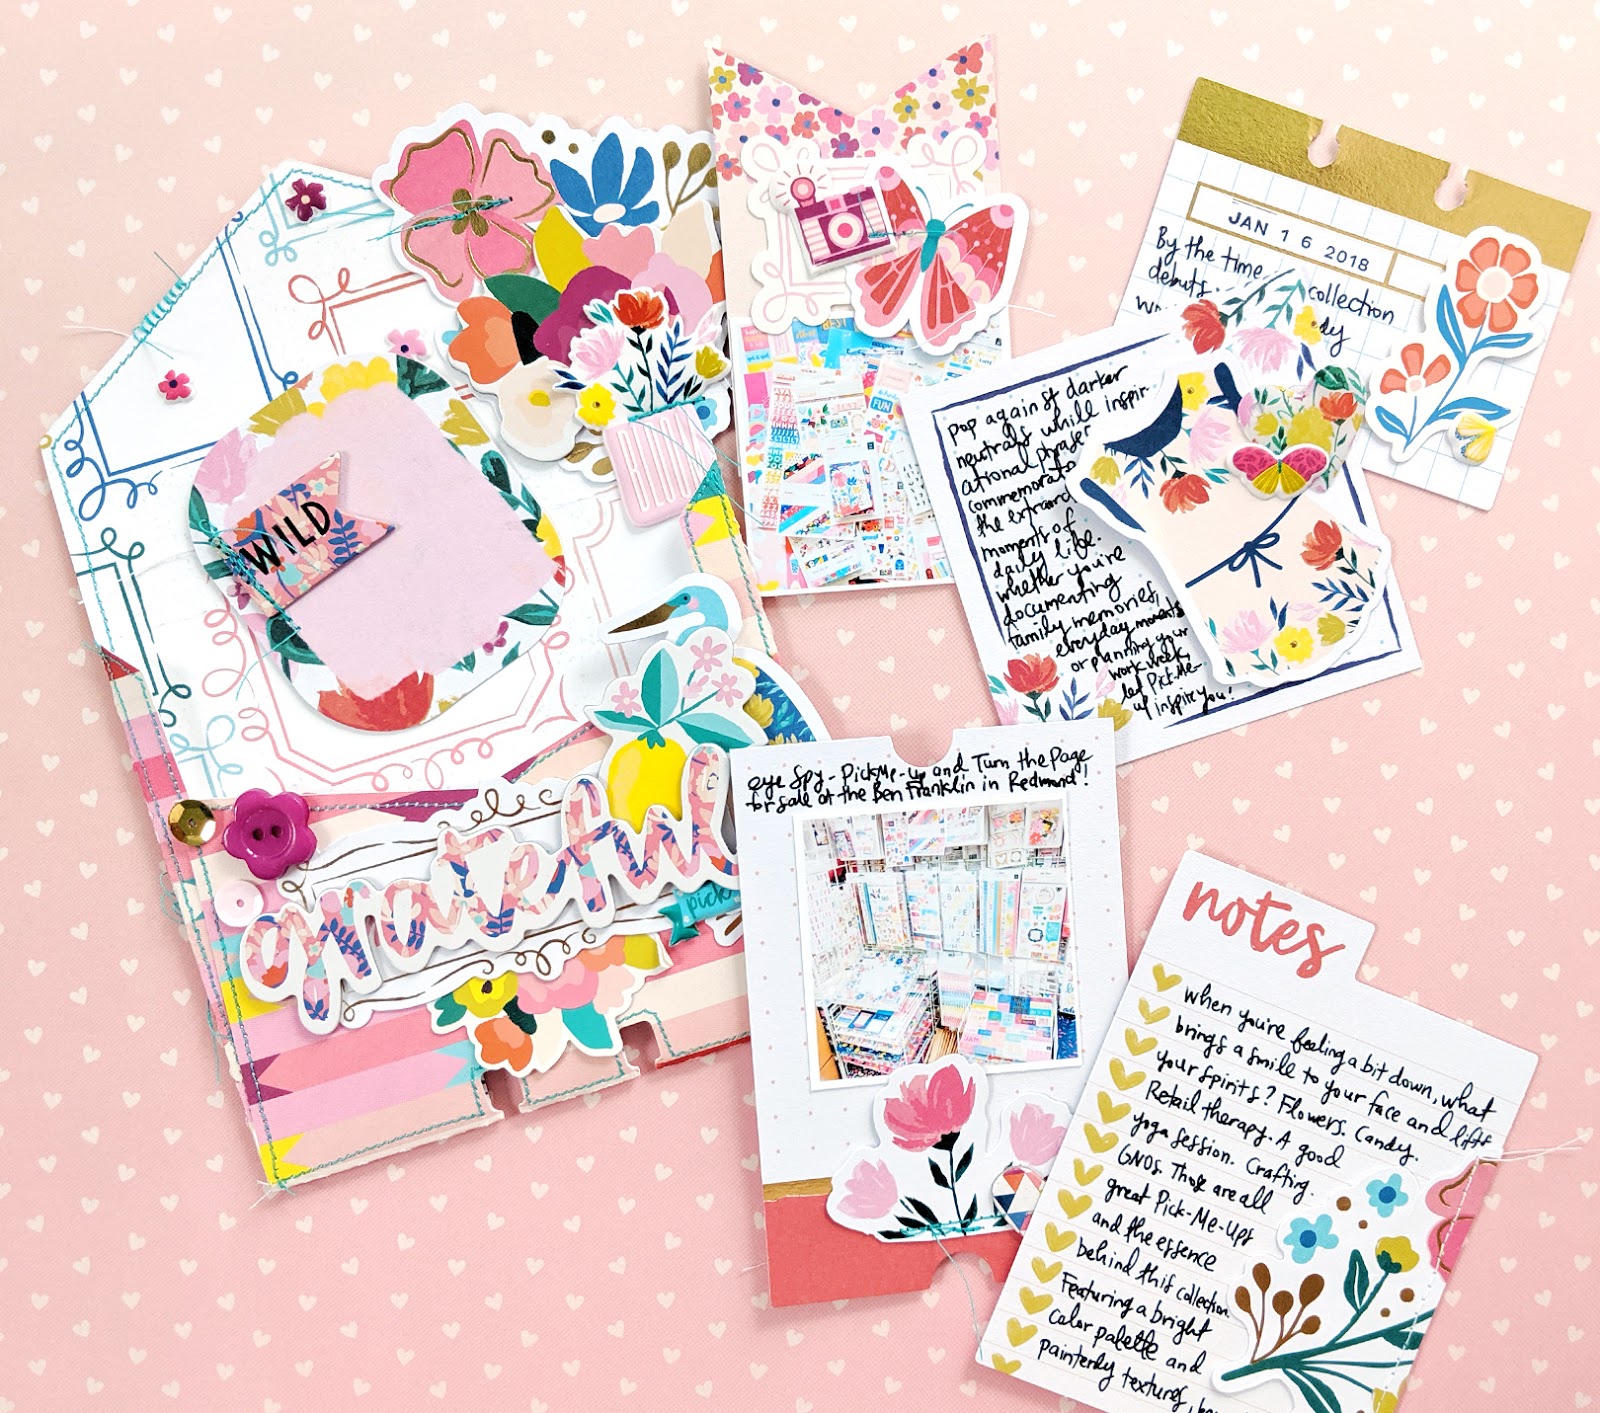
PICK-ME-UP is my 5th collection and here are the three cards created with it.


I've seen a few of these purse MemoryDex cards and just had to make one too! I love the sound it makes when it closes (yes, the sound!) because of the magnetic closure. That embellished paper clip on the front is leftover SWAG from Creativation 2018 - I made a whooooole bunch of them to give away at my booth and still have some leftovers so it was a fun bit to include here. The brads are all from American Crafts from back when I worked there in-house in 2008.

Inside the purse is a picture of me at my booth in Phoenix at Creativation where this line launched.

What can I say, envelopes are just so fun to make and to hold all the details!

Lots of cute tags and cards in this line.
Moving onto my 6th collection called WHIMSICAL! Oh the colors!


Another charm card! Same concept as before, but this time in the form of butterflies.

The third card is a trio of flower bouquets using all the Floral Die Cuts. This was the first collection of mine with a dedicated pack of flowers and now every collection hereafter must have them. After 10 months working with the same collection I was ecstatic to have this colorful line to work with!

The next set is HORIZON!


Here is a patterned paper pocket where I tucked in all of the Tags and some Ephemera Die Cuts.

This line launched on February 18th 2019. It was so fun to see it at Creativation in Phoenix, January 2019. I also love that this line has a lot of travel-themed elements. I have so many adventures from when we lived in Germany to document still!

This last card is a mesh sequin pocket card. The sequins aren't actually from Horizon, the only thing I used that wasn't from my collections! But I thought they matched well :) To help the sequins from all falling to the bottom I stitched rows between the stripes so they stay in designated sections.


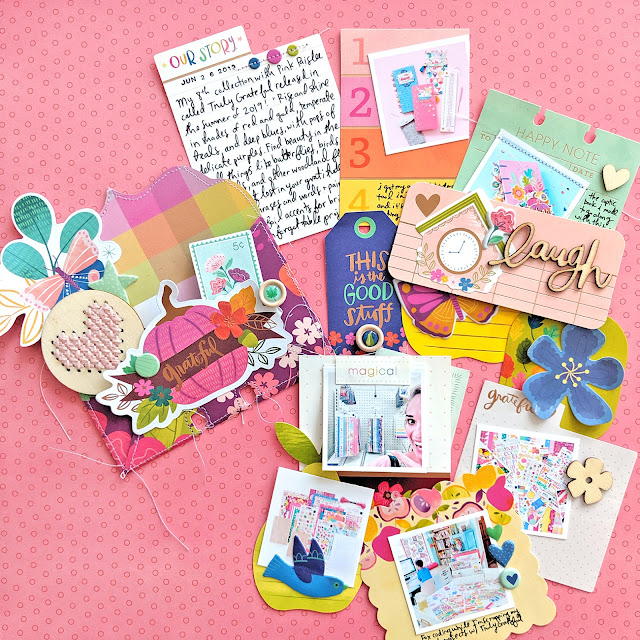
For this first card I used a layered heart cut file and cut out 9 concentric hearts from a rainbow of Truly Grateful patterned papers. I sewed around the edges with white thread for texture and contrast and then attached it onto a MemoryDex card base. To embellish I added the Truly Grateful logo and then a smattering of Floral Die Cuts, Epoxy Stickers, and a Wooden Button.

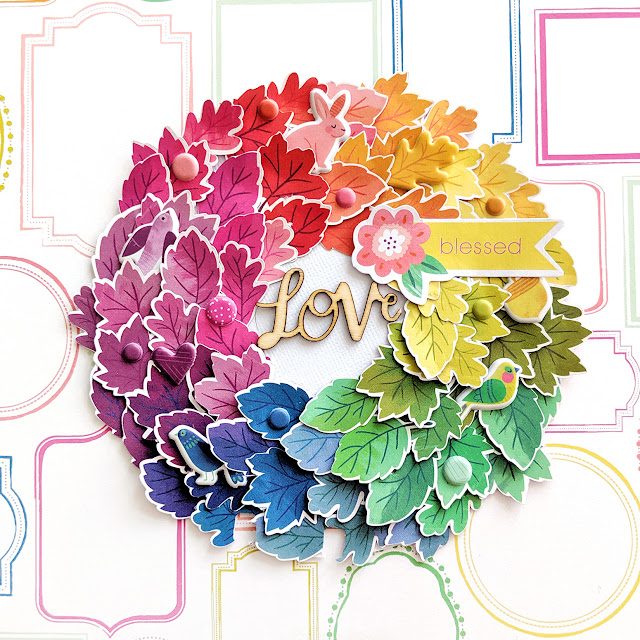
When I got Truly Grateful in the mail, one of the first things I did was have my Silhouette Cameo 3 cut out all of the leaves from Paper 10 using the PixScan feature (I have a tutorial within this process video). All of the leaves have been sitting in a little baggie just waiting for the perfect project. Enter MemoryDex card #2! I was able to add almost every single leaf in a wreath design and it makes my heart so happy seeing all of the colors together. I embellished with a "Love" wood veneer piece from the Mixed Embellishments glued in the center, a sprinkling of Puffy Stickers placed tone-on-tone, and a "blessed" Ephemera Die Cut.
For the third MemoryDex card I die cut an envelope and stuffed it full of Journaling Spots. In the Mixed Embellishments is a round wood veneer piece with holes which I cross stitched through to complete the heart.

On the Journaling Spots I wrote about Truly Grateful, when it released, photos of the collection, and a couple other things I want to remember like finding a few of my products in Target - a total surprise and surreal moment!

When I got Truly Grateful in the mail, one of the first things I did was have my Silhouette Cameo 3 cut out all of the leaves from Paper 10 using the PixScan feature (I have a tutorial within this process video). All of the leaves have been sitting in a little baggie just waiting for the perfect project. Enter MemoryDex card #2! I was able to add almost every single leaf in a wreath design and it makes my heart so happy seeing all of the colors together. I embellished with a "Love" wood veneer piece from the Mixed Embellishments glued in the center, a sprinkling of Puffy Stickers placed tone-on-tone, and a "blessed" Ephemera Die Cut.

For the third MemoryDex card I die cut an envelope and stuffed it full of Journaling Spots. In the Mixed Embellishments is a round wood veneer piece with holes which I cross stitched through to complete the heart.

On the Journaling Spots I wrote about Truly Grateful, when it released, photos of the collection, and a couple other things I want to remember like finding a few of my products in Target - a total surprise and surreal moment!

Continuing with this progressive project - I've created the next set of three cards for my Pink Paislee MemoryDex using Bloom Street!

This rolled flower ampersand card is one of my most favorite things ever :) It's a miniature version of the rolled flower ampersand I created for my Spring Decor class at Big Picture Classes from many years ago. I die cut my Rolled Flower Cut Files from Paper 07 - 36 flowers, each sized to under 2" to fit in the 36 squares of patterns so they're itty bitty! I also cut about a dozen more mini flowers from other Bloom Street papers. This little card is just over 4" tall. Very fiddly to make but soooo worth it! For the base I folded a piece of Paper 14 in half then used the official MemoryDex punch to add the notches at the bottom to fit inside the box.

For this second card I folded a piece of the Specialty Floral Transparency Paper in half, tried to use the punch but it was too thick so I just used scissors, and then machine stitched around three of the sides. I poured in the sequins from the Mixed Embellishments and then finished sewing it closed to create a fun shaker pocket! I attached an eyelet to the top right corner then tied on a Tassel along with one of the Flower Charms. The layered paperclip is the one piece of SWAG that I kept from the 68 I made to give away at Creativation 2020 so I thought this was a fun place to keep it displayed. I printed the Bloom Street logo and tucked it under the clip along with a photo of me. I layered Floral Die Cuts under the photo and added a heart border sticker from the 4-Page Sticker Book. To finish this card I added a few jewels from the Mixed Embellishments for sparkle and shine!

The last card is an envelope cut file that I cut from Paper 23 and then machine stitched around all the flaps. I layered Ephemera Die Cuts, stickers from the 4-Page Sticker Book, a colorful "bloom street" title made with the Puffy Word Stickers, a heart from the Puffy Vinyl Stickers, Layered Butterfly Sticker, and a couple Floral Die Cuts. The more layers the better!

In the envelope I tucked journaling cards from the Ephemera Die Cuts on which I added photos, the stamped date Bloom Street was released, and the blurb explaining what this collection is all about!

And that's all my Pink Paislee MemoryDex cards! I loved working with every collection again and enjoyed working with them as much now, sometimes years later, as I did when they were brand new. That's a good feeling. Not tired of these lines yet and I still love scrapbooking!

Here is the entire collection of MemoryDex cards:


Thank you so very much for stopping by today! I so loved making this near-and-dear-to-my-heart project and hope you like it too and feel inspired to create a MemoryDex of your own!


This project is amazing! I can't wait to see the three cards that you make with your new collection.
ReplyDeleteYou have done it again!! Amazed me!!!! WOW WOW WOW!!!! I don't know how you do it!!!! These are just STUNNING! I loveeeeeeeeeee the colors, the pockets, the stitching!!!! GORGEOUS!!!!!!!!!!!!
ReplyDeleteI left a little message on YouTube but will add, I'm so inspired every single day by you, your stunning projects and your gorgeous collections ! We're beyond lucky and I'm so thankful <3 xK
ReplyDeleteWow! Your cards are so bright and beautiful!
ReplyDelete